background image

14

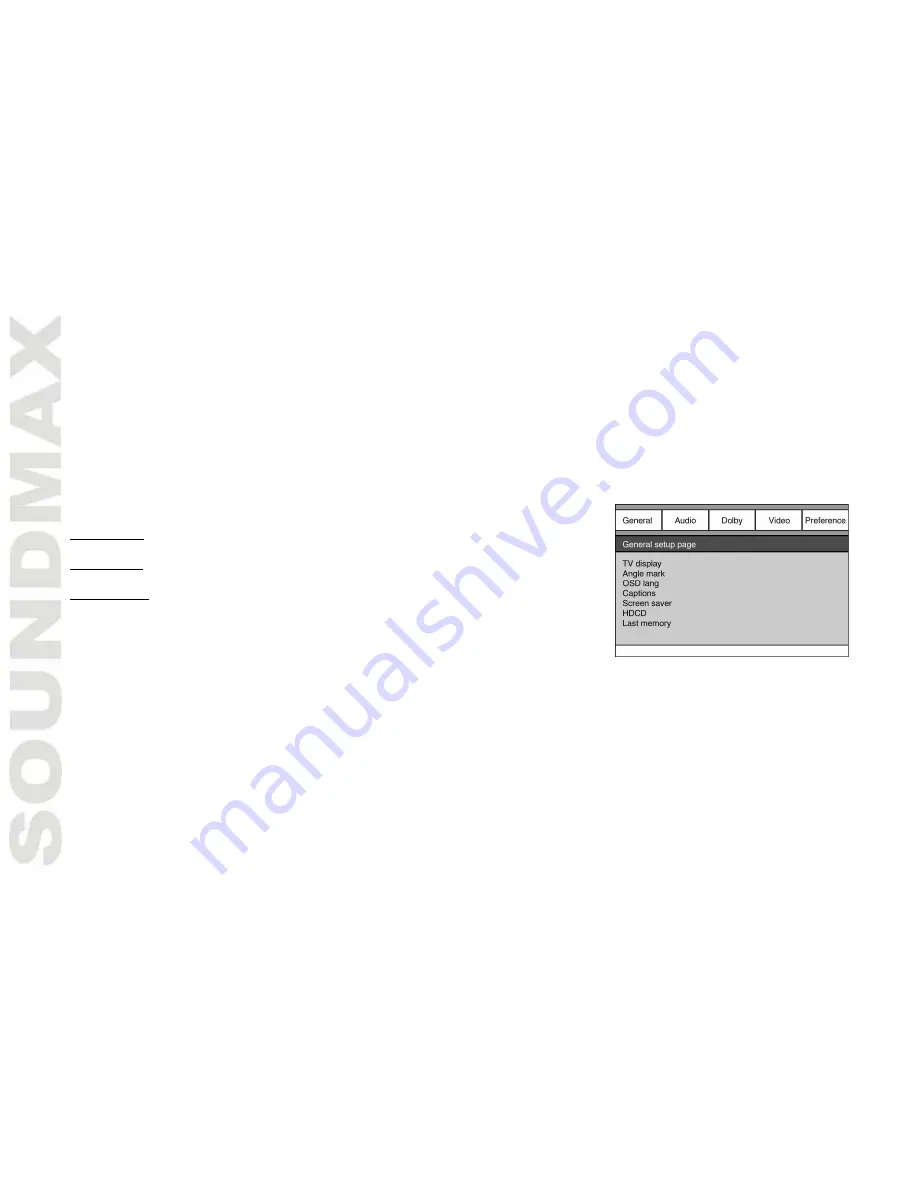
System setup

1. Press SETUP button to enter the setup menu. In setup mode, press SETUP button again to quit the setup page.

2. Use LEFT/RIGHT cursor buttons to choose a setup page: General setup page, Audio setup page, Dolby Digital setup,
Video setup page, Preference page.

3. Press DOWN cursor button to enter the setup page selected.
4. Use UP/DOWN cursor buttons to select the option you want to adjust.

5. Press RIGHT cursor button to enter the adjustment list. Use UP/DOWN cursor buttons to select the adjustment and press
ENTER button to confirm and return to options list.

6. To return to setup page list press LEFT cursor button in the options list.
Note: The items in gray can’t be set up. The setup is memorized and kept after power is off.

General setup

TV DISPLAY

NORMAL/PS: When the unit connects to the normal TV set, the wide-screen image

shows on the full screen, but some part is cut off.
NORMAL/LB: When the unit connects to the normal TV set, the wide-screen image

shows and black bars appear on the top and bottom of screen.
WIDE (16:9): Use this item when the unit is connected with the wide screen TV set.

ANGLE MARK

It will show the angle mark when playing DVD disc with multi-angle view if selecting On.

OSD LANG

Select on-screen display language: English, Russian.

CAPTIONS

This function doesn’t work with discs without captions. If Captions is Off, press SUBTITLE button on the RC to set Captions

on. The default setup is On.

SCREEN SAVER

If Screen saver is set ON and the unit is switched on without a disc playing for several minutes, a moving picture appears
on the screen, and the unit will go to standby mode after several minutes. Press STANDBY button on the RC to wake it up.

HDCD

You can select the digital filter Off, 1x (44.1 KHz), 2x (88.2 KHz).The initial factory setup is Off.

LAST MEMORY

When this function is on, the unit can memorize the time elapsed from the last time you played the disc. Then at the next

playing, it will resume playing from the memorized point.

Summary of Contents for MS-MSD10

Page 1: ...MS MSD10 DVD MICRO SYSTEM DVD Instruction manual...

Page 2: ...2 Contents Contents 2 Before you start 3 Control elements 6 Connection 9 Button functions 10 System setup 14 Other operations 17 General information 19 Specification 21...

Page 3: ...ss 1 laser product The laser beam may produce radiation harm to the directly touching human body To prevent the risk of fire or electric shock don t allow water to come into contact with the device an...

Page 4: ...incorrect playback Please place the unit in a dry and well aired area Do not place it near heating units or expose it to direct sunlight mechanical vibration humidity or excessive dust Never use liqu...

Page 5: ...formats Disc types Symbol Contents DVD Audio Video MP3 Audio Video CD VCD Audio Video SVCD Audio Video DVCD Audio Video HDCD Audio JPEG Digital Photo CDDA Audio Kodak Picture CD Digital Photo MPEG4 A...

Page 6: ...5 Display 5 Audio line in 2 Left Right 6 SOURCE button 6 FM antenna input 7 USB CARD DVD button 7 Stereo audio out Right 8 PLAY PAUSE button 8 Coaxial digital audio out 9 Microphone jack 9 Composite...

Page 7: ...10 A B button 11 REPEAT button 12 TV MODE button 13 USB button 14 ZOOM button 15 CH LEVEL button 16 OPEN CLOSE button 17 AUTO SEARCH button 18 V MODE button 19 ANGLE button 20 GOTO button 21 OSD butt...

Page 8: ...ity is observed 3 Install the cover back Use two AAA 1 5V batteries for the RC The RC should be pointed at the IR sensor within 8 meters and within 30 degrees at the left or the right side Take the ba...

Page 9: ...to a TV or a stereo input of power amplifier Coaxial digital audio Use the special coaxial cable to connect the coaxial output of this unit to the coaxial input of power amplifier Speaker output Use t...

Page 10: ...e g track chapter number playback time etc AUTO SEARCH In radio mode press this button to activate automatic search and saving of available radio stations in the band ECHO Press this button repeatedl...

Page 11: ...ne audio language press this button to select the needed audio language For MP3 disc press this button repeatedly to select audio channel right left stereo mix mono Or you can press R L button on the...

Page 12: ...utton to go on programming Maximum 20 programmable items are possible Use cursor buttons to move the cursor to START item Press ENTER button to start program playback Press PROG button to cancel progr...

Page 13: ...r press VOL buttons on the RC to adjust the volume level of the selected channel MO ST In Radio mode press this button to switch between Mono and Stereo reception modes S EFFECT Press this button to s...

Page 14: ...t off NORMAL LB When the unit connects to the normal TV set the wide screen image shows and black bars appear on the top and bottom of screen WIDE 16 9 Use this item when the unit is connected with th...

Page 15: ...cho Dolby setup DUAL MONO Stereo stereo output signal L Mono left output signal R Mono right output signal Mix Mono left and right output average signal DYNAMIC If watching large dynamic scope movie p...

Page 16: ...the initial settings by your preference If a setting is supported by disc content it will work Otherwise the disc default value works And these settings can be changed respectively by pressing AUDIO...

Page 17: ...5 20 times less then the original images MPEG4 standard for transmitting audio and video data via channels with low capacity This format is very popular since it made possible to place full length mov...

Page 18: ...Rotate 90 degrees clockwise ZOOM Change zoom mode Cursor buttons Move zoom center Note Some file names can be displayed incorrectly due to incompatibility of supported encoding USB Memory card notes T...

Page 19: ...s Do not touch the recorded surface of the discs Use 12 cm CDs Use only conventional fully circular discs Do not use irregularly shaped discs Cleaning discs Fingerprints should be carefully wiped from...

Page 20: ...pears Disc not inserted Insert the disc Disc inserted incorrectly Install the disc with the label side facing up Disc cannot be read Condensate on the unit laser head Switch the unit on without disc f...

Page 21: ...cture CD JPEG MPEG4 DivX Built in sound decoders Dolby Digital Stereo audio out Coaxial audio 2 RCA Line in Composite video S Video Component YUV SCART Headphone out Progressive scan Support of subtit...

Page 22: ...22 22 23 26 29 30 35 38 40 42...

Page 23: ...23 1 1 2...

Page 24: ...24...

Page 25: ...25 DVD MP3 Video CD VCD SVCD DVCD HDCD JPEG CDDA Kodak Picture CD MPEG4...

Page 26: ...26 1 R L 1 2 STOP 2 SCART 3 POWER 3 4 PREVIOUS 4 1 5 5 2 6 SOURCE 6 FM 7 USB CARD DVD 7 8 PLAY PAUSE 8 9 9 10 10 S video 11 11 12 12 POWER On Off 13 SD MMC 13 14 NEXT 15 USB 16 OPEN CLOSE...

Page 27: ...E FINE FAST BACKWARD FAST FORWARD 10 A B 11 REPEAT 12 TV MODE 13 USB 14 ZOOM 15 CH LEVEL 16 OPEN CLOSE 17 AUTO SEARCH 18 V MODE 19 ANGLE 20 GOTO 21 OSD 22 SETUP 23 VOL VOL 24 TITLE 25 MENU 26 SOURCE 2...

Page 28: ...28 1 2 3 AAA 1 5V 8 30...

Page 29: ...29 AV S Video S Video S Video S Video SCART 21 SCART SCART SCART RCA RCA DVD VCD VCR DTS DTS DTS...

Page 30: ...30 STANDBY STANDBY STANDBY POWER OFF OPEN CLOSE OPEN CLOSE OPEN CLOSE MP3 AUTO SEARCH ECHO OSD ZOOM DVD VCD ZOOM 2x 3x 4x...

Page 31: ...31 REPEAT REPEAT TITLE DVD TITLE SLOW VCD DVD SLOW 1 2 1 4 1 8 1 16 SETUP SETUP SUBTITLE DVD SUBTITLE AUDIO DVD MP3 R L MENU DVD MENU ENTER ENTER ANGLE DVD ANGLE...

Page 32: ...32 V MODE YUV RGB S Video SOURCE DVD Line1 1 Line2 2 TV MODE P Scan STOP DVD SVCD VCD CD STOP STOP PLAY PAUSE PLAY PAUSE PROG PROG 10 NEXT ENTER 20 ENTER PROG MP3 PROG VOL VOL VOL VOL...

Page 33: ...BACKWARD 2X 4X 8X 16X 32X 1 100 FINE FAST FORWARD 2X 4X 8X 16X 32X 1 100 PREVIOUS NEXT DVD PREVIOUS SVCD VCD CD PREVIOUS DVD NEXT SVCD VCD CD NEXT MUTE MUTE MUTE TONE b t VOL CH LEVEL rCH LCH VOL MO...

Page 34: ...34 USB USB DVD USB USB CARD DVD USB GOTO...

Page 35: ...35 1 SETUP SETUP 2 Dolby Digital 3 4 5 ENTER 6 T 4 3 PS 4 3 LB 16 9 OSD SUBTITLE 20 STANDBY...

Page 36: ...36 HDCD 1 44 1 2 88 2 SPDIF SPDIF SPDIF SPDIF RAW SPDIF PCM Dolby Digital...

Page 37: ...37 S Video S Video YUV Y U V RGB SCART P Scan YUV PAL NTSC Multi PAL Multi NTSC 136900 136900...

Page 38: ...38 DVD VCD MP3 JPEG MPEG4 MP3 12 MP3 CD 600 170 MP3 CD JPEG Joint Photographic Expert Group 15 20 MPEG4 MP3 MPEG4 1 2 PLAY PAUSE ENTER AVI AVI 2...

Page 39: ...39 JPEG STOP PLAY PAUSE ENTER JPEG STOP NEXT PREVIOUS PLAY PAUSE UP DOWN LEFT 90 RIGHT 90 ZOOM Cursor buttons USB SD MMC USB SD MMC 8 USB USB...

Page 40: ...40 12 1 2 1 1 AAA 1 5V 2 1 1 1...

Page 41: ...41 1 2 1 2...

Page 42: ...2 50 FM 87 5 108 DVD R RW DVD R RW CD R RW USB SD MMC DVD DVCD Super VCD VCD HDCD CDDA MP3 Kodak Picture CD JPEG MPEG4 DivX Dolby Digital 2 RCA S Video YUV SCART MPEG4 ID3 179 x 260 x 166 139 x 160 x...

Reviews: