background image

5

INST

ALLA

TION

Installation

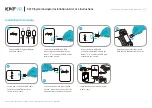
BEFORE YOU BEGIN:

Turn the ignition off.

1. 

Ensure the factory radio is turned off

2. 

Installation

Remove the factory radio.

 The VOLZNAUX1 will connect directly to the 

CD changer port on the rear panel of the factory radio. Use the factory 

service manual for detailed instructions on how to remove the factory radio. If you feel this 
process is beyond your abilities, we strongly recommend having the work done by a mobile 
electronics specialist. 

The factory CD changer connector is located on the rear panel of the radio; if this connector 
housing already has an 8-pin DIN connector attached, the vehicle is pre-wired for a factory CD 
changer.  Remove this connector if present—it will not be used.

1

1

Connect the VOLZNAUX1 harness.

 To ensure reliable, trouble-free 

operation, the constant and switched power sources for the VOLZNAUX1 

should be connected separately from the factory radio connections. Solder or use crimp 
terminals to connect the +12V constant and +12V switched power connections described in 
the steps below. Double-check connections for electrical continuity using a multimeter. Ensure 
that all connections are properly protected with heat-shrink tubing or electrical tape to prevent 
damage to the VOLZNAUX1 and vehicle systems.

Connect the yellow wire from the VOLZNAUX1harness to a co12V power source. 

1. 

We 

DO NOT

 recommend the +12V constant in the factory radio harness.

Connect the red wire from the VOLZNAUX1 harness to a sw12V power source. 

2. 

We 

DO NOT

 recommend the +12V “ignition” source in the factory radio harness.

Plug the male 8-pin DIN connector on the VOLZNAUX1 harness to the matching connector 

3. 

on the rear panel of the factory radio. Connect the remaining end of the harness to the 
VOLZNAUX1 module.

2

2

Summary of Contents for Simple-fi VOLZNAUX1

Page 1: ...and allows for remote control of all Zune device functions remote sold separately Features The SoundGate VOLZNAUX1 utilizes sophisticated microprocessor control ultra reliable surface mount construct...

Page 2: ...as well When installation is complete readjust the features to their previous settings Never use a backup power supply such as another battery during installation work in an attempt to avoid losing t...

Page 3: ...r Zune device and vehicle systems This wire requires a 12V 1500mA fuse Power connector Connect black wire to bare metal chassis Connect red wire to a 12V switched ignition power source Zune Dock Conne...

Page 4: ...arness Male 8 pin DIN Connetctor If present disconnect the existing 8 pin connector on the rear of the factory radio Replace the factory connector with the 8 pin male DIN connector shown above VOLZNAU...

Page 5: ...ree operation the constant and switched power sources for the VOLZNAUX1 should be connected separately from the factory radio connections Solder or use crimp terminals to connect the 12V constant and...

Page 6: ...that will connect to and control your Zune device Power connector wiring Connect the black wire of the power connector shown on page 3 to a clean bare metal chassis ground When in doubt measure the re...

Page 7: ...D button or using the Mode button to switch to CD changer mode make sure you have music playing on your Zune Device Press Random twice to switch between INPUT A your Zune device and INPUT B optional a...

Page 8: ...other exciting SoundGate products Auxiliary Input Interfaces and Docking Stations which allow you to input audio from MP3 Players DVD Video Satellite Radio and more to OEM and aftermarket car audio s...

Reviews: