9
Subwoofer Installation
54. Remove the passenger’s side threshold panel along the bottom of the front and rear door openings.
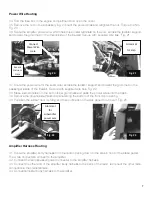
55. Pull back the rubber door molding and then pull back on the kick panel to remove it. Fig. 28
56.
IMPORTANT:
Connect the black ground wire of the subwoofer harness to the factory ground point in the
passenger’s side kick panel. Torque to 9Nm. Fig. 29
57. Route the subwoofer harness along the door opening and toward the rear of the cab.
58. Route the white two-pin connecter of the subwoofer harness to the two-pin connecter on the amplifi er
harness.
59. If the truck is equipped with the factory subwoofer option, run the subwoofer harness through the
incision that the factory subwoofer harness comes through. Tuck the factory wires under the carpet out of
the way.
60. If the truck was not equipped with the factory subwoofer option, measure fi ve inches from the sill plate
under the rear seat and make an incision in the carpet where the subwoofer enclosure will reside and pull
the subwoofer harness through the incision. Fig. 30
61. If the truck was equipped with the factory subwoofer, use the original bolts to secure the new subwoofer
enclosure to the fl oor.
62. If the truck was not equipped with the factory subwoofer option, fi nd the three mounting holes in the
sheet metal. Cut a small hole in the carpet above each hole and install the supplied nut inserts.
63. Secure the subwoofer with the supplied M6 bolts. Fig. 31
64. Install fuses into fuse holders.
65. Reinstall all previously remove parts in reverse order.
66. Reconnect negative battery cable. Torque to 7Nm.
Fig. 28
Connect black
ground wire of
subwoofer
harness here
Fig. 29
5 inches
Fig. 30
Fig. 31

