background image

Installation

We strongly recommend that you install the unit in easily accessible location. So you can later upgrade the
unit or re-program it in case of incorrect programming.

IMPORTANT

i

Gain access to the back of you vehicle’s Head Unit.

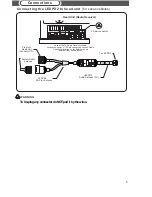
Find the same port as our Audio Harness (see

)

Disconnect the existing connector and plug in our Audio connector into this port, then plug female end of Audio
Harness to the plug in for your factory connector. Audio harness female connector is not used In some vehicles.

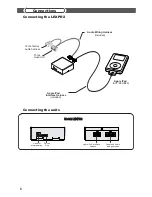
Plug the other end of Audio cable into designated port on LEXPD2.

Connect iPod cable as shown in the”Connecting LEXPD2” picture.

Setup proper Emulation Mode for this unit (see

)

Turn the car on and check LEXPD2 functionality and (especially Text capability) before the final assembly.

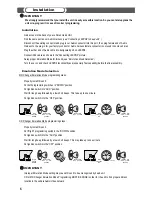
“Connecting LEXPD2 to head unit”

“Emulation Mode Selection”

Installation

Both

switches
“DOWN”

Emulation Mode Selection

MD Changer Emulation Mode programming steps:

Properly install this unit.

Put both programming switches in “DOWN” position.

Put ignition switch into “ACC” position.

Wait for long beep followed by a few short beeps. This take up to one minute.

Put ignition switch into the “OFF” position.

Ignition into

“ACC” or “ON”

position

Ignition into

“OFF” position

Both

switches

“UP”

Ignition into

“ACC” or “ON”

position

10 sec

Right

switch

“DOWN”

CD Changer Emulation Mode programming steps:

Properly install this unit.

Put “Right” programming switch in the “DOWN” position.

Put ignition switch into the “ACC” position.

Wait for long beep followed by a few short beeps. This may take up to one minute.

Put ignition switch into the“OFF” position.

Ignition into

“ACC” or “ON”

position

Ignition into

“OFF” position

Ignition into

“ACC” or “ON”

position

10 sec

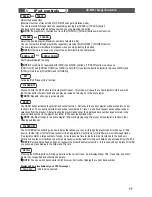
Improper Emulation Mode setting may cause this unit to be unrecognized by head unit.

CD or MD Changer Emulation Mode Programming MUST BE DONE in order for the unit to find proper address
location in the vehicle Audio/Video network.

IMPORTANT

i

Both

switches

“UP”

6

Summary of Contents for LEXPD2

Page 1: ... 9 LEXUS ES300 330 2002 2006 All LEXUS ES350 2007 2008 All LEXUS GS300 430 2001 2005 All LEXUS GS300 350 430 450H 2006 2009 All LEXUS GX470 2003 2008 All LEXUS IS300 2001 2005 All LEXUS IS250 350 2006 2008 All LEXUS LS430 2001 2006 All LEXUS LS460 2007 2008 with Navigation LEXUS LX470 2001 2003 All LEXUS LX470 2004 2007 All LEXUS LX570 2008 All LEXUS RX300 2001 2003 with Navigation LEXUS RX330 350...

Page 2: ...EING INSTALLED FAILURE TO FOLLOW INSTALLATION INSTRUCTIONS MAY DAMAGE THE PRODUCT AND THE VEHICLE WILL VOID THE PRODUCT WARRANTY MAY VOID THE VEHICLE WARRANTY Some States Provinces or other governmental jurisdictions such as cities may have laws that prohibit the operation of a video screen within the sight of the Driver If you have purchased such a product you should use the product only in locat...

Page 3: ...your iPod If you leave it inside the vehicle on a hot or cold day For further information please refer to the iPod manual IMPORTANT i We strongly recommend that you organize your songs into playlists for proper operation of this unit To avoid improper track number display Do NOT place more then 99 songs into single playlist If iPod does not have playlists songs it may cause unpredictable outcome a...

Page 4: ...nit Audio Wiring Harness included Apple iPod Apple iPod Interface Harness included NOT INCLUDED Model LEXPD2 Model LEXPD2 Connecting the LEXPD2 Connecting the units Used for programming Apple iPod interface harness Power and Audio wiring harness Service Port ...

Page 5: ... Unit connector A A Connecting the LEXPD2 to head unit for Lexus vehicles 20 pin connector To Un plug any connector do NOT pull it by the wires WARNING Lexus GX 470 Radio Receiver shown Locate connector A 20 pin connector on your Radio Connector location on the Radio may be different from shown above Audio Harness 36 ...

Page 6: ...tion Mode Selection MD Changer Emulation Mode programming steps Properly install this unit Put both programming switches in DOWN position Put ignition switch into ACC position Wait for long beep followed by a few short beeps This take up to one minute Put ignition switch into the OFF position Ignition into ACC or ON position Ignition into OFF position Both switches UP Ignition into ACC or ON posit...

Page 7: ...ps This may take up to one minute LEXPD2 Put ignition switch into the OFF position Ignition into ÏACCÓor ÏONÓ position Ignition into ÏOFFÓposition Both switches ÏUPÓ Ignition into ÏACCÓor ÏONÓ position Wait 10 sec Wait for long beep Carpet or car chassis Soft Velcro Fastener Hard Velcro Fastener Mounting unit using Velcro fasteners Velcro Fasteners are not included SoundGate strongly recommends gr...

Page 8: ...cally bypass the automobile manufacturer s on screen warnings concerning use of the onboard navigation system These warnings are Caution Drive safely and obey traffic rules Watching this screen while vehicle is in motion can lead to a serious accident Make selections only while stopped Some map data may be incorrect Read safety instructions in Navigation Manual 2 PLEASE PRE NOTIFY EVERY DRIVER OF ...

Page 9: ...le iPod Direct disc selection MAY NOT look operate or be available on different year and model Radio Integrated into Navigation System Song Title Artist Name or Album Name see DISC SCAN function Apple iPod Apple iPod MD TEXT MD changer emulation For Radio Receiver with LCD For Radio Integrated into Navigation System Playlist Title Head Unit DISC CD To switch between the unit sources you need to us...

Page 10: ...aylist repeat This mode will cause the current playlist to start over with the first track after the last track has been played instead of moving on to the next playlist NOTE Repeats all songs in active playlist Displayed Errors available only as a TEXT message iPod is not connected Check iPod SCROLL UP SCROLL DOWN and Fast Forward Rewind the song For vehicle not equipped with DISC and DISC button...

Page 11: ...aylist repeat This mode will cause the current playlist to start over with the first track after the last track has been played instead of moving on to the next playlist NOTE Repeats all songs in active playlist Displayed Errors available only as a TEXT message iPod is not connected Check iPod SCROLL UP SCROLL DOWN and Fast Forward Rewind the song For vehicle not equipped with DISC and DISC button...

Page 12: ...we believe these new technologies are full of opportunities for mobile electronic dealers across the nation We make it a high priority to not only research these new systems but to understand them and their impact on the aftermarket car audio industry Armed with this knowledge we are well equipped to help you integrate new components into these systems with our innovative high performance interfac...

Reviews: