SoundFreaq SFQ-09 User Manual Download Page 8


Type: 

Li-Ion Battery 

Model No: 

LC18650 

Rated Voltage: 

7.4V 

Capacity: 

1800mAh 


WARNING


There is a danger of explosion if the battery is incorrectly replaced. Replace it only with the same 
or equivalent type. Do not expose it to excessive heat such as sunshine, fire, etc., where it would 
be exposed to high temperatures above 60°C. 
 

Checking Battery Power 

When the system is on using the battery power and in idle mode, press and hold the 

VOL+ 

and 

VOL–

 buttons simultaneously on the system to check the battery power by the LED indicator. 
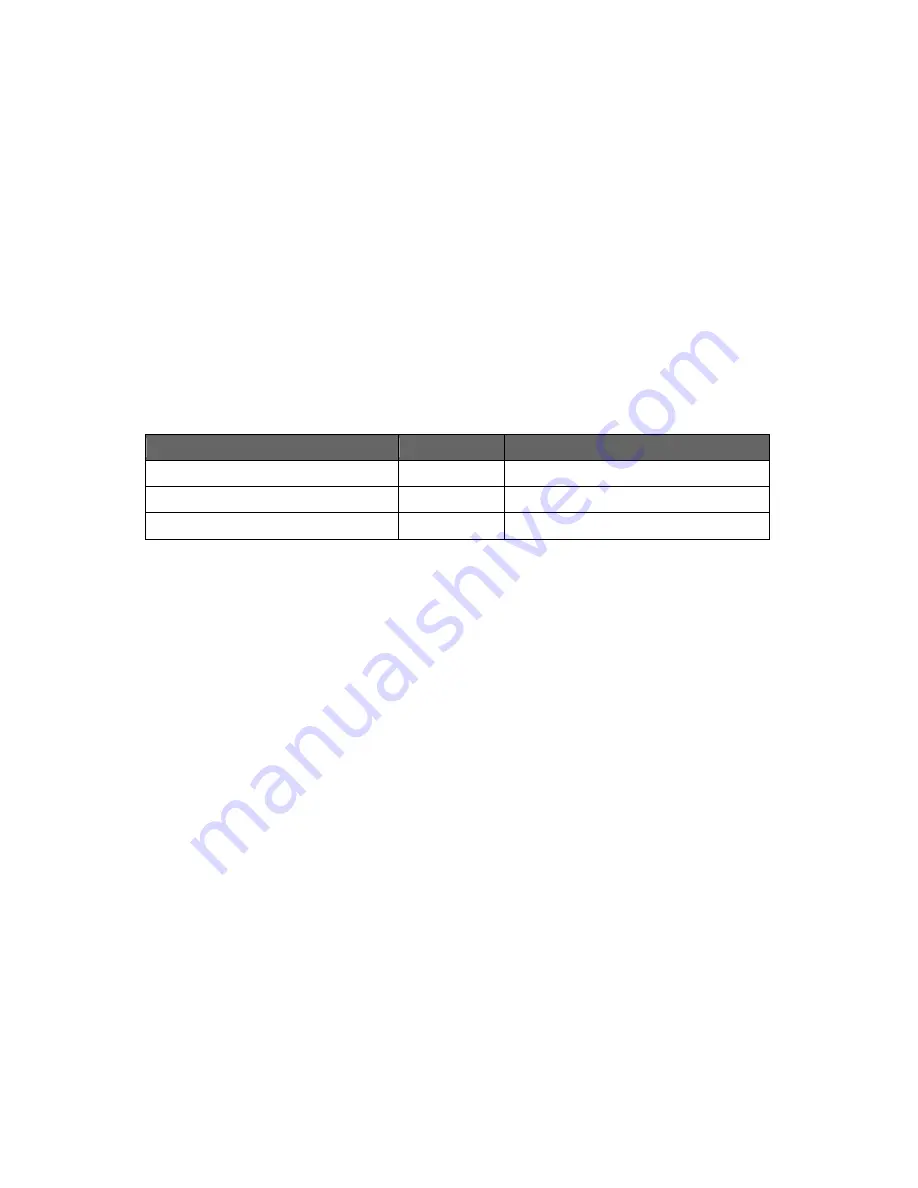
 

Status 

Color 

Battery Power 

Fast blinking (4 times) 

Green 

66%-100% 

Fast blinking (3 times) 

Green 

36%-65% 

Fast blinking (2 times) 

Green 

15%-35% 


Note: 

  During operations in battery mode, if the LED indicator blinks alternately in white and green 

at a slow rate, it indicates the battery power is less than 15%; then you need to connect the 
AC power adapter to charge it in time. 

Summary of Contents for SFQ-09

Page 1: ...Double Spot SFQ 09 User Manual...

Page 2: ...14 Refer all servicing to qualified service personnel Servicing is required when the apparatus has been damaged in any way such as power supply cord or plug is damaged liquid has been spilled or objec...

Page 3: ...e to radio or television reception which can be determined by turning the equipment off and on the user is encouraged to try to correct the interference by one or more of the following measures Reorie...

Page 4: ...t be disposed as general household waste at its end of life Instead the product should be handed over to the applicable collection point for the recycling in accordance with your national legislation...

Page 5: ...11 Turning on off the System 11 Adjusting the Volume 11 Selecting a Sound Mode 11 Activating the Power Saving Mode 11 Selecting the Sound Source 12 Playing back via Bluetooth 13 Establishing a Blueto...

Page 6: ...o the AC Power Adapter WARNING For optimal performance use only the supplied AC power adapter Ensure that power supply outlet matches with the unit AC s input 100V 240V 50 60Hz before connection Conne...

Page 7: ...ack During charging the charging LED indicator combination with the button will indicate the charging status as follows System Mode During Charging Charging Complete Standby Blinks in green at a slow...

Page 8: ...wer When the system is on using the battery power and in idle mode press and hold the VOL and VOL buttons simultaneously on the system to check the battery power by the LED indicator Status Color Batt...

Page 9: ...put the system into pairing mode 7 On Standby button Press to switch between standby and power on modes LED Indicator Illuminates and indicates the battery pack charging status See Charging the Batter...

Page 10: ...your external USB devices 10 AUX IN jack Inputs audio signals from an external device 11 switch Slide to activate or deactivate the UQ3 High Definition Wide Stereo sound effect 12 TONE switch Slide to...

Page 11: ...Sound modes can be selected to enhance the type of music being played You can select one sound mode of WARM FLAT and BRIGHT by sliding the TONE switch on the back of the system Activating the Power S...

Page 12: ...ove the audio cable from the AUX IN jack the sound source will switch to Bluetooth mode automatically When a Bluetooth connection has been established and the system is in Bluetooth mode once you inse...

Page 13: ...uests it The LED indicator on top panel starts blinking quickly to indicate that the system and your device have entered into the connection mode After a Bluetooth connection is established successful...

Page 14: ...seconds the music will come out from the system If not select the Use as Audio Device Stereo once again The Sound Quality should be good Playing back from PC Notebook 1 Press the Start button to open...

Page 15: ...ernal device to the AUX IN jack on the back panel of the system using a stereo audio cable supplied Notes When the audio cable is connected to the AUX IN jack the system will switch to the AUX IN mode...

Page 16: ...parately connect your device to Double Spot and turn on the system to begin charging Notes Please use the USB power cord that came with your device to connect to Double Spot to charge When using the B...

Page 17: ...h UQ3 enhancement may cause distortion TIP For playback in Bluetooth or Aux mode the output volume is set by both the volume control on Sound Spot Stereo and the source device Both may be adjusted to...

Page 18: ...system does not connect with any audio source for more than 45 minutes Turn on the system again and play back an audio source If using the battery pack check if the battery pack is exhausted Connect A...

Page 19: ...2 0 and 2 1 compliant Support Profile A2DP AVRCP Input Sensitivity AUX Input 1000mV Input Terminal External DC IN AUX IN Power Source DC IN 12V 2 5A Dimensions Approx 280mm L x 80mm D x 112mm H Weight...

Page 20: ...Save this manual...

Reviews: