background image

29

S o u n d E a r ® 3   –   m a n u a l  

R e t u R n   t o   ta b l e   o f   C o n t e n t s


SOUndEAr® USB KEy   

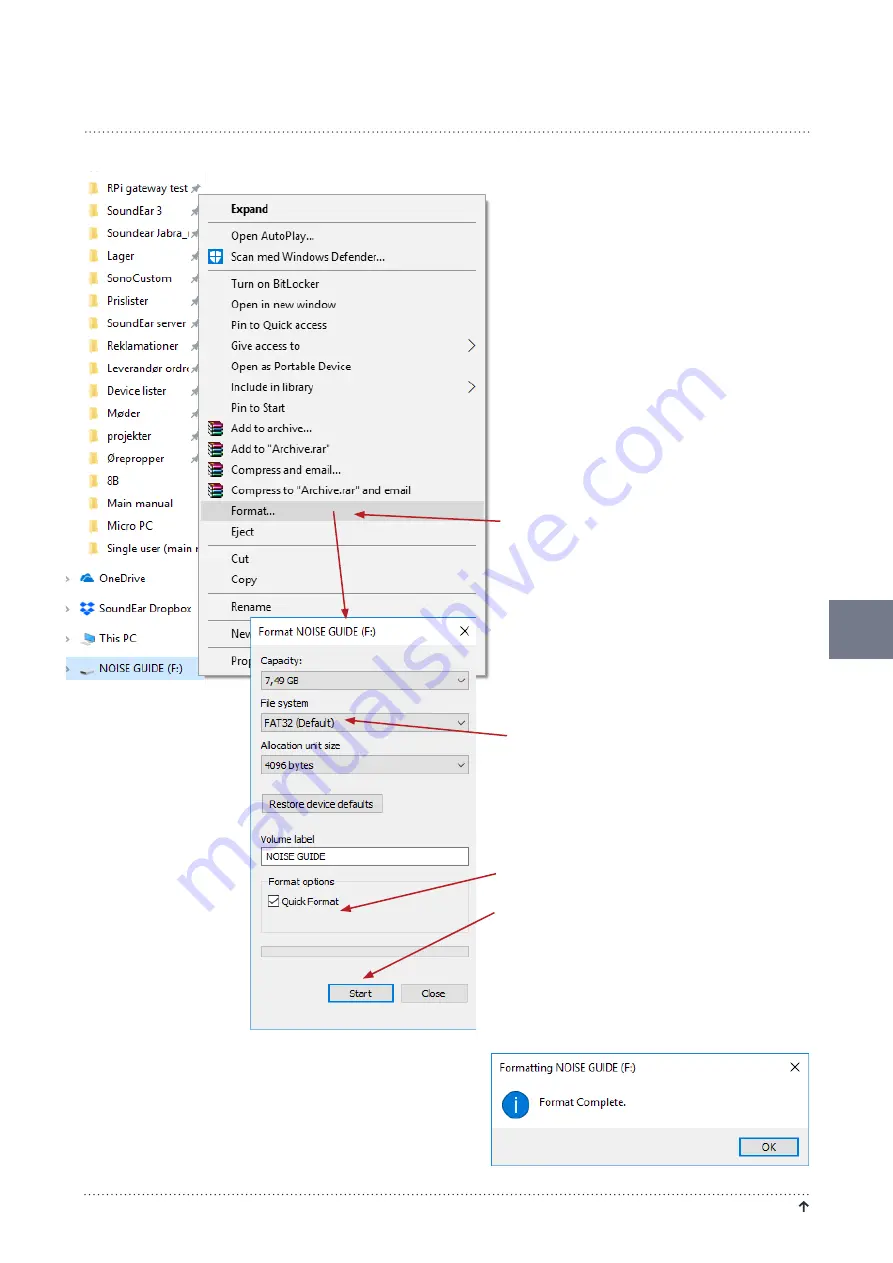
FOrMAttinG tHE USB KEy 

the usB key included is formatted in the format 

called “fat 32”. if you wish to use an alternative 

usB key with a larger memory, it is important 

that it has the same format.

Please follow the steps below to format your USB 
key.

iMPOrtAnt: 

Please remember to export any files 

you may have on your USB key before formatting, 
as the formatting will overwrite all existing files 
on your USB key.

1.  connect the USB key to your Pc.
2.  right-click on the USB drive.
3.  Select “Format” in the drop-down menu. 

4.  Select “Fat 32” under File System.

5  check the box “Quick Format”.

6  click ”Start”.

7.  the USB key is now ready for use.

Summary of Contents for SoundAir3 300

Page 1: ...Manual UK Model 300 Model 310 Model 320 Model 310xl SoundEar 3 VERSION 5 1 11...

Page 2: ...Model 320 9 Basic features of the SoundEar 3 10 Ports on the device 10 Model 300 310 and XL 10 Model 320 11 Using the touch display 12 SoundEar software setup 13 SoundEar 3 with wireless connection 13...

Page 3: ...matting the USB key 29 Export log files from the internal memory 30 Import measurement data from the USB key to the software 30 Measurement data 31 Live measurements 31 Chart statistics 32 Show in cha...

Page 4: ...rt 49 Chart statistics 51 Export measurements to CSV 52 Generate Noise Report 54 Show measurements in folder 55 Choose destination folder 55 Advanced settings 56 Analog output 56 Microphone calibratio...

Page 5: ...tage of your product For a complete understanding of the features and possibilities of the SoundEar 3 we advise you to carefully read this manual before use Please find all our latest updates on our w...

Page 6: ...ap your noise environment SoundEar 3 Has a measuring range from 30 dB to 120 dB Able to turn off the visual warning signal at night so it doesn t disturb patients sleeping in hospitals Integrated log...

Page 7: ...tent Please check the box content depending on the box purchased 1 SoundEar 3 2 USB key with software 3 External microphone 4 Four pole extension cables for calibration 5 Power adaptor with EU US and...

Page 8: ...round Area 40 m2 Diameter 10 11 m How to mount your SoundEar 3 on the wall When selecting a location for your SoundEar 3 please make sure to follow the instructions below 1 Make sure not to cover the...

Page 9: ...etting up the SoundEar 3 device 1 Loosen the screw to remove the wall mounting bracket Fasten the wall mounting bracket on the wall with 4 screws Hang SoundEar 3 320 onto the wall mounting bracket and...

Page 10: ...1 GND Out 2 1 2 1 Analogue output Connect your external system here if you have one 2 USB port Insert the SoundEar USB drive here to download measurements or the USB dongle for wireless connectivity 3...

Page 11: ...odel 320 1 External mic Insert your microphone here 2 SoundBuster Connect your SoundBuster here if you have one 3 Power supply Insert power supply here 4 USB port Insert the SoundEar USB drive here to...

Page 12: ...touch display go to Display Settings in the software LAeq1s Shows the current noise level as an A weighted average over the last second OFF Turn off the mini display When turned off a small red light...

Page 13: ...bout wireless connectivity and continue reading the manual SoundEar 3 with wireless connection If you are using your SoundEar 3 with wireless connectivity please click on the following links to downlo...

Page 14: ...nstall the software The SoundEar USB key includes the software installer Please find the software on the included USB key Insert the USB key in your computer open the USB and click on the installation...

Page 15: ...re single user Software update Please make sure that you have installed the latest version of the SoundEar Software 1 Go to the menu Setup About SoundEar 3 to see your current software version 2 Click...

Page 16: ...tup and Device info and click Check for firmware updates We recommend doing this each time you conduct a software update Important After conducting a firmware update you need to perform a factory rese...

Page 17: ...e nts Device configuration Connecting the device Before connecting the device to your computer open the SoundEar 3 software and you are ready to start the con figuration Insert the micro USB port into...

Page 18: ...select the laptop icon to configure your device for single use Here you can 1 Name the device If not configured the software will store the measurements using the device s unique ID 2 Location 3 Set...

Page 19: ...lay located in the upper right hand corner of the screen Note Your device must be connected to the computer via USB for you to set the time on your device After double clicking on the time bar a loadi...

Page 20: ...the yellow ear to 60 dB and red to 75 dB 2 Select how long the noise level should be exceeded before the red ear turns on Here we have selected 3 sec 3 As a standard the visual alarm is measured in L...

Page 21: ...limits for green yellow and red ear using the slider In this example we will set them all to 60 dB This allows you to turn off the light emanating from the device preventing it from disturbing people...

Page 22: ...ten ts S oundE ar 3 m anual 22 Define settings NOISE LEVEL 320 Even though the 320 does not have a visual alarm you can still set the background in live measurements to make it easy to see when the no...

Page 23: ...r screen background will show your settings Define settings NOISE LEVEL 320 Red 80 120 dB If you want an alternate night setting check the box Night and create your settings After 22 00 your screen wi...

Page 24: ...the drop down menu whether you want the display to show the time the current noise level in LAeq 1 second or the alarm level for the red ear You can also choose to turn the mini display off 2 If you...

Page 25: ...ail notifications about critical noise levels using the Alarm setting 1 Go to the tab Alarm and select the noise limit and duration at which the system will send an e mail notification In this case 60...

Page 26: ...ine settings Alarm 3 Check the Show on live measurements box if you want the alarm level to show in the Live Measurement view for your device 4 When you have created your settings click Configure Note...

Page 27: ...to Define settings and go through the tabs Noise levels and Display to create your settings without clicking Configure 2 Return to the tab Export settings to USB and click on Export setup to USB Make...

Page 28: ...Here are our recommendations on noise levels for different auditive environments Auditive Environment Noise limit in dB Exam No disruptive noise Intense concentration 35 45 dB Operating rooms Neonatal...

Page 29: ...as the same format Please follow the steps below to format your USB key Important Please remember to export any files you may have on your USB key before formatting as the formatting will overwrite al...

Page 30: ...asurements for up to 600 days These measurements can be extracted from the device to the SoundEar software via USB Import measurement data from the USB key to the software SoundEar 3 transfer data fro...

Page 31: ...ement Data you will find all features relating to viewing the data both live measurements and from the measurement library Live measurements If your SoundEar 3 device is connected you will be able to...

Page 32: ...s well as peak levels for your device s If you have selected more than one device it will show the average noise levels for all the devices combined By clicking the green arrow you can go back and for...

Page 33: ...ws the average A weighted noise level over a 15 minute period LAeq 60 min shows the average A weighted noise level over a 60 minute period LCpk max shows the highest measured C peak value within a sec...

Page 34: ...ecific period in order to have a closer look at noise levels Current measurements 1 Move your mouse cursor anywhere on the graph 2 With a mouse controller simply move the mouse scroll wheel back and f...

Page 35: ...1 Version Shows which firmware version you have on your device 2 Name You can name your device here The name is used for naming your measurements in the measurements folder If you have chosen not to n...

Page 36: ...rements on a daily or weekly basis via e mail Go to Set up in the left side menu and click Reporting Note You can only receive a report if your device is directly connected to your computer or if you...

Page 37: ...of Conte nts Reporting REPORT NAME 1 Report name Start by naming your report This name will be used for the PDF you will receive as an email along with the date 2 Show in report Choose what you want i...

Page 38: ...Return to Tab l e o f Co n ten ts S oundE ar 3 m anual 38 Reporting Device average Device average gives you an overview of what has been measured for the chosen devices in the chosen time period...

Page 39: ...39 SoundE ar 3 m a nua l Re tu r n to Table of Conte nts Reporting AN Example...

Page 40: ...Return to Tab l e o f Co n ten ts S oundE ar 3 m anual 40 Reporting AN Example...

Page 41: ...a nua l Re tu r n to Table of Conte nts Reporting CHART Chart will show you what has been measured for the chosen devices in one chart Hours Hours shows you the average measured for each hour in the c...

Page 42: ...Return to Tab l e o f Co n ten ts S oundE ar 3 m anual 42 Reporting Day If you choose to include multiple days in the report Day will give the average daily noise level for each of the chosen devices...

Page 43: ...Every day Choose time you want to receive the report Chose time periode to include in the report Type in email address s to receive the report Weekly report Mark check box Every week Choose time you...

Page 44: ...oxes for the devices you want to include in the report Noise limits in report Drag the markers to set the noise levels you want shown in the report The set noise levels will be used on all devices cho...

Page 45: ...column You can see an overview of your settings in the right column Click Preview to see a sample of the report If you want to edit your report click on the button Edit If you want to remove a report...

Page 46: ...urn to Tab l e o f Co n ten ts S oundE ar 3 m anual Library Here you can find and compare the measurements collected Navigating the library Open Library located in the Measurement Data menu Show measu...

Page 47: ...t time interval you want to look at by designating the hours and minutes in the drop down menu 4 Click Show to view your measurements 2 Select the dates you want to look at Dates with data available w...

Page 48: ...anual 48 Library Show in chart As standard the graph will show LAeq 1min measurements Use the arrows to choose between LAeq 1 sec LAeq 1 min LAeq 15 min LAeq 60 min You can also choose to have your m...

Page 49: ...Library Show as hours days or chart In the Show as drop down menu you can get an average view of your measurements shown as hours days or chart Hours Presents you with a bar chart representing the av...

Page 50: ...anual 50 Library Show as hours days or chart Days Presents you with a bar chart representing the average noise level for each day in your selected period Chart Presents you with a continuous chart of...

Page 51: ...atistics As standard Chart statistics will show you the aver age of all your measurements for all selected devices Use the green arrows to view the statistics for each device The information in chart...

Page 52: ...v file with the precise information you need In this example I am interested in a Csv file with LAeq 1min values for two devices over a period of three days 1 Click on the drop down menu Export and se...

Page 53: ...53 SoundE ar 3 m a nua l Re tu r n to Table of Conte nts Library Export measurements to Csv 4 Open the Csv file to view your measurements...

Page 54: ...lick on the report symbol in the top right corner of the screen 2 Name your report and select what you want included in the report By default device average is always included 3 Set your noise setting...

Page 55: ...ng you to analyze them further in Excel or other data analysis software of your choosing By clicking here you will be directed to the root folder 1 Choose where to save your measurements by click ing...

Page 56: ...description of the various outputs on the back of the device Note The two analog outputs share a ground connection 24 VDC 150 mA USB Log config SoundBuster Power 5 VDC PC data Ext mic Power 24 VDC Ana...

Page 57: ...l Re tu r n to Table of Conte nts Advanced settings Analog output Choose analog output format either 0 10 V or 4 20 mA Set the dynamic area e g 30 120 dB Save your settings by clicking Configure in t...

Page 58: ...fic microphone ID and last date of calibration is displayed in the upper left corner of the micro phone We recommend that the microphone is calibrated at least once a year or as needed 1 Connect Sound...

Page 59: ...nts Advanced settings Microphone calibration The calibration takes a moment A new pop up window will tell you when the calibration is completed When the calibration is complete connect the micro phon...

Page 60: ...dB 120 dB Red 60 dB 120 dB Night settings are not part of the standard settings To activate please check the Night Settings box Advanced settings Output 1 dB A Slow Output 2 dB C Fast Output Type 0 1...

Page 61: ...lay 1 sec 5 min 2xOutputs 1 for dB A 1 for dB C Either 0 10V or 4 20mA outputs 2xUSB ports Micro USB Power PC USB OTG Log config Display Data LAeq 1 second Alarm settings Clock off Power Supply 5VDC m...

Page 62: ...heeled bin means that within the European Union the product must be taken to separate collection at the product end of its life This applies not only to your device but also to any enhancements marked...

Reviews: