10
Soundcraft SX Series User Guide V1.0
3. SX SERIES CONTROLS
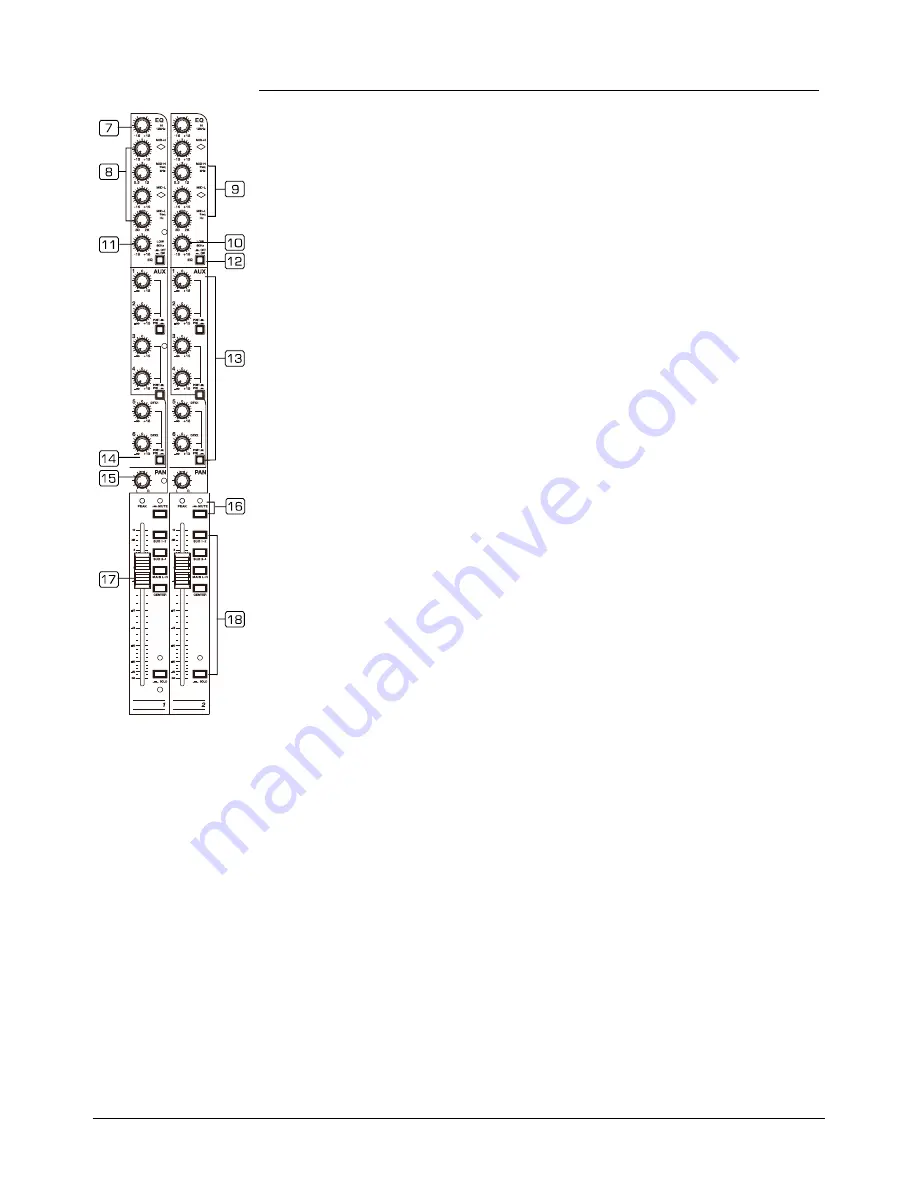
10- MID-LOW
This control gives you up to 15 dB boost or cut at 500 Hz.
11- LOW
If you turn this control up, you will boost all frequencies below 80 Hz. You will give more punch
to bass drum and bass guitar and make the vocalist more “macho”. Turn it down, you will cut all
the frequencies below 80 Hz. In this way, you can avoid low frequency vibrations and resonance
thus preserving the life of your woofers.
12- EQ SWITCH
This switch allows the user to use the EQ Section in signal path. Of course it can be used to
make A/B comparisons between equalized signal and not equalized signal. It also can be used
to apply equalization at a certain point of the show, excluding it when it’s not necessary.
13-AUX SENDS LEVEL CONTROL
These six controls are used to adjust the level of the respective signal sent to AUX bus, AUX-
1,AUX2, AUX3,AUX4,AUX5,AUX6 can be switched to PRE/POST-FADER via the PRE/POST button,
so, generally, they can be used for monitor application and effects & sound processors input. In
this typical compact unit, excluding sending out the signal directly to the external effect or pro-
cessor equipment, AUX SEND 5&6 can also be assigned to the internal onboard effect module.
14-PAN CONTROL
Abbreviation of PANORAMA control for mono channels, or the stereo channels, always says,
BALANCE control. Keep this control in center position, then the signal will be positioned in the
middle of stage.
15-PEAK LED
Inside your SX series, the audio signal is monitored in several different stages and then sent to
the PEAK LED. When the LED is red illuminated, it warns you that you are reaching signal satura-
tion and possible distortion, then you should reduce the input level for avoiding distortion.
16-MUTE BUTTON & LED
Each channel is equipped with a MUTE button. Pressing this button is equal to turning the fader
down, which can mute the corresponding channel output except for the channel INSERT send
and SOLO (in PFL mode). And the MUTE LED will illuminate.
17-FADER
This fader will adjust the overall level of this channel and set the amount of signal send to the
main output.
18-ASSIGNMENT Controls
Each channel provides four push-buttons: SUB1-2, SUB3-4, MAIN L-R, CENTER and SOLO.
Pressing the SOLO button, the corresponding SOLO LED will illuminate and the SOLO signal will
replace other signals send to the Headphone/Control Room and Meters. Usually use the SOLO
function in live work to preview channels before they are let into the mix.
It Is useful to set an instrument’s input level and EQ, and you can also solo any channel that you
want to. The SOLO switch never affects any mix other than the Control Room. The other three
buttons can be considered as signal assignment switches.
Pressing the SUB1-2 will assign the channel signal to Subgroup1/2, you can depend on the PAN
switch to adjust the amount of channel signal sent to the SUB1 versus SUB2, when turns the
PAN to completely left, then the signal can be only controlled by Subgroup1 and vice versa. In
the same way, pressing the SUB3-4 or MAIN L/R will assign the channel signal to Subgroup 3/4
or MAIN MIX L/R, and will also be affected by PAN.


