


1 - 20
Mono Input Channel
1 - MIC INPUT
The mic input accepts XLR-type connectors and is designed to suit a wide range of
BALANCED or UNBALANCED signals. Professional dynamic, condenser or ribbon mics
are best because these will be LOW IMPEDANCE. You can use low-cost HIGH IMPEDANCE
mics, but the level of background noise will be higher. If you press the 48V switch down
the socket provides a suitable powering voltage for professional condenser mics (this is
also known as Phantom Power).
ONLY connect condenser microphones with the
48V powering OFF (switch UP), and ONLY turn the
48V powering on or off with all output faders
DOWN, to prevent damage to the mixer or
external devices.
TAKE CARE when using unbalanced sources,
which may be damaged by the phantom power
voltage on pins 2 & 3 of the XLR connector.
Unplug any mics if you want to use the LINE Input. The input level is set using the GAIN
knob.
2 - 48V (Phantom Power)
Many professional condenser mics need an external powering voltage, normally 48V,
also known as PHANTOM POWER. This is a method of sending a powering voltage down
the same wires as the mic signal. Each switch supplies the 48V power to four MIC inputs.
The adjacent LED illuminates when the power is active.
DO NOT USE unbalanced mics with 48V switched
on as they may be damaged by the phantom
power voltage. Balanced dynamic mics and leads
can normally be used with 48V switched on
(contact your microphone manufacturer for
guidance)
Mics should always be plugged in, and all output
faders set to minimum before switching 48V ON to
avoid damage to external equipment
3 - LINE INPUT
Accepts 3-pole `A gauge (TRS) jacks. Use this high impedance input for sources other
than mics, such as keyboards, drum machines, synths, tape machines or guitars. The
input is BALANCED for low noise and top quality from professional equipment, but you
can use UNBALANCED sources by wiring up the jacks as shown, although you should
then keep cable lengths as short as possible. Unplug anything in the MIC input if you
want to use this socket. Set the input level using the GAIN knob.
Summary of Contents for LX7-2
Page 1: ...i T T T T Technical Manual echnical Manual echnical Manual echnical Manual echnical Manual ...
Page 5: ...1 1 INTRODUCTION ...
Page 8: ...1 4 ...
Page 18: ...1 14 Audio Connector Pinouts ...
Page 19: ...1 15 Dimensions ...
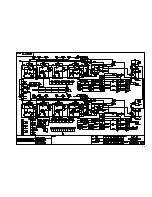
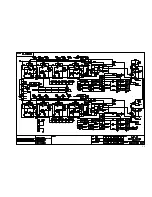
Page 20: ...1 16 BLOCK DIAGRAM ...
Page 21: ...1 17 ...
Page 22: ...1 18 USING THE CONSOLE ...
Page 23: ...1 19 Overview A 16 channel frame is shown ...
Page 34: ...2 2 ...
Page 35: ...2 3 ...
Page 36: ...2 4 ...
Page 37: ...2 5 ...
Page 38: ...2 6 ...
Page 39: ...2 7 ...
Page 40: ...2 8 ...
Page 41: ...2 9 ...
Page 42: ...2 10 ...
Page 43: ...2 11 ...
Page 44: ...2 12 ...
Page 45: ...2 13 ...
Page 46: ...2 14 ...
Page 47: ...2 15 ...
Page 48: ...2 16 ...
Page 49: ...2 17 ...
Page 50: ...2 18 ...
Page 51: ...2 19 ...
Page 52: ...2 20 ...
Page 53: ...2 21 ...
Page 54: ...2 22 ...
Page 55: ...2 23 ...
Page 56: ...2 24 ...
Page 57: ...2 25 ...
Page 58: ...2 26 ...
Page 59: ...2 27 ...
Page 60: ...2 28 ...
Page 61: ...2 29 ...
Page 62: ...2 30 ...
Page 63: ...LX7 II Spare Parts Page 3 1 LX7 II Spare Parts ...
Page 108: ...Page 3 46 LX7 II Spare Parts ...


