


PIX-E7
Quick Start Guide
1. Attach Power
The PIX-E7 has two powering options. It may be powered from an
external DC power source, using the PIX-E PSU (power supply unit)
included with the monitor. It may also be powered with one or two
removable, rechargeable, lithium-ion batteries, such as the Sony
®
L
Series batteries (not included).
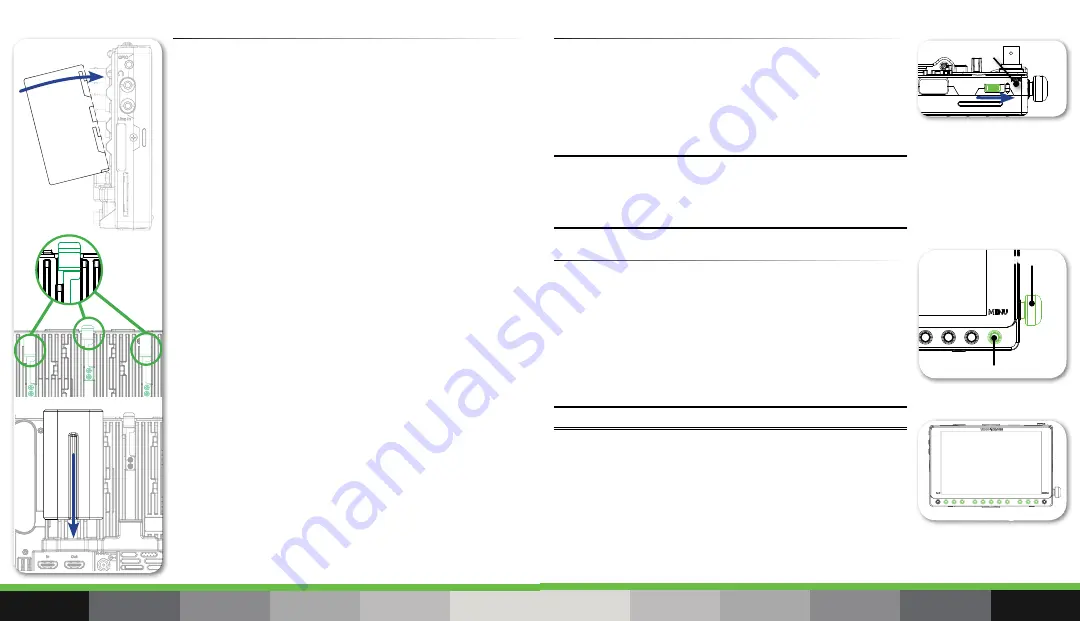
To mount an L Series battery:
1. Position the battery so its two terminals line up with the tips of the
two gold-plated pins on the monitor.
2. Press the battery against the monitor to depress the spring-loaded
retainer clip and slide the battery onto the pins. The retainer clip
will spring up with a click to let you know the battery is secure.
To remove a battery:
▶
Depress the retainer clip and slide battery off of pins.
To connect external power:
1. Plug one end of the PIX-E PSU into the monitor’s DC input, centered
at bottom of back panel.
2. Screw the connector in place to secure it.
3. Plug the other end of the PIX-E PSU into a standard AC wall outlet.
When on, the monitor displays the voltage levels of all available power
sources as part of the on-screen display (OSD).
2. Power Up
To turn on the monitor:
▶
Slide the Power switch to the right.
Located on the top panel next to the Power switch, the green power
LED will illuminate, and the Video Devices splash screen will appear
on the 7-inch LCD.
Note: PIX-E monitors have a very powerful processor and operating system, so it
takes up to 45 seconds to boot the first time. However, the QuickBoot™ feature
reduces subsequent boot times throughout the rest of the day to just a few
seconds. To use QuickBoot, keep a power source connected and use the Power
switch to turn the monitor on and off.
Power LED
3. Touch Screen and Buttons
The monitor’s user interface features the best of both worlds in
navigation options. Tap the touch-screen for quick adjustments or,
keep the screen free of fingerprints by using tactile controls, such as
soft key buttons and the Control knob.
To view the Main Menu:
▶
Press the MENU button. You can then use the touchscreen or
Control knob to navigate the menu.
Note: Press the MENU button to exit and return to live view.
Between the ALT and MENU buttons are 11 soft key buttons. Text
labels above the soft key buttons indicate each button’s current
function. Their primary functionality is set to toggle monitoring tools
on/off, such as: peaking, zebras, scopes, and more. However, the soft
key buttons are multi-functional; their alternative functionality includes
accessing the File List and Audio screens, and acting as transport
controls for recording and playback.
MENU Button
Control Knob
Soft Keys
Retainer
Clips
4
5


