Frequency Hopping
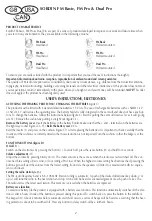
It is possible to hop from one end of the frequency band to the other. To hop to the higher end of the frequency band press the
(+) and volume (O) button simultaneously, and to hop to the lower end press the (-) and volume (O) button simultaneously.
Stereo / Mono shifting, (+) (–) (does not apply to Basic Line)
The radio will automatically shift from stereo to mono in the event of very poor reception. Stereo will be restored when stable
reception occurs again. The FM-radio can be locked in the mono mode by simultaneously pressing the station tuner down (-)
and up (+) keys. The mono lock will be released by repeated pressing of the same keys. The locked mode will also disappear
on changing the batteries.
Battery warning (does not apply to Basic Line)
Two tones will be heard when about 10–20 hours battery life remains. The battery warning is repeated every half hour until the
batteries are completely discharged.
ADDITIONAL FUNCTION, ONLY APPLIES TO DUAL PRO
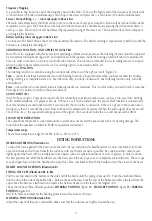
Dual Pro is also equipped with electronics for reproducing ambient sound, known as the listening function. Sound is captured
by two external microphones (figure E1) and reproduced in the speakers inside the hearing protector. Sound is reproduced in
stereo in order to maintain or improve sound direction location. This function is intended for use in settings where it is impor-
tant to be able to hear ambient sounds, such as warning signals, conversation, traffic, etc.
LISTENING FUNCTION
The listening function is controlled using the control knob at the rear of the right ear muff, (figure E2).
Turn – controls the balance between the radio and listening function. A beep indicates when you have reached the midway
setting, which gives complete balance. To hear the radio only, turn fully clockwise. To hear listening function only, turn fully
anticlockwise.
Press – cuts out the radio completely and sets listening function to maximum. This is useful when you need to talk to someone.
Press again (any button) to return to the preset balance.
AUDIO INPUT (E3)
Dual Pro has a single 3.5 mm stereo input socket for connecting an external audio source, such as a two-way radio, hunting
radio, mobile telephone, CD player, radio, etc. If there is a call on the audio input, the pre-set Dual function is automatically
shut off and remains muted until around 15 seconds after the end of the conversation. If there is a pause in the conversation
lasting more than 15 seconds the preset Dual function will automatically be restored. When the audio signal does not exceed
163 mVrms (rms = the equivalent average power of the signal), the noise level inside the cup will not exceed 82 dB(A).
SOUND LEVEL RESTRICTION
The output from the product’s sound reproduction system does not exceed the known risk levels for hearing damage. The
sound from the speakers is limited to 82 dB(A) equivalent sound level.
Temperature range
The ambient temperature range for the FM radio is –20º to +50º C.
FITTING INSTRUCTIONS
HEADBAND VERSION (Illustration A)
To adjust the force applied to the head, move the slide (A1) up and down the headband arm for most comfortable fit. Brush
excess hair back and out from beneath the cushions with your hand as much as possible. Be certain that the cushions seal
tightly against the head with no interference from objects such as respirator headbands or arms of glasses, in order to obtain
the best performance. With the headband over the head, place the ear cups so as to completely enclose the ears. The ear cups
may be slipped up or down the headband to adjust for a firm, comfortable fit with the headband over the crown of the head.
HELMET MOUNTED VERSION (Illustration B)
FITTING THE CUPS (Illustration B1 to B3).
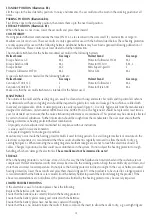
Pull the ear cup down to the bottom of the yolk and lift the blade until the spring clicks up (B1). Push the attachment blade
into the slot on the side of the helmet (B2). Release the head harness from the rear of the helmet and place the lead from the
cups above the harness’ attachment and replace the harness. Make sure the lead is not tangled. (B3).
The ear muffs have three different positions. WORKING POSITION (figure B4), STAND-BY POSITION (figure B5), PARKING
POSITION(figure B6)
NOTE! In noisy environments the hearing protector must be worn at all times.
WORKING POSITION (Illustration B4).
Adjust the cups until they are comfortable. Make sure that the cushions seal tightly around the ears.
3


