background image

S/N

Name

Qty.

S/N

Name

Qty.

1

Main

frame

1 SET

10

Screw

2 PCS

2

Rear

bracket

1 SET

11

Bottle

1 PCS

3

Front

bracket

1 SET

12

Left pedal

1 SET

4

Seat

post

adjuster

1 SET

13

Right pedal

1 SET

5

Cushion

frame

1 SET

14

Screw

4 PCS

6

Handle

adjuster

1 SET

15

Spring

washer

4 PCS

7

Handle

frame

1 SET

16

Flat

washer

4 PCS

8

Adjusting

knob

2 PCS

17

Flat

washer

2 PCS

9

Bottle

cage

1 PCS

Product installation steps

After assembly, please check and confirm that the product is free from serious shaking before use!

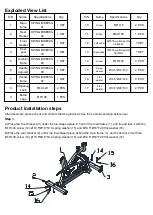
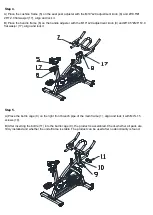
Step 1.

A) Place the front bracket (3) under the tile-shaped plate in front of the main frame (1), and fix and lock it with the
M10*L30 screw (14), Ø10.5*Ø18*T2.0 spring washer (15) and Ø10.5*Ø18*T2.0 flat washer (16).

B) Place the rear bracket (2) under the tile-shaped piece behind the main frame (1), and fix and lock it with the
M10*L30 screw (14), Ø10.5*Ø18*T2.0 spring washer (15) and Ø10.5*Ø18*T2.0 flat washer (16).

SPING BIKE800-

07

Ø10.5*Ø22*T2.0

M10.L20

Ø10.5*Ø26*T2.0

Ø6*128

SPING BIKE800-

04

M16 fine-pitch sports

frontbite

SPING BIKE800-

05

M10*L30

SPING BIKE800-

06

Ø10.5*Ø18*T2.0

SPING BIKE800-

01

M4*L15

SPING BIKE800-

02

Ø60*150

SPING BIKE800-

03

M16 fine-pitch sports

crossbite

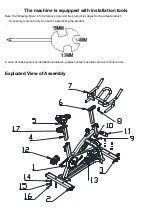
Exploded View List

Specifications

Specifications

Summary of Contents for A90-212

Page 1: ...ASSEMBLY INSTRUCTION INada107_US A90 212 READ AND SAVE THESE INSTRUCTIONS FOR FUTURE USE Light Commercial Spinning Bike...

Page 2: ...d you should be accompanied by a professional 11 Please warm up before exercise to avoid strain 12 When the product fails please stop using it immediately 3 Please make a clear space within 1m around...

Page 3: ...se of missing tools or installation problems please contact customer service hotline in time Exploded View of Assembly The machine is equipped with installation tools Note the following figure is for...

Page 4: ...use Step 1 A Place the front bracket 3 under the tile shaped plate in front of the main frame 1 and fix and lock it with the M10 L30 screw 14 10 5 18 T2 0 spring washer 15 and 10 5 18 T2 0 flat washer...

Page 5: ...the main frame 1 align the installation hole and lock it Step 2 A The axis of the left pedal 12 is marked with L and the crank is also marked with L After comparison install and lock it anticlockwise...

Page 6: ...all parts are firmly installed and whether the underframe is stable The product can be used after no abnormality is found A Place the cushion frame 5 on the seat post adjuster with the M10 L20 adjust...

Page 7: ...e other leg inward to make it close to the inside of the straightened leg amd try to touch your toes with your hands Hold for 10 to 15 seconds and then relax Repeat 3 times for each leg see Figure 2 3...

Page 8: ...Handle height adjustment The height of the handle can be adjusted according to different heights of users Loosen the L shaped fixed knob of the handle holder pull the handle adjustment tube frame into...

Page 9: ......

Reviews: