background image

20

Reproducción de un
“Memory Stick”


Puede reproducir archivos MP3/JPEG/
MPEG1 en un “Memory Stick”.

Notas
• No es posible utilizar “Memory Stick Duo” ni

“Memory Stick PRO”.

• No es posible reproducir datos que requieran

funciones MagicGate.

• Es posible que algunos archivos MPEG1 no se

reproduzcan en forma correcta según la manera
en que se grabaron.

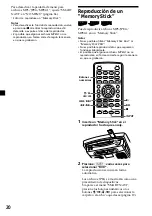
1

Inserte un “Memory Stick” en el
reproductor hasta que encaje.

2

Presione 

(INPUT)

 varias veces para

seleccionar “DVD”.

La reproducción se inicia en forma
automática.

Los archivos JPEG se mostrarán como una
presentación de diapositivas.
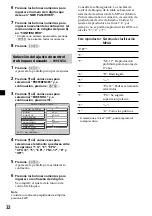
Si aparece el menú “SMART NAVI”,
presione los botones numéricos o los
botones 

M

/

,

/

m

/

<

 para seleccionar la

carpeta o el archivo que desee (página 19).

ENTER

SEARCH

POWER

DISPLAY

CLEAR

SETUP

AUDIO

ANGLE

SUBTITLE

MENU

TOP MENU

INPUT

1

2

3

4

5

6

7

8

9

0

VOL

./>

u

x

M/m

</,

y

m/M

INPUT

Botones
numéricos

Para desactivar la pantalla de menú para
archivos MP3/JPEG/MPEG1

*

, ajuste “SMART

NAVI” en “NO MENU” (página 34).

*

Sólo si se reproduce un “Memory Stick”.

Notas
• Para desactivar la función de reanudación, vuelva

a presionar 

x

 mientras la reproducción está

detenida o expulse el disco del reproductor.

• Es posible que algunos archivos MPEG1 no se

reproduzcan en forma correcta según la manera
en que se grabaron.

Summary of Contents for XVM-R90D

Page 1: ... Si desea obtener información sobre la instalación y las conexiones consulte el apartado Conexiónes de la página 35 2 159 612 31 2 Operating Instructions Manual de instrucciones Overhead DVD Entertainment System REPRODUCTOR SUSPENDIDO DE DVD PARA EL AUTO GB ES CS Overhead DVD Entertainment System ...

Page 2: ... in this manual could void your authority to operate this equipment This label is located on the bottom of the chassis CAUTION INVISIBLE DO NOT STARE INTO BEAM OR VIEW DIRECTLY WITH OPTICAL INSTRUMENTS LASER RADIATION WHEN OPEN This label is located on the drive unit s internal chassis ...

Page 3: ...splaying the multi angle notice ANGLE MARK 27 Setting the screen saver SCR SAVER 27 Selecting the speaker mode SPEAKER SETUP 28 Selecting the audio output mode AUDIO OUT 28 Selecting the compression setting for the sound DYNAMIC 29 Selecting the colour system for the line output video signal COLOR SYSTEM 29 Selecting the audio language for DVD AUDIO 30 Displaying the subtitles for DVD SUBTITLE 30 ...

Page 4: ... leave enough room for ventilation on openings and slots to protect from over heating If you have any questions or problems concerning the player please consult your nearest Sony dealer Welcome Thank you for purchasing this Sony Overhead DVD Entertainment System You can enjoy its various features even more with DVD Video CD Audio CD playback MP3 JPEG file encoded disc playback MP3 JPEG MPEG1 file ...

Page 5: ...l a hole in car panels make sure that any hidden car parts will not be damaged Do not use any nuts or bolts for safety devices such as steering linkage fuel supply or braking systems This can cause a fire or an accident Take care to prevent cords and wires from getting tangled or crimped in the moving portion of a seat rail On heat build up Heat may build up in the player if it is used for an exte...

Page 6: ...stions or problems concerning your unit that are not covered in this manual please consult your nearest Sony dealer Before installing Make sure that the POWER SELECT switch is set to the correct position A If your car has an accessory position on the ignition key B If your car has no accessory position on the ignition key A is the factory preset position When the POWER SELECT switch is set to B Pr...

Page 7: ...or DVD Rs DVD RWs in video mode Functions available for Video CDs or CD Rs CD RWs in video CD format Functions available for music CDs or CD Rs CD RWs in music CD format Functions available for files in MP3 format stored on CD ROMs CD Rs CD RWs and Memory Stick Functions available for files in JPEG format stored on CD ROMs CD Rs CD RWs and Memory Stick Functions available for files in MPEG1 format...

Page 8: ...ons This player CANNOT play these discs DVD Audio DVD RAM DVD ROM CD G SVCD CD I Photo CD VSD Active Audio Data CD Extra Data Mixed CD Data CD ROM the data other than the MP3 JPEG file DVD RW recorded in VR mode This product incorporates copyright protection technology that is protected by method claims of certain U S patents and other intellectual property rights owned by Macrovision Corporation ...

Page 9: ...chapter number enabling you to locate the chapter you want Depending on the disc chapters may not be recorded Track Sections of a picture or a music feature on a Video CD Audio CD Each track is assigned a track number enabling you to locate the track you want Scene On a Video CD with PBC Playback Control functions the menu screens moving pictures and still pictures are divided into sections called...

Page 10: ...me or to select the item during menu operation 9 EJECT button 18 Available to eject a disc from the player even when the player is turned off q Memory Stick slot 20 qa x stop button 18 21 qs u play pause button 18 21 qd OPEN button 12 Slide to open the monitor qf Speakers left right qg REVERSE button 12 14 To switch images upside down and reverse the output of the audio channels qh MENU button 14 ...

Page 11: ...er title or track qa CLEAR button qs SUBTITLE button 22 To change the subtitle language while playing a DVD qd ENTER button 17 23 26 To enter a setting qf ANGLE button 24 To select the multiple angles of view while playing a DVD qg AUDIO button 24 25 To change the audio output audio language qh slow reverse y slow forward buttons 17 20 qj u play pause button 17 20 25 qk x stop button 17 20 ql SETU...

Page 12: ...y monitor when closing Do not put any foreign objects between the LCD panel and the enclosure when closing 30 180 120 Adjusting the tilt and swivel The display monitor can be adjusted within the angles shown Tips Before closing the display monitor make sure that the monitor is turned and facing the enclosure you will hear a click The monitor stores the input mode you set even if you turn off the p...

Page 13: ...Selecting the colour system The player detects the colour system of the input video signal NTSC or PAL and changes the setting automatically auto mode Do the steps below to change the colour system setting for the input video signal manually 1 Press POWER to turn on the player The current input channel DVD appears on the screen for 5 seconds 2 Within 5 seconds press VOL or VOL repeatedly to select...

Page 14: ...ress MENU repeatedly to select IR HP 2 Press VOL or VOL to select off Setting the FM modulator You can transmit the audio signals to the FM radio and output the signals from the car stereo Do the procedure below to turn on or off the FM modulator and select the frequency 1 Press MENU repeatedly to select FM Modulator 2 Press VOL or VOL to select Low Middle High or Off Select the FM modulator outpu...

Page 15: ...ideo Adjust Reset Press or MENU Notes When the output level is set to High in step 2 noise may be heard If noise is heard due to the interference with the local FM broadcast change the FM transmission frequency When the FM modulator is turned off you cannot change the frequency setting Changing the display settings You can adjust the display settings manually if the display is hard to see from the...

Page 16: ... screen mode Full An image with an aspect ratio of 4 to 3 enlarged to the left and right edges of the screen Zoom An image with an aspect ratio of 4 to 3 enlarged to the left and right edges of the screen with the overflowing parts top and bottom cut off to fill the screen Normal An image with an aspect ratio of 4 to 3 regular image Wide An image with an aspect ratio of 4 to 3 with only the left a...

Page 17: ...eject a disc from the player though you cannot insert a disc Read the instruction manual supplied with the disc to play with this player When you play an 8 cm disc e g CD single be sure to insert it to the centre area of the disc slot Depending on the recording method used on the disc it may take a minute or more before playing Depending on the condition of the disc it may not play back page 39 A ...

Page 18: ...c Press EJECT on the player Pause Press u 2 Press again to resume playback Go to the next chapter Press track or scene Go back to the Press preceding chapter track or scene Fast forward Press M m while fast reverse playing 3 4 Slow forward Press y while DVD Video CD only playing 3 4 Slow reverse DVD only 1 If the resume playback function is activated you can resume playback later by pressing u For...

Page 19: ...OLDER 3 Resume playback 1 During playback press x to stop The player memorises the point where playback is stopped DVD Video CD Audio CD PRESS PLAY TO CONTINUE flashes on the screen 2 Press u to start playback When resume playback is activated playback starts from the point where playback is stopped When resume playback is deactivated playback starts from the beginning MP3 When resume playback is ...

Page 20: ... JPEG files are displayed as a slide show If the SMART NAVI menu display appears press the number buttons or M m buttons to select the desired folder file page 19 ENTER SEARCH POWER DISPLAY CLEAR SETUP AUDIO ANGLE SUBTITLE MENU TOP MENU INPUT 1 2 3 4 5 6 7 8 9 0 VOL u x M m y m M INPUT Number buttons To turn off the menu display for MP3 JPEG MPEG1 files set SMART NAVI to NO MENU page 34 Only when ...

Page 21: ... 1 2 3 4 5 6 7 8 9 0 VOL DISPLAY Note Depending on the recording method and size of data it may take some time before playback of the first track file To eject the Memory Stick Push in the Memory Stick momentarily then remove it Notes Insert the Memory Stick in the correct direction Do not forcefully remove the Memory Stick Operation for playback To Do this Stop playback Press x Pause Press u 1 Go...

Page 22: ...desired language page 47 Notes You can also change the subtitle languages by changing Setup See Displaying the subtitles for DVD SUBTITLE page 30 You can change to a specific subtitle language using a setup menu only if the language is included in both the disc and the setup screen If you want to hide the subtitles press SUBTITLE repeatedly to select OFF This function varies or may not work depend...

Page 23: ...nu You can play your favourite scene or song by selecting titles of songs and scenes during a DVD playback You can select an item subtitle language audio language etc by selecting a DVD menu The contents of title menus and DVD menus differ depending on the DVD There may be some DVDs which have no recorded menus Using the TOP MENU button Some DVDs have a title menu From the title menu you can selec...

Page 24: ... you have currently selected the total number of multiple alternative angles ENTER SEARCH POWER DISPLAY CLEAR AUDIO ANGLE SUBTITLE MENU TOP MENU INPUT 1 2 3 4 5 6 7 8 9 0 VOL SETUP ANGLE 3 5 Changing the audio language Some DVDs have multiple audio languages you can choose from During playback press AUDIO repeatedly to select the desired audio language The current audio language is displayed at th...

Page 25: ...the PBC menu may be displayed automatically after inserting a Video CD Each time you press TOP MENU the PBC menu function turns on or off 2 Press u The PBC menu is displayed 3 While the PBC menu screen is displayed press the number buttons to select the number of the desired item press to go to the previous next page Button functions vary or may not work depending on the Video CD Notes To display ...

Page 26: ...o select GENERAL SETUP then press ENTER SETUP MENU MAIN PAGE GENERAL SETUP GENERAL SETUP SPEAKER SETUP AUDIO SETUP PREFERENCES EXIT SETUP ENTER SEARCH POWER DISPLAY CLEAR SETUP AUDIO ANGLE SUBTITLE MENU TOP MENU INPUT 1 2 3 4 5 6 7 8 9 0 VOL ENTER M m SETUP 3 Press M or m repeatedly to select TV DISPLAY then press 4 Press M or m repeatedly to select 4 3 PS 4 3 LB or 16 9 WIDE 5 Press ENTER To retu...

Page 27: ...MAIN PAGE then press ENTER GENERAL PAGE SCREEN SAVER ON ON OFF TV DISPLAY ANGLE MARK SCR SAVER MAIN PAGE Displaying the multi angle notice ANGLE MARK If various angles multi angles for a scene are recorded on the DVD and you have set the ANGLE MARK to ON a notice appears at the scene 1 Press SETUP The main page for setup appears 2 Press M or m repeatedly to select GENERAL SETUP then press ENTER 3 ...

Page 28: ...LT RT DOWNMIX MAIN PAGE Selecting the audio output mode AUDIO OUT You can select the audio output setting from S PDIF RAW or S PDIF PCM S PDIF Sony Philips Digital Interface is a standard of audio transfer file format S PDIF allows the transfer of audio however signal quality may be degraded S PDIF RAW outputs the original audio data in S PDIF format S PDIF PCM outputs the sampling of the original...

Page 29: ...me Note To return to the main page for setup press M m repeatedly to select MAIN PAGE then press ENTER AUDIO SETUP DYNAMIC RNG COMPRESSION OFF AUDIO OUT DYNAMIC MAIN PAGE FULL HIGH MID LOW OFF Selecting the colour system for the line output video signal COLOR SYSTEM The player can output NTSC or PAL video signals 1 Press SETUP The main page for setup appears 2 Press M or m repeatedly to select PRE...

Page 30: ...EFERENCES PAGE SET PREFERENCE TO ENGLISH ENGLISH FRENCH SPANISH JAPANESE OTHERS OFF COLOR SYSTEM AUDIO SUBTITLE DISC MENU PARENTAL PASSWORD DEFAULTS SMART NAVI Selecting the audio language for DVD AUDIO Some DVDs have multiple audio languages you can select from 1 Press SETUP while playback is stopped The main page for setup appears 2 Press M or m repeatedly to select PREFERENCES then press ENTER ...

Page 31: ...D PASSWORD OLD PASSWORD NEW PASSWORD CONFIRM PWD Selecting the DVD menu language DISC MENU You can select the display language for the DVD menu 1 Press SETUP The main page for setup appears 2 Press M or m repeatedly to select PREFERENCES then press ENTER 3 Press M or m repeatedly to select DISC MENU then press 4 Press M or m repeatedly to select the desired item from ENGLISH FRENCH SPANISH or JAPA...

Page 32: ... you enter a wrong number press ENTER All the numbers are cleared 8 Press ENTER Selecting the desired parental setting PARENTAL 1 Press SETUP The main page for setup appears 2 Press M or m repeatedly to select PREFERENCES then press ENTER 3 Press M or m repeatedly to select PARENTAL then press 4 Press M or m repeatedly to select the desired item from 1 G 2 3 PG 4 PG 13 5 6 R 7 NC 17 8 or OFF 5 Pre...

Page 33: ...ETTINGS RESET COLOR SYSTEM AUDIO SUBTITLE DISC MENU PARENTAL PASSWORD DEFAULTS SMART NAVI Changing your password PASSWORD You can change your password for parental setting here Follow the steps below 1 Press SETUP The main page for setup appears 2 Press M or m repeatedly to select PREFERENCES then press ENTER 3 Press M or m repeatedly to select PASSWORD then press 4 Press to select CHANGE and pres...

Page 34: ...TER 3 Press M or m repeatedly to select SMART NAVI then press 4 Press to select WITH MENU 5 Press ENTER WITH MENU is displayed at the lower left on the screen To turn off the menu display for MP3 JPEG MPEG1 files select NO MENU in step 4 To return to normal play screen press SETUP anytime Only when a Memory Stick is played Notes To return to the main page for setup press M m repeatedly to select M...

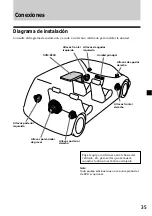
Page 35: ...ion of the unit XVM R90D Front Left speaker Rear Left speaker Subwoofer Tweeter Left Head unit Front Right speaker Rear Right speaker Be sure to securely fasten all equipment to the car chassis etc to prevent them moving while your car is in motion Note All equipment other than one DVD player is optional Tweeter Right ...

Page 36: ...necessary for your car and car audio system In such a case consult your dealer 2 If your car has no ACC accessory position on the ignition key switch set the POWER SELECT switch to B page 6 and connect this ACC cable to the 12 V power battery terminal Relay box 5 m Amplifier equipped with a digital input optional 0 5 m On AUDIO VIDEO OUTPUT connectors You can connect a Monitor to the AUDIO VIDEO O...

Page 37: ...nector ACC 5 m Fuse 5 A Fuse 1 A Red Yellow Black GND 1 m POWER REM 5 m Blue Max supply current 0 3 A To a power amplifier Black Filter box AUDIO VIDEO INPUT On AUDIO VIDEO INPUT connectors You can connect a VTR etc to the AUDIO VIDEO INPUT connectors to input the contents being played back on the device RCA pin cord not supplied ...

Page 38: ...polarity when installing the battery Do not hold the battery with metallic tweezers otherwise a short circuit may occur WARNING Battery may explode if mistreated Do not recharge disassemble or dispose of in fire Additional Information Maintenance Fuse replacement When replacing the fuse be sure to use one matching the amperage rating stated on the original fuse If the fuse blows check the power co...

Page 39: ...ly e g playback skipping or no playback due to heat shrinking of a sticker or label causing a disc to warp Discs with non standard shapes e g heart square star cannot be played on this player Attempting to do so may damage the player Do not use such discs Before playing clean the discs with a commercially available cleaning cloth Wipe each disc from the centre out Do not use solvents such as benzi...

Page 40: ... 31 characters long Each folder can have up to 8 trees For Joliet in the expansion format make sure of the contents of the writing software etc Notes With formats other than ISO 9660 level 1 and level 2 folder names or file names may not be displayed correctly When naming be sure to add the file extension MP3 to the file name If you put the extension MP3 to a file other than MP3 the player cannot ...

Page 41: ...he MagicGate copyright protection technology and can be used only with Memory Stick PRO compliant products Memory Stick PRO cannot be used in this player Memory Stick MagicGate High speed data transfer compatible Equipped with MagicGate and supports high speed data transfer This player does not support parallel high speed data transfer Memory Stick ROM Stores pre recorded read only data You cannot...

Page 42: ...he Memory Stick Do not disassemble or modify the Memory Stick Do not allow the Memory Stick to get wet Do not use or store the Memory Stick in a location that is subject to Extremely high temperature such as in a car parked in the sun Direct sunlight High humidity or places with corrosive substances To prolong the life of the Memory Stick use the supplied storage case On cleaning Clean the player ...

Page 43: ... input DC 12V input Power requirements 12 V DC Dimensions Approx 285 73 455 mm w h d Mass Approx 3 5 kg Operating temperature 0 C to 45 C Supplied accessories Card remote commander RM X137 Power supply lead 1 RF modulator cable 1 Mounting plate 1 Screws 5 Tapping screws 8 Operating Instructions 1 Monitor System Liquid crystal colour display Display Manual flipdown panel Drive system TFT LCD active...

Page 44: ...loaded Another disc is already loaded The disc is forcibly inserted upside down or in the wrong way Be sure to insert an 8 cm disc in the centre area of the disc slot If you insert an 8 cm disc in the side of the disc slot it may not be loaded MP3 files cannot be played back Recording was not performed according to the ISO 9660 level 1 or level 2 format or the Joliet convention in the expansion fo...

Page 45: ...when playing a disc Resume Playback may be activated t Press x again or eject the disc Depending on the DVD a title menu or a DVD menu may automatically appear on the monitor during playback t Select the desired menu page 23 Depending on the Video CD the PBC menu display automatically appears on the monitor during playback t Select the desired menu page 25 Playback stops automatically The disc may...

Page 46: ...o low t Operate the player at a temperature of 0 C to 45 C REGION ERROR The region code of the DVD currently in the player does not conform to the player t Make sure the region code of the DVD and the player page 8 NO DISC The data recorded on the disc is damaged The player does not support the format in which the data is recorded to the disc The operation cannot be done ...

Page 47: ...378 Indonesian 7876 Dutch 8482 Turkish 6679 Tibetan 7383 Icelandic 7879 Norwegian 8484 Tatar 6682 Breton 7384 Italian 7982 Oriya 8487 Twi 6765 Catalan 7387 Hebrew 8065 Punjabi 8575 Ukrainian 6779 Corsican 7465 Japanese 8076 Polish 8582 Urdu 6783 Czech 7473 Yiddish 8083 Pushto Pashto 8590 Uzbek 6789 Welsh 7487 Javanese 8084 Portuguese 8673 Vietnamese 6865 Danish 7565 Georgian 8185 Quechua 8679 Vola...

Page 48: ... este manual puede anular su autorización para utilizar este equipo CAUTION INVISIBLE DO NOT STARE INTO BEAM OR VIEW DIRECTLY WITH OPTICAL INSTRUMENTS LASER RADIATION WHEN OPEN Esta etiqueta está situada en el chasis interno de la unidad de activación Esta etiqueta está situada en la parte inferior del chasis ...

Page 49: ...lización del aviso de varios ángulos ANGLE MARK 27 Ajuste del salvapantallas SCR SAVER 27 Selección del modo de altavoz SPEAKER SETUP 28 Selección del modo de salida de audio AUDIO OUT 28 Selección del ajuste de compresión del sonido DYNAMIC 29 Selección del sistema de color para la señal de video de la línea de salida COLOR SYSTEM 29 Selección del idioma del audio de un DVD AUDIO 30 Visualización...

Page 50: ...itar el riesgo de lesiones graves o accidentes lea las siguientes advertencias antes de instalar y utilizar el reproductor Para la seguridad del conductor Cumpla con las leyes de tráfico de su país Mientras conduzca No mire ni utilice el reproductor ya que podría distraerse y provocar un accidente El conductor no deberá utilizar los auriculares ya que puede sufrir distracciones y provocar un accid...

Page 51: ...el auto asegúrese de no dañar los componentes ocultos del mismo No utilice tuercas ni tornillos de dispositivos de seguridad como el mecanismo de la dirección o los sistemas de suministro de combustible o frenos Esto puede ocasionar un incendio o un accidente Asegúrese de evitar que los cables y alambres se enreden o se doblen en la parte móvil del riel de los asientos Acumulación de calor Se pued...

Page 52: ...que este manual no trate comuníquese con el proveedor Sony más cercano a su domicilio Antes de la instalación Asegúrese de que el interruptor POWER SELECT está en la posición correcta A Si el auto dispone de una posición de accesorios en la llave de encendido B Si el auto no dispone de una posición de accesorios en la llave de encendido A es la posición que se ajusta en fábrica Cuando el selector ...

Page 53: ...a DVD VIDEO o DVD R DVD RW en modo de video Funciones disponibles para Video CD o CD R CD RW en formato de CD de video Funciones disponibles para CD de música o CD R CD RW en formato de CD de música Funciones disponibles para archivos en formato MP3 almacenados en CD ROM CD R CD RW y Memory Stick Funciones disponibles para archivos en formato JPEG almacenados en CD ROM CD R CD RW y Memory Stick Fu...

Page 54: ...os siguientes DVD Audio DVD RAM DVD ROM CD G SVCD CD I Photo CD VSD Active Audio Datos CD Extra Datos Mixed CD Datos CD ROM datos que no sean los de archivos MP3 JPEG DVD RW grabados en modo VR grabación de video Este producto incorpora tecnología de protección de derechos de autor copyright amparada por reclamaciones de método de ciertas patentes de EE UU otros derechos de propiedad intelectual d...

Page 55: ...ulo se le asigna un número de capítulo que permite localizarlo Es posible que algunos discos no tengan capítulos grabados Pista Secciones de un elemento de imagen o de música de un disco Video CD o CD de audio A cada pista se le asigna un número de pista que permite localizarla Escena En un Video CD con funciones PBC control de reproducción las pantallas de menú las imágenes en movimiento y las im...

Page 56: ... Para subir o bajar el volumen o para seleccionar el elemento durante las funciones de menú 9 Botón EJECT 18 Para expulsar un disco del reproductor aunque el reproductor esté apagado q Ranura para Memory Stick 20 qa Botón x detener 18 21 qs Botón u reproducir pausa 18 21 qd Botón OPEN 12 Deslícelo para abrir el monitor qf Altavoces izquierdo derecho qg Botón REVERSE 12 14 Para invertir las imágene...

Page 57: ... botones correspondientes del mando a distancia de tarjeta controlan las mismas funciones que los del reproductor Las instrucciones de este manual describen el uso del reproductor empleando principalmente el mando a distancia de tarjeta Sugerencia Consulte Sustitución de la pila de litio para obtener más información sobre cómo sustituir la pila página 38 Mando a distancia de tarjeta RM X137 qa Bot...

Page 58: ... No coloque ningún objeto extraño entre el panel de cristal líquido y su receptáculo cuando cierre el monitor 30 180 120 Ajuste de la inclinación y el giro La pantalla del monitor puede ajustarse según los ángulos que se muestran a continuación Sugerencias Antes de cerrar la pantalla del monitor compruebe que éste esté girado y orientado hacia el receptáculo oirá un chasquido El monitor almacena e...

Page 59: ...lección del sistema de color El reproductor detecta el sistema de color de la señal de entrada de video NTSC o PAL y cambia el ajuste de forma automática modo automático Realice los pasos siguientes para cambiar el ajuste del sistema de color de la señal de entrada de video manualmente 1 Presione POWER para encender el reproductor El canal de entrada actual DVD aparece en la pantalla durante 5 seg...

Page 60: ...tivar los audífonos inalámbricos 1 Presione MENU varias veces para seleccionar IR HP 2 Presione VOL o VOL para seleccionar off Ajuste del modulador de FM Puede transmitir las señales de audio a la radio FM y emitir las señales del equipo de sonido de su auto Realice los pasos siguientes para encender o apagar el modulador de FM y seleccionar la frecuencia 1 Presione MENU varias veces para seleccio...

Page 61: ...aste Cuando Brightness está seleccionado Presione VOL para dar más brillo al contraste Presione VOL para oscurecer la imagen El valor del ajuste del elemento seleccionado aparece en esta área Picture 32 Press or MENU Brightness 32 Press or MENU continúa en la página siguiente t Cuando Color está seleccionado Presione VOL para aumentar la intensidad del color Presione VOL para disminuir la intensid...

Page 62: ...de como el modo de pantalla Full Imagen con una relación de aspecto de 4 a 3 aumentada hacia los lados izquierdo y derecho de la pantalla Zoom Imagen con una relación de aspecto de 4 a 3 aumentada hacia los lados izquierdo y derecho de la pantalla con las partes rebasadas superior en inferior cortadas para llenar la pantalla Normal Imagen con una relación de aspecto de 4 a 3 imagen común Wide Imag...

Page 63: ...pero no podrá insertarlo Lea el manual de instrucciones suministrado con el disco para reproducirlo con este reproductor Si reproduce un disco de 8 cm por ejemplo un CD single asegúrese de insertarlo en el área central de la ranura del disco Según el método de grabación utilizado en el disco es posible que la reproducción tarde un minuto o más en iniciarse Según el estado del disco es posible que ...

Page 64: ...cción más tarde presionando u Para conocer más detalles consulte Reanudación de la reproducción página 19 2 Aparece PAUSE en la pantalla 3 No se emite ningún sonido durante el avance o retroceso rápido ni durante el avance o retroceso lento 4 Un disco que no sea un DVD vuelve a la reproducción normal cuando se acaba una pista o un archivo MP3 Búsqueda directa de capítulos títulos pistas 1 Durante ...

Page 65: ...tivará cuando el disco se expulse Si la función de reanudación está activada durante la reproducción de avance rápido lento o de retroceso rápido lento la reproducción normal se iniciará cuando presione u SMART NAVI ROOT FOLDER 1 FOLDER 2 FOLDER 3 0 1 2 3 ROOT SMART NAVI _ _ SCHUBERT BACH MOZART CHOPIN BRAHMS 0 1 2 3 4 5 ROOT FOLDER 1 FOLDER 2 FOLDER 3 Reproducción de archivos MP3 JPEG MPEG1 con l...

Page 66: ...trarán como una presentación de diapositivas Si aparece el menú SMART NAVI presione los botones numéricos o los botones M m para seleccionar la carpeta o el archivo que desee página 19 ENTER SEARCH POWER DISPLAY CLEAR SETUP AUDIO ANGLE SUBTITLE MENU TOP MENU INPUT 1 2 3 4 5 6 7 8 9 0 VOL u x M m y m M INPUT Botones numéricos Para desactivar la pantalla de menú para archivos MP3 JPEG MPEG1 ajuste S...

Page 67: ...o de grabación y el tamaño de los datos la reproducción de la primera pista o el primer archivo puede demorar un poco Para expulsar el Memory Stick Empuje hacia dentro el Memory Stick un momento y a continuación extráigalo Notas Inserte el Memory Stick en la dirección correcta No extraiga el Memory Stick a la fuerza Operaciones de reproducción Para Realice lo siguiente Detener la reproducción Pres...

Page 68: ...l idioma que desea página 47 Notas También puede cambiar el idioma de los subtítulos al cambiar la configuración Consulte Visualización de subtítulos de un DVD SUBTITLE página 30 Sólo puede cambiar a un determinado idioma de subtítulos utilizando el menú de ajustes si el idioma está incluido tanto en el disco como en la pantalla de ajustes Si desea ocultar los subtítulos presione SUBTITLE varias v...

Page 69: ...ritas seleccionando títulos de canciones y escenas durante la reproducción de un DVD Puede elegir un elemento el idioma de los subtítulos el idioma del audio etc seleccionando un menú DVD Los contenidos de los menús de títulos y los menús DVD son distintos dependiendo del DVD Es posible que haya discos DVD que no tengan menús grabados Uso del botón TOP MENU Algunos DVD tienen un menú de títulos Pu...

Page 70: ...ulo seleccionado actualmente y número total de ángulos distintos ENTER SEARCH POWER DISPLAY CLEAR AUDIO ANGLE SUBTITLE MENU TOP MENU INPUT 1 2 3 4 5 6 7 8 9 0 VOL SETUP ANGLE 3 5 Cambio del idioma del audio Algunos DVD permiten escuchar el sonido en varios idiomas Presione AUDIO varias veces durante la reproducción para seleccionar el idioma del audio que desea El idioma del audio actual se muestr...

Page 71: ...juste PBC ON presione los botones numéricos o para cambiar el elemento El menú PBC no aparece pero comienza la reproducción del elemento seleccionado Durante la reproducción de un Video CD con la opción PBC ON presione O volver para visualizar el menú PBC Los menús PBC serán distintos dependiendo del Video CD Lea el manual de instrucciones suministrado con el Video CD ENTER SEARCH POWER DISPLAY CL...

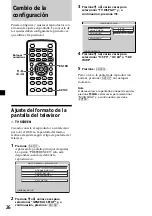
Page 72: ...nar GENERAL SETUP y a continuación presione ENTER SETUP MENU MAIN PAGE GENERAL SETUP GENERAL SETUP SPEAKER SETUP AUDIO SETUP PREFERENCES EXIT SETUP ENTER SEARCH POWER DISPLAY CLEAR SETUP AUDIO ANGLE SUBTITLE MENU TOP MENU INPUT 1 2 3 4 5 6 7 8 9 0 VOL ENTER M m SETUP 3 Presione M o m varias veces para seleccionar TV DISPLAY y a continuación presione 4 Presione M o m varias veces para seleccionar 4...

Page 73: ...n presione ENTER GENERAL PAGE SCREEN SAVER ON ON OFF TV DISPLAY ANGLE MARK SCR SAVER MAIN PAGE Visualización del aviso de varios ángulos ANGLE MARK Si se grabaron varios ángulos para una escena en un DVD y la opción ANGLE MARK se ajustó en ON aparecerá un aviso en la escena 1 Presione SETUP Aparecerá la pantalla principal de ajustes 2 Presione M o m varias veces para seleccionar GENERAL SETUP y a ...

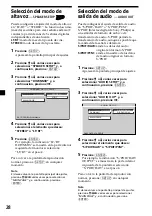
Page 74: ...WNMIX MAIN PAGE Selección del modo de salida de audio AUDIO OUT Puede configurar el ajuste de salida de audio en S PDIF RAW o S PDIF PCM S PDIF Interfaz digital de Sony Philips es un estándar de formato de archivo de transferencia de audio S PDIF permite la transferencia de audio aunque es posible que la calidad de la señal se deteriore S PDIF RAW emite los datos del audio original en formato S PD...

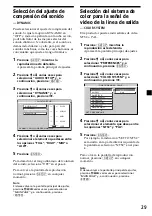
Page 75: ...ncipal de ajustes presione M m varias veces para seleccionar MAIN PAGE y a continuación presione ENTER AUDIO SETUP DYNAMIC RNG COMPRESSION OFF AUDIO OUT DYNAMIC MAIN PAGE FULL HIGH MID LOW OFF Selección del sistema de color para la señal de video de la línea de salida COLOR SYSTEM El reproductor puede emitir señales de video NTSC o PAL 1 Presione SETUP mientras la reproducción esté detenida Aparec...

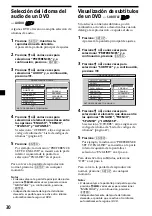
Page 76: ...PAGE SET PREFERENCE TO ENGLISH ENGLISH FRENCH SPANISH JAPANESE OTHERS OFF COLOR SYSTEM AUDIO SUBTITLE DISC MENU PARENTAL PASSWORD DEFAULTS SMART NAVI Selección del idioma del audio de un DVD AUDIO Algunos DVD ofrecen una amplia selección de idiomas de audio 1 Presione SETUP mientras la reproducción está detenida Aparecerá la pantalla principal de ajustes 2 Presione M o m varias veces para seleccio...

Page 77: ...enú DVD DISC MENU Puede seleccionar el idioma de visualización del menú DVD 1 Presione SETUP Aparecerá la pantalla principal de ajustes 2 Presione M o m varias veces para seleccionar PREFERENCES y a continuación presione ENTER 3 Presione M o m varias veces para seleccionar DISC MENU y a continuación presione 4 Presione M o m varias veces para seleccionar el elemento que desea entre las opciones EN...

Page 78: ...smo número de 4 dígitos del paso 6 en CONFIRM PWD Si ingresa un número equivocado presione ENTER Se borrarán todos los números 8 Presione ENTER Selección del ajuste de control de bloqueo deseado PARENTAL 1 Presione SETUP Aparecerá la pantalla principal de ajustes 2 Presione M o m varias veces para seleccionar PREFERENCES y a continuación presione ENTER 3 Presione M o m varias veces para selecciona...

Page 79: ...CES PAGE LOAD FACTORY SETTINGS RESET COLOR SYSTEM AUDIO SUBTITLE DISC MENU PARENTAL PASSWORD DEFAULTS SMART NAVI Cambio de la contraseña PASSWORD Puede cambiar su contraseña para la función de control de bloqueo Siga los pasos que se muestran a continuación 1 Presione SETUP Aparecerá la pantalla principal de ajustes 2 Presione M o m varias veces para seleccionar PREFERENCES y a continuación presio...

Page 80: ...ar SMART NAVI y a continuación presione 4 Presione para seleccionar WITH MENU 5 Presione ENTER La opción WITH MENU se muestra en la parte inferior izquierda de la pantalla Para desactivar la pantalla de menú de archivos MP3 JPEG MPEG1 seleccione NO MENU en el paso 4 Para volver a la pantalla de reproducción normal presione SETUP en cualquier momento Sólo si se reproduce un Memory Stick Notas Si de...

Page 81: ...tavoz posterior izquierdo Altavoz potenciador de graves Altavoz de agudos izquierdo Unidad principal Altavoz frontal derecho Altavoz posterior derecho Fije el equipo con firmeza en el chasis del vehículo etc para evitar que se mueva cuando el vehículo esté en movimiento Nota Todo equipo adicional que no sea un reproductor de DVD es opcional Altavoz de agudos derecho ...

Page 82: ...ptador opcional para el auto y el equipo de sonido de su auto En tal caso consulte a su distribuidor 2 Si su auto no tiene posición ACC accesorio en el interruptor de la llave de encendido ajuste el selector POWER SELECT en B página 6 y conecte este cable ACC al terminal de alimentación de 12 V batería Caja de relé 5 m Amplificador equipado con una entrada digital opcional 0 5 m Conectores AUDIO V...

Page 83: ...5 m Fusible de 5 A Fusible de 1 A Rojo Amarillo Negro GND 1 m POWER REM 5 m Azul Corriente máxima de 0 3 A A un amplificador de potencia Negro Caja de filtros AUDIO VIDEO INPUT Conectores AUDIO VIDEO INPUT Puede conectar una videograbadora etc a los conectores AUDIO VIDEO INPUT para recibir el contenido que se reproduce en el dispositivo Cable con clavijas RCA no suministrado ...

Page 84: ...pilas con pinzas metálicas ya que puede producirse un cortocircuito ADVERTENCIA La pila puede estallar si se manipula de manera incorrecta No la recargue desarme ni ponga en el fuego para desecharla Información adicional Mantenimiento Cambio del fusible Cuando cambie el fusible asegúrese de usar uno cuyo amperaje sea idéntico al especificado en el original Si el fusible se funde revise las conexio...

Page 85: ...oducción o simplemente no la hay debido a que el calor contrae el adhesivo o la etiqueta y hace que el disco se deforme Los discos de formas no estándar por ejemplo forma de corazón cuadrado o estrella no pueden reproducirse en este reproductor Si lo hace podría dañarlo No utilice este tipo de discos Antes de la reproducción limpie los discos con un paño de limpieza disponible en el mercado Hágalo...

Page 86: ...les Con respecto al formato de expansión conforme a la norma Joliet revise el contenido del software de escritura etc Notas En el caso de formatos que no sean ISO 9660 nivel 1 o nivel 2 es posible que los nombres de las carpetas y de los archivos no se vean correctamente Al asignar nombres asegúrese de añadirles la extensión de archivo MP3 Si asigna la extensión MP3 a un archivo que no es MP3 el r...

Page 87: ... sólo es posible utilizarlo con productos compatibles con Memory Stick PRO No se puede utilizar un Memory Stick PRO en este reproductor Memory Stick compatible con la transferencia de datos de alta velocidad MagicGate Viene equipado con MagicGate y admite la transferencia de datos de alta velocidad Este reproductor no admite la transferencia de datos de alta velocidad paralela Memory Stick ROM Alm...

Page 88: ... al Memory Stick No desmonte ni modifique el Memory Stick No permita que se humedezca el Memory Stick No utilice ni almacene el Memory Stick en un lugar sujeto a Temperaturas extremadamente altas como por ejemplo en un auto estacionado bajo el sol Luz solar directa Humedad alta ni lugares con sustancias corrosivas Para prolongar la vida del Memory Stick utilice la funda de almacenamiento suministr...

Page 89: ...tería de automóvil de cc alimentación 12 V Dimensiones Aprox 285 73 455 mm an al prf Masa Aprox 3 5 kg Temperatura de funcionamiento de 0 C a 45 C Accesorios suministrados Mando a distancia detarjeta RM X137 Cable de alimentación 1 Cable de modulador RF 1 Plataforma de montaje 1 Tornillos 5 Tornillos de rosca 8 Manual de instrucciones 1 Monitor Sistema Pantalla de color de cristal líquido Pantalla...

Page 90: ...ertar un disco Ya hay un disco insertado El disco se ha insertado a la fuerza al revés o de forma incorrecta Asegúrese de insertar los discos de 8 cm en el centro de la ranura de discos Si lo inserta un poco desplazado es posible que no se cargue No es posible reproducir archivos MP3 La grabación no se ha realizado conforme al formato del nivel 1 o el nivel 2 de ISO 9660 o la norma Joliet respecto...

Page 91: ...cipio Es posible que la función de reanudación de la reproducción esté activada t Presione x nuevamente o expulse el disco En algunos DVD es posible que aparezca un menú de títulos o un menú DVD automáticamente en el monitor durante la reproducción t Seleccione el menú deseado página 23 En algunos Video CD la pantalla del menú PBC aparece automáticamente en el monitor durante la reproducción t Sel...

Page 92: ...el reproductor a una temperatura que oscile entre 0 C y 45 C REGION ERROR El código de región del DVD que contiene el reproductor no es compatible con el reproductor t Compruebe el código de región del DVD y del reproductor página 8 NO DISC Los datos grabados en el disco están dañados El reproductor no admite el formato en el que se grabaron los datos en el disco No es posible completar la operaci...

Page 93: ...li 7378 Indonesian 7876 Dutch 8482 Turkish 6679 Tibetan 7383 Icelandic 7879 Norwegian 8484 Tatar 6682 Breton 7384 Italian 7982 Oriya 8487 Twi 6765 Catalan 7387 Hebrew 8065 Punjabi 8575 Ukrainian 6779 Corsican 7465 Japanese 8076 Polish 8582 Urdu 6783 Czech 7473 Yiddish 8083 Pushto Pashto 8590 Uzbek 6789 Welsh 7487 Javanese 8084 Portuguese 8673 Vietnamese 6865 Danish 7565 Georgian 8185 Quechua 8679 ...

Page 94: ...2 警告 必须注意 本说明书中未明确准予的任何改变 或修改都会使您对此设备的操作权限无效 ...

Page 95: ...25 改变设定 设定电视机屏幕高宽比 TV SCREEN 26 显示多角度提示 ANGLE MARK 27 设定屏幕节能 SCR SAVER 27 选择扬声器模式 SPEAKER SETUP 28 选择音频输出模式 AUDIO OUT 28 选择声音压缩设定 DYNAMIC 29 选择线路输出视频信号的彩色系统 COLOR SYSTEM 29 选择 DVD 音频语言 AUDIO 30 显示 DVD 的字幕 SUBTITLE 30 选择 DVD 菜单语言 DISC MENU 31 准备初始视听者设定 31 将播放机恢复到工厂设定 DEFAULTS 33 设定 MP3 JPEG MPEG1 文件的菜单显示 SMART NAVI 34 线路连接 安装图 35 线路连接图 36 其他信息 维护 38 光碟的注意事项 39 关于 MP3 文件 40 关于 Memory Stick 41 规格 43 ...

Page 96: ...Sony Overhead DVD Entertainment System 您可以欣赏以下各种功能 播放 DVD VCD 音频 CD 播放 MP3 JPEG 文件编码光碟 播放 MP3 JPEG MPEG1 文件编码 Memory Stick 通过光纤数码输出端子支持 DTS Dolby 数 码 附带的控制器附件 卡片式遥控器 RM X137 操作本播放机之前 请仔细阅读本操作说明书 并妥善保存以备必要时使用 版权 本产品采用版权保护技术 该技术已取得美国 专利权及其他知识产权 并属于 Macrovision Corporation 和其他产权拥有者所有 使用此 版权保护技术时 必须获得 Macrovision Corporation 的许可 只有获得 Macrovision Corporation 的允许 才能在家庭和其他有限 的场所使用此版权保护技术 不可擅自更改或拆解本机 Memo...

Page 97: ...拔出钥匙 在引擎开启时安装本装置会造成电 池漏电或短路 安装本装置时切勿伤及任何管路 管线 燃料 箱或电器线路 否则会引起火灾 如果在汽车 面板内钻孔 应确保不会损坏任何隐蔽的汽车 部件 切勿将螺母或螺栓用于安全设备 如转向联动 装置 燃料输送或刹车系统 否则会造成火灾 或事故 请当心防止软线或电线缠绕住或卷住座椅横档 的可移动位置 关于变热 如果长时间使用 播放机可能会变热 但并非 故障 湿气凝结 在雨天或极度潮湿的地区 透镜内可能会有湿 气凝结 如果发生此现象 本播放机将无法正 常操作 这种情况下 请取出光碟 并等待约 一小时直到湿气蒸发 为保持良好的声音品质 小心切勿将果汁或其它软饮料溅到播放机或光 碟上 续下页 t ...

Page 98: ...向 盘 换档杆或刹车踏板 在司机或乘客上下车时可能撞到受伤的位 置 如果您有任何有关本装置的问题或困难 而本说明书内未能涵盖 请与距您最近的 Sony 销售商联系 安装之前 确信 POWER SELECT 开关设定在正确位置 A 如果您的汽车在点火开关上有辅助位置 B 如果您的汽车在点火开关上没有辅助位 置 A 是出厂预置位置 当 POWER SELECT 开关设定在 B 按播放机上的 POWER 打开播放机 按卡片式遥控器上的 POWER 不能打开播放 机 注意 驾驶后勿必关闭播放机 若要关闭播放机 请按如下操作 按播放机上的 POWER 按卡片式遥控器上 POWER 电源开着将造成电池消耗 B A POWER SELECT 开关 ...

Page 99: ...书 本说明书中使用以下图标 图标 意义 视频模式中 DVD VIDEO 或 DVD R DVD RW 的可用功能 视频 CD 格式中 Video CD 或 CD R CD RW 的可用功能 音乐 CD 格式中音乐 CD 或 CD R CD RW 的可用功能 储存在 CD ROM CD R CD RW 和 Memory Stick 中的 MP3 格式文 件的可用功能 储存在 CD ROM CD R CD RW 和 Memory Stick 中的 JPEG 格式 文件的可用功能 储存在 Memory Stick 中的 MPEG1 格式文件的可用功能 续下页 t DVD VIDEO VCD 音频 CD MP3 文件 JPEG 文件 ...

Page 100: ...VD 的不同 即使有些 DVD 受到地区限 制而不能播放 地区代码指示可能也不会出 现 地区代码 小心 本播放机无法播放下列光碟 DVD 音频 DVD RAM DVD ROM CD G SVCD CD I Photo CD VSD Active Audio 数据 CD Extra 数据 Mixed CD 数据 CD ROM MP3 JPEG 文件以外的数据 以 VR 模式录制的 DVD RW 本产品采用版权保护技术 该技术已取得美国专利权 及其他知识产权 并属于 Macrovision Corporation 和其他产权拥有者所有 使用此版权保护技术时 必 须获得 Macrovision Corporation 的许可 只有获 得 Macrovision Corporation 的允许 才能在家庭 和其他有限的场所使用此版权保护技术 不可擅自更 改或拆解本机 关于 PBC 播放控制 的注意...

Page 101: ...D 的结构 VCD 音频 CD 的结构 标题 DVD 等中最长的图像或音乐部分 例如视频软 件的电影 或音频软件的整个文件夹等 章 比标题小的图像或音乐部分 一个标题包括几 个章 每个章都有一个章节编号以便您找到想 要的章 视光碟的不同 某些光碟可能没有录 制章 轨迹 Video CD Audio CD 上一个图像或音乐部分 每个轨迹都有一个轨迹编号以便您能找到想要 的轨迹 场面 在具有 PBC 播放控制 功能的 Video CD 上 菜单画面 移动图像和静止图像被分成片 断 称为 场面 每个场面都有一个场面编 号以便您能找到想要的场面 光碟 重设播放机 第一次操作播放机前 或更换汽车电池后 或 改变连接后 你必须重设播放机 请用尖物按 RESET 例如圆珠笔 用针用力 按会损坏播放机 注意 当您按 RESET 时 之前一些设定会丢失 如果发 生这种情况 请重新设定 按 RESET 后 播...

Page 102: ...按钮 9 5 后退 前进 按钮 18 21 6 卡片式遥控器接收器 无线耳机发射器 7 显示幕 8 VOL 音量 按钮 13 14 用于调高或调低音量 或在菜单操作中选择 项目 9 EJECT 按钮 18 在播放机电源已关闭的情况下也能弹出播放 机内的光碟 0 Memory Stick 插槽 20 qa x 停止 按钮 18 21 qs u 播放 暂停 按钮 18 21 qd OPEN 按钮 12 推动此按钮 打开显示屏 qf 扬声器 左 右 qg REVERSE 按钮 12 14 用于颠倒图像和音频声道输出 qh MENU 按钮 14 用于进行各种显示设定和 FM 传感器设定 注意 即使按 POWER 关闭播放机 您也可以从播放机中 退出光碟 但是您无法插入光碟 控制按钮的位置 XVM R90D ...

Page 103: ...快退 M 快进 按钮 17 20 8 M m 按钮 17 20 23 26 9 POWER 开启 关闭 按钮 13 17 用于打开 关闭播放机 0 SEARCH 搜索 按钮 17 用来确定光碟上所需的章 标题或轨迹 qa CLEAR 清除 按钮 qs SUBTITLE 字幕 按钮 22 播放 DVD 时用于改变字幕语言 qd ENTER 执行 按钮 17 23 26 用来确认设置 qf ANGLE 角度 按钮 24 用于播放 DVD 时选择多种观看角度 qg AUDIO 音频 按钮 24 25 用来更改音频输出 音频语言 qh 慢退 y 慢进 按钮 17 20 qj u 播放 暂停 按钮 17 20 25 qk x 停止 按钮 17 20 ql SETUP 设定 按钮 26 用于执行菜单操作 w INPUT 输入 按钮 13 20 用来选择输入源 wa VOL 音量 按钮 17 用来增大或...

Page 104: ... POWER 不能打开播放机 第 6 页 将显示监视器转回其外框 合起显示监视器直到发出喀嗒声 注意 合起时当心不要将手指夹在显示监视器内 合起时不要在液晶显示板和外框之间放置任何异物 30 180 120 调整倾斜度和旋转度 本显示监视器可按下图所示的角度内进行调 整 提示 合拢显示监视器之前 要确认监视器已转动且面朝机 壳 您会听到喀嗒一声 即使关闭播放机 监视器也将保存您设定的输入模 式 监视器反转显示位置 您可以在转动 180 度后使液晶屏表面朝外合拢 监视器 并且按下 REVERSE 后屏幕上图像 会倒转显示 每按一次 REVERSE 反转屏幕 模式就在开和关之间转换 POWER OPEN 180 x REVERSE x ...

Page 105: ... 开关设在 B 处时 按卡片式遥 控器上的 POWER 不能打开播放机 第 6 页 选择彩色系统 播放机探测输入视频信号 NTSC 或 PAL 的彩 色系统 并自动改变设定 自动模式 操作以下步骤 手动改变输入视频信号的彩色 系统设定 1 按 POWER 打开播放机 当前输入频道 DVD 在屏幕上显示 5 秒 钟 2 在 5 秒钟内 反复按 VOL 或 VOL 选择 NTSC 或 PAL 注意 当手动改变时 输入视频信号的彩色系统设定不会返 回自动模式 除非关闭播放机或改变输入频道设定 因此 当设定为 PAL 时 在 NTSC 系统中录制的 DVD 无法在播放机的显示幕上观看 除非您关闭播放 机电源 再打开 ENTER SEARCH POWER DISPLAY CLEAR SETUP AUDIO ANGLE SUBTITLE MENU TOP MENU INPUT 1 2 3 4 5 6 ...

Page 106: ... 仅在选定 NTSC 彩色系统时显示 第 13 页 2 按 VOL 或 VOL 选择 off MENU REVERSE VOL Speaker On Press or MENU 关闭无线耳机 1 反复按 MEMU 选择 IR HP 2 按 VOL 或 VOL 选择 off 设置 FM 调节器 您可以将音频信号传送到 FM 收音机并从汽车 立体声输出信号 按如下步骤打开或关闭 FM 调节器并选择频率 1 反复按 MEMU 选择 FM Modulator 2 按 VOL 或 VOL 选择 Low Middle High 或 Off 根据汽车立体声收音机灵敏度 选择 FM 调 节器的输出水平 3 若要选择频率 按 REVERSE 出现 Frequency 画面 4 按 VOL 或 VOL 选择频率 可设定范围为 88 3 MHz 至 89 9 MHz 以 0 2 MHz 增减 Frequency...

Page 107: ...mmer 设定将被 重新设定至出厂预设等级 Color 32 Press or MENU Hue CTR Press or MENU 2 Dimmer On Press or MENU Video Adjust Reset Press or MENU 注意 第 2 步中将输出水平设置为 High 时 可能会听 见噪音 如果因为当地 FM 广播干扰而听到噪音 则改变 FM 传送频率 当 FM 调节器关闭时 不能更改频率设定 改变显示设定 如果从您所坐的位置观看显示很困难 您可以 手动调节显示设定 1 反复按 MEMU 选择需要的项目 2 按 VOL 或 VOL 调节所需要 的设定 选择 Picture 时 按 VOL 增大对比度 按 VOL 减小对比度 选择 Brightness 时 按 VOL 使图像变亮 按 VOL 使图像变暗 所选项目的设定值出现在本区域 Picture 32 Pres...

Page 108: ...景可能闪烁 如果出现这种情 况 请设定至关 选择 Mode 时 Full Zoom Normal 或 Wide 将被设置为屏幕模式 Full 全屏 被放大至屏幕左 右边缘的 4 比 3 纵横比图像 Zoom 缩放 被放大至屏幕左 右边缘的 4 比 3 纵横比图像 超 出部分 顶部和 底部 被切除以 充满屏幕 Normal 普通 常规 4 比 3 纵横比的 图像 普通图 像 Wide 宽缩放 4 比 3 纵横比例 的图像 仅图像 的左边和右边被 放大以充满屏 幕 Blue Back On Press or MENU Mode Full Press or MENU ...

Page 109: ...碟附赠的使用说明书 然后用播放机进 行播放 当您播放 8 cm 光碟 例如 单曲 CD 则必须将 其插于光碟槽的正中位置 视光碟录制方法而定 可能需要花费一分钟或更长时 间才能播放 视光碟的状况而定 可能无法播放 第 39 页 高比特率的 MP3 文件 例如 320kbps 可能无法正 确播放 VBR 可变比特率 MP3 文件可能不能正确播放 当将 SMART NAVI 设置为 NO MENU 第 34 页 时 如果音频 CD MP3 JPEG 光碟的最后曲目或 文件播放完毕后 将从首个曲目或文件开始重播 ENTER SEARCH POWER DISPLAY CLEAR SETUP AUDIO ANGLE SUBTITLE MENU TOP MENU INPUT 1 2 3 4 5 6 7 8 9 0 VOL ENTER SEARCH POWER DISPLAY CLEAR SETUP A...

Page 110: ...通过按 u 恢复播放 有关详情 请参阅 重续播放 第 19 页 2 屏幕上显示 PAUSE 3 快进 快退或者慢进 慢退时没有声音输出 4 除 DVD 外 一个轨迹 MP3 文件结束后光碟恢复到 正常播放 按 x 1 按播放机上的 EJECT 按 u 2 再按恢复播放 按 按 播放模式下按 M m 3 4 播放中按 y 3 4 直接搜索章 标题 轨迹 1 播放或暂停期间 按 SEARCH 按钮显示 搜索屏幕 DVD 当您按 或 时 搜索画面在标题和 章节之间来回切换 VCD 仅当 PBC 功能关闭时 音频 CD 出现轨迹搜索屏幕 2 按数字按钮输入所需的章 标题 轨迹号 3 按 ENTER 键 注意 无法输入 0 ...

Page 111: ... 也可用 M m 按钮选择想要的 MP3 JPEG MPEG1 文件 开始播放 SMART NAVI ROOT FOLDER 1 FOLDER 2 FOLDER 3 0 1 2 3 ROOT SMART NAVI _ _ SCHUBERT BACH MOZART CHOPIN BRAHMS 0 1 2 3 4 5 ROOT FOLDER 1 FOLDER 2 FOLDER 3 重续播放 1 播放期间 按 x 停止播放 播放机记忆停播点 DVD VCD 音频 CD PRESS PLAY TO CONTINUE 在屏幕上闪 烁 2 按 u 开始播放 重续播放启动时 播放机从停播点开始播 放 重续播放停止时 从起始处开始播放 MP3 重续播放启动时 播放机从起始处开始播 放被停止的 MP3 文件 轨迹 注意 当您播放 Memory Stick 时 重续功能将被关闭 即使在播放光碟时 如果在播放机...

Page 112: ...机 直至 发出喀嗒声 2 反复按 INPUT 选择 DVD 自动开始播放 JPEG 文件以幻灯片形式显示 如果出现 SMART NAVI 菜单显示 按数字 键或 M m 选择需要的文件夹 文件 第 19 页 ENTER SEARCH POWER DISPLAY CLEAR SETUP AUDIO ANGLE SUBTITLE MENU TOP MENU INPUT 1 2 3 4 5 6 7 8 9 0 VOL u x M m y m M INPUT 数字按钮 要关闭 MP3 JPEG MPEG1 文件的菜单显示 请 将 SMART NAVI 设定为 NO MENU 第 34 页 仅当播放 Memory Stick 时 注意 要关闭重续播放功能 在停止播放时再按一次 x 或 从播放机中弹出光碟 由于录制方式的不同 有些 MPEG1 文件可能不能被 正确播放 ...

Page 113: ... 0 HAPT R REM E A I N 0 03 26 Dolby D OFF ENTER SEARCH POWER DISPLAY CLEAR SETUP AUDIO ANGLE SUBTITLE MENU TOP MENU INPUT 1 2 3 4 5 6 7 8 9 0 VOL DISPLAY 注意 根据录制方法和数据大小的不同 在播放首个曲目 文件前 可能会花一些时间 若要取出 Memory Stick 短暂按一下 Memory Stick 然后将其取出 注意 按正确方向插入 Memory Stick 切勿强行取出 Memory Stick 播放操作 要 这样做 停止播放 按 x 暂停 按 u 1 播放下一个文件 按 播放前一个文件 按 快进 快退 播放时按 M m 2 3 仅 MP3 MPEG1 慢进 仅 MPEG1 播放时按 y 2 3 1 画面显示 PAUSE 2 快进...

Page 114: ... 显示 DVD 的字幕 SUBTITLE 第 30 页 您可以用设定菜单改变为特定的字幕语言 仅限于 光碟和设定屏幕中都包含有的语言 如果您要隐藏字幕 请反复按 SUBTITLE 按钮选 择 OFF 视 DVD 而定 此功能可能会改变或不起作用 ENTER SEARCH POWER DISPLAY CLEAR SETUP AUDIO ANGLE SUBTITLE MENU TOP MENU INPUT 1 2 3 4 5 6 7 8 9 0 VOL SUBTITLE SUBTITLE 02 32 ENGLISH S I NGLE 0 REMA I 0 04 45 N T 0 OTAL ELA SED 0 06 32 P S 0 I NGLE 0 00 12 ELA SED P T 0 OTAL REMA I N 0 41 15 OFF Video CD PBC 设定为 OFF CD ...

Page 115: ...示顶部菜单 标题 顶部菜单的内容视 DVD 的不同而异 2 按 M m 选择想要的标题 3 按 ENTER 按钮 开始播放您选择的标题 ENTER SEARCH POWER DISPLAY CLEAR SETUP AUDIO ANGLE SUBTITLE MENU TOP MENU INPUT 1 2 3 4 5 6 7 8 9 0 VOL TOP MENU MENU ENTER M m 使用 MENU 菜单 按钮 某些 DVD 有包含音频语言 字幕语言 标题和 章等项目的更为广泛的菜单 1 在播放 DVD 时 按 MENU 按钮 显示 DVD 菜单 2 按 M m 选择想要的标题 3 按 ENTER 按钮 如果出现附加选择屏幕 请重复步骤 2 和 3 注意 某些 DVD 没有 DVD 菜单 而在某些 DVD 上 DVD 菜单和标题菜单的内容是相同的 在某些 DVD 上 DVD Menu ...

Page 116: ... 当前选择的角度数字 各种角度的总数字 ENTER SEARCH POWER DISPLAY CLEAR AUDIO ANGLE SUBTITLE MENU TOP MENU INPUT 1 2 3 4 5 6 7 8 9 0 VOL SETUP ANGLE 3 5 改变音频语言 某些 DVD 中有多种音频语言可供选择 播放期间 反复按 AUDIO 按钮选择所需 的音频语言 当前的音频语言显示在左上角 例如 显示音频语言 可能会出现声源格式 Dolby D DTS 或 LPCM 出现语言代码显示时 请输入所需语言的语言 代码 第 47 页 当显示相同的语言显示两 次或多次 则此 DVD 是以多音频格式录制 注意 仅当 DVD 上录制有多种音频语言时 您才可以切换 音频语言 您还可以用 DVD 菜单 第 23 页 或设定屏幕 第 30 页 改变音频语言 您可以用设定屏幕改变为特定的音频语言 ...

Page 117: ...菜单不显示 但是开始播 放您选择的项目 用 PBC ON 播放 VCD 时 按 O 返回 显示 PBC 菜单 PBC 菜单视 VCD 的不同而异 请阅读随 VCD 附带的 使用说明书 ENTER SEARCH POWER DISPLAY CLEAR SETUP AUDIO ANGLE SUBTITLE MENU TOP MENU INPUT 1 2 3 4 5 6 7 8 9 0 VOL TOP MENU u O 数字按钮 改变音频输出 播放 VCD 或音频 CD 时 您可以选择想要的音 频输出 STEREO 立体声 L MONO 左单声道 R MONO 右单声道 或 MIX MONO 混合单声道 1 播放期间 按 AUDIO 按钮 当前输出显示在左上角 例如 显示音频输出 2 显示输出时 请按 AUDIO 按钮选择想要 的输出 STEREO L MONO R MONO 或 MIX MON...

Page 118: ...ENERAL SETUP SPEAKER SETUP AUDIO SETUP PREFERENCES EXIT SETUP ENTER SEARCH POWER DISPLAY CLEAR SETUP AUDIO ANGLE SUBTITLE MENU TOP MENU INPUT 1 2 3 4 5 6 7 8 9 0 VOL ENTER M m SETUP 3 反复按 M 或 m 选择 TV DISPLAY 然 后按 4 反复按 M 或 m 选择 4 3 PS 4 3 LB 或 16 9 WIDE 5 按 ENTER 按钮 要返回到正常的播放屏幕 任何时候都可按 SETUP 按钮 注意 要返回设定主页面 反复按 M m 选择 MAIN PAGE 主页面 然后按 ENTER 按钮 GENERAL PAGE WIDE SCREEN TV 4 3 PS 4 3 LB 16 9 WIDE TV...

Page 119: ...ENTER 按钮 GENERAL PAGE SCREEN SAVER ON ON OFF TV DISPLAY ANGLE MARK SCR SAVER MAIN PAGE 显示多角度提示 ANGLE MARK 如果 DVD 上有录制了各种角度 多角度 的场 面 且您已将 ANGLE MARK 设定为 ON 则场面上将出现提示 1 按 SETUP 按钮 出现设定主页面 2 反复按 M 或 m 选择 GENERAL SETUP 一般设定 然后按 ENTER 按钮 3 反复按 M 或 m 选择 ANGLE MARK 角 度标记 然后按 4 反复按 M 或 m 选择 ON 5 按 ENTER 按钮 ANGLE MARK ON 角度标记开启 显示 在监视器的左下角 要关闭多角度提示 请在步骤 4 中选择 OFF 要返回到正常的播放屏幕 任何时候都可按 SETUP 按钮 注意 要返回设定主页面 反复...

Page 120: ...EREO DOWNMIX STEREO LT RT DOWNMIX MAIN PAGE 选择音频输出模式 AUDIO OUT 您可以将音频输出设定选择为 S PDIF RAW 或 S PDIF PCM S PDIF Sony Philips Digital Interface 索尼 飞利浦数字接口 是一种标准音频传输文件格式 S PDIF 可传输 音频 但是信号质量可能被降低 S PDIF RAW 以 S PDIF 格式输出初始音频数 据 S PDIF PCM 以 S PDIF 格式输出初始音频数 据的样本 1 按 SETUP 按鈕 出现设定主页面 2 反复按 M 或 m 选择 AUDIO SETUP 声 音设定 然后按 ENTER 按钮 3 反复按 M 或 m 选择 AUDIO OUT 音频 输出 然后按 4 反复按 M 或 m 选择想要的项目 S PDIF RAW 或 S PDIF P...

Page 121: ... m 选择 MAIN PAGE 主页面 然后按 ENTER 按钮 AUDIO SETUP DYNAMIC RNG COMPRESSION OFF AUDIO OUT DYNAMIC MAIN PAGE FULL HIGH MID LOW OFF 选择线路输出视频信号的 彩色系统 COLOR SYSTEM 本播放机可以输出 NTSC 或 PAL 视频信号 1 按 SETUP 按钮 出现设定主页面 2 反复按 M 或 m 选择 PREFERENCES 喜 好设定 然后按 ENTER 按钮 3 反复按 M 或 m 选择 COLOR SYSTEM 然后按 4 反复按 M 或m 从 NTSC 或 PAL 中选 择需要的项目 5 按 ENTER 按钮 例如 如果您在步骤 4 中选择了 NTSC 则 SET TO NTSC 显示在屏幕 的左下角 要返回到正常的播放屏幕 任何时候都可按 SETUP 按钮 ...

Page 122: ...ENGLISH ENGLISH FRENCH SPANISH JAPANESE OTHERS OFF COLOR SYSTEM AUDIO SUBTITLE DISC MENU PARENTAL PASSWORD DEFAULTS SMART NAVI 选择 DVD 音频语言 AUDIO 某些 DVD 中有多种音频语言可供选择 1 播放停止时按 SETUP 出现设定主页面 2 反复按 M 或 m 选择 PREFERENCES 喜 好设定 然后按 ENTER 按钮 3 反复按 M 或 m 选择 AUDIO 声音 然后按 4 反复按 M 或 m 选择想要的项目 ENGLISH 英语 FRENCH 法 语 SPANISH 西班牙语 或 JAPANESE 日语 如果您选择 OTHERS 其它 请输入 语言代码一览表 第 47 页 中的语言 代码 5 按 ENTER 按钮 例如 如果您在步骤 4 中...

Page 123: ...PASSWORD OLD PASSWORD NEW PASSWORD CONFIRM PWD 选择 DVD 菜单语言 DISC MENU 您可以为 DVD 菜单选择需要的语言 1 按 SETUP 按钮 出现设定主页面 2 反复按 M 或 m 选择 PREFERENCES 喜 好设定 然后按 ENTER 按钮 3 反复按 M 或 m 选择 DISC MENU 光碟 菜单 然后按 4 反复按 M 或 m 选择想要的项目 ENGLISH 英语 FRENCH 法 语 SPANISH 西班牙语 或 JAPANESE 日语 如果您选择 OTHERS 其它 请输入 语言代码一览表 第 47 页 中的语言 代码 5 按 ENTER 按钮 例如 如果您在步骤 4 中选择了 ENGLISH 则 PREFERENCE SET TO ENGLISH 显示在屏幕的左下角 要返回到正常的播放屏幕 任何时候都可按 SE...

Page 124: ...数号码 如果输入错误 请按 ENTER 按钮 所有的数 字都被清除 8 按 ENTER 按钮 选择想要的视听者设定 PARENTAL 1 按 SETUP 按钮 出现设定主页面 2 反复按 M 或 m 选择 PREFERENCES 喜 好设定 然后按 ENTER 按钮 3 反复按 M 或 m 选择 PARENTAL 视听 者控制 然后按 4 反复按 M 或 m 选择所需的项目 1 G 2 3 PG 4 PG 13 5 6 R 7 NC 17 8 或 OFF 5 按 ENTER 按钮 出现密码屏幕 6 按数字按钮输入您的 4 位数密码 视听者设定完成 注意 如果您忘记了 4 位数的密码 请按 5370 PREFERENCES PAGE SET TO NO_PARENTAL 2 3 PG 4 PG 13 5 6 R 7 NC 17 8 OFF COLOR SYSTEM AUDIO SUBTITL...

Page 125: ...SETTINGS RESET COLOR SYSTEM AUDIO SUBTITLE DISC MENU PARENTAL PASSWORD DEFAULTS SMART NAVI 更改密码 PASSWORD 您可以改变视听者设定的密码 请按照以下步 骤操作 1 按 SETUP 按钮 出现设定主页面 2 反复按 M 或 m 选择 PREFERENCES 喜 好设定 然后按 ENTER 按钮 3 反复按 M 或 m 选择 PASSWORD 密 码 然后按 4 按 选择 CHANGE 然后按 ENTER 5 按数字按钮依次输入您的旧密码 新密码 然后再次输入新密码进行确认 6 按 ENTER 按钮 要返回到正常的播放屏幕 任何时候都可按 SETUP 按钮 注意 如果您忘记了您的 4 位数的密码 请按 5370 PREFERENCES PAGE CHANGE PASSWORD CHANGE CO...

Page 126: ...择 PREFERENCES 喜 好设定 然后按 ENTER 按钮 3 反复按 M 或 m 选择 SMART NAVI 然 后按 4 按 选择 WITH MENU 5 按 ENTER 按钮 WITH MENU 无菜单 显示在屏幕的左 下角 要关闭 MP3 JPEG MPEG1 文件的菜单显示 请 在步骤 4 中选择 NO MENU 要返回到正常的播放屏幕 任何时候都可按 SETUP 按钮 仅当播放 Memory Stick 时 注意 要返回设定主页面 反复按 M m 选择 MAIN PAGE 主页面 然后按 ENTER 按钮 由于录制方式的不同 有些 MPEG1 文件可能不能被 正确播放 PREFERENCES PAGE MENU MODE NO MENU WITH MENU COLOR SYSTEM AUDIO SUBTITLE DISC MENU PARENTAL PASSWORD DE...

Page 127: ...35 线路连接 安装图 本装置的安装请参照安装图并询问有资格的技术人员 XVM R90D 前左扬声器 后左扬声器 超低音扬声器 左高音扬声器 主机 前右扬声器 后右扬声器 确保所有装置均安全固定在汽车框架上 以 防止它们在汽车行进中发生移动 注意 除了 DVD 播放机以外 所有设备都是选购的 右高音扬声器 ...

Page 128: ... OUTPUT 来于汽车天线 汽车音响 选购 天线连接器 1 扬声器系统 选购 1 您的汽车和汽车音响系统可能需要一个适配器 选 购 关于此事请咨询您的经销商 2 如果您车上的点火开关没有 ACC 附件 位置 则 将 POWER SELECT 开关设在 B 处 第 6 页 并将 ACC 电缆连接到 12 V 电源 电池 端子 继电器盒 5 m 有数码输入的放大器 选购 0 5 m 关于 AUDIO VIDEO OUTPUT 连接口 您可以将监视器连接至 AUDIO VIDEO OUTPUT 连接器 以输入正在播放机上播放的内容 RCA 针导线 不提供 ...

Page 129: ...的金属表面 至汽车电池 12 V 至点火钥匙 2 ACC 位 置 4 针电源连接器 ACC 5 m 保险丝 5 A 保险丝 1 A 红色 黄色 黑色 GND 1 m POWER REM 5 m 蓝 最大电流 0 3 A 至功率放大器 黑色 滤波器盒 AUDIO VIDEO INPUT 关于 AUDIO VIDEO INPUT 连接口 您可以将录影机等连接至 AUDIO VIDEO INPUT 连接口 输入设备中正在播放的内容 RCA 针导线 不提供 ...

Page 130: ...电池注意事项 请将锂电池放在儿童够不着的地方 若吞下锂 电池 请立即就医 请用干布擦拭电池以确保接触良好 安装电池时务必注意电池极性 请勿用金属镊子拿取电池 否则可能导致短 路 警告 如果粗暴对待电池 则电池可能爆炸 切勿对电池充电 拆解或丢弃在火中 其他信息 维护 更换保险丝 更换保险丝时 务必使用与原保险丝额定安培 数相同的保险丝 如果保险丝熔断 请检查电 路连接并更换保险丝 更换后 如果保险丝再 次熔断 可能有内部故障 此时 请联系就近 的 Sony 经销商 x 警告 切勿使用额定安培数超过本机附带保险丝的额 定安培的保险丝 否则会损坏本机 1 2 面朝上 ...

Page 131: ...或损坏光碟 请勿使用任何贴有标签或不干胶的光碟 使用这类光碟可能会导致下列故障 无法弹出光碟 由标签或不干胶脱落并缠 住弹出机构所致 无法正确读取音频数据 例如 跳跃播放 或无法播放 这是由于不干胶或标签的 热涨冷缩导致光碟变形 本播放机无法播放非标准形状的光碟 例如 心形 方形 星形 强行播放可能会损坏播 放机 切勿使用此类光碟 播放之前 请用商用清洁布擦拭光碟 请从中 心向外擦 请勿使用如汽油 稀释剂 商用清 洁剂 或用于留声机光碟的防静电喷雾剂等擦 拭光碟 用版权保护编码的音乐光碟 本产品设计用于播放符合 Compact Disc CD 标准的光碟 近来 许多录制公司都推出用版 权保护编码的各种音乐光碟 请注意 这些光 碟中可能会有某些不符合 CD 标准并可能无法 用本产品播放的光碟 ...

Page 132: ...超过 3 个字符 而且都 是大写字母 文件夹名称不得长于 8 个字 符 嵌套文件夹等级不可超过 8 个 Level 2 规格允许文件名称长达 31 个字符 各文件夹最多可有 8 个树级 对于扩展格式中的 Joliet 请确认写入软件 的内容等 注意 对于 ISO 9660 level 1 和 level 2 之外的格式 文件夹名称或文件名称可能无法正确显示 命名时 务必在文件名称后加上文件扩展名 MP3 如果您在非 MP3 文件后面加上扩展名 MP3 则 本播放机将无法正确地识别此文件并将产生会损坏扬 声器的随机噪音 下列光碟 Memory Stick 需花更长时间开始播 放 以复杂树形结构录制的光碟 Memory Stick 可以添加数据的光碟 高比特率的 MP3 文件 例如 320kbps 可能无法正 确播放 VBR 可变比特率 MP3 文件可能无法被正确播放 此播放机不支持 ID3 ...

Page 133: ... 版权保护技术 本播放机不能执行需要 MagicGate 功能的数 据播放 Memory Stick PRO 有 MagicGate 版权保护技术 并且只能与 Memory Stick PRO 兼容的产品一起使用 Memory Stick PRO 不能在本播放机中使 用 Memory Stick MagicGate 兼容高速数据 传输 有 MagicGate 版权保护技术并支持高速数据 传输 本播放机不支持平行高速数据传输 Memory Stick ROM 储存先前录制的只读数据 您不能在 Memory Stick ROM 上录制数据或删除先前录制的数 据 Memory Stick 有内存选择功能 这是一种有 128MB 组合内存的 Memory Stick 您可以通过 Memory Stick 背面的内存选择 开关选择内存用于各种目的 不保证所有 Memory Stick 媒体都能被播放...

Page 134: ...附送标识外的其他东 西 C 正确地贴上标识 勿使其伸出粘贴位置 请勿用手指或金属物体接触 Memory Stick 的连接器 A 请勿使 Memory Stick 弯曲 摔落或受到强 烈的冲击 请勿拆卸或改造 Memory Stick 请勿弄湿 Memory Stick 请避免在以下场所使用或保存 Memory Stick 高温 如停在阳光下的汽车内 阳光直射处 高湿度或有腐蚀性物质的场所 为延长 Memory Stick 的使用寿命 请用附 送的存放盒 关于清洁 用粘有水或中性清洁剂的软布擦拭播放机外 壳 请勿使用可能会损坏机壳光洁度的任何类 型的研磨剂 擦洗粉或者酒精或苯等溶剂 ...

Page 135: ... 0 001 W PEAK 一般 输出 FM 输出 音频输出 视频输出 光纤输出 输入 音频输入 视频输入 DC 12 V 输入 电源要求 12 V 直流 尺寸 约 285 73 455 mm 宽 高 深 质量 约 3 5 kg 工作温度 0 C 到 45 C 提供的附件 卡片式遥控器 RM X137 电源导线 1 RF 调节器电缆 1 安装盘 1 螺丝 5 自攻螺丝 8 使用说明书 1 显示屏 系统 液晶彩色显示 显示 手动翻转面板 驱动系统 TFT LCD 有效矩阵系统 图像尺寸 9 英寸宽屏幕 16 9 图像分割 336 960 宽 1 440 高 234 点 设计和规格若有改变 恕不另行通知 ...

Page 136: ... 位置 t 按住 POWER 播放光碟 Memory Stick 无法装入光碟 播放机内已装有光碟 光碟被强行颠倒插入或以错误的方法插入 勿必将一 8 厘米光碟插入光碟插槽中心位 置 如果将其插入光碟插槽一侧 光碟可能 无法被装入 无法播放 MP3 文件 光碟未以符合 ISO 9660 level 1 或 level 2 格式 或者以扩展格式的 Joliet 协议录 制 文件扩展名 MP3 未加在文件名称后面 文件未以 MP3 格式储存 JPEG 文件不能显示 JPEG 文件不能正确显示 文件名未加上文件扩展名 JPG 文件未以 JPEG 格式保存 MP3 JPEG 文件的播放时间较其他文件的长 下列光碟 Memory Stick 将花费更长时间 开始播放 以复杂树形结构录制的光碟 Memory Stick 可以新增数据的光碟 暂停等播放功能被关闭 按压了 RESET 按钮 光碟 Memo...

Page 137: ...间的所有障碍物 靠近遥控感应窗使用卡片式遥控器 将遥控器的发光体对准播放机的遥控感应 窗 如果电池电力微弱 请更换电池 播放光碟时 播放机无法从起始处开始播放 重续播放功能可能被开启 t 再按一次 x 按钮或弹出光碟 视 DVD 而定 播放时标题菜单或 DVD 菜单 可能自动出现在显示屏上 t 选择想要的菜单 第 23 页 视 VCD 而定 播放期间 PBC 菜单自动出现 在显示屏上 t 选择想要的菜单 第 25 页 播放自动停止 该光碟可能包含自动暂停信号 当播放这类 光碟时 播放机在信号处停止播放 无法执行某些功能 例如停止或搜索播放 对于某些光碟 您无法启动这些功能 播放 DVD 时无法更改音频轨迹的语言 该 DVD 上未录制多语言轨迹 此 DVD 上禁止改变轨迹语言 播放 DVD 时无法更改字幕语言 该 DVD 上未录制多种语言字幕 此 DVD 上禁止改变字幕语言 播放 DVD 时...

Page 138: ...46 出错显示 出错显示 下列指示将显示大约 8 秒 POWER OFF ABNORMALITY in TEMP 周围温度过高或过低 t 在 0 至 45 环境中使用本播放 机 REGION ERROR 播放机内当前 DVD 的地区代码不符合本播放 机 t 确认 DVD 和播放机的地区代码 第 8 页 NO DISC 光碟上录制的数据被损坏 播放机不支持录制在光碟上的数据格式 无法操作 ...

Page 139: ... 6679 Tibetan 7383 Icelandic 7879 Norwegian 8484 Tatar 6682 Breton 7384 Italian 7982 Oriya 8487 Twi 6765 Catalan 7387 Hebrew 8065 Punjabi 8575 Ukrainian 6779 Corsican 7465 Japanese 8076 Polish 8582 Urdu 6783 Czech 7473 Yiddish 8083 Pushto Pashto 8590 Uzbek 6789 Welsh 7487 Javanese 8084 Portuguese 8673 Vietnamese 6865 Danish 7565 Georgian 8185 Quechua 8679 Volapük 6869 German 7575 Kazakh 8277 Raeto...

Page 140: ...Sony Corporation Printed in Korea ...

Reviews: