background image


14

The installation distance between the projector and a screen varies depending on the size 
of the screen.

1

Determine the installation position of the projector and screen.

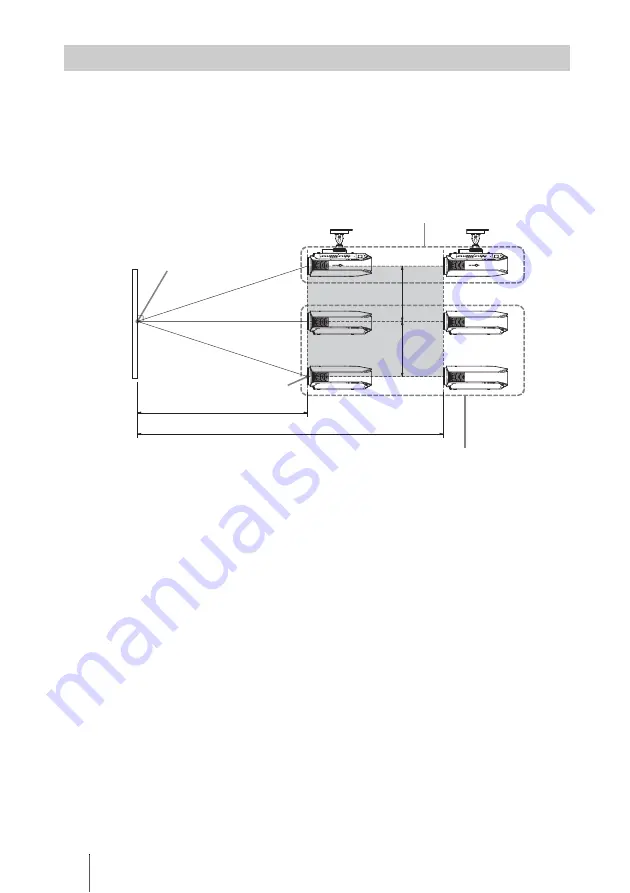
You can obtain a good quality picture if you position the projector with the center of 
the lens within the areas indicated in the gray areas in the illustration. Use the values 
a, b and c in the table on page 15 as a guide.

a:

Minimum projection distance between the screen and the center of the projector’s 
lens

b:

Maximum projection distance between the screen and the center of the projector’s 
lens

c:

Vertical distance between the center of the screen and the center of the projector’s
lens when using the maximum upper vertical lens shift feature.

For installation of the projector on a ceiling, see “Ceiling Installation.” (

1

 page 68)

For details on the lens shift feature, see “Step 3: Adjusting the Picture Position.” 
(

1

 page 21)

Positioning the Projector and a screen

Center of projector’s 
lens

a

b

c

Center of the screen

c

Ceiling installation

Floor installation

Summary of Contents for VPLVW40 - SXRD Projector - HD 1080p

Page 1: ...Operating Instructions VPL VW40 2007 Sony Corporation 3 280 691 11 1 Video Projector ...

Page 2: ...This equipment generates uses and can radiate radio frequency energy and if not installed and used in accordance with the instructions may cause harmful interference to radio communications However there is no guarantee that interference will not occur in a particular installation If this equipment does cause harmful interference to radio or television reception which can be determined by turning ...

Page 3: ...lease contact your local authorities or the Electronic Industries Alliance www eiae org For customers in Europe The manufacturer of this product is Sony Corporation 1 7 1 Konan Minato ku Tokyo 108 0075 Japan The Authorized Representative for EMC and product safety is Sony Deutschland GmbH Hedelfinger Strasse 61 70327 Stuttgart Germany For any service or guarantee matters please refer to the addres...

Page 4: ...ttery over to the applicable collection point for the recycling of waste batteries For more detailed information about recycling of this product or battery please contact your local Civic Office your household waste disposal service or the shop where you purchased the product For customers in Taiwan only The socket outlet should be installed near the equipment and be easily accessible CAUTION RISK...

Page 5: ... Off the Power 28 Selecting the Wide Screen Mode 29 Selecting the Picture Viewing Mode 31 Adjusting the Picture Quality 32 Selecting to directly adjust the desired menu item 32 Selecting desired adjust menu items in the order 33 Adjusting the Picture Using Real Color Processing 34 Using the Supplied Software to Adjust the Picture Quality ImageDirector3 35 Operation through the Menus 36 Picture Men...

Page 6: ...n holes intake 57 Cleaning the Air Filter 60 Cleaning and the Screen of the Projector 60 Specifications 61 Preset Signals 63 Input Signals and Adjustable Setting Items 66 Ceiling Installation 68 When Using the PSS H10 Projector Suspension Support 68 Making Fine Adjustments to the Horizontal Picture Position 72 Index 75 Others ...

Page 7: ... the unit itself has been turned off Do not look into the lens while the lamp is on Do not place your hand or objects near the ventilation holes The air coming out is hot On preventing internal heat build up After you turn off the power with the I 1 ON STANDBY switch do not disconnect the unit from the wall outlet while the cooling fan is still running Caution The projector is equipped with ventil...

Page 8: ...1 page 22 LAMP COVER indicator 1 page 55 M m arrow enter button 1 page 36 Ventilation holes exhaust 1 page 13 AC IN socket S VIDEO INPUT connector mini DIN 4 pin VIDEO INPUT connector phono type 1 page 19 Y PB CB PR CR phono type 1 page 17 INPUT A connector 1 page 20 HDMI 1 connector 1 page 18 TRIGGER jack mini jack Outputs a 12 V signal when the power is on REMOTE connector Connects to a computer...

Page 9: ...lation holes intake 1 page 13 Ventilation holes intake 1 page 13 Lamp cover 1 page 57 Ventilation holes intake 1 page 13 Projector suspension support attaching hole 1 page 68 Adjusters 1 page 24 Ventilation holes intake 1 page 13 Ventilation holes intake 1 page 13 Ventilation holes intake 1 page 13 ...

Page 10: ...DJ PIC button 1 page 33 PICTURE MODE buttons 1 page 31 INPUT button 1 page 27 COLOR SPACE button 1 page 32 GAMMA CORRECTION button 1 page 32 M m arrow buttons 1 page 36 WIDE MODE button 1 page 29 MENU button 1 page 36 CONTRAST button 1 page 41 Infrared transmitter 1 ON STANDBY switch 1 page 22 LIGHT button Illuminates the buttons on the remote control SHARPNESS button 1 page 41 LENS button 1 page ...

Page 11: ...l liquid of any kind onto it Do not place the remote in a location near a heat source a place subject to direct sunlight or a damp room Connections and Preparations Remote control 1 and Size AA R6 batteries 2 Lens cap 1 When you have purchased the projector the lens cap is put onto the lens Remove this lens cap when you use the projector Operating Instructions this manual AC power cord 1 ImageDire...

Page 12: ... around the unit Hot and humid Locations subject to direct cool or warm air from an air conditioner Installing the projector in such a location may cause a malfunction of the unit due to moisture condensation or rise in temperature Near a heat or smoke sensor Malfunction of the sensor may occur Very dusty and extremely smoky locations Install in a location away from walls To maintain the performan...

Page 13: ...a level surface or on the ceiling Failing to set this mode when using the projector at high altitudes may result in uneven color uniformity and reducing the reliability of the effects of the lamp When installing the unit at altitudes When using the projector at an altitude of 1 500 m or higher set Cooling Setting in the Setup menu to High 1 page 46 Failing to set this mode when using the projector...

Page 14: ...on distance between the screen and the center of the projector s lens b Maximum projection distance between the screen and the center of the projector s lens c Vertical distance between the center of the screen and the center of the projector s lens when using the maximum upper vertical lens shift feature For installation of the projector on a ceiling see Ceiling Installation 1 page 68 For details...

Page 15: ... 122 1 4 3732 147 4677 184 1 4 5622 221 3 8 6252 246 1 4 7827 308 1 4 9402 370 1 4 b maximum 2105 82 7 8 3181 125 1 4 4257 167 5 8 5333 210 6409 252 3 8 8023 315 7 8 9637 379 1 2 10713 421 7 8 13403 527 5 8 16093 633 5 8 c 324 12 7 8 485 19 1 8 647 25 1 2 809 31 7 8 971 38 1 4 1213 47 7 8 1456 57 3 8 1618 63 3 4 2022 79 5 8 2426 95 5 8 Screen size inches 40 60 80 100 120 150 180 200 250 300 mm 101...

Page 16: ...ts the screen 1 page 21 To project an image connect video equipment to the projector 1 page 17 When using a screen with an uneven surface stripes pattern may rarely appear on the screen depending on the distance between the screen and the projector or the zooming magnifications This is not a malfunction of the projector Note Screen Top view ...

Page 17: ... malfunction or poor picture quality When pulling out a cable be sure to pull it out from the plug not the cable itself Refer to the operating instructions of the connected equipment To connect to a DVD player recorder or Blu ray Disc player equipped with component video connectors Connecting to a VCR Component video cable not supplied Video signal flow DVD player recorder or Blu ray Disc player e...

Page 18: ...the V mark on the upper part of the HDMI input of the projector and the V mark on the connector of the cable is set at the same position If the picture from equipment connected to the projector with an HDMI cable is not clear check the settings of the connected equipment Notes HDMI cable not supplied Video signal flow Right side of the projector DVD player recorder or Blu ray Disc player etc with ...

Page 19: ...ion manual of each equipment Tip If you do not know to which connector you should connect the cable S VIDEO INPUT S video input connector or VIDEO INPUT video input connector connect it to S VIDEO to enjoy better picture quality If the equipment to be connected has no S video connector connect the cable to the video output S video or video cable not supplied Video signal flow Right side of the pro...

Page 20: ...the equipment may not appear properly Set your computer to output the signal to only the external monitor For details refer to the computer s operating instructions supplied with your computer For settings of the computer consult with the manufacturer of the computer If the picture from equipment connected to the projector with an HDMI cable is not clear check the settings of the connected equipme...

Page 21: ...e as those on the remote control Depending on the installation location of the projector you may not control it with the remote control In this case point the remote control to the screen instead of the projector Note 1 After connecting the AC cord to the projector plug the AC cord into a wall outlet The ON STANDBY indicator lights in red and the projector goes into standby mode ON STANDBY indicat...

Page 22: ...n 3 Turn on the equipment connected to the projector Refer to the operating instructions of the connected equipment 4 Press INPUT to project the picture on the screen Each time you press the button the input indication and equipment to be projected change 1 page 27 5 Adjust the vertical picture position Press the LENS button repeatedly until the Lens Shift adjustment window test pattern appears Th...

Page 23: ...ns For detailed information see Making Fine Adjustments to the Horizontal Picture Position on page 72 6 Adjust the picture size Press the LENS button repeatedly until the Lens Zoom adjustment window test pattern appears Then adjust the size of the picture by pressing the M m buttons To make the picture larger press M To make the picture smaller press m Side view Picture position when the picture i...

Page 24: ... 48 To adjust the tilt of the installation surface If the projector is installed on an uneven surface use the adjusters to keep the projector level Be careful not to catch your finger when turning the adjusters 7 Adjust the focus Press the LENS button repeatedly until the Lens Focus adjustment window test pattern appears Then adjust the focus of the picture by pressing the M m buttons Note Adjuste...

Page 25: ...u Language You can select one of 16 languages for displaying the menu and other on screen displays The factory default setting is English To change the current menu language set the desired language with the menu screen 1 Press MENU The menu appears 1 2 3 4 ...

Page 26: ... Setup menu and press or The setting items of the selected menu appears 3 Press M m to select Language and press or 4 Press M m to select a language and press The menu changes to the selected language To clear the menu Press MENU ...

Page 27: ...r than those from HDMI standard is input Adjusting the Brightness and the Contrast or adjusting the Sharpness in the Picture menu may improve these conditions 1 page 41 Projecting 1 Power on both the equipment and the device connected to the equipment 2 Press INPUT repeatedly to select the input you want to project on the screen Display the indication of the input you want Example To view the pict...

Page 28: ...sage disappears The ON STANDBY indicator flashes in green and the fan continues to run to reduce the internal heat First the ON STANDBY indicator flashes quickly during which you will notbeabletolightuptheON STANDBYindicatorwiththe 1 ON STANDBY switch 3 Confirm that the fan stops running and the ON STANDBY indicator lights in red You can turn off the projector by holding the 1 ON STANDBY switch fo...

Page 29: ...ntire screen properly The upper and lower portions of the screen are slightly cut off Normal A picture with normal 4 3 aspect ratio is displayed in the center of the screen to fill the vertical screen size Full A picture squeezed to 4 3 is displayed with the correct aspect ratio A 4 3 picture is enlarged horizontally to fit the 16 9 screen Tip Squeezed An original 16 9 aspect ratio picture is reco...

Page 30: ...l picture by switching to the wide mode may constitute an infringement of the rights of authors or producers which are legally protected Zoom A normal 16 9 aspect ratio picture is enlarged vertically and horizontally in the same ratio to fill the screen Use this mode to view a letterbox picture or a letterbox picture with side panels If the subtitle of a movie etc is hidden and cannot be seen adju...

Page 31: ...selected by DYNAMIC CINEMA Recommended when viewing a movie in the dark place USER 1 USER 2 and USER 3 You can adjust the quality of the picture to suit your taste and store the settings into the selected memory of the projector Press one of the USER 1 USER 2 and USER 3 buttons then adjust the picture by using the buttons on the remote control or the menus 1 pages 32 40 The settings are stored and...

Page 32: ... color reproduction on the screen COLOR TEMP button Each time you press the button the setting of the button is changed in the order of High Middle Low Custom1 Custom2 Custom3 BLACK LEVEL button Each time you press the button the setting of the button is changed in the order of High Low Off GAMMA CORRECTION button Each time you press the button the setting of the button is changed in the order of ...

Page 33: ...e Picture menu 1 page 40 Some adjustment windows cannot be displayed depending on the type of input signal For details see Input Signals and Adjustable Setting Items 1 page 66 2 Make the setting or adjustment on an item When changing the adjustment level To increase the value press To decrease the value press When changing the setting Press M m to change the setting 1 2 Example To adjust the contr...

Page 34: ...hen press The RCP Real Color Processing window appears 3 Select the target color you want to adjust Repeat steps 1 and 2 described below to specify the target color 1 Press M m to select Color Select then press to select the color you want to adjust among Red Yellow Green Cyan Blue and Magenta Only the portions that correspond to the specified color will be colored and the other portions will be d...

Page 35: ...or with a computer connect while the power of the computer and the projector is off 2 Press M m to select Position or Range and specify it more delicate color position and color range you want to adjust using 4 Adjust the color of the specified portions Press M m to select RCP Color or RCP Hue then adjust the color or hue of the portions selected in step 3 to suit your taste using while watching t...

Page 36: ...ments and settings Some of the adjustable setting items are displayed in a pop up menu in a setting menu or adjustment menu with no main menu or in the next menu window If you select an item name followed by an arrow B the next menu window with setting items appears To change the on screen menu language see Step 4 Selecting the Menu Language 1 page 25 Using the Menus 2 3 4 1 RESET button ...

Page 37: ... the Menus 1 Press MENU The menu window appears 2 Press M m to select a menu item and press or The items that can be set or adjusted with the selected menu appear The item presently selected is shown in yellow ...

Page 38: ... want to set or adjust and press or The setting items are displayed in a pop up menu in a setting menu in an adjustment menu or in the next menu window Pop up menu Setting items Next menu window Setting items Setting menu Adjustment menu ...

Page 39: ...To clear the menu Press MENU To reset the picture that has been adjusted Select Reset from Picture menu When the screen display appears select Yes using and press All of the following settings are reset to its factory preset value The settings of Advanced Iris Lamp Control Contrast Brightness Color Hue Color Temp Sharpness and Expert Setting on the Picture menu To reset the items that have been ad...

Page 40: ...n adjust the quality of the picture to suit your taste and then store the settings Once the settings are stored you can view the picture with the adjusted picture quality by pressing the PICTURE MODE button on the remote control To store the settings 1 Select User1 User2 or User3 2 Adjust the items you want in the menus Tips You can also adjust the picture quality in Dynamic Standard or Cinema and...

Page 41: ...lower the contrast You can make adjustments by pressing the CONTRAST on the remote control Brightness Adjusts the brightness of the picture The higher the setting the brighter the picture The lower the setting the darker the picture You can make adjustments by pressing the BRIGHTNESS on the remote control Color Adjusts the intensity of the color density The higher the setting the greater the inten...

Page 42: ... to a progressive format Off Plays a video signal in an interlace format without converting Black Level Adj Adjust Produces a bolder dynamic picture Set according to the input signal source High Gives higher emphasis to the black color Low Gives lower emphasis to the black color Off Cancels this feature Gamma Correction Adjusts the response characteristics of the tone of the picture Select a favor...

Page 43: ... picture using Real Color Processing and store the settings Once the settings are stored you can view the picture with the adjusted picture quality Off Cancels this feature For details see Adjusting the Picture Using Real Color Processing 1 page 34 Color Space You can convert the range of color reproduction Normal Converts the color to Hi Vision color Wide Reproduces more natural color tones in a ...

Page 44: ...l You can set the aspect ratio of the picture to be displayed for the current input signal This item is enabled only when a PC signal is input Full1 Displays a picture on the whole of the screen without changing the aspect ratio of the original picture Full2 Displays a picture on the whole of the screen Zoom A normal 16 9 aspect ratio picture is enlarged vertically and horizontally in the same rat...

Page 45: ...ition of the image signal automatically for Phase Pitch and Shift Phase Adjusts the dot phase of the panel and the computer signal Adjust the picture to the point where it looks clearest Pitch Adjusts the horizontal size of the picture from a computer The higher the setting the wider the picture The lower the setting the narrower the picture Adjust the setting to match the number of dots of the in...

Page 46: ... when using the projector at an altitude of 1 500 m or higher Standard Use this setting when using the projector at normal altitudes When this item is set to High the fan noise becomes slightly louder since the number of fan rotation increases Standby Mode Lowers the power consumption in standby When set to Standard the power consumption in standby becomes normal When set to Low the power consumpt...

Page 47: ...er Blu ray Disc player digital tuner etc When the input signal is not displayed correctly with this item set to Auto select the item according to the input signal Color System Selects the color system of the input signal Auto Selects the color system of the input signal automatically from among NTSC3 58 PAL SECAM NTSC4 43 PAL M PAL N or PAL60 NTSC3 58 PAL N Allows you to set the color system to th...

Page 48: ...essing INPUT Set this to Off when you want to select an input selector with no input signal or you want to switch the setting manually Test Pattern Displays the test pattern When set to On a test pattern appears on the screen to be used when adjusting the lens with Lens Focus Lens Zoom and Lens Shift or correcting the screen proportions with V Keystone A test pattern does not appear when this item...

Page 49: ...lly and or vertically Off The picture does not flip HV Flips the picture horizontally and vertically H Flips the picture horizontally V Flips the picture vertically Use this item for installation for the backside projection or ceiling installation Lens Control Avoids any operation of the lens such as Lens Focus Lens Zoom and Lens Shift by mistake When set to On you can adjust the projection lens u...

Page 50: ...ach screen edge Left Right Top Bottom on the Blanking adjustment screen with M m buttons Adjust the desired Blanking value with button When both the Blanking and the V Keystone are adjusted at the same time the Blanking cannot be adjusted correctly When using the Blanking make sure that you set the V Keystone to 0 Note ...

Page 51: ...alog computer signals You can save input signals that have not been preset on these user memories When an unpreset signal is input for the first time a memory number is displayed as 0 When you adjust the data of the signal in the Screen menu it will be registered to the projector If more than 20 user memories are registered the newest memory always overwrites the oldest one See the chart on page 6...

Page 52: ...tom Cause and Remedy No picture c Check that the proper connections have been made 1 page 17 c Select the input source correctly using the INPUT button 1 page 27 c Set the computer signal to output from an external monitor c Set the computer signal to output only to an external monitor c Select Computer Component or Video GBR for Input A Signal Sel on the Setup menu according to the input signal 1...

Page 53: ...l c Adjust Phase for Adjust Signal in the Screen menu properly 1 page 45 Symptom Cause and Remedy Symptom Cause and Remedy On screen display does not appear c Set Status in the Setup menu to On 1 page 46 c Check if the 1 ON STANDBY indicator should light in green The model name does not disappear from the screen c The display mode of the projector may be set at the time of purchase Consult with yo...

Page 54: ...in the product reliability of the projector s components in a room where the temperature is higher than normal The fan noise becomes slightly louder The approximate normal temperature is 25 C Image is left on the screen image retention c When High contrast non moving images are displayed for a long period of time there may be some image retention on the screen This is only a temporary condition Tu...

Page 55: ...temperature Wait until the lamp cools and then turn on the power again ON STANDBY flashes in red A repetition rate of 4 flashes c The fan is broken Consult with qualified Sony personnel ON STANDBY flashes in red A repetition rate of 2 flashes c The internal temperature is unusually high Check to ensure that if nothing is blocking the ventilation holes or whether or not the projector is being used ...

Page 56: ...the control panel of the projector once Please clean the filter c It is time to clean the air filter Clean the air filter 1 page 60 To clear this message press any button either on the remote control or the control panel of the projector once Please clean the filter Have you finished Yes No c It is time to clean the air filter Clean the air filter 1 page 60 c If you cleaned the air filter select Y...

Page 57: ... you touch it wipe off the fingerprints with a soft cloth Pay special attention to replacing the lamp when the projector is installed on the ceiling When removing the lamp unit make sure it remains horizontal then pull straight up Do nottiltthelampunit Ifyoupulloutthelamp unit while tilted and if the lamp breaks the pieces may scatter causing injury When you remove the air filter be careful not to...

Page 58: ...p straight out 5 Ensure you push the new lamp all the way then securely tighten those three screws on the lamp Lock the cover release lever and put it back Be careful not to touch the optical block inside the unit 6 Close the lamp cover then tighten the screws 7 Remove the filter holder 8 Remove the air filter Note Claws ...

Page 59: ...cement slot and do not allow any liquid or other objects into the slot to avoid electrical shock or fire Be sure to use an LMP H200 Projector Lamp for replacement If you use lamps other than the LMP H200 the projector may malfunction Be sure to turn off the projector and unplug the power cord before replacing the lamp then check the ON STANDBY lamp has already been turned off The projector will no...

Page 60: ...ance of the projector take care with respect to the following Wipe the lens gently with a soft cloth such as a cleaning cloth or glass cleaning cloth Stubborn stains may be removed with a soft cloth such as a cleaning cloth or glass cleaning cloth lightly dampened with water Never use solvent such as alcohol benzene or thinner or acid alkaline or abrasive detergent or chemical cleaning cloth as th...

Page 61: ...ance 1 Vp p 2 dB sync negative 75 ohms terminated C chrominance burst 0 286 Vp p 2 dB NTSC 75 ohms terminated or burst 0 3 Vp p 2 dB PAL 75 ohms terminated Y PB CB PR CR Component phono type Y with Sync 1 Vp p 2dB sync negative 75 ohms terminated PB CB 0 7 Vp p 2dB 75 ohms terminated PR CR 0 7 Vp p 2 dB 75 ohms terminated HDMI Digital RGB Y CB PB CR PR INPUT A HD D sub 15 pins Analog RGB component...

Page 62: ...e AA R6 batteries 2 AC power cord 1 Lens Cap 1 Operating Instructions 1 CD ROM ImageDirector3 1 Design and specifications are subject to change without notice Optional accessories Projector Lamp LMP H200 for replacement Projector Suspension Support PSS H10 ...

Page 63: ... Cord type SVT H05VV F CEE 13 53 rd OC Rated Voltage Current 10A 125V 10A 250V 10A 250V Safety approval UL CSA VDE VDE Preset Signals Memory No Preset signal resolution fH kHz fV Hz Sync H Size 1 VIDEO 60 60 Hz 15 734 59 940 2 VIDEO 50 50 Hz 15 625 50 000 3 480 60i DTV 480 60i 720 480i 15 734 59 940 SonG Y or composite sync 4 576 50i DTV 576 50i 720 576i 15 625 50 000 SonG Y or composite sync comp...

Page 64: ...eg V neg 864 28 VESA 72 37 861 72 809 H neg V neg 832 29 VESA 75 IBM M3 37 500 75 000 H neg V neg 840 30 VESA 85 IBM M4 43 269 85 008 H neg V neg 832 31 800 600 VESA 56 35 156 56 250 H pos V pos 1024 32 VESA 60 37 879 60 317 H pos V pos 1056 33 VESA 72 48 077 72 188 H pos V pos 1040 34 VESA 75 IBM M5 46 875 75 000 H pos V pos 1056 35 VESA 85 53 674 85 061 H pos V pos 1048 36 832 624 Mac 16 49 724 ...

Page 65: ...os 1664 Signal Preset memory number Video signal VIDEO INPUT and S VIDEO INPUT connectors 1 2 Component signal INPUT A and Y PB CB PR CR connectors 3 to 11 Video GBR signal INPUT A connector 3 to 11 Computer signal INPUT A connector 21 to 39 55 to 56 Signal Preset memory number Component signal HDMI 1 2 connectors 3 to 8 10 to 14 Video GBR signal HDMI 1 2 connectors 3 to 8 10 to 14 Computer signal...

Page 66: ...al Video signal Component signal Video GBR signal PC signal Advanced Iris z z z z Lamp Control z z z z Contrast z z z z Brightness z z z z Color z except for B W z z Hue z NTSC3 58 NTSC4 43 only except for B W z z Color Temp z z z z Sharpness z z z NR z z preset memory numbers 3 4 7 8 9 only z preset memory numbers 3 4 7 8 9 only DDE z z preset memory numbers 3 4 7 8 9 only z preset memory numbers...

Page 67: ...e setting can be made only for analog signal When connecting a cable such as an HDMI cable etc check the type of the signal in the Information Menu 1 page 51 and Digital signal 1 page 65 and check items that are adjustable can be set Item Input signal Video signal Component signal Video GBR signal PC signal Wide Mode z z z z 2 Over Scan z z Screen Area 1 z preset memory numbers 7 8 9 12 13 14 only...

Page 68: ...When Using the PSS H10 Projector Suspension Support a x a Distance between the screen and the installation hole at the ceiling side of the ceiling mount unit front side x Distance between the ceiling and the center of the screen such that the picture will not be truncated or blocked PSS H10 Projector Suspension Support not supplied Ceiling Center of the screen Center of the lens ...

Page 69: ...8 4448 175 1 8 5524 217 1 2 6600 259 7 8 8214 323 1 2 9828 387 10904 429 3 8 13594 535 1 4 16284 641 1 8 x Minimum Distance 249 9 7 8 374 14 3 4 498 19 5 8 623 24 5 8 747 29 1 2 934 36 7 8 1121 44 1 4 1245 49 1 8 1557 61 3 8 1868 73 5 8 Maximum Distance 592 23 3 8 754 29 3 4 916 36 1 8 1077 42 1 2 1239 48 7 8 1482 58 3 8 1724 67 7 8 1886 74 3 8 2290 90 1 4 2695 106 1 8 Screen Size inches 40 60 80 ...

Page 70: ...asurements are shown below when installing the projector on a ceiling using the PSS H10 Top view Install the projector so that the center of the lens is parallel to the center of the screen 130 5 1 8 191 3 7 5 8 236 3 9 3 8 Front of the cabinet Center of the lens Upper ceiling mount bracket Center of the supporting pole The center of the supporting pole is different from that of the unit Distance ...

Page 71: ...97 5 7 7 8 75 3 150 6 175 7 93 5 3 3 4 395 15 5 8 Ceiling The bottom surface of the mount bracket Center of the supporting pole Center of the lens Center of the lens Front of the cabinet 191 3 7 5 8 130 5 1 8 236 3 9 3 8 235 1 9 3 8 471 4 18 5 8 ...

Page 72: ...lens is scratched there is a charge for repair Also do not look into the lens while you are adjusting the picture position You can adjust the lens position right or left by about 1 mm from the center of the lens 1 Remove the ring washer attached around the lens by turning it counterclockwise 2 Loosen the four screws located at the position indicated with an arrow by turning them counterclockwise 2...

Page 73: ...the right the lens moves to the right The range of movement is approximately 1mm When using the 16 9 screen Unit mm inches Image projection size inch 40 60 80 100 120 150 180 200 mm 1016 1524 2032 2540 3048 3810 4572 5080 Fine adjustment level 60 2 3 8 90 3 5 8 120 4 3 4 150 6 180 7 1 8 225 8 7 8 270 10 3 4 300 11 7 8 Picture position when moving the picture the maximum distance to the left Pictur...

Page 74: ...the border of the lens in turn and tighten them to fix the lens in place 5 Attach the ring washer by turning it clockwise When you use the horizontal and vertical lens shift features at the same time and adjust the horizontal lens shift to the maximum the picture moves up to a maximum of 53 of its original position Note ...

Page 75: ...pment 17 Contrast 41 Cooling Setting 46 E Expert Setting 42 F fH 51 fV 51 G Gamma Correction 32 42 H HDMI 18 Hue 41 I Image Flip 49 ImageDirector3 35 42 Input A Signal Sel 47 L Lamp Timer 51 Language 46 Location of Controls Front Right side 8 Rear Bottom 9 M Menu Advanced Picture 43 Function 48 Information 51 Installation 49 Picture 40 Screen 44 Setup 46 Messages Caution 56 Warning 56 N NR 42 O Ov...

Page 76: ...settable items 39 resetting the items 39 S Screen Area 44 Selecting the menu language 25 Sharpness 41 Specifications 61 Standby Mode 46 Status 46 Supplied accessories 11 T Troubleshooting 52 V V Keystone 49 W WIDE MODE 29 Wide Mode Full 44 Full1 44 Full2 44 Normal 44 Wide Zoom 44 Zoom 44 ...

Page 77: ......

Page 78: ......

Page 79: ......

Page 80: ...Sony Corporation Printed in Japan Printed on 70 or more recycled paper ...

Reviews: