Sony VPCSB Series Replacement Instructions Download Page 2


  VPCSB Series Hard Disk Drive 


            Replacement Instructions 


FOR TECHNICAL SUPPORT IN THE US CALL TOLL FREE 1-866-651-7669 FROM 9:00 AM TO 11:00 PM EST 

P/N  

989202617


Rev. B


2/4


Step 3: 

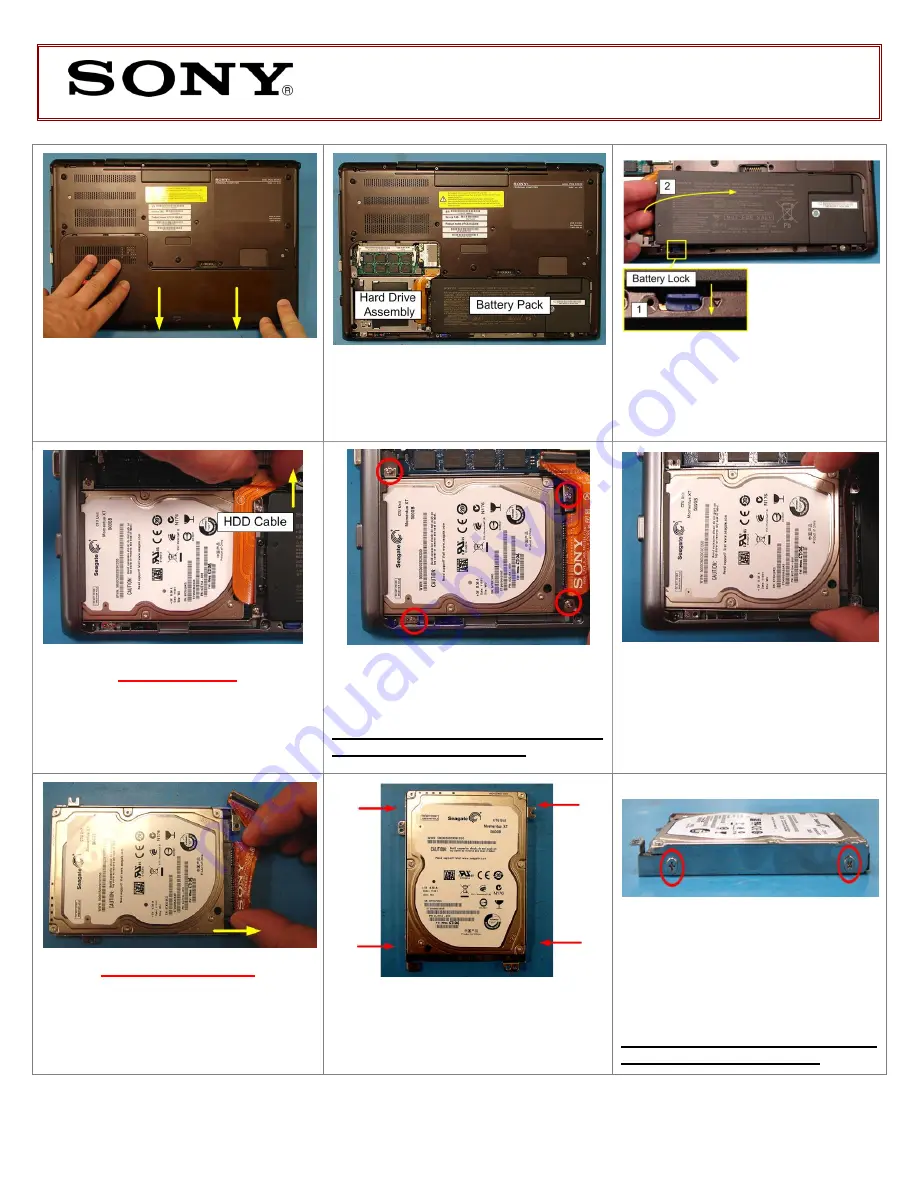
Take note of the Battery Pack 

and Hard Drive (HDD) location.


Step  2.

  Slide  the  Hard  Drive/Battery 

Door  towards  the  Bottom  edge  of  the 
unit to remove.  


Step 4.

 Locate the Battery Lock. Slide 

down  to  the  “UNLOCK”  position  and 
hold.  Grasp  the  Battery  from  the  Left 
side and lift up to remove.   


HDD Removal 

 
Step 1.


Using two fingers

,  lift the HDD 

Cable  straight up  to  disconnect  from  the 
unit. 

Step  2.

  Using  the  enclosed  magnetic 

screwdriver,  remove  the  four  (4)  screws 
securing the HDD Assembly. 

Put the screws aside to re-secure the 
HDD later in the procedure.  


Step  3. 

Grasp  the  Right  side  of  the 

HDD  and  carefully  lift  from  the  unit  to 
remove.  


HDD Disassembly 

 
Step 1.

 Using two fingers, slide the Hard 

Drive Cable away from the Hard Drive to 
disconnect. 


Step  2.

  Identify  the  four  (4)  side  screws 

which  secure  the  HDD  Brackets  to  the 
HDD. 


Step  3.

  Remove  the  screws  & 

brackets. 

Put  the  Brackets  and  screws  aside 
for transfer to the new HDD.


Summary of Contents for VPCSB Series

Page 1: ... screwdriver remove the two 2 screws securing the Hard Drive Battery Door Put the screws aside to re secure the Door later in the procedure These easy instructions will guide you through the Hard Drive replacement process Before you begin place your notebook computer on a clean or covered surface to avoid damage to the computer s case Follow the ESD Electrostatic Discharge damage prevention instru...

Page 2: ...ft up to remove HDD Removal Step 1 Using two fingers lift the HDD Cable straight up to disconnect from the unit Step 2 Using the enclosed magnetic screwdriver remove the four 4 screws securing the HDD Assembly Put the screws aside to re secure the HDD later in the procedure Step 3 Grasp the Right side of the HDD and carefully lift from the unit to remove HDD Disassembly Step 1 Using two fingers sl...

Page 3: ...tion as the old Hard Drive so that it aligns with the Brackets as shown Step 2 Re install the four 4 Hard Drive Bracket screws to secure the Brackets to the New Hard Drive Step 2 Re install the four 4 Hard Drive screws holding the Hard Drive assembly in place Step 3 Re install the HDD Cable to the Hard Drive by aligning the connectors Note The wide end of the Cable attaches to the Hard Drive at th...

Page 4: ...ry Reinstallation Step 1 Reinstall the Battery into the Battery Bay Step 2 Re attach the Hard Drive Battery Door by sliding up towards the unit Verify the Door sits completely flush Step 3 Re install the two 2 Hard Drive Door screws to secure the Door Step 4 Reconnect the AC Adaptor Power on your computer and continue with the recovery process by following the instructions described on the back of...

Reviews: