Various Functions
34
Setting the Clock (CLOCK)
The date and time are set on the SETUP menu.
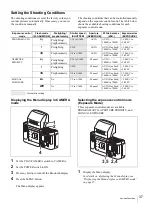
Displaying the Setup display
1
Set the POWER switch to ON.
2
Press any button to turn off the Bluetooth display.
3
Press the MENU button.
The Menu display appears.
4
Select SETUP by pressing
v
or
V
of the control
button.
5
Press ENTER of the control button.
The Setup display appears.
Setting the date and time
1
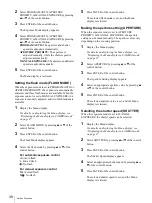
Select CLOCK by pressing
v
or
V
of the control
button on the Setup display.
2
Press ENTER of the control button.
The Clock display appears.
3
Select the display mode of date (Y/M/D, M/D/Y, or
D/M/Y) by pressing
v
or
V
of the control button.
4
Set the date and time.
1)
Select an item to be set by pressing
b
or
B
of the
control button.
2)
Set the value by pressing
v
or
V
of the control
button.
5
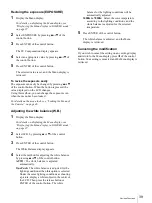
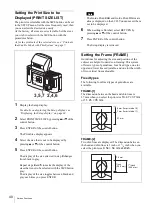
When all settings are finished, select OK by
pressing
B
of the control button.
6
Press ENTER of the control button.
The date and time are set, and the Setup display is
retrieved.
To interrupt setting the date and time
Select CANCEL in step
5
, and press ENTER of the
control button.
1
5
3
4
MENU
ENTER
MONITOT
R
(P
AL)
W
T
LCD
VIDEO
OUT
PLAY
CAM
ERA
PRINTER
PRINTER
ALARM
COLOR
B/W
SIZE
2,6
5
4
-1)
1,3,4
-2)
MENU
ENTER
MONITOT
R
(P
AL)
W
T
LCD
VIDEO
OUT
PLAY
CAM
ERA
PRINTER
PRINTER
ALARM
COLOR
B/W
SIZE
Summary of Contents for UPX-C200
Page 207: ......
Page 208: ...Sony Corporation Printed in Japan ...

