background image

57

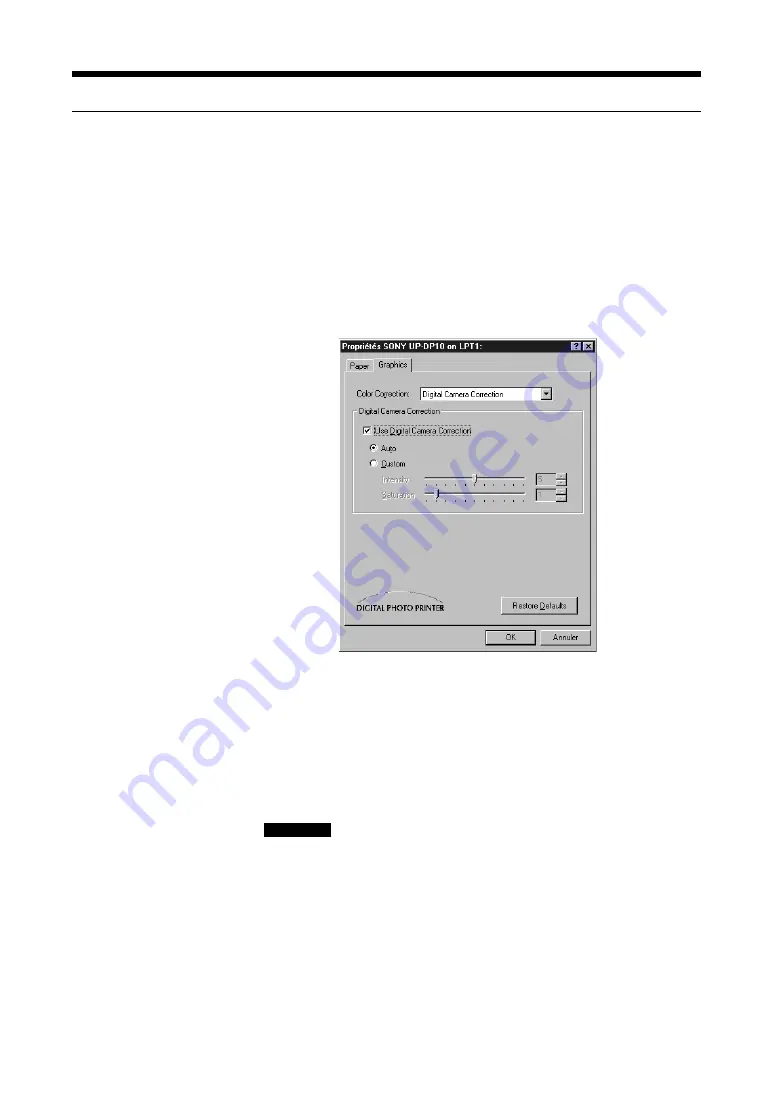
Réglages de l’onglet [Graphics]

Cet onglet est utilisé pour effectuer des réglages relatifs à l’image, tel que la
couleur d’impression et la clarté. Effectuer ces réglages si l’impression finale
n’est pas satisfaisante ou pour des réglages avancées.
Sélectionner [Digital Camera Correction], [Color Balance], [Tone Curve] ou
[Sharpness] dans la liste de [Color Correction]. Ces réglages peuvent être
effectués sous changement en fonction du choix sélectionné.
Pour annuler toute modification effectuée et réinitialiser les réglages, cliquer
sur [Restore Defaults] dans chaque écran.

<

[Digital Camera Correction]

Sélectionner cet écran pour imprimer une image d’un appareil photo
numérique pour corriger l’intensité et la saturation.
• Si la case [Use Digital Camera Correction] est cochée, le traitement de

correction d’image approprié à l’appareil photo numérique est appliqué
à l’image.

• Le traitement optimal est effectué lorsque [Auto] est sélectionné.
• La sélection de [Custom] permet de régler manuellement [Intensity] et

[Saturation].

Remarque

Le réglage de [Saturation] sur “0” permet d’utiliser le composant de
saturation original mais  le réglage de [Intensity] sur “0” ne permet
d’utiliser le composant d’intensité original.

Summary of Contents for UP-DP10

Page 1: ... 2000 Sony Corporation 3 203 973 11 1 Operating Instructions Page 2 Mode d emploi Page 37 GB FR UP DP10 Digital Photo Printer ...

Page 2: ...vice pursuant to Part 15 of the FCC Rules These limits are designed to provide reasonable protection against harmful interference in a residential installation This equipment generates uses and can radiate radio frequency energy and if not installed and used in accordance with the instructions may cause harmful interference to radio communications However there is no guarantee that interference wi...

Page 3: ...r On Off 8 Installing the Printer Driver 9 With Windows 98 9 With Windows 95 12 With the Macintosh OS 13 Preparing to Print 14 Preparing a Print Pack 14 Loading the Ink Ribbon Cartridge and Printing Paper 16 Removing the Ink Ribbon Cartridge and the Printing Paper 19 Making Printer Setting from your Computer 20 With Windows 20 With the Macintosh 25 Miscellaneous 31 Maintaining the Performance of t...

Page 4: ...n The printer itself is thin and the size of an A4 sheet The printer can operate either in a vertical position or in a horizontal position The printer weighs only 2 7kg making it light and easy to handle Paper Jams Can Be Cleared Easily If the paper jams it can be easily cleared simply by removing the cover Checking the Packing List Check the contents of the box against the packing list Paper supp...

Page 5: ...o a printer port A personal computer on which Microsoft Windows 98 or Windows 95 runs normally At least 32MB of RAM At least 30MB of hard disk space A printer port Please see the user s manual provided with your computer for the appropriate type of printer cable Note When using device driver Windows system lpt vxd version 4 00 953 in Windows 95 normal printing might be impossible In this event obt...

Page 6: ...n cartridge cover 3 Lamps POWER lamp PRINT lamp PAPER lamp RIBBON lamp ALARM lamp The lamps indicate the printer status by lighting or flashing For details refer to page 32 4 Paper supply eject tray cover 5 Bottom cover 6 USB port 7 Parallel port 8 AC power inlet 9 Ventilation holes ...

Page 7: ...end using a shielded printer cable not more than 2m long and with a double ended ferrite core Make sure that you insert the cable connectors all of the way when making the connections The driver provided with this printer does not support usage through a network Proper operation can not be assured when USB connection is made through a hub The printer cannot be connected using both a USB cable and ...

Page 8: ...to the operating manual for the personal computer Connecting the Power Supply Plug the female end of the power cord into the AC power inlet on the printer and then plug the other end into an AC power outlet Turning the Power On Off Press the Operation switch so that the POWER lamp is on To turn the printer off press the Operation switch again Printer cable purchased separately Windows 95 98 comput...

Page 9: ...e computer on Once Windows 98 starts up the Add New Hardware Wizard window appears If the Add New Hardware Wizard dialog box does not appear when Windows 98 starts up install the printer by selecting Start t Settings t Printers t Add Printer 2 Click Next The window changes as shown below 3 Select Search for the best driver for your device and then click Next The window changes as shown below 4 Pla...

Page 10: ... changes as shown below 10Select the Specify a location option click Browse specify the Win98 English folder in the CD ROM and then click Next The window changes as shown below 11Click Next The window changes as shown below 12If necessary you can type a name for the printer in the Printer name field Then click Finish The window changes as shown below 13Click Finish The wizard ends Installation is ...

Page 11: ...rinter by selecting Start t Settings t Printers t Add Printer 2 Click Next The window changes as shown below 3 Select Search for the best driver for your device and then click Next The window changes as shown below 4 Place the Printer Software UP DP10 CD ROM in the CD ROM drive 5 Select the Specify a location option click Browse specify the Win98 English folder in the CD ROM and then click Next Th...

Page 12: ...nter to the computer Notes The driver does not support connection with a USB cable under Windows 95 Use a printer cable The installation procedure may differ from the procedure described here depending on the Windows 95 version that you are using If that is the case refer to your Windows 95 operating manual for instructions 1 Turn the printer on first and then turn the computer on Once Windows 95 ...

Page 13: ...again and then click OK With the Macintosh OS Install the printer driver that is contained in the CD ROM that is provided with the printer 1 Place the PRINTER SOFTWARE UP DP10 CD ROM in the Macintosh s CD ROM drive The PRINTER SOFTWARE icon appears on the desktop 2 Double click the Driver icon to open the folder 3 Double click the Chooser icon to open the folder 4 Double click the UP DP10 Install ...

Page 14: ...ng along the left and right perforations or a portion of the top and bottom of the image may not be printed on the paper Features Photocards These sheets produce prints that have no white border when photos taken with a digital camera that has a 2 3 aspect ratio V H are printed on these sheets and the border is then cut off along the perforations Photocards These sheets produce prints that have no...

Page 15: ... image quality If it is necessary to change the ink ribbon cartridge or to add more paper while printing is in progress do not turn off the printer If you turn off the printer the image that is stored in the printer s memory will be lost Ink ribbon cartridges cannot be re used If a paper jam occurs do not just pull the paper out Remove the paper by following the procedure described in If the Paper...

Page 16: ...arrow The ink ribbon could become damaged if you load the ribbon while it is slack 2 Open the ribbon cartridge cover WARNING Components located behind the ribbon cartridge door become very hot To avoid burns never put your hand inside the opening 3 Grasp the handle on the ink ribbon cartridge and make sure that the ink ribbon cartridge is facing the right way Align the protuberances on the cartrid...

Page 17: ...e the blank glossy side of the paper Doing so could leave fingerprints which will harm image quality 1 Fan the paper thoroughly If the paper is curled uncurl it 2 With the printing surface glossy side facing up place the paper in the paper supply eject tray making sure that the paper is under the tabs at the end of the tray Printing surface Tabs Stopper ...

Page 18: ...ign the protuberances on the tray with the grooves in the printer slide the tray in as far as it will go and then make sure that the PAPER lamp has turned off Notes Do not allow more than 10 sheets of paper to accumulate on the eject surface of the paper supply eject tray To prevent dust contamination attach the provided tray cover to the paper supply eject tray when you take the tray out of the p...

Page 19: ...bbon cartridge 1 Open the ribbon cartridge cover 2 Grasp the handle and pull the cartridge out Removing the printing paper 1 Pull the paper supply eject tray out of the printer 2 Lift the metal plate at the bottom of the paper supply eject tray and then pull out the printing paper ...

Page 20: ...only valid until you quit the application The SONY UP DP10 Properties dialog box has tabs that are standard for the OS and tabs that are specific to the UP DP10 The following section explains the tabs that are specific to the UP DP10 Paper and Graphics Note also that although the sample screens are taken from Windows 98 the setting items methods etc are identical in Windows 95 Paper tab settings T...

Page 21: ...s selected then only one image is printed on each sheet If 16 up is selected then 16 identical thumbnail images are printed on each sheet Laminate Pattern Use this item to select one of the following three laminate processing options for the print surface If Glossy is selected prints are produced with a glossy finish If Texture is selected prints are produced with a textured finish If Matte is sel...

Page 22: ...es you have made and restore the initial settings click Restore Defaults on each screen Digital Camera Correction Select this screen when printing an image from a digital camera in order to correct the intensity and the saturation If you click the Use Digital Camera Correction checkbox so that it is in the checked on state image correction processing that is suited for digital camera images is per...

Page 23: ...f the printer either by dragging the sliders left or right clicking on v or V or by inputting a value directly through the keyboard Tone Curve You can adjust values output by the printer with respect to values input by choosing a tone curve setting of Hard or Soft ...

Page 24: ...pness Use this screen to adjust the contour emphasis of the image either by dragging the sliders left or right clicking on v or V or by inputting a value directly through the keyboard Increasing the setting increases the contour emphasis of the image ...

Page 25: ...nother printer and now want to use the UP DP10 1 Select the Chooser from the Apple menu The Chooser window opens 2 Select the UP DP10 icon from among the icons displayed on the left side of the Chooser window The UP DP10 printers that are connected are then listed in the listbox on the right side of the Chooser window 3 Select the UP DP10 name in the listbox 4 Close the Chooser window ...

Page 26: ...to 400 can be set for this ratio Orientation Select the printing orientation Image Layout This item becomes valid if UPC 10S01 is selected for the paper type If 1 up is selected then only one image is printed on each sheet If 16 up is selected then 16 identical thumbnail images are printed on each sheet Laminate Pattern Use this item to select one of the following three laminate processing options...

Page 27: ...ges will be printed If From To is selected the specified range of pages is printed Input the values in these fields through the keyboard Color Correction settings The Color Correction screen is used to make settings related to images such as the printing color and brightness Adjust these settings when you are not satisfied with the final results of printing or when you need to make advanced adjust...

Page 28: ... image Optimal processing can be performed by selecting Auto Selecting Custom allows you to manually set Intensity and Saturation Note Setting Saturation to 0 causes the original saturation component to be used but setting Intensity to 0 does not cause the original intensity component to be used Click Restore Defaults to return all of the settings on this screen to their initial values Color Balan...

Page 29: ...by choosing a tone curve setting of Hard or Soft Sharpness Use the scroll bar on this screen to adjust the contour emphasis of the image Increasing the setting increases the contour emphasis of the image Click Restore Defaults to return the settings on this screen to their initial values ...

Page 30: ...In the Profile pop up menu specify the UP DP10 profile In the Intent pop up menu select one of the following for color reproduction mapping Perceptual Images Saturation Graphics Relative Colormetric Absolute Colormetric In the Quality pop up menu select one of the following for the color mapping quality Best Normal Draft ...

Page 31: ... dilute detergent solution wring the cloth out thoroughly and then wipe the dirt away Afterwards wipe away any moisture with a dry cloth Do not use paint thinner benzene alcohol chemical dust cloths or other materials that could harm the finish of the cabinet Troubleshooting What to do Before sending the printer for repair repeat the checks If it still doesn t operate properly please consult the s...

Page 32: ...lt does not look clean Check whether you are printing on the right side of the paper t Properly load the printing paper as explained in Loading the Printing Paper page 17 Check whether the ink ribbon cartridge or printing paper are dirty t Load a new ink ribbon cartridge or clean printing paper Printer status and action a The power is on a Printing is in progress Lit Lamp POWER Flashing PRINT a Th...

Page 33: ...ove the jammed paper see below The ink ribbon has broken t Repair the ink ribbon with cellophane tape page 34 a The ribbon cartridge cover is open t Close the cover The bottom cover is open t Close the cover Lit Lamp ALARM Flashing All lamps a A problem has occurred that requires repair by service personnel t Contact your dealer or the nearest Sony Service Center 3 Open the ribbon cartridge cover ...

Page 34: ...ching hot internal components 7 Replace the bottom cover the paper supply eject tray and the ink ribbon cartridge 8 Plug the power cord back in and then turn on the printer Note Any image that was in the printer s memory will have been lost Perform the print operation on the personal computer again If the Ink Ribbon Breaks 1 Use scissors to cut off any segment of the ribbon that is crinkled and th...

Page 35: ...sheets Paper eject method Front ejection Sheets are ejected in order on top of paper supply tray Ribbon cartridge Can print 25 sheets Inputs AC IN power inlet Thermal head 11 6 dots mm Accessories Paper supply eject tray 1 Power cord 1 Stands 2 Tray case 1 Ink ribbon cartridge sufficient for printing 10 sheets 1 Print paper 5 sheets each of UPC 10P23 and UPC 10P34 1 CD ROM 1 Operating Manual 1 Sof...

Page 36: ...13 O Select Xflag Xflag 14 I nAutoFd HostBusy HostAck 15 Not defined 16 17 GND 18 O Peripheral Logic High pull up to 5V with 1k Ω 19 30 GND 31 I nInit nInit nReverseRequest 32 O nFault nDataAvail nPeriphRequest 33 Not defined 34 Not defined 35 Not defined 36 I nSelectln IEEE 1284 Active IEEE 1284 Active Pin No I O Signal Function VCC Cable power maximum current I O Data Data I O Data Data pull up ...

Page 37: ...SSEMENT Afin d éviter tout risque d incendie ou d électrocution ne pas exposer cet appareil à la pluie ou à l humidité Afin d écarter tout risque d électrocution garder le coffret fermé Ne confier l entretien de l appareil qu à un personnel qualifié Français FR ...

Page 38: ...3 Installation du pilote d imprimante 44 Avec Windows 98 44 Avec Windows 95 47 Avec Macintosh OS 48 Préparation à l impression 49 Préparation d un pack d impression 49 Chargement de la cartouche ruban d encre et du papier d impression 51 Retrait de la cartouche ruban d encre et du papier d impression 54 Réglages d imprimante à partir de l ordinateur 55 Avec Windows 55 Avec Macintosh 60 Divers 66 M...

Page 39: ... la taille d une feuille A4 Elle peut fonctionner soit verticalement ou horizontalement Elle ne pèse que 2 7 kg et est de ce fait légère et facile à manipuler Les bourrages de papier peuvent facilement être dégagés Si le papier est coincé il peut facilement être dégagé en ouvrant simplement le couvercle Vérification du contenu de l emballage Vérifier le contenu du paquet avec la liste des articles...

Page 40: ...imante Un ordinateur personnel avec Microsoft Windows 98 ou Windows 95 fonctionnant normalement Au moins 32 MB de RAM Au moins 30 MB d espace disque dur Un port d imprimante Prière de se reporter au manuel de l utilisateur fourni avec votre ordinateur pour le type de câble d imprimante approprié Remarque Lors de l utilisation d un pilote de périphérique Windows system pt vxd version 4 00 953 sous ...

Page 41: ...oin POWER Témoin PRINT Témoin PAPER Témoin RIBBON Témoin ALARM Les témoins indiquent l état de l imprimante en s allumant ou en clignotant Pour les détails se reporter à la page 67 4 Couvercle du plateau d alimentation éjection de papier 5 Couvercle du socle 6 Port USB 7 Port parallèle 8 Prise d alimentation CA 9 Fentes de ventilation ...

Page 42: ...e maximum 2 mètres de long et muni d un tore de ferrite à deux bouts S assurer d insérer complètement les connecteurs du câble lors des connexions Le pilote fourni avec cette imprimante n accepte l utilisation via un réseau Si la connexion USB est effectuée via un concentrateur l appareil risque de ne pas fonctionner correctement L imprimante ne peut être raccordée à l aide d un câble USB et d un ...

Page 43: ... emploi de l ordinateur personnel Branchement de l alimentation Branchement de l alimentation Brancher le bout femelle du cordon d alimentation dans la prise d alimentation CA de l imprimante puis l autre bout dans la prise murale CA Mise sous hors tension Appuyer sur l interrupteur d alimentation pour allumer le témoin POWER Pour éteindre appuyer de nouveau sur l interrupteur Câble d imprimante a...

Page 44: ...Assistant Ajout de nouveau matériel apparaît Si la boîte de dialogue Assistant Ajout de nouveau matériel n apparaît pas lorsque Windows 98 est lancé il faut installer l imprimante en sélectionnant Démarrer t Paramètres t Inmprimantes t Ajout d imprimante 2 Cliquer sur Suivant La fenêtre change comme ci dessous 3 Sélectionner Rechercher le meilleur pilote pour votre périphérique Recommandé et cliqu...

Page 45: ...ner l option Définir un emplacement cliquer sur Parcourir spécifier le dossier Win98 French dans le CD ROM puis cliquer sur Suivant La fenêtre change comme ci dessous 11Cliquer sur Suivant La fenêtre change comme ci dessous 12Il est possible de taper si nécessaire le nom de l imprimante dans le champ Nom de Imprimante Cliquer ensuite sur Terminer La fenêtre change comme ci dessous 13Cliquer sur Te...

Page 46: ...sélectionnant Démarrer t Paramètres t Inmprimantes t Ajout d imprimante 2 Cliquer sur Suivant La fenêtre change comme ci dessous 3 Sélectionner Rechercher le meilleur pilote pour votre périphérique Recommandé et cliquer sur Suivant La fenêtre change comme ci dessous 4 Placer le CD ROM Printer Software UP DP10 dans le lecteur CD ROM 5 Sélectionner l option Définir un emplacement cliquer sur Parcour...

Page 47: ... accepte pas la connexion via un câble USB sous Windows 95 Utiliser un câble d imprimante La procédure d installation risque de différer de la procédure décrite ici en fonction de la version Windows 95 utilisée Si cela est le cas se reporter au mode d emploi Windows 95 pour les instructions 1 Mettre tout d abord l imprimante sous tension puis l ordinateur Une fois Windows 95 lancé la fenêtre Assis...

Page 48: ...eau le dossier Win95 French dans le CD ROM puis cliquer sur OK Avec Macintosh OS Installer le pilote d imprimante contenu dans le CD ROM fourni avec l imprimante 1 Placer le CD ROM PRINTER SOFTWARE UP DP10 dans le lecteur CD ROM du Macintosh L icône PRINTER SOFTWARE apparaît dans le bureau 2 Faire un double clic sur l icône Driver pour ouvrir le dossier 3 Faire un double clic sur l icône Chooser p...

Page 49: ...coupé les perforations gauches et droites ou bien une partie du haut et du bas de l image risque de ne pas être imprimée sur le papier Caractéristiques Cartes photo Ces feuilles donnent des impressions sans bords blancs lorsque les photos sont prises avec un appareil photo numérique avec un ration d aspect de 2 3 V H Elles sont imprimées sur ces feuilles puis le bord est coupé le long des perforat...

Page 50: ...d encre ou rajouter du papier en cours d impression ne pas mettre l imprimante hors tension Si l imprimante est mise hors tension l image enregistrée dans la mémoire sera perdue Les cartouches ruban d encre ne sont pas réutilisables En cas de bourrage de papier ne pas tirer seulement le papier coincé Retirer le papier en suivant les instructions de la procédure En cas de bourrage de papier page 68...

Page 51: ...la flèche Le ruban d encre risque d être endommagé s il est chargé avec du mou 2 Ouvrir le couvercle de la cartouche ruban AVERTISSEMENT Les composants situés derrière le couvercle de la cartouche ruban deviennent très chaud Pour éviter tout risque de brûlure ne jamais mettre les doigts dans la fente 3 Tenir la cartouche ruban par la languette et vérifier qu elle est dans le bon sens Aligner les p...

Page 52: ...ncre Les traces de doigts sur le ruban d encre risquent de détériorer la qualité de l image 1 Ventiler la rame de papier Si le papier est plié le déplier 2 Avec la surface d impression face brillante vers le haut placer le papier dans le plateau d alimentation éjection du papier en s assurant que le papier se trouve sous les onglets au fond du plateau Surface d impression Onglets Arrêtoir ...

Page 53: ...u avec les rainures sur l imprimante glisser le plateau le plus loin possible et vérifier que le témoin PAPER est éteint Remarques Ne pas laisser plus de 10 feuilles s accumuler sur le plateau d alimentation éjection du papier Pour éviter toute contamination par la poussière fixer le couvercle du plateau au plateau d alimentation éjection du papier lorsque le plateau est retiré de l imprimante L i...

Page 54: ... 1 Ouvrir le couvercle de la cartouche ruban d encre 2 Tenir la languette et tirer la cartouche vers l extérieur Retrait du papier d impression 1 Tirer le plateau d alimentation éjection du papier hors de l imprimante 2 Soulever la plaque métallique sous le plateau d alimentation éjection du papier et sortir le papier d impression ...

Page 55: ... dans la boîte de dialogue d impression Les réglages effectués avec cette méthode sont valides jusqu à ce qu on quitte l application La boîte de dialogue SONY UP DP10 Propriétés possède des onglets standard pour OS et d autres spécifiques pour UP D10 La section suivante explique les onglets spécifiques à la UP DP10 Paper et Graphics Noter que les écrans échantillons sont pris dans Windows 98 mais ...

Page 56: ...UPC 10S01 est sélectionné pour le type de papier Si 1 up est sélectionné une seule image est imprimée sur chaque feuille Si 16 up est sélectionné 16 images miniatures identiques sont imprimées sur chaque feuille Laminate Pattern Utiliser cet article pour sélectionner l une des 3 options de traitement laminé pour la surface d impression Si Glossy est sélectionné les imprimés ont une finition brilla...

Page 57: ...initialiser les réglages cliquer sur Restore Defaults dans chaque écran Digital Camera Correction Sélectionner cet écran pour imprimer une image d un appareil photo numérique pour corriger l intensité et la saturation Si la case Use Digital Camera Correction est cochée le traitement de correction d image approprié à l appareil photo numérique est appliqué à l image Le traitement optimal est effect...

Page 58: ...de l imprimante soit en glissant les réglettes à gauche et à droite soit en cliquant sur v ou V ou en entrant directement une valeur par le clavier Tone Curve Il est possible de régler les valeurs de sortie par l imprimante en fonction des valeurs d entrée en choisissant un réglage de courbe de tonalité entre Hard et Soft ...

Page 59: ... l accentuation du contour de l image soit en glissant les réglettes à gauche et à droite soit en cliquant sur v ou V ou en entrant directement une valeur par le clavier Plus la valeur du réglage augmente plus le contour de l image est accentué ...

Page 60: ...que fois qu une autre imprimante a été utilisée avant la UP DP10 1 Sélectionner Sélecteur dans le menu Apple La fenêtre Sélecteur ouvre 2 Sélectionner l icône UP DP10 parmi les icônes affichées à gauche de la fenêtre Sélecteur Les imprimantes UP DP10 raccordées sont alors listées dans le tableau à droite de la fenêtre Sélecteur 3 Sélectionner le nom UP DP10 dans la liste 4 Fermer la fenêtre Sélect...

Page 61: ...e valeur entre 25 et 400 Orientation Sélectionner l orientation d impression Image Layout Cet article devient valide si UPC 10S01 est sélectionné pour le type de papier Si 1 up est sélectionné une seule image est imprimée sur chaque feuille Si 16 up est sélectionné 16 images miniatures identiques sont imprimées sur chaque feuille Laminate Pattern Utiliser cet article pour sélectionner l une des 3 ...

Page 62: ...de pages à imprimer Si All est sélectionné toutes les pages sont imprimées Si From To est sélectionné les pages spécifiées sont imprimées Entrer les valeurs à l aide du clavier Réglages Color Correction L écran Color Correction est utilisé pour effectuer des réglages relatifs à l image tel que la couleur d impression et la clarté Effectuer ces réglages si l impression finale n est pas satisfaisant...

Page 63: ... La sélection de Custom permet de régler manuellement Intensity et Saturation Remarque Le réglage de Saturation sur 0 permet d utiliser le composant de saturation original mais le réglage de Intensity sur 0 ne permet d utiliser le composant d intensité original Cliquer sur Restore Defaults pour remettre tous les réglages de cet écran à leurs valeurs initiales Color Balance Utiliser les barres de d...

Page 64: ...eurs d entrée en choisissant un réglage de courbe de tonalité entre Hard et Soft Sharpness Utiliser la barre de défilement pour régler l accentuation du contour de l image Plus la valeur du réglage augmente plus le contour de l image est accentué Cliquer sur Restore Defaults pour remettre tous les réglages de cet écran à leurs valeurs initiales ...

Page 65: ...profil de UP DP10 Dans le menu déroulant Intent sélectionner l un des articles suivants pour le mappage de la reproduction couleur Perceptual Images Saturation Graphics Relative Colormetric Absolute Colormetric Dans le menu déroulant Quality sélectionner l un des articles suivants pour la qualité du mappage couleur Best Normal Draft ...

Page 66: ...avec la saleté Essuyer après le boîtier avec un chiffon sec Ne pas utiliser de dissolvant de benzène de l alcool ou de chiffons de poussière avec un produit chimique ou tout autre matériau qui risquent d endommager la finition du boîtier Guide de dépannage Que faire Avant d envoyer l imprimante en réparation refaire les vérifications Si elle ne fonctionne toujours pas correctement s adresser au ma...

Page 67: ...e Vérifier si l impression s est effectuée sur la bonne face t Charger correctement le papier d impression tel qu expliqué dans Chargement du papier d impression page 52 Vérifier si la cartouche ruban d encre ou le papier d impression est propre t Charger une nouvelle cartouche ruban d encre ou du papier d impression propre Etat de l imprimante et action a L imprimante est sous tension a Impressio...

Page 68: ...ble de retirer la cartouche ruban d encre contacter le revendeur ou le service après vente Sony le plus proche 4 Retirer le papier coincé S il n est pas possible de retirer le papier coincé ou s il n est pas visible suivre la procédure décrite ci dessous Si tout le papier coincé a été retiré passer directement à l étape 7 5 Retirer le couvercle inférieur en appuyant sur les marques et en le glissa...

Page 69: ... touchant les composants internes chauds 7 Remettre le couvercle inférieur le plateau d alimentation éjection du papier et la cartouche ruban d encre 8 Remettre le cordon d alimentation puis mettre l imprimante sous tension Remarque Toute image de trouvant auparavant dans la mémoire de l imprimante a été perdue Effectuer de nouveau l opération d impression avec l ordinateur personnel En cas de rup...

Page 70: ...ode d éjection du papier Ejection frontale Les feuilles sont éjectées dans l ordre au dessus du plateau d alimentation du papier Cartouche ruban Peut imprimer 25 feuilles Entrées AC IN prise électrique Tête thermique 11 6 points mm Accessoires Plateau d alimentation éjection du papier 1 Cordon d alimentation 1 Supports 2 Boîtier du plateau 1 Cartouche ruban d encre suffisante pour imprimer 10 feui...

Page 71: ...13 S Select Xflag Xflag 14 E nAutoFd HostBusy HostAck 15 Non défini 16 17 GND 18 S Peripheral Logic High pull up to 5V with 1k Ω 19 30 GND 31 E nInit nInit nReverseRequest 32 S nFault nDataAvail nPeriphRequest 33 Non défini 34 Non défini 35 Non défini 36 E nSelectln IEEE 1284 Active IEEE 1284 Active Dans la norme d interface parallèle bi directionnelle IEEE STD 1284 1994 la UP DP10 accepte les mod...

Page 72: ...Sony Corporation Printed in Japan ...

Reviews: