background image

– 10 –

KV-XF29M50/XF29M63/XF29M80
KV-XF29M83/XF29M90

RM-954

8

Using Y

our New TV

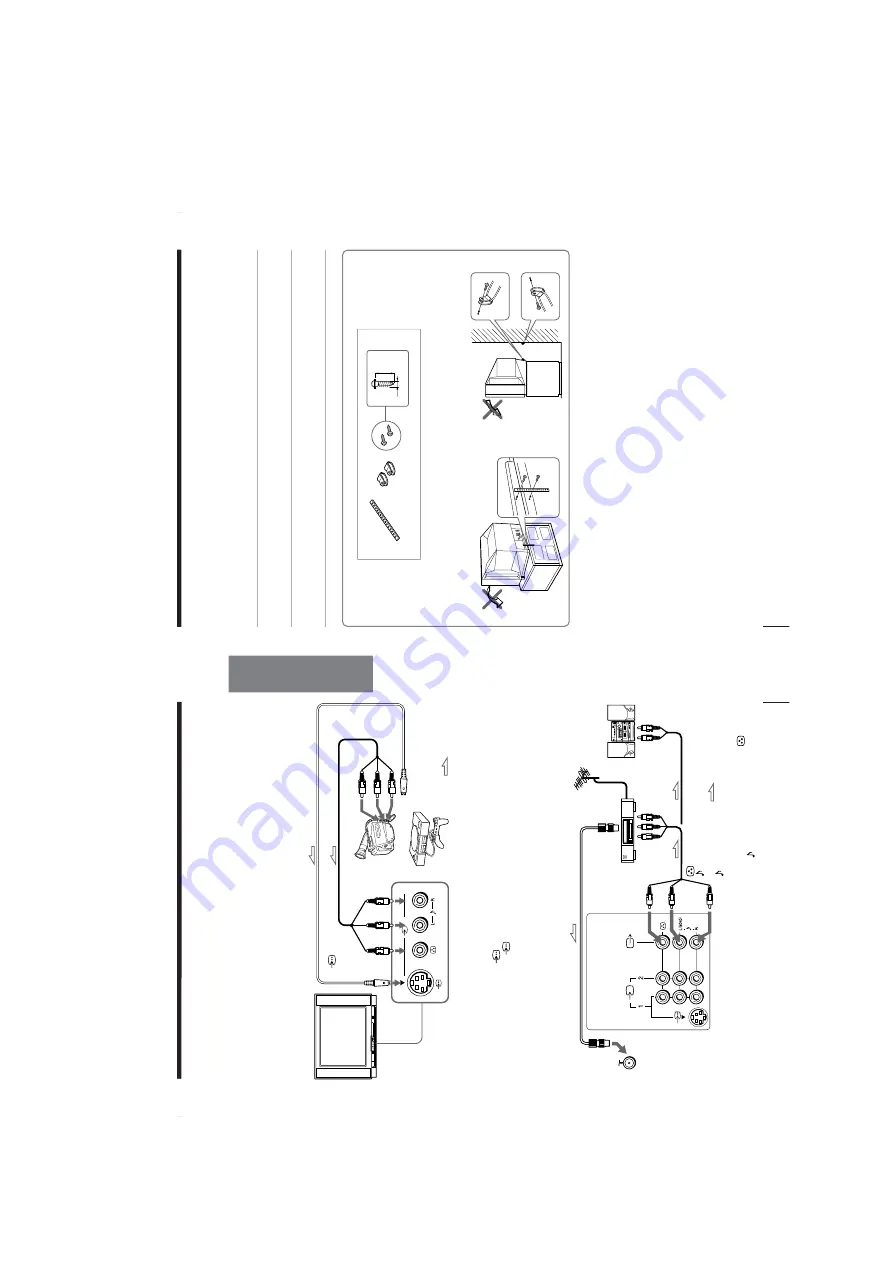
Securing the TV

T

o

 pr

event the TV fr

om falling, secur

e the TV using one of the following methods:

A

With the supplied screws, attach the band to the TV stand and to the rear of

the TV using the provided hole.

B

Put the cord or chain through the clamps to secure the TV against a wall or

pillar

.

Note

Use only the supplied scr

ews. Use of other scr

ews may damage the TV

.

20

mm

AB

3.8mm

or

7

Using Y

our New TV

Using Your New TV

W

O

O

F

E

R

(8

)

3

( MONO

)

Connecting optional components

Y

ou can connect optional audio/video components, such as a VCR, multi disc player

,

camcor

der

, video game or ster

eo system.

T

o

 watch the pictur

e of the connected equipment, see page 10.

Connecting a camcor

der/video game equipment

using the 

 (video input) jacks

Note

Y

ou can also connect video equipment to the 

 1 or 2 (video input) jacks

at the r

ear of your TV

.

If both 

 (S video input) and 

 3 (video input) ar

e input at the same

time, the 

 (S video input) is automatically selected. T

o

 view 

 3

(video input), disconnect the S video cable.

Connecting audio/video equipment using the 

Ú

(monitor output) jacks

Note

When connecting a monaural VCR, connect the yellow plug to 

 (the

yellow jack) and the black plug to 

 -L (MONO) (the white jack).

To

  S video output

Fr

ont of TV

Camcor

der

Video game

equipment

To

 video and

audio outputs

 (yellow)

-L (MONO)

(white)

-R (r

ed)

Rear of TV

To

antenna

output

To

 video and

audio inputs

or

Audio system

To

audio

inputs

VCR

:Signal flow

:Signal flow

To


(S video

input)

To

 3

(video input)

To


Ú

(monitor

output)

or

Audio/Video cable (not supplied)

S video cable (not supplied)

Antenna cable (not supplied)

Audio/V

ideo cable

(not supplied)

or

Summary of Contents for TRINITRON KV-XF29M50

Page 1: ...50 RM 954 Thailand SCC U18B A KV XF29M63 RM 954 Thailand SCC U18A A KV XF29M80 RM 954 E SCC U13B A KV XF29M83 RM 954 ME SCC U16A A KV XF29M90 RM 954 ISR SCC U19A A MODEL COMMANDER DEST CHASSIS NO CHASSIS TRINITRON COLOR TV SERVICE MANUAL BG 3S SelfDiagnosis Supported model ...

Page 2: ...Input 3 Output 1 Phono jacks 1 VP P 75 ohms Audio Input 3 Output 1 Phono jacks 500 mVrms S Video Input 2 Y 1 Vp p 75 ohms unbalanced sync negative C 0 286 Vp p 75 ohms 2 Headphone Output 1 Minijack Picture tube 29 inch Tube size cm 72 Measured diagonally Screen size cm 68 Measured diagonally Dimension w h d mm 722 573 517 KV XF29M50 XF29M80 KV XF29M90 794 589 517 KV XF29M63 XF29M83 Mass kg 50 KV X...

Page 3: ...Adjustments 39 4 CIRCUIT ADJUSTMENT 4 1 Adjustments with Commander 40 4 2 Adjustment Method 41 4 3 Picture Quality Adjustments 46 4 4 A Board Adjustment After IC003 Memory Replacement 46 4 5 Picture Distortion Adjustment 47 Section Title Page 5 DIAGRAMS 5 1 Block Diagram 49 5 2 Frame Schematic Diagram 52 5 3 Circuit Boards Location 55 5 4 Schematic Diagrams and Printed Wiring Boards 56 1 Schematic...

Page 4: ...cro reset No of times STANDBY TIMER lamp flashes Does not light 2 times 5 times Self diagnostic display Diagnostic result 002 000 or 002 001 255 003 001 255 004 001 255 at the same time 005 000 or 005 001 225 101 00 or 101 001 225 Probable Cause Location Power cord is not plugged in Fuse is burned out F3601 H3 H OUT Q511 is shorted A board IC701 is shorted C board 13V is not supplied A board IC 50...

Page 5: ...imes Vertical deflection stopped White balance failure 5 times One flash count is not used for self diagnostic 3 STOPPING THE STANDBY TIMER FLASH Turn off the power switch on the TV main unit or unplug the power cord from the outlet to stop the STANDBY TIMER lamp from flashing Lamp ON 0 3 sec Lamp OFF 3 sec Lamp OFF 0 3 sec 2 times 5 times STANDBY SLEEP lamp ...

Page 6: ... fault has been detected Numeral I means a fault has been detected 101 000 SELF DIAGNOSTIC 5 HANDLING OF SELF DIAGNOSTIC SCREEN DISPLAY Since the diagnostic results displayed on the screen are not automatically cleared always check the self diagnostic screen during repairs When you have completed the repairs clear the result display to 0 Unless the result display is cleared to 0 the self diagnosti...

Page 7: ...ion stopped Occurs when an absence of the vertical deflection pulse is detected by Q509 and IC001 shut down the power supply Vertical deflection overcurrent Occurs when an overcurrent on V drive line is detected by Q507 Power supply will be shut down when detect this by IC001 White balance failure If the RGB levels do not balance or become low level within 5 seconds this error will be detected by ...

Page 8: ...ng storms or if you are not going to use the TV for several days Install the TV in a stable position Do not allow children to climb onto it Do not plug in too many appliances to the same power socket Do not damage the power cord Clean the TV with a dry and soft cloth Do not use benzine thinner or any other chemicals to clean the TV Do not scratch the picture tube 4 Using Your New TV VIDEO VIDEO IN...

Page 9: ... 3 Preset the channels automatically Tip If you want to stop the automatic channel presetting press MENU twice Note This is not used for these models The TV system TV SYS is always AUTO in the AUTO PROGRAM menu Now You Are Ready To preset the channels manually see page 26 and 27 1 2 Front of TV 6 Using Your New TV Connecting the 3D WOOFER WOOFER 8 3D WOOFER Black wire Red wire KV XF29M63 XF29M83 1...

Page 10: ...onnecting a camcorder video game equipment using the video input jacks Note You can also connect video equipment to the 1 or 2 video input jacks at the rear of your TV If both S video input and 3 video input are input at the same time the S video input is automatically selected To view 3 video input disconnect the S video cable Connecting audio video equipment using the Ú monitor output jacks Note...

Page 11: ...the TV lights up Press U on the TV Press Press to select VIDEO 1 VIDEO 2 and VIDEO 3 To return to the TV program press Press JUMP Press The picture sound and either the program number or video mode are displayed The on screen display for the picture and sound information disappears after about 3 seconds Changing the menu language KV XF29M50 XF29M80 XF29M90 You can change the menu language as well ...

Page 12: ...IC ROTATI I N T E L L I G E N T L A N G U A G E ENGLISH PR01 L A N G U A G E SET UP CHILD LOCK PR00 OFF PIC ROTATION FAVORITE CH I N T E L L I G E N T V O L O F F L A N G U A G E ENGLISH 10 Using Your New TV ENTER Changing the menu language KV XF29M63 only You can change the menu language as well as the on screen language For details on how to use the menu see How to use the menu on page 18 1 Pres...

Page 13: ... SLEEP TIMER OFF SLEEP TIMER 90M After 30 minutes No Sleep Timer After 60 minutes After 90 minutes 12 Advanced Operations Advanced Operations SOUND MODE Selecting the picture and sound modes You can select picture and sound modes and adjust the setting to your preference in PERSONAL option Selecting the picture mode Press PIC MODE repeatedly until you get the desired picture mode Select To DYNAMIC...

Page 14: ...ons Press SURROUND repeatedly until you receive the desired surround sound Listening with surround sound The surround feature enables you to enjoy the sound effects of a concert hall or movie theater FAVORITE SOUND MODE PIC MODE ENTER MENU A B SURROUND Select To HIGH listen to sound that spreads out over a large area giving the feeling of being at a concert hall LOW listen to the sound that gives ...

Page 15: ... area for NICAM and A2 German programs Notes If the signal is very weak the sound becomes monaural automatically If the stereo sound is noisy when receiving a NICAM program select MONO The sound becomes monaural but the noise is reduced If the sound is distorted or noisy when receiving a monaural program through the antenna terminal Press A B repeatedly until MONO appears on the screen To cancel t...

Page 16: ... and No 4 482 866 The word BBE and the BBE symbol are the trademarks of BBE Sound Inc Adjusting Your Setup MENU KV XF29M50 XF29M80 XF29M90 17 Adjusting Your Setup MENU Introducing the menu system The MENU button lets you open a menu and change the settings of your TV Here s an overview of the menu system Level 1 Level 2 Level 3 Function A V CONTROL PICTURE MODE Select the picture mode DYNAMIC n ST...

Page 17: ...ET UP icon CH PRESET icon Name of the current menu Menu level 3 Menu level 2 Adjusting Your Setup MENU Menu level 1 The BBE is manufactured by Sony Corporation under license from BBE Sound Inc It is covered by U S Patent No 4 638 258 and No 4 482 866 The word BBE and the BBE symbol are the trademarks of BBE Sound Inc Adjusting Your Setup MENU KV XF29M83 20 Adjusting Your Setup MENU How to use the ...

Page 18: ... desired item e g COLOR then press ENTER 2 Adjust the value according to the following table then press ENTER For Press to Press to PICTURE decrease picture contrast increase picture contrast COLOR decrease color intensity increase color intensity BRIGHT darken the picture brighten the picture HUE increase red picture tones increase green picture tones SHARP soften the picture sharpen the picture ...

Page 19: ...I G E N T V O L O F F L A N G U A G E ENGLISH ENTER FAVORITE ENTER 1 2 3 4 5 6 7 8 0 9 ENTER ENTER ENTER continued KV XF29M50 XF29M80 XF29M90 21 Adjusting Your Setup MENU 1 Press MENU 2 Press or to select the SET UP icon then press ENTER 3 Press or to select FAVORITE CH then press ENTER twice 4 Press or or number buttons to program the desired channel e g PR03 then press ENTER 5 To continue progra...

Page 20: ... CHILD LOCK PR00 OFF PIC ROTATION FAVORITE CH I N T E L L I G E N T V O L O F F L A N G U A G E ENGLISH KV XF29M83 24 Adjusting Your Setup MENU ENTER 1 2 3 4 5 6 7 8 0 9 1 Press MENU 2 Press or to select the SET UP icon then press ENTER 3 Press or to select CHILD LOCK then press ENTER 4 Press or or number buttons to select the desired channel then press ENTER 5 Press or to select ON then press ENT...

Page 21: ...E CH I N T E L L I G E N T V O L O F F L A N G U A G E ENGLISH ENTER Changing the SET UP setting continued ENTER ENTER KV XF29M63 24 Adjusting Your Setup MENU ENTER 1 2 3 4 5 6 7 8 0 9 1 Press MENU 2 Press or to select the SET UP icon then press ENTER 3 Press or to select CHILD LOCK then press ENTER 4 Press or or number buttons to select the desired channel then press ENTER 5 Press or to select ON...

Page 22: ...er to Introducing the menu system on page 19 and How to use the menu on page 20 ENTER ENTER ENTER PIC ROTATION KV XF29M50 XF29M80 XF29M90 23 Adjusting Your Setup MENU 1 Press MENU 2 Press or to select the SET UP icon then press ENTER 3 Press or to select the desired option e g INTELLIGENT VOL then press ENTER Changing other SET UP menu options SET UP CHILD LOCK PR00 OFF PIC ROTATION FAVORITE CH I ...

Page 23: ... and how to use the menu refer to Introducing the menu system on page 19 and How to use the menu on page 20 ENTER PIC ROTATION ENTER ENTER SET UP CHILD LOCK PR00 OFF PIC ROTATION FAVORITE CH I N T E L L I G E N T V O L O F F L A N G U A G E ENGLISH SET UP CHILD LOCK OFF FAVORITE C PIC ROTATI I N T E L L I G E N T V O L L A N G U A G E ON KV XF29M83 26 Adjusting Your Setup MENU ENTER Changing the C...

Page 24: ...VHF LOW FINE AUTO PR 10 B G M continued ENTER ENTER ENTER ENTER MANUAL PROGRAM VHF LOW FINE AUTO PR 10 TV SYS M 28 Adjusting Your Setup MENU 7 If you are not satisfied with the picture and sound quality you may improve them by using fine tuning 1 Press or to select FINE then press ENTER 2 Press or to select MANUAL then press ENTER 3 Press or until you are satisfied with the picture and sound quali...

Page 25: ...e 19 and How to use the menu on page 20 Note If you preset a locked channel that particular channel will be unlocked automatically CH PRESET MANUAL PROGRAM SKIP PR05 ON TV SYS B G COL SYS AUTO AUTO PROGRAM CH PRESET MANUAL PRO PR 10 SKIP TV SYS B G ON COL SYS AU OFF AUTO PROGR ENTER ENTER Select AUTO PROGRAM MANUAL PROGRAM TV SYS COL SYS SKIP 30 Additional Information Additional Information Self d...

Page 26: ...tion Possible cause Symptom Solutions Good picture No sound Dotted lines or stripes Double images or ghosts No color Abnormal color patches TV cannot receive stereo broadcast signal Troubleshooting continued Press to increase the volume level Press to cancel the muting Press A B KV XF29M63 only until a good sound is heard Do not use a hair dryer or other equipment near the TV Adjust the antenna di...

Page 27: ...und switches on and off or is distorted or The sound switches between monaural and stereo frequently KV XF29M63 only Picture slant The u indicator on your TV flashes red for about 3 seconds per interval TV cabinet creaks A boom sound is heard when the TV is turned on Connection is loose or the cable is damaged The antenna direction is inappropriate Broadcast signal has a transmission problem The t...

Page 28: ... may cause Distorted picture Noisy sound Antenna connection 35 Additional Information P166 SECTEXT 166 FR1 MAR 03 59 09 Fom Singapore To PARIS To OSAKA To ROMA To SYDNEY Day Dep Arr Flight Alrcraft 1 6 220 0588 SQ28 747 2 2130 1225 PA115 L15 3 2115 1330 SQ26 747 2 7 2130 0745 SQ24 747 4 2300 0915 AZ487 747 2 5 1000 1715 SQ6 747 4 6 0930 2015 CX522 L10 1 2210 0610 SQ21A 747 2 2100 0835 SQ21A 747 Co...

Page 29: ...on 10 6 Number buttons 9 7 JUMP button 10 8 Menu operation buttons 20 MENU button or buttons ENTER button 9 PROGR button 9 º A B button 15 KV XF29M63 only Timer setting buttons 11 wake up timer sleep timer volume buttons 9 Remote Control 1 4 7 2 5 8 0 3 6 9 FAVORITE SOUND MODE PIC MODE ENTER MENU A B SURROUND 5 4 3 6 7 8 9 º SOUND MODE button 12 SURROUND button 14 FAVORITE button 13 PIC MODE butto...

Page 30: ...Y REMOVAL 2 3 SPEAKER REMOVAL 2 1 3D SPEAKER BOX REMOVAL KV XF29M63 XF29M83 only 1 Four screws Washer head P 4 16 2 Bracket speaker 1 Chassis assy 2 2 REAR COVER REMOVAL 1 3D Speaker box assy Red wire Black wire 1 Eight screws BVTP 4 16 1 Three screws BVTP 4 16 1 One screw BVTP 4 16 2 Rear cover ...

Page 31: ...F PARTS For replacement of the Control Button and Light Guide unscrew them exchange with the new parts and fix them with screws BVTP respectively 2 7 1 REPLACEMENT OF CONTROL BUTTON Control button Two screws BVTP 3 12 One screw BVTP 3 12 2 5 F BRACKET REMOVAL 4 Two screws BVTP 3 12 5 F bracket 2 Two claws 1 Three connectors 3 F board 6 Two screws BVTP 3 12 ...

Page 32: ...NAL BRACKET REMOVAL 2 10 H3 BOARD REMOVAL 3 Two connectors 6 One screw BVTP 3 12 with washer 1 Two connectors 4 Four claws 5 H3 Board 2 Four connectors 1 Two screws BVTP 3 12 2 Two claws 3 Terminal bracket 2 8 D1 BOARD REMOVAL 1 Three connectors 2 One claw 3 D1 board ...

Page 33: ...sher head P 4 16 3 Four screws washer head P 4 16 2 Speaker Bracket assy L 4 Speaker Bracket assy R Two screws Tapping Tension spring 6 Chassis assy 9 Deflection yoke 8 Neck assy 7 C board 5 Anode cap Picture tube Cushion Two screws Tapping 4 B3 Board 5 A Board 3 Five connectors 1 Two screws BVTAP 3 12 2 Three screws BVTAP 3 12 2 11 A AND B3 BOARDS REMOVAL ...

Page 34: ... anode cap A metal fitting called the shatter hook terminal is built into the rubber 3 Do not turn the foot of rubber over too hard The shatter hook terminal will stick out or damage the rubber HOW TO HANDLE AN ANODE CAP 3 When one side of the rubber cap is separated from the anode button the anode cap can be removed by turning up the rubber cap and pulling it up in the direction of the arrow c 2 ...

Page 35: ...the set s power and degauss with the degausser 3 1 BEAM LANDING 1 Input a white signal with the pattern generator Contrast Brightness 2 Position neck assy as shown in Fig3 2 3 Set the pattern generator raster signal to a red raster 4 Move the deflection yoke to the rear and adjust with the purity control so that the red is at the center and the blue and the green take up equally sized areas on eac...

Page 36: ...other at the center of the screen 3 If the H STAT variable resistor cannot bring the red green and blue dots together at the center of the screen adjust the horizontal convergence with the H STAT variable resistor and the V STAT magnet in the manner given below In this case the H STAT variable resistor and the V STAT magnet influence each other so be sure to perform adjustments while tracking Cent...

Page 37: ...that the horizontal lines at the top and bottom of the screen are straight Blue Red VM board Blue Red VM board Neck assy Neck assy Note 1 The Red and Blue magnets should be equally far from the horizontal center line 2 Do not separate the Red and Blue magnets too far Less than 8 mm 2 Dynamic Convergence Adjustment Preparation Before starting this adjustment adjust the horizontal static convergence...

Page 38: ...e misconverged areas a b c d Permalloy assembly 3 3 FOCUS ADJUSTMENT Adjust FOCUS control on the flyback transformer for the best focus FLYBACK TRANSFORMER T503 Screen Focus TLV Rotate TLV 2 VOL 29 34 on DY Rotate TLV VOL 25 on DY XCV Rotate XCV Adj core on DY YCH Rotate YCH VOL on DY TLH Insert TLH Correction Plate to DY Pocket Left or Right ON DY YCH XCV TLV1 TLV2 ...

Page 39: ...e balance 7 Write into the memory by pressing MUTING then 0 3 SUB BRIGHT ADJUSTMENT 1 Set to service mode 2 Input a staircase signal of black to white from the pattern generator 3 BRIGHTNESS 50 PICTURE MINIMUM 4 Select SBR WHB7 with 1 and 4 and adjust SBR WHB7 level with 3 and 6 so that the second stripe from the right is dimly lit 3 4 G2 SCREEN AND WHITE BALANCE ADJUSTMENTS 1 G2 SCREEN ADJUSTMENT...

Page 40: ...de Item Name Item No Software version Suffix No OEM Code Total Power On time hours p Marking of virgin NVM GEO 1 0C 59 7F 000A 0 601S Device Name 50 1 4 7 2 5 8 0 3 6 9 FAVORITE SOUND MODE PIC MODE ENTER MENU A B SURROUND RM 954 b METHOD OF CANCELLATION FROM SERVICE MODE Set the standby condition Press POWER button on the commander then press POWER button again hereupon it becomes TV mode c METHOD...

Page 41: ...ing and back to SERVICE Use the same method for all Items Use 1 and 4 to select the adjustment item use 3 and 6 to adjust write with MUTING then execute the write with Note 1 In WRITE the data for all items are written into memory together 2 For adjustment items that have different standard data between 50Hz or 60Hz be sure to use the respective input signal after adjustment 1F SERVICE 50 HPS Adju...

Page 42: ...YNAMIC other 0A 7 2 A4 7 2 2 BDR 1F 3F B Drive DYNAMIC other 0B 7 2 A5 7 2 3 RCT 7 0F R Cutoff SECAM other 07 3 0 A7 3 0 4 GCT 7 0F G Cutoff SECAM other 08 7 4 A8 3 0 5 BCT 7 0F B Cutoff SECAM other 08 3 0 A8 3 0 6 BMN 15 1F Brightness Minimum Data 06 7 2 106 7 SBR 1F 3F Sub Brightness Control 06 7 2 107 SAJ 0 PMX 33 3F Picture Maximum Data 03 7 2 CXA2130S 88H 105 1 SHU 8 0F Sub Hue Control TV Vid...

Page 43: ... 0 BCS 1 3 Bass Center Shift 4 3 0 TDA7315 80H 24C 1 0 1 TCS 1 3 Treble Center Shift 5 3 0 24D 1 0 2 TRF 2 3 RF Treble Offset 5 3 0 24E 1 0 MSP 0 WST 15 FF W G Stereo Threshold MSP3415D 84H 165 1 WBT EA FF W G Bilingual Threshold 166 2 WLL 5 FF W G Monaural Threshold 167 3 WAC 1 0F W G Agreement Count 168 4 WDL 30 FF W G Search Delay 169 5 NDL 20 FF NICAM Search Delay 16A 6 SDL 10 FF Stereo status...

Page 44: ...F PIP V Pedestal Level 0E 7 4 1AD 7 4 0B PDU 0 0F PIP U Pedestal Level 0E 3 0 1AD 3 0 TXT 0 TXH 1 3 Teletext Horizontal Position 10 1 0 SAA5261 58H 248 1 0 1 TXV 0 3 Teletext Vertical Position 10 6 4 248 5 4 OPM 0 OSH 0A 3F OSD H Position Option Misc 1F1 CXP86461 60H 18D 7 2 1 COM 1 03 Comb Selection 23F 7 6 2 APC 1 1 APC Switch 23E 5 3 TSY 0 03 TV Sys at Auto TV Sys 23E 4 3 4 MUT 0 1 No Signal Mu...

Page 45: ...XTAL 4 43 1 1 1 1 1 ITEM INFORMATION No OPB0 OP1 No OPB1 OP2 No OPB2 OP3 Item KV XF29M50 KV XF29M63 KV XF29M80 KV XF29M83 KV XF29M90 1 1 1 1 1 1 1 1 1 1 DVD Input 0 0 0 0 0 0 0 0 0 0 Thai Bil 0 1 0 0 0 HDEV 1 1 1 1 1 NICAM 0 1 0 0 1 TOP 1 1 1 1 1 Item KV XF29M50 KV XF29M63 KV XF29M80 KV XF29M83 KV XF29M90 Chinese 1 0 0 0 1 11 KEY 0 0 0 0 0 Arabic 0 0 0 1 0 US ST 0 0 0 0 0 Auto TV sys 1 1 1 1 1 Aut...

Page 46: ...te the data VB1 VB2 VB3 VB4 VB1 VB2 VB3 VB4 BELL FILTER ADJUSTMENT 1 Input SECAM color bar signal 2 Connect the dual trace oscilloscope to CN303 pin 9 not mounted 3 Adjust SERVICE MODE ITEMS SBF as shown below 4 4 A BOARD ADJUSTMENT AFTER IC003 MEMORY REPLACEMENT When replacing IC003 MEMORY be sure to change IC001 μ COM to the following new IC at the same time IC001 μ CON CXP86461 601S KV XF29M50 ...

Page 47: ... 0 HPS H POSITION GEO 1 HSZ H SIZE GEO 2 PAP PIN AMP GEO 5 VSZ V SIZE GEO 7 VLN V LINEARITY GEO 4 VPS V POSITION GEO 6 SCO VERTICAL S Correction GEO 8 BOW AFC BOW GEO 9 AGL AFC ANGLE GEO 3 TLT TRAPEZIUM GEO 0A UCP UPPER CORNER PIN GEO 0B LCP LOWER CORNER PIN PICTURE DISTORTION ADJUSTMENT 2 H TRAPEZOID Rotate RV1801 ...

Page 48: ... 48 KV XF29M50 XF29M63 XF29M80 KV XF29M83 XF29M90 RM 954 MEMO ...

Page 49: ...29M83 only SP ASSY R out CRT SOCKET G out CRT M68LNH010X NECK ASSY DY Y29RSA M2 B out R out V out U out Y out V in U in Y in VM out G out B out 22 23 24 21 19 18 11 13 14 IK in H DRIVE H PULSE E W VD VD VM DRIVE Q5902 5906 H OUT Q511 2SC4927 V OUT IC503 TDA8172 HDT T501 H DRIVE Q506 2SC2688 PIN CONT IC502 NJM2903M PIN OUT Q505 IRF614 PMT T505 HLT T504 FBT T503 NX 4009 V PARA IC2805 DQP V DRIVE Q28...

Page 50: ...M63 XF29M90 51 A 1372 569 A H3 BOARD COMPLETE KV XF29M63 A 1372 586 A H3 BOARD COMPLETE KV XF29M50 XF29M90 52 A 1135 978 A B3 BOARD COMPLETE KV XF29M50 XF29M90 A 1135 975 A B3 BOARD COMPLETE KV XF29M63 53 A 1388 232 A J2 BOARD COMPLETE KV XF29M63 ONLY 54 4 022 115 31 HOLDER AC CORD 55 1 575 023 61 CORD POWER WITH CONNECTOR 6A 250V KV XF29M50 XF29M63 1 574 062 11 CORD POWER WITH CONNECTOR 2 5A 250V...

Page 51: ...BE M68LNH010X KV XF29M50 XF29M63 8 735 041 05 PICTURE TUBE M68LNH010X KV XF29M90 REF NO PART NO DESCRIPTION REMARK 113 4 046 765 11 SCREW TAPPING 7 CROWN WASHER 114 3 704 372 21 HOLDER HV CABLE 115 4 064 818 01 SPACER DY 116 2 163 920 11 PLATE TLH CORRECTION 117 8 451 494 21 DEFLECTION YOKE Y29RSA M2 118 8 453 011 11 NA299 M 119 A 1331 878 A C BOARD COMPLETE 120 1 416 495 12 COIL DEMAGNETIC 121 4 ...

Page 52: ... SCREW BVTP 4 12 p 7 685 663 71 SCREW BVTP 4 16 REF NO PART NO DESCRIPTION REMARK 155 156 154 151 153 152 151 A 1501 377 A BOX ASSY SPEAKER 3D 152 4 065 515 01 BOX TP 3D SPEAKER 153 1 529 172 11 SPEAKER LOUD 10CM 154 4 065 516 01 BOX BT 3D SPEAKER 155 4 037 244 01 FOOT 156 4 302 428 03 SCREW WASHER HEAD P 3X12 ...

Page 53: ...C302 1 163 005 11 CERAMIC CHIP 470PF 10 50V C303 1 126 963 11 ELECT 4 7MF 20 50V C304 1 126 967 11 ELECT 47MF 20 50V C305 1 164 004 11 CERAMIC CHIP 0 1MF 10 25V C306 1 163 099 00 CERAMIC CHIP 18PF 5 50V C307 1 163 099 00 CERAMIC CHIP 18PF 5 50V C308 1 163 259 91 CERAMIC CHIP 220PF 5 50V C309 1 126 957 11 ELECT 0 22MF 20 50V C311 1 126 965 11 ELECT 22MF 20 50V C312 1 164 346 11 CERAMIC CHIP 1MF 16V...

Page 54: ... 11 CERAMIC CHIP 0 001MF 10 50V C605 1 119 886 51 CERAMIC 470PF 10 250V C606 1 119 886 51 CERAMIC 470PF 10 250V C607 1 161 830 00 CERAMIC 0 0047MF 99 500V C608 1 161 830 00 CERAMIC 0 0047MF 99 500V C609 1 126 968 11 ELECT 100MF 20 50V C610 1 126 964 11 ELECT 10MF 20 50V C611 1 161 830 00 CERAMIC 0 0047MF 99 500V C612 1 161 830 00 CERAMIC 0 0047MF 99 500V C613 1 125 905 11 ELECT 560MF 20 450V C614 ...

Page 55: ...EL1Z D505 8 719 988 62 DIODE 1SS355 D506 8 719 911 19 DIODE 1SS119 25 D507 8 719 988 62 DIODE 1SS355 D508 8 719 988 62 DIODE 1SS355 D509 8 719 158 15 DIODE RD5 6SB D510 8 719 988 62 DIODE 1SS355 D511 8 719 988 62 DIODE 1SS355 D512 8 719 988 62 DIODE 1SS355 D513 8 719 908 03 DIODE GP08D D517 8 719 945 80 DIODE ERC06 15S D518 8 719 900 26 DIODE ERD29 08J D519 8 719 945 80 DIODE ERC06 15S D520 1 216 ...

Page 56: ...L003 1 414 180 11 INDUCTOR 3 3UH L005 1 414 233 22 INDUCTOR CHIP 0UH L101 1 414 856 11 INDUCTOR 10UH L102 1 414 856 11 INDUCTOR 10UH L103 1 414 856 11 INDUCTOR 10UH L104 1 414 856 11 INDUCTOR 10UH L105 1 414 856 11 INDUCTOR 10UH L301 1 414 189 31 INDUCTOR 100UH L302 1 414 185 41 INDUCTOR 22UH L501 1 412 525 31 INDUCTOR 10UH L502 1 422 613 11 COIL AIR CORE L503 1 412 525 31 INDUCTOR 10UH L504 1 412...

Page 57: ...1K 5 1 10W R028 1 216 049 91 RES CHIP 1K 5 1 10W KV XF29M63 XF29M90 ONLY R029 1 216 049 91 RES CHIP 1K 5 1 10W R031 1 216 049 91 RES CHIP 1K 5 1 10W R032 1 216 025 91 RES CHIP 100 5 1 10W R034 1 216 049 91 RES CHIP 1K 5 1 10W R035 1 216 025 91 RES CHIP 100 5 1 10W R036 1 216 025 91 RES CHIP 100 5 1 10W R037 1 216 025 91 RES CHIP 100 5 1 10W R038 1 216 049 91 RES CHIP 1K 5 1 10W R040 1 216 025 91 R...

Page 58: ... 68K 1 1 4W R591 1 260 288 11 CARBON 0 47 5 1 2W F R592 1 216 689 11 METAL CHIP 39K 0 50 1 10W R593 1 260 288 11 CARBON 0 47 5 1 2W F R594 1 260 288 11 CARBON 0 47 5 1 2W F R596 1 215 918 00 METAL OXIDE 1 5K 5 3W F R597 1 247 750 11 CARBON 680 5 1 2W F R326 1 216 029 00 RES CHIP 150 5 1 10W R327 1 216 033 00 RES CHIP 220 5 1 10W R331 1 216 295 91 SHORT 0 R332 1 216 033 00 RES CHIP 220 5 1 10W R333...

Page 59: ...5 11 CARBON 680 5 1 4W R641 1 216 361 21 METAL OXIDE 0 22 5 2W F R642 1 249 419 11 CARBON 1 5K 5 1 4W R643 1 247 843 11 CARBON 3 3K 5 1 4W R644 1 249 419 11 CARBON 1 5K 5 1 4W R646 1 215 924 00 METAL OXIDE 15K 5 3W F R647 1 249 387 11 CARBON 3 3 5 1 4W R648 1 216 057 00 RES CHIP 2 2K 5 1 10W R649 1 249 417 11 CARBON 1K 5 1 4W R650 1 215 882 00 METAL OXIDE 22 5 2W F R652 1 215 900 11 METAL OXIDE 22...

Page 60: ...50V C3212 1 126 964 11 ELECT 10MF 20 50V C3213 1 104 665 11 ELECT 100MF 20 25V C3214 1 104 665 11 ELECT 100MF 20 25V C3215 1 117 720 11 CERAMIC CHIP 4 7MF 10V C3216 1 117 720 11 CERAMIC CHIP 4 7MF 10V C3217 1 163 021 91 CERAMIC CHIP 0 01MF 10 50V C3218 1 163 017 00 CERAMIC CHIP 0 0047MF 10 50V C3219 1 163 017 00 CERAMIC CHIP 0 0047MF 10 50V C3220 1 163 037 11 CERAMIC CHIP 0 022MF 10 50V C3221 1 16...

Page 61: ...CN1407 1 779 891 11 CONNECTOR BOARD TO BOARD 8P CN6200 1 564 507 11 PLUG CONNECTOR 4P CN6204 1 564 509 11 PLUG CONNECTOR 6P CN6206 1 564 510 11 PLUG CONNECTOR 7P DIODE D1401 8 719 158 35 DIODE RD9 1SB D1402 8 719 158 35 DIODE RD9 1SB D1403 8 719 158 35 DIODE RD9 1SB D1404 8 719 158 35 DIODE RD9 1SB D1405 8 719 158 35 DIODE RD9 1SB D1406 8 719 158 35 DIODE RD9 1SB D1407 8 719 158 35 DIODE RD9 1SB D...

Page 62: ...P 2 2K 5 1 10W R1468 1 216 093 00 RES CHIP 68K 5 1 10W R1469 1 216 105 91 RES CHIP 220K 5 1 10W R1470 1 216 105 91 RES CHIP 220K 5 1 10W R1471 1 216 022 00 RES CHIP 75 5 1 10W R1472 1 216 033 00 RES CHIP 220 5 1 10W R1473 1 216 033 00 RES CHIP 220 5 1 10W R1477 1 216 047 91 RES CHIP 820 5 1 10W R1478 1 216 051 00 RES CHIP 1 2K 5 1 10W R1479 1 216 105 91 RES CHIP 220K 5 1 10W R1480 1 216 105 91 RES...

Page 63: ...073 00 RES CHIP 10K 5 1 10W R3285 1 216 073 00 RES CHIP 10K 5 1 10W R3286 1 216 073 00 RES CHIP 10K 5 1 10W R3287 1 216 073 00 RES CHIP 10K 5 1 10W R3288 1 216 073 00 RES CHIP 10K 5 1 10W R3289 1 216 073 00 RES CHIP 10K 5 1 10W R3290 1 216 081 00 RES CHIP 22K 5 1 10W R3291 1 216 079 00 RES CHIP 18K 5 1 10W R3294 1 216 073 00 RES CHIP 10K 5 1 10W R3295 1 216 065 91 RES CHIP 4 7K 5 1 10W R3296 1 216...

Page 64: ...4 344 11 CERAMIC CHIP 0 068MF 10 25V C3277 1 164 344 11 CERAMIC CHIP 0 068MF 10 25V C3278 1 164 344 11 CERAMIC CHIP 0 068MF 10 25V C3279 1 164 344 11 CERAMIC CHIP 0 068MF 10 25V C3280 1 115 419 11 CERAMIC CHIP 3300PF 5 25V C3281 1 163 037 11 CERAMIC CHIP 0 022MF 10 50V C3282 1 126 964 11 ELECT 10MF 20 50V C3283 1 126 964 11 ELECT 10MF 20 50V C3284 1 115 339 11 CERAMIC CHIP 0 1MF 10 50V C3285 1 126...

Page 65: ... 553 45 IC TDA7481 JACK J1401 1 784 646 11 TERMINAL S J1402 1 778 388 11 JACK BLOCK PIN 9P CHIP CONDUCTOR JR1405 1 216 295 91 SHORT 0 JR1406 1 216 295 91 SHORT 0 JR1407 1 216 295 91 SHORT 0 JR1408 1 216 295 91 SHORT 0 JR3200 1 216 295 91 SHORT 0 JR3201 1 216 295 91 SHORT 0 JR3202 1 216 295 91 SHORT 0 JR3203 1 216 295 91 SHORT 0 JR3204 1 216 295 91 SHORT 0 JR3207 1 216 295 91 SHORT 0 JR3208 1 216 2...

Page 66: ...00 RES CHIP 220 5 1 10W R3281 1 216 033 00 RES CHIP 220 5 1 10W R3282 1 216 079 00 RES CHIP 18K 5 1 10W R3283 1 216 081 00 RES CHIP 22K 5 1 10W R3284 1 216 073 00 RES CHIP 10K 5 1 10W R1409 1 216 105 91 RES CHIP 220K 5 1 10W R1410 1 216 105 91 RES CHIP 220K 5 1 10W R1411 1 216 295 91 SHORT 0 R1412 1 216 295 91 SHORT 0 R1414 1 216 025 91 RES CHIP 100 5 1 10W R1426 1 216 025 91 RES CHIP 100 5 1 10W ...

Page 67: ...1 216 308 00 RES CHIP 4 7 5 1 10W R6256 1 216 065 91 RES CHIP 4 7K 5 1 10W R6257 1 216 061 00 RES CHIP 3 3K 5 1 10W R6258 1 216 017 91 RES CHIP 47 5 1 10W R6259 1 216 308 00 RES CHIP 4 7 5 1 10W R6260 1 216 073 00 RES CHIP 10K 5 1 10W R6262 1 216 059 00 RES CHIP 2 7K 5 1 10W R6263 1 216 059 00 RES CHIP 2 7K 5 1 10W R6266 1 216 089 91 RES CHIP 47K 5 1 10W R6268 1 216 065 91 RES CHIP 4 7K 5 1 10W R6...

Page 68: ...5 3W F R734 1 247 739 11 CARBON 100 5 1 2W R744 1 215 415 00 METAL 560 1 1 4W R745 1 215 410 00 METAL 360 1 1 4W R1800 1 249 417 11 CARBON 1K 5 1 4W R1801 1 249 426 11 CARBON 5 6K 5 1 4W R1802 1 249 387 11 CARBON 3 3 5 1 4W F R1803 1 249 387 11 CARBON 3 3 5 1 4W F R1805 1 249 429 11 CARBON 10K 5 1 4W R1806 1 249 425 11 CARBON 4 7K 5 1 4W R1808 1 249 425 11 CARBON 4 7K 5 1 4W R1809 1 249 435 11 CAR...

Page 69: ...OR 2SC4793 RESISTOR R2801 1 216 081 00 RES CHIP 22K 5 1 10W R2803 1 216 057 00 RES CHIP 2 2K 5 1 10W R2804 1 216 041 00 RES CHIP 470 5 1 10W R2806 1 216 073 00 RES CHIP 10K 5 1 10W R2809 1 216 073 00 RES CHIP 10K 5 1 10W R2812 1 216 097 91 RES CHIP 100K 5 1 10W R2813 1 216 089 91 RES CHIP 47K 5 1 10W R2816 1 216 097 91 RES CHIP 100K 5 1 10W R2820 1 216 089 91 RES CHIP 47K 5 1 10W R2821 1 249 412 1...

Page 70: ... FILM 0 01MF 5 50V C3902 1 136 153 00 FILM 0 01MF 5 50V C3904 1 104 664 11 ELECT 47MF 20 25V C3905 1 126 965 11 ELECT 22MF 20 50V C3906 1 126 965 11 ELECT 22MF 20 50V C3907 1 136 175 00 FILM 0 68MF 5 50V KV XF29M63 XF29M83 ONLY C3910 1 104 664 11 ELECT 47MF 20 16V C3911 1 104 664 11 ELECT 47MF 20 16V C3912 1 102 114 00 CERAMIC 470PF 10 50V C3913 1 126 960 11 ELECT 1MF 20 50V C3914 1 126 965 11 ELE...

Page 71: ...692 431 21 SWITCH TACTILE S3907 1 692 431 21 SWITCH TACTILE S3908 1 692 431 21 SWITCH TACTILE A 1388 232 A J2 BOARD COMPLETE KV XF29M63 ONLY A 1388 228 A J2 BOARD COMPLETE KV XF29M83 ONLY CONNECTOR CN3451 1 564 518 11 PLUG CONNECTOR 3P DIODE D3453 8 719 110 72 DIODE RD30ESB2 D3454 8 719 110 72 DIODE RD30ESB2 JACK J3451 1 694 467 11 TERMINAL PUSH 2P A 1342 442 A VM1 BOARD COMPLETE KV XF29M50 GE XF2...

Page 72: ...7 1 249 416 11 CARBON 820 5 1 4W R5918 1 249 429 11 CARBON 10K 5 1 4W R5919 1 249 417 11 CARBON 1K 5 1 4W F R5920 1 249 439 11 CARBON 68K 5 1 4W R5921 1 216 476 11 METAL OXIDE 180 5 3W F R5922 1 249 414 11 CARBON 560 5 1 4W R5923 1 249 383 11 CARBON 1 5 5 1 4W F R5925 1 249 400 11 CARBON 39 5 1 4W F R5929 1 215 880 00 METAL OXIDE 10 5 2W F R5930 1 249 413 11 CARBON 470 5 1 4W R5931 1 249 413 11 CA...

Page 73: ...CESSORIES AND PACKING MATERIALS KV XF29M50 THAILAND XF29M63 XF29M90 3 701 910 00 SCREW SPECIAL DIA 3 8X20 3 864 172 11 MANUAL INSTRUCTION KV XF29M50 THAILAND 3 865 298 11 MANUAL INSTRUCTION KV XF29M63 3 864 172 21 MANUAL INSTRUCTION KV XF29M90 4 037 760 01 BAG PROTECTION 4 057 329 01 TRAY 4 059 705 01 CLIP 4 067 437 01 INDIVIDUAL CARTON 4 067 438 01 CUSHION UPPER ASSY 4 067 439 01 CUSHION LOWER AS...

Page 74: ... components identified by shading and mark are critical for safety Replace only with part number specified KV XF29M50 XF29M63 XF29M80 KV XF29M83 XF29M90 RM 954 Sony Corporation Display Company TV Display Business Asia English 98JA70181 1 Printed in Malaysia 1998 10 9 965 709 01 ...

Page 75: ...CXA1855S slave 90H CN1307 BBE IC3206 NJM2150D DAC IC3205 CXA1315P slave 48H AUDIO PROCESSOR IC3207 TDA7315D slave 80H DBFB IC3202 DBFB 3D O6202 AUDIO OUT IC6201 AUDIO OUT IC6200 TA8200AH RED OUT GREEN OUT BLUE OUT STV5112 IC701 N S DRIVE IC1800 H3 C VM1 SP ASSY R out CRT SOCKET G out CRT A60LPN70X NECK ASSY DY Y34RSA M B out R out G out B out 22 23 24 21 19 18 11 13 14 IK in H DRIVE H PULSE E W VD...

Page 76: ...OR VM1 B2 A H3 FUNCTION KEY B3 C R IN 11V SDA SCL GND S IN C IN CV Y IN GND L IN GND GND W OUT W OUT 5 4 2 1 CN6202 AUDIO GND MUTE 9V 3 2 1 CN6206 AV SWITCH NECK ASSY DY ASSY N S COIL N S COIL 3 1 NS COIL CN1802 2 NC CN702 1 G2 FBT 4 3 GND R H1 3 2 1 E 200V CN701 2 G 9V IK GND GND R B 6 5 4 3 2 1 CN305 1 2 3 H1 GND 200V CN505 CN904 CN3905 CN3602 CN601 CN104 CN3603 1 E GND 1 SP R IN SP GND SP GND S...

Page 77: ...PERATURE ALR HIGH RIPPLE Note The component identified by shading and mark are critical for safety Replace only with part number specified 5 3 CIRCUIT BOARDS LOCATION VM1 A B2 B3 F H3 C 5 8 2 6 2 2 3 8 8 8 INT0 INT1 INT2 TEX TX EXTAL XTAL RST MP V DD V SS RMC AN0 AN5 6 PA0 PA7 PORT A PORT B PORT C PORT D PORT E PORT F PORT G PB0 PB7 PC0 PC5 PC6 PC7 PD0 PD7 PE0 PE1 PE2 PE3 PE4 PE6 PF0 PF7 PG3 PG6 P...

Page 78: ... 25V B CHIP 0 1 25V B CHIP 0 1 25V B CHIP 0 1 25V B CHIP 0 1 25V B CHIP 0 1 25V B CHIP 0 1 25V B CHIP 0 1 25V B CHIP 2 2k CHIP 1 5k CHIP 4 7k CHIP 10k CHIP 220 CHIP 220 CHIP 220 CHIP 6P WHT S MICRO CST10 00MX 220 CHIP 1P MINI 1P TAB 22k CHIP 1M CHIP 470 CHIP 33k CHIP 27k CHIP 1 16V F CHIP 18k CHIP 18p CH CHIP 22k CHIP 0 1 25V B CHIP 3 3k CHIP 47p CH CHIP 3 9k CHIP 3 9k CHIP 3 9k CHIP 10p CH CHIP 1...

Page 79: ...2 PIN CONTROL JW 15 JW 5 220 2W RS 15k 3W RS 1k CHIP 6 8k CHIP 10k CHIP 47k CHIP 47k CHIP 220k CHIP 47 15k 3W RS 3 3 JW 7 5 100k CHIP 1k 0 CHIP 0 CHIP 2P VH 22 2W RS 0 22 2W RS 22k RN 22k RN 0 1 1W RF 82k CHIP 10k FPRD 0 47 1 2W FPRD 0 47 1 2W FPRD 0 47 1 2W FPRD 4 7k 1W RS 1500p 2kV 10 1 10UH 8 2M 1W 0 1 25V F CHIP 0 1 25V B CHIP 680p 500V B RD20ES T1B2 1SS119 25TD 1 1UH 1mH LHL08 1mH LHL08 DCC 5...

Page 80: ... F 9 D620 D 8 D621 F 9 D622 F 8 D623 F 12 D624 E 12 D625 D 12 D627 F 8 D628 G 5 D629 F 9 D630 E 10 D631 G 12 D632 F 12 D633 E 12 D634 F 11 D635 E 12 D636 D 12 D637 F 11 D638 E 11 D901 C 13 D902 C 13 D903 C 13 D904 D 13 D905 F 13 D906 I 13 IC IC001 B 10 IC002 C 10 IC003 A 9 IC100 B 5 IC201 B 11 IC203 B 3 IC204 B 2 IC301 B 6 IC503 J 5 IC601 J 8 IC602 H 6 IC603 D 8 IC604 D 10 IC901 I 13 Q001 C 8 Q002...

Page 81: ...Y IN S Y C TO SP CN6204 CN6202 CN3451 CN1400 CN904 CN104 CN601 CN4602 TO F BOARD TO A BOARD TO A BOARD TO A BOARD TO B3 BOARD TO J2 BOARD TO B3 BOARD TO B3 BOARD AUDIO L Y Y AUDIO R AUDIO R AUDIO L S S C S FUNCTION KEY 5V 5V 4 9 4 9 0 0 0 1 0 1 4 0 1 0 B SSSBG3S H3 25 H3 Board 1 2 3 4 5 6 7 1 2 3 4 5 6 7 8 1 2 3 C5903 C5907 C5908 C5910 C5912 C5913 C5914 C5916 C5917 CN5901 D5901 D5903 D5905 R5902 R...

Page 82: ...ERMINAL 100 25V 470p CH CHIP 470p CH CHIP 1 16V F CHIP 1 16V F CHIP 4 7 10V F CHIP 4 7 10V F CHIP 0 022 B CHIP 0 022 B CHIP 0 022 B CHIP 0 022 B CHIP 2 2 16V F CHIP 0 1 25V F CHIP 10 2 2 16V F CHIP 10 25V BP 10 25V BP 2 2 16V F CHIP 2 2 16V F CHIP 0 CHIP 2 2 16V F CHIP 0 CHIP TDA7315D 013TR TONE CTRL 5MM FLR50 220k CHIP 220k CHIP 100 CHIP JW 5MM 10k CHIP 10k CHIP 22k CHIP 22k CHIP 0 CHIP 6 8k CHIP...

Page 83: ...5M80 RM 954 3D STEREO BYPASS TRU Rch out Lch out Rch in Lch in TRU 3D STEREO TRU SPACE VR CENTER VR MIX EXT FIL 2 EXT FIL 1 R R BYPASS TRU B3 Board PRINTED WIRING BOARD B3 BOARD IC3201 NJM2187L B3 AUDIO PROSESSOR AV SWITCH Schematic diagram F board ...

Page 84: ...ECAM PAL 122Vp p H 125Vp p H PAL SECAM NTSC SECAM 115Vp p H 4 3 2 2 1 1 1 3 PAL NTSC 140Vp p H NTSC 113Vp p H PAL 122Vp p H 118Vp p H SECAM 23 1Vp p H PAL NTSC 22 8Vp p H SECAM PAL NTSC 126Vp p H 135Vp p H C BOARD IC701 STV5112 C BOARD WAVEFORMS 1 2 1 2 1 2 3 4 1 2 3 4 C654 R4601 CN4601 CN4602 CN4603 JW4602 JW4601 T4601 T4602 JW4603 JW4604 C4602 C4601 F4601 VDR461 0 0047 250V E 1M 1 2W 2P VH 2P VH...

Page 85: ...OCKET 110M GP08DPKG23 STV5112 VIDEO AMP 3P BLK S MICRO 4 7 250V 47 25V 1000 25V 0 1 PT 68k 2W RS 68k 2W RS 68k 2W RS 1P TAB 3P MINI HSS83TD PROTECT HSS83TD PROTECT HSS83TD PROTECT 1SS119 SLICE 1SS119 SLICE 100k RN 10 FPRD 0 001 B RD11ES B3 360 RN 560 RN 0 1 250V PP FLR50 FLR50 FLR50 JW 5MM JW 5MM JW 5MM 1SS119 25TD 1SS119 25TD 0 0047 2kV 47p CH 1SS119 25TD SLICE 1SS119 25TD 1SS119 25TD 1SS119 25TD...

Reviews: