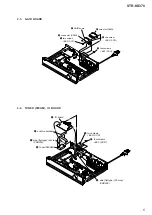


STR-KS370
7
SECTION 3
TEST MODE
1. COLD RESET
All preset contents are cleared when this mode is activated. Use
this mode before returning the product to clients upon completion
of repair.
Procedure:
1. Press the [
?/1
] button on the set to turn the power on.
2. Keeps pressing the [
?/1
] button on the set for about
fi
ve sec-
onds.
3. The message “CLEARED” appears, then the set turns off.
2. HOW TO ENTER THE TEST MODE
Note:
The operation of the button of the following test modes is only a
remote commander.
Procedure:
1. Press the [
?/1
] button to turn the power on.
2. Press the buttons in order of [TUNER]
[RETURN]
Hold
SHIFT button ([ENTER]
[0]
[1]
[0])
[SOUND
FIELD +]
3. The message “TEST MENU” appears, then enter the test
menu.
4. Press the [
?/1
] button to exit from the test mode.
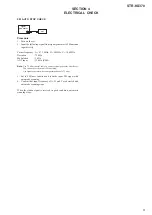
3. PANEL TEST
3-1. Pattern check
Procedure:
1. Enter the test mode menu.
2. Press the [
]/[
] buttons to select “PANEL”, and press the
[ENTER] button.
3. All segments and all LEDs turn on. Change as follows all on,
test pattern 1, test pattern 2 and test pattern 3, all on in this
order.
NIGHT
SLEEP
HDMI
COAX
OPT
TUNED
ST
S-AIR
ECO
MUTING
AACLPCM
;
TrueHD
;
D + EX
;
PL II x
DTS 96/24
-ES NEO:6
DTS -HDLBR
MSTR HI RES
NIGHT
SLEEP
HDMI
COAX
OPT
TUNED
ST
S-AIR
ECO
MUTING
AAC
LPCM
;
TrueHD
;
D
+
EX
;
PL
II
x
DTS
96/24
-ES
NEO:6
DTS -HD
LBR
MSTR
HI RES
TUNED
ST
LPCM
;
D EX
;
PL
II
DTS
NEO:6
DTS -HD
MSTR
3-2. Key check
Procedure:
1. Press the [VOLUME –] button, while executing pattern
check.
2. The message “K0 V0” appears. “K0” value increases when-
ever a button on the set is pressed. However, once a button has
been pressed, it is no longer taken into account. All buttons on
the set is pressed, “K3 V0” is displayed.
3. “V” value increases in the manner of 0, 1, 2, 3 ... [MASTER
VOLUME] knob is turned clockwise, or it decreases in the
manner of 0, 9, 8, 7 ... [MASTER VOLUME] knob is turned
counterclockwise.
4. Press the [
?/1
] button to exit from the test mode.
3-3. Software version and destination display
Procedure:
1. Press the [] button, while executing pattern
check.
2. The display of model name, destination, and software version
changes whenever [] button is pressed.
3. Press the [
?/1
] button to exit from the test mode.
4. AMP TEST
Not used for the servicing.
Press the [
?/1
] button if having entered this mode.
5. TUNER FACTORY PRESET
Not used for the servicing.
Press the [
?/1
] button if having entered this mode.
6. VACS DISPLAY
Procedure:
1. Enter the test mode menu.
2. Press
the
[
]/[
] buttons to select “VACS DISP”, and press the
[ENTER] button.
3. It will appear the VACS status
7. VACS ON/OFF
Procedure:
1. Enter the test mode menu.
2. Press the [
]/[
] buttons to select “VACS ON OFF”, and press
the [ENTER] button.
3. The VACS status will change.
8. DSP HALT MODE
Not used for the servicing.
Press the [
?/1
] button if having entered this mode.
9. DSP STATUS DISPLAY
Not used for the servicing.
Press the [
?/1
] button if having entered this mode.
10. HDMI UCOM UPDATE
Procedure:
1. Enter the test mode menu.
2. Press
the
[
]/[
] buttons to select “HDMI VER”, and press the
[ENTER] button.
3. HDMI MICOM software version is displayed.
4. Press the [
?/1
] button to exit from the test mode.
11. HDMI THROUGH DMPORT UPDATE
Procedure:
1. Enter the test mode menu.
2. Press the [
]/[
] buttons to select “HDMI UPD”, and press the
[ENTER] button.
3. Connect the programming jig to dmport connection.
4. Flash HDMI software from computer through programming
jig.
5. Press the [
?/1
] button to exit from the test mode.
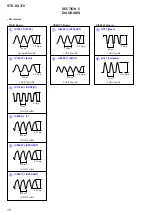
12. DMPORT TEST
Procedure:
1. Connect the DMPORT check jig (Part No. J-2501-309-A) with
the DMPORT jack (CN1701) on the MAIN board.
2. Press the [
?/1
] button to turn the power on.
3. Con
fi
rm that both LEDs of the DMPORT check jig lights.
(Con
fi
rmation the power supply line)
4. Press the [DMPORT] button to select the “DMPORT”.
5. Enter the test mode menu.
6. Press the [
]/[
] buttons to select the “DMPORT CHK”, and
press the [ENTER] button.
7. The message “DMPORT OK.” appears on the
fl
uorescent indi-
cator tube and enter the digital media port test mode. (Con
fi
r-
mation of communication line)
When “NO DETECT” and “UART TO” are displayed on
the
fl
uorescent indicator tube, con
fi
rm the connection of the
DMPORT check jig, and enter the mode again.
Each time the [
>
] button is pressed, the connect check and
adaptor version check are changed.
Press the [
.
] button, connected con
fi
rmation of the
DMPORT check jig is done again.
8. To a pin-jack of the DMPORT check jig input information rel-
evant to audio signal (sine-wave 1.0 Vrms).
9. Con
fi
rm the output of speakers. (Con
fi
rmation of analog sig-
nal)


