background image

SmartFile Function

44

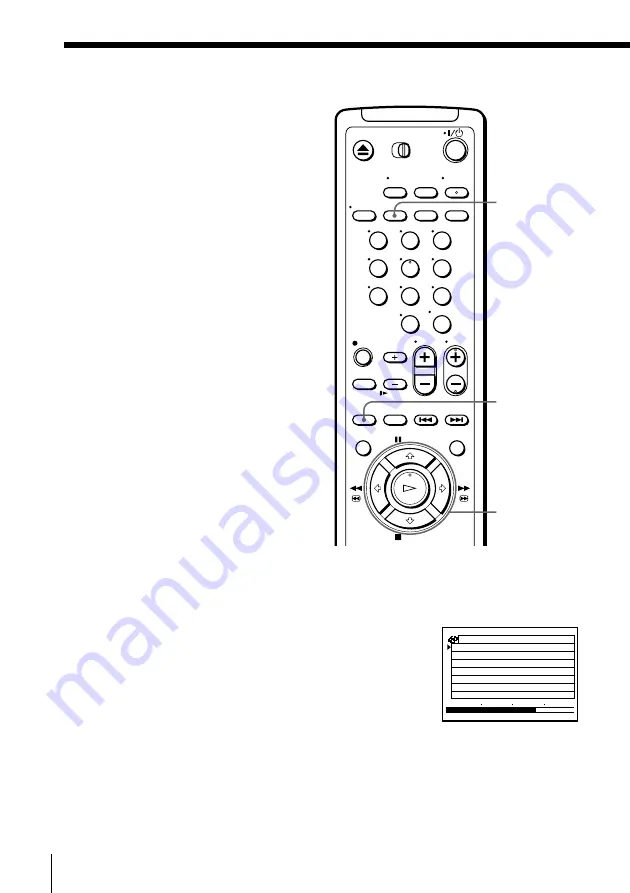
Recording using the SmartFile function (continued)

Recording after locating the
Blank Time space

The SmartFile function identifies not
only the largest amount of available
blank space, but also recorded material
that doesn’t have corresponding
program data stored in the SmartFile
label.  The longest available recording
space (including programs that are not
stored on the SmartFile label) is referred
to as “Blank Time space”.  You can locate
the beginning of the Blank Time space
for recording.  If there is a recorded
program after the Blank Time space, the
VCR will record over that program
unless you stop recording.  If there is a
program you want to prevent from
being recorded over or erased, protect
that program before you start recording
another program (see page 58).

Before you start…

• Turn on your TV and set it to the

video channel.

M

/

m

OK

SP/EP

p . 1

BLANK  TIME

M

8

4

H

1

EP

START

END

8/10/99~8/16/99

MON

6 : 3 0

PM CH

1

6

/

8

SP

M

0

3

H

0

1

6

FRI

8 : 0 0

PM CH

1

3

/

8

SP

M

0

5

H

0

1

2

TUE

2 : 3 0

PM CH

8

0

/

8

EP

M

0

3

H

0

1

SMARTFILE

1

2

3

4

5

6

7

8

9

0

1

Insert a SmartFile tape with its safety tab in place.

The VCR turns on and the SMARTFILE indicator lights up.

2

Press SMARTFILE.

The SmartFile search list appears on the TV
screen.  The Blank Time space appears in the
“BLANK TIME” row.

The BLANK indicator lights up and the Blank
Time space also appears in the display
window.

Summary of Contents for SLV-M11HF - Video Cassette Recorder

Page 1: ...____ Serial No _________________________ Declaration of Conformity Trade Name SONY Model No SLV M11HF Responsible Party Sony Electronics Inc Address 1 Sony Drive Park Ridge NJ 07656 USA Telephone No 201 930 6970 This device complies with Part 15 of the FCC Rules Operation is subject to the following two conditions 1 This device may not cause harmful interference and 2 this device must accept any i...

Page 2: ...position only Keep the unit and cassettes away from equipment with strong magnets such as microwave ovens or large loudspeakers Do not place heavy objects on the unit If the unit is brought directly from a cold to a warm location moisture may condense inside the VCR and cause damage to the video head and tape When you first install the unit or when you move it from a cold to a warm location wait f...

Page 3: ...ling timer settings 29 Recording stereo and bilingual programs 31 Searching using the index function 32 Adjusting the picture 34 Changing menu options 37 Editing with another VCR SmartFile Function 39 About the SmartFile function 41 Recording using the SmartFile function 50 Selecting and playing a program 52 Checking the contents of a tape 53 Labeling a recorded program and tape 58 Protecting a re...

Page 4: ...e 1 Turn on your TV and set it to the video channel 2 Insert a tape The VCR turns on and starts playing automatically if you insert a tape with its safety tab removed Z EJECT X PAUSE H PLAY x STOP M FF m REW SMART CUE CLEAR DISPLAY 1 2 3 4 5 6 7 8 9 0 ...

Page 5: ... don t want to watch such as a commercial and restart playback by pressing a single button 1 Press SMART CUE during playback of the scene you want to skip The VCR starts searching 2 Press SMART CUE again when you find the scene you want to watch The VCR stops searching rewinds a few seconds then resumes normal playback If you press and hold SMART CUE while the VCR is skip searching the VCR will st...

Page 6: ...en press DISPLAY Notes Tapes recorded in the LP mode on other VCRs can be played back on this VCR but the picture quality cannot be guaranteed While setting the menu on the TV screen you cannot use H PLAY X PAUSE M FF m REW or x STOP buttons The counter resets to 0 00 00 whenever a tape is reinserted The counter stops counting when it comes to a portion with no recording Playing a tape continued S...

Page 7: ... and set it to the video channel To record from a cable box turn it on 2 Insert a tape with its safety tab in place Recording TV programs SP EP INPUT SELECT CH z REC TV VIDEO COUNTER REMAIN x STOP DISPLAY Number buttons ENTER 1 2 3 4 5 6 7 8 9 0 continued ...

Page 8: ... three times as long as SP Standard Play however SP produces better picture and audio quality 6 Press z REC to start recording The recording indicator lights up red in the display window To stop recording Press x STOP STEREO SAP LP SP EP VIDEO APC EDIT VTR 1 2 3 AV INSERT BLANK STEREO SAP LP SP EP VIDEO APC EDIT VTR 1 2 3 AV INSERT BLANK STEREO SAP LP SP EP VIDEO APC EDIT VTR 1 2 3 AV INSERT BLANK...

Page 9: ...enu to 180 For details see page 35 To watch another TV program while recording 1 Press TV VIDEO to turn off the VIDEO indicator in the display window 2 If the TV is connected to the VCR s LINE OUT jacks set the TV to TV input if not skip this step 3 Select another channel on the TV To select the channel using the shuttle ring To select a channel in step 4 above you can also use the shuttle ring Du...

Page 10: ...the information won t be recorded on the tape If you don t want to watch TV while recording you can turn off the TV When using a cable box make sure to leave it on Notes The remaining tape length may not be indicated accurately for short tapes such as T 20 or T 30 or tapes recorded in the LP mode The display does not appear during still pause mode or slow motion playback It may take up to one minu...

Page 11: ...Station ID You can select the TV program from station ID Before you start Set FAVORITE CH to OFF in the ADVANCED OPTIONS menu page 35 CH ENTER 1 Turn on your TV and set it to the video channel To record from a cable box turn it on 1 2 3 4 5 6 7 8 9 0 continued ...

Page 12: ...t the station ID you want 4 Press ENTER Note If the TV channel has no station ID the channel number appears on the TV screen IJK OPQ CDE LMN RST AAB ABB XYZ UVW FGH 12 15 9 13 19 3 45 43 22 10 Locating a channel by Station ID continued CH ENTER ENTER IJK OPQ CDE LMN RST AAB ABB XYZ UVW FGH 12 15 9 13 19 3 45 43 22 10 ...

Page 13: ...n your TV and set it to the video channel When using a cable box turn it on Insert a tape with its safety tab in place Make sure the tape is longer than the total recording time If you insert a tape with the SmartFile function make sure the total recording time doesn t overlap the protected program For details about the SmartFile function see page 39 1 CLEAR VCR Plus SP EP Number buttons ENTER x S...

Page 14: ...sCode number If you make a mistake press CLEAR and re enter the correct number 3 Press SP EP to select the tape speed SP or EP 4 Press to select ONCE DAILY or WEEKLY then press ENTER To record Select Only once ONCE Everyday Monday to Friday DAILY Once a week WEEKLY The date start and stop time channel number and tape speed appear on the TV screen If the information is not correct press CLEAR to ca...

Page 15: ...ording stops and the VCR is unlocked Tips To cancel the VCR Plus GOLD system recording press VCR Plus before pressing ENTER in step 4 above When you are recording a program in the SP mode and the remaining tape becomes shorter than the recording time the tape speed is automatically changed to the EP mode Note that some noises will appear on the picture when the tape speed is changed If you want to...

Page 16: ...a cable box turn it on Insert a tape with its safety tab in place Make sure the tape is longer than the total recording time If you insert a tape with the SmartFile function make sure the total recording time doesn t overlap the protected program For details about the SmartFile function see page 39 MENU 1 INPUT SELECT 1 Press MENU then press M m to select TIMER SET CHECK and press OK CH x STOP TIM...

Page 17: ... while the date is highlighting For details see Daily weekly recording below To record from a source connected to the LINE 1 IN or LINE 2 IN jacks press INPUT SELECT to display LINE1 or LINE2 in the CH position 4 Press to confirm the setting The cursor appears at the beginning of the line To enter another setting select the next line and repeat step 3 5 Press OK 6 Press 1 to turn off the VCR The i...

Page 18: ...y window and the VCR switches on Remember to press 1 to reset the VCR to the timer recording standby mode after using the VCR You can also do the following tasks while the VCR is recording Reset the counter Display tape information on the TV screen Check the timer settings Watch another TV program To lock the VCR after setting the timer Child Lock While the VCR turns on hold down 1 POWER on the VC...

Page 19: ...the tape speed is changed If you want to keep the tape speed set AUTO TAPE SPEED to OFF in the ADVANCED OPTIONS menu page 35 When a tape with a SmartFile label attached is inserted the AUTO BLANK SEARCH screen appears after closing the menu in step 5 For details see Setting timer recording in the Blank Time space page 47 Notes If you are using cable box control you cannot select LINE1 or LINE2 The...

Page 20: ... the normal speed Play in slow motion During fast forward hold down M FF M FF During rewind hold down m REW m REW During playback press M FF or m REW on the remote commander During playback hold down M FF M FF or m REW m REW When you release the button normal playback resumes During playback press 2 During playback or pause press y SLOW m REW M FF H PLAY Shuttle ring JOG 2 y SLOW 1 2 3 4 5 6 7 8 9...

Page 21: ...ety of playback options There are two ways for using the shuttle ring normal mode and jog mode To use the shuttle ring in normal mode During playback or pause turn the shuttle ring clockwise or counterclockwise Each change in the shuttle ring position changes the playback mode and the corresponding mark appears on the TV screen for a few seconds in the following way if the on screen display functi...

Page 22: ... again The JOG button goes off Tip Adjust the picture using the TRACKING buttons if Streaks appear while playing in slow motion The picture shakes while pausing To set tracking to the center position press both buttons at the same time Notes The sound is muted during these operations Tapes recorded in the LP mode on other VCRs can be played back on this VCR but the picture quality cannot be guaran...

Page 23: ...select the channel from your favorite channel list Before you start Set FAVORITE CH to ON in the ADVANCED OPTIONS menu page 35 The selected station ID ENTER CH IJK OPQ CDE LMN RST AAB ABB XYZ UVW FGH FAVORITE CH 12 15 9 13 19 3 45 43 22 10 0 Creating your favorite channel list 1 Press ENTER The FAVORITE CH screen appears on the TV screen 2 Press CH to select the station ID you want to replace cont...

Page 24: ...3 Press to select the station ID you want to set 4 Repeat steps 2 and 3 to set the station IDs as required 5 Press ENTER Note If the TV channel has no station ID the channel number appears on the TV screen IJK OPQ BBA LMN RST AAB ABB XYZ UVW FGH FAVORITE CH 12 15 27 13 19 3 45 43 22 10 ...

Page 25: ...s CH to select the station ID you want 4 Press ENTER Note If the TV channel has no station ID the channel number appears on the TV screen The selected station ID Selecting a channel from your favorite channel list ENTER CH IJK OPQ BBA LMN RST AAB ABB XYZ UVW FGH FAVORITE CH 12 15 27 13 19 3 45 43 22 10 IJK OPQ BBA LMN RST AAB ABB XYZ UVW FGH FAVORITE CH 12 15 27 13 19 3 45 43 22 10 1 2 3 4 5 6 7 8...

Page 26: ...ay window 2 Press z REC repeatedly to set the duration Each press advances the time in increments of 30 minutes The tape counter decreases minute by minute to 0 00 then the VCR stops recording and turns off automatically To extend the duration Press z REC repeatedly to set a new duration To cancel the duration Press z REC repeatedly until the indicator disappears and the VCR returns to normal reco...

Page 27: ... SET CHECK and press OK If you want to change a setting go on to the next step If you do not need to change the settings press OK then turn off the VCR to return to recording standby CLEAR MENU 1 TUE 9 28 9 TIMER SET CHECK 3 DATE START STOP CH 7 00 8 00 6 SP 10 2 10 30 11 15 50 EP 1 00 3 00 LINE1 EP EVERY 12 55 1 30 12 SP THU AM AM SAT PM PM SAT MON SUN AM PM AM PM 0 M m OK 1 2 3 4 5 6 7 8 9 0 con...

Page 28: ...n press repeatedly until the cursor appears at the beginning of the line To cancel the setting press CLEAR 4 Press OK If any timer settings remain turn off the VCR to return to recording standby When the timer settings overlap The program that starts first has priority and the second program starts recording only after the first program has finished If the programs start at the same time the progr...

Page 29: ...ise For details see page 34 Recording bilingual programs Normally this VCR records only the main sound When a SAP Second Audio Program is received the SAP indicator lights up To record only SAP sound set TUNER AUDIO in the ADVANCED OPTIONS menu to SAP For details see page 35 Selecting the sound during playback Press AUDIO MONITOR to select the sound you want The sound being recorded will not chang...

Page 30: ...on check that AUDIO MIX in the ADVANCED OPTIONS menu is set to OFF How sound is recorded on a video tape The VCR records sound onto two separate tracks Hi fi audio is recorded onto the main track along with the picture Monaural sound is recorded onto the normal audio track along the edge of the tape Normal audio track Hi fi audio track main track Monaural sound Stereo sound left right channels Rec...

Page 31: ...ss INDEX SEARCH repeatedly to specify how many index signals ahead or behind you want to search To search ahead press INDEX SEARCH To search backwards press INDEX SEARCH The VCR starts searching and the index number on the TV screen counts down to zero Playback starts automatically from that point To stop searching Press x STOP Note No index signal will be added when recording starts from recordin...

Page 32: ...tion should disappear as you press one of the two buttons the indicator lights up To resume automatic tracking adjustment eject the tape and reinsert it About the Reality Regenerator function The Reality Regenerator function automatically restores the picture to its original quality during playback To use the Reality Regenerator function press REALITY REGENERATOR The REALITY REGENERATOR indicator ...

Page 33: ...e tape is ejected Notes The automatic tracking adjustment cannot be guaranteed to work with tapes recorded in the LP mode on other VCRs The APC function does not work if the tape speed is automatically changed from the SP to EP mode during a timer recording when AUTO TAPE SPEED is set to ON in the ADVANCED OPTIONS menu unless the tape has been recorded in the EP mode with the APC function There is...

Page 34: ... the TV to the VCR input AUTO STEREO ON to receive stereo programs OFF to reduce noise The sound changes to monaural AUDIO MIX ON to listen to the sound recorded on hi fi and normal audio tracks at the same time The AUDIO MONITOR button will not function OFF to listen to hi fi and normal audio tracks separately Select the sound using the AUDIO MONITOR button Page 2 Page 1 ADVANCED OPTIONS SHARPNES...

Page 35: ...ape length becomes shorter than the recording time To operate AUTO TAPE SPEED set TAPE SELECT correctly OFF to keep the tape speed TAPE SELECT AUTO when using a T 160 length tape or any tape shorter than a T 140 length tape 180 when using a T 140 or T 180 length tape For details see page 9 SMART CUE MEDIUM to set the automatic rewinding time on skip playback to a medium length SHORT to set to a sh...

Page 36: ... page 47 SMARTFILE LIST MANUAL to display the SmartFile search list only when you press the SMARTFILE button AUTO to display the SmartFile search list automatically when you insert a SmartFile tape Note If you set the DEFAULT SPEED option to EP you can still change the recording tape speed to SP or vice versa by pressing the SP EP button only for that program Next time you record a program the rec...

Page 37: ...olor If the other VCR is a monaural type and connected to this VCR s LINE 2 IN jacks connect the audio plug to the AUDIO L white jack The sound is recorded on both right and left channels When connecting to the AUDIO R red jack the sound is recorded only on the right channel If you connected this VCR to both the LINE IN and LINE OUT jacks of the other VCR select the input correctly to prevent a hu...

Page 38: ...SE 3 Press z REC on this VCR and set it to recording pause 4 To start editing press the X PAUSE buttons on both VCRs at the same time To stop editing Press the x STOP buttons on both VCRs Tip To cut out unwanted scenes while editing press X PAUSE on this VCR when an unwanted scene begins When it ends press X PAUSE again to resume recording Note If you start recording following the procedure above ...

Page 39: ... Selecting and playing a program page 50 To play back a recorded program select the program you want to watch using the SmartFile search list The VCR locates the program and playback starts automatically Checking the contents of a tape page 52 When you bring the SmartFile label close to the SMARTFILE sensor on the VCR a summary of the recorded programs appears in the SmartFile check list It is not...

Page 40: ... Erasing the data of an unwanted program page 60 By erasing a program from the SmartFile list the VCR will record over the unwanted program Registering the contents of a recorded tape in the SmartFile label page 62 You can register programs recorded on a tape in the memory of a new SmartFile label Storing program data from the DIRECTV digital satellite receiver Program Data Download page 64 If you...

Page 41: ... labels For the customers in the USA To order additional SmartFile labels see the back page For the customers in Canada Additional SmartFile labels can be purchased at Sony of Canada Ltd Authorized VHS Dealers Notes The SmartFile label is equipped with a memory chip The memory chip may be damaged and cannot be used when you twist or fold the SmartFile label remove the SmartFile label and re attach...

Page 42: ...rogram data see Recording after locating the Blank Time space on page 44 Tip You can protect a recorded program from accidental over recording or erasure see page 58 Note If you press X PAUSE one or more times during recording thereby creating short lengths of recorded time between such pauses program data may not be stored in the SmartFile label To check the information of a recorded program Pres...

Page 43: ... isn t set to the correct time the initial and latest dates of use for the SmartFile the recording date and day of the week and the recording start time won t be stored correctly on the SmartFile list When you record a program using the normal recording mode while CABLE MOUSE is set to ON in the CABLE BOX CONTROL menu the channel number is stored as CH When you set AUTO TAPE SPEED to ON in the ADV...

Page 44: ...over that program unless you stop recording If there is a program you want to prevent from being recorded over or erased protect that program before you start recording another program see page 58 Before you start Turn on your TV and set it to the video channel M m OK SP EP p 1 BLANK TIME M 8 4 H 1 EP START END 8 10 99 8 16 99 MON 6 30PM CH 1 6 8 SP M 0 3 H 0 1 6 FRI 8 00PM CH 1 3 8 SP M 0 5 H 0 1...

Page 45: ...SP mode from where the first program starts the first program data is erased If the remaining length of the first program is 15 minutes or less in EP mode or 5 minutes or less in SP mode after being overwritten by the second program the first program data is erased p 1 BLANK TIME M 6 3 H 0 SP START END 8 10 99 8 16 99 MON 6 30PM CH 1 6 8 SP M 0 3 H 0 1 6 FRI 8 00PM CH 1 3 8 SP M 0 5 H 0 1 2 TUE 2 ...

Page 46: ...he ADVANCED OPTIONS menu the SmartFile search list appears automatically when you insert a SmartFile tape see page 36 Note You may not be able to locate the beginning of the Blank Time space correctly in the above step 5 when the SmartFile tape contains one or more short length less than about 15 minutes in EP mode and about 5 minutes in SP mode programs that are not stored in the SmartFile label ...

Page 47: ...ding If there is a program you want to prevent from being recorded over or erased protect that program before you start recording another program see page 58 Before you start Turn on your TV and set it to the video channel M m OK MENU VCR Plus P l us Code SP EP EP En t e r p r og r am s P l us Code us i ng 0 9 k ey s To c hange t ape s peed pus h SP EP VCR Plus 1 Insert a SmartFile tape with its s...

Page 48: ... The indicator appears in the display window and the VCR stands by for recording If you are using a cable box leave it on If the recordings overlap If a newly recorded program overlaps a stored program the data appearing in the SMARTFILE list is as follows If the second program overwrites the first program for 15 minutes or more in EP mode or 5 minutes or mor e in SP mode from where the first prog...

Page 49: ...in EP mode 5 minutes or more in SP mode The recording time is updated to the time until overwriting starts Program 1 Program 2 Information will be erased 15 minutes or less in EP mode 5 minutes or less in SP mode Tip You can set BLANK SEARCH in the ADVANCED OPTIONS menu so that Blank Time search is automatically performed each time the timer is set AUTO Select OFF to cancel this option see page 36...

Page 50: ...2 30PM CH 8 0 8 EP M 0 3 H 0 1 p 1 BLANK TIME M 8 4 H 1 EP START END 8 10 99 8 16 99 MON 6 30PM CH 1 6 8 SP M 0 3 H 0 1 6 FRI 8 00PM CH 1 3 8 SP M 0 5 H 0 1 2 TUE 2 30PM CH 8 0 8 EP M 0 3 H 0 1 1 Insert a SmartFile tape The VCR turns on and the SMARTFILE indicator lights up 2 Press SMARTFILE The SmartFile search list appears on the TV screen The BLANK indicator lights up and the Blank Time space a...

Page 51: ...n you insert a SmartFile tape see page 36 Note You may not be able to locate the beginning of the selected program correctly when the SmartFile tape contains one or more short length less than about 15 minutes in EP mode and about 5 minutes in SP mode programs that are not stored in the SmartFile label the SmartFile tape is damaged or dirty ...

Page 52: ...tFile check list is displayed the BLANK TIME remaining tape display changes You can also use the M m and OK buttons on the remote commander If you press a button other than SP EP or OK the SmartFile check list disappears Notes You cannot display the SmartFile check list while you display the SmartFile list of a different SmartFile tape inserted into the VCR you display any other menu you play back...

Page 53: ...to 18 characters can be input for a program and tape label M m OK MENU Labeling a recorded program and selecting a category Before you start Turn on your TV and set it to the video channel CLEAR Tape title Program label Category 1 Insert a SmartFile tape The VCR turns on and the SMARTFILE indicator lights up p 1 M 0 3 H 5 EP START END Favorites 0 8 EP M 0 3 H 0 1 Rock Box MUSIC BLANK TIME 1 2 3 4 ...

Page 54: ...8 3 H 0 SP M 0 5 H 0 EP M 0 3 H 0 SELECT QUIT MENU TITLE CATEGORY 1 FRI 8 00PM CH 12 3 8 1 SMARTFILE EDIT MON p 1 8 10 99 8 16 99 6 30PM CH 16 6 8 SP M 0 0 1 8 TUE 2 30PM CH 8 3 H 0 SP M 0 5 H 0 EP M 0 3 H 0 SELECT QUIT MENU TITLE CATEGORY 1 FRI 8 00PM CH 12 3 8 1 SMARTFILE EDIT MON p 1 8 10 99 8 16 99 6 30PM CH 16 6 8 SP M 0 0 1 8 TUE 2 30PM CH 8 3 H 0 SP M 0 5 H 0 EP M 0 3 H 0 SELECT CONFIRM OK ...

Page 55: ...l is erased and the recording start time and channel number reappear To erase the selected category Press CLEAR in step 7 above The selected category is erased and the space becomes blank To label a regularly scheduled timer recorded program Once you label a program which is set to record regularly i e everyday same day of the week etc in the VCR Plus GOLD system or timer recording mode the VCR re...

Page 56: ...nd press OK The SMARTFILE EDIT menu appears 3 Press M to select the tape title CLEAR SMARTFILE EDIT p 1 8 10 99 8 16 99 6 8 SP M 0 0 1 8 3 H 0 SP M 0 5 H 0 EP M 0 3 H 0 SELECT 1 3 8 1 TITLE CATEGORY QUIT MENU Someday Nick Matt Rock Box DRAMA COMEDY MUSIC SMARTFILE EDIT p 1 8 10 99 8 16 99 6 8 SP M 0 0 1 8 3 H 0 SP M 0 5 H 0 EP M 0 3 H 0 SELECT 1 3 8 1 T I TLE ED I T QUIT MENU Someday Nick Matt Roc...

Page 57: ...osition 5 Label the tape 1 Press M m to select a character Each time you press m the character changes as shown below A t B t t Z t symbol t 0 t 1 t 9 t a t b t t z t blank space If you make a mistake press CLEAR 2 To set the next character press The cursor moves to the next position 3 Repeat steps 1 and 2 to label the tape 6 Press OK The tape title is stored 7 Press MENU to exit the menu To erase...

Page 58: ... 4 H 1 EP START END 8 10 99 8 16 99 MON 6 30PM CH 1 6 8 SP M 0 3 H 0 1 6 FRI 8 00PM CH 1 3 8 SP M 0 5 H 0 1 2 TUE 2 30PM CH 8 0 8 EP M 0 3 H 0 1 8 10 99 8 16 99 MON p 1 BLANK TIME M 8 4 H 1 EP 6 30PM CH 16 6 8 SP M 0 FRI 3 1 8 0 1 8 TUE 2 30PM CH 8 3 H 0 SP M 0 5 H 0 EP M 0 3 H 0 START END 1 8 00PM CH 12 1 Insert a SmartFile tape The VCR turns on and the SMARTFILE indicator lights up 2 Press SMART...

Page 59: ...le search list appears automatically when you insert a SmartFile tape see page 36 Notes When you record another program just after a protected program locate the beginning of the Blank Time space by following the instructions in Recording after locating the Blank Time space on page 44 Otherwise if the recording start point overlaps the protected program the VCR may record over the protected progra...

Page 60: ...the video channel DISPLAY CLEAR SMARTFILE M m p 1 BLANK TIME M 8 4 H 1 EP START END 8 10 99 8 16 99 MON 6 30PM CH 1 6 8 SP M 0 3 H 0 1 6 FRI 8 00PM CH 1 3 8 SP M 0 5 H 0 1 2 TUE 2 30PM CH 8 0 8 EP M 0 3 H 0 1 1 2 3 4 5 6 7 8 9 0 1 Insert a SmartFile tape The VCR turns on and the SMARTFILE indicator lights up 2 Press SMARTFILE The SmartFile search list appears on the TV screen The BLANK indicator l...

Page 61: ...not erase a protected program from the SmartFile list You have to first unlock the protected program by following the instructions in To unlock the protected program on page 59 then erase that program from the list If a program is left about 15 minutes or less in EP mode or about 5 minutes or less in SP mode you cannot make the program reappear by using the DISPLAY button p 1 BLANK TIME M 8 4 H 1 ...

Page 62: ...and select the category see page 53 Before you start Turn on your TV and set it to the video channel 1 Attach a new SmartFile label to a recorded cassette tape 2 Insert the SmartFile tape 3 Press SMARTFILE GENERATOR A message appears indicating that the recorded programs are being registered The index signals are detected from the start of the tape and registration stops if the end of the tape is ...

Page 63: ... SP mode the program does not have an index signal or the index signal has been recorded over and erased the tape is damaged or dirty If you don t set the clock or the clock isn t set to the correct date the registration date won t be stored correctly on the SmartFile list After you press SMARTFILE GENERATOR and start registration registration is interrupted if you press x STOP H PLAY M FF m REW 1...

Page 64: ...artFile tape The DIRECTV digital satellite receiver equipped with the Program Data Download function will be available in the future How to hook up to the DIRECTV digital satellite receiver You should connect CPD IN of the VCR and VCR CONTROL of the DIRECTV digital satellite receiver using the supplied monaural cable Wall Audio video cable not supplied Monaural cable supplied Coaxial cable supplie...

Page 65: ...eiver s timer the program and category name are automatically stored on the SmartFile tape Program name Category name Notes Do not operate the VCR the DIRECTV digital satellite receiver and any other equipment connected to these units for at least 2 minutes after timer recording starts If you operate these equipment immediately after timer recording starts the correct program data may not be sent ...

Page 66: ...eset the clock and timer Make sure the TV is set to the channel for the VCR If you are using a monitor set it to video input Adjust the tracking with the TRACKING buttons The video heads are dirty see below Clean the video heads using the Sony T 25CLD T 25CLDR or T 25CLW video head cleaning cassette If these cleaning cassettes are not available in your area have the heads cleaned at your nearest S...

Page 67: ...moved Make sure the tape is not at its end The current position of the tape is record protected Search for the recording available space If the tape contains a protected program recording automatically stops before the protected program Use another tape which has enough recording space Check that the clock is set Make sure a tape has been inserted Check that the safety tab has not been removed Mak...

Page 68: ...e remote commander with new ones if they are weak Make sure the TV RECEIVER VIDEO switch is set correctly If you are not using S Link make sure that both miniplugs are unconnected Make sure the CABLE BOX CONTROL option is set to OFF The recording condition of the tape is very poor and tracking cannot be adjusted Set your TV s code number The code number may change when you replace the batteries of...

Page 69: ...ry head helical scanning FM system Video heads Double azimuth four heads Video signal NTSC color EIA standards Tape speed SP 33 35 mm s 1 3 8 inches s EP 11 11 mm s 7 16 inches s LP 16 67 mm s 11 16 inches s playback only Maximum recording playback time 8 hrs in EP mode with T 160 tape Fast forward and rewind time Approx 1 min with T 120 tape The time may vary according to the brand and or type of...

Page 70: ...LE button 42 50 58 8 CURSOR m M buttons 52 9 A EJECT button 5 0 m REW rewind button 5 20 qa H PLAY button 5 21 qs M FF fast forward button 5 20 qd JOG button 22 qf z REC record button 8 26 38 qg x STOP button 5 38 qh Shuttle ring 9 21 qj X PAUSE button 5 38 qk OK button 16 45 52 ql CHANNEL TRACKING buttons 8 32 w EDIT button 38 wa REALITY REGENERATOR button 32 ws EASY SET UP button wd SMARTFILE GE...

Page 71: ...5 3 STEREO indicator 29 4 SAP Second Audio Program indicator 29 5 VIDEO indicator 9 6 Tape speed indicator 8 7 APC Adaptive Picture Control indicator 33 8 EDIT indicator 38 9 BLANK indicator 44 0 Tracking indicator 32 qa Line channel indicator 8 38 qs Time counter clock indicator 6 qd Remaining time indicator 9 qf Tape recording indicator 8 continued ...

Page 72: ... 37 3 CABLE BOX CONTROL CONTROL S OUT jack 4 LINE 1 IN AUDIO R L VIDEO jacks 37 64 5 CPD Control and Program Data IN jack 64 6 VHF UHF IN connector 64 7 VHF UHF OUT connector 64 8 RF Radio Frequency UNIT switch 9 LINE OUT AUDIO R L VIDEO jacks Index to parts and controls continued ...

Page 73: ... 45 6 2 RECEIVER VOL volume button 20 7 z REC record button 8 26 8 MUTING button 9 y SLOW RECEIVER VOL volume button 20 0 SMARTFILE button 42 50 58 qa INPUT SELECT button 8 10 38 qs MENU button 16 27 qd X PAUSE M button 5 16 27 45 x STOP m button 5 16 27 45 m REW rewind button 5 14 20 M FF fast forward button 5 14 20 H PLAY OK button 5 16 45 1 2 3 4 5 6 7 8 9 0 continued ...

Page 74: ... qh AUDIO MONITOR button 29 qj VCR Plus button 13 qk CLEAR button 6 14 28 57 ql Number buttons 14 w ENTER button 12 14 23 wa CH channel buttons 8 ws VOL volume buttons wd INDEX SEARCH buttons 31 wf SMART CUE button 5 Index to parts and controls continued 1 2 3 4 5 6 7 8 9 0 ...

Page 75: ...erator 32 Recording 7 bilingual programs 29 SAP broadcasts 29 saving 9 stereo broadcasts 29 timer setting 16 using VCR Plus GOLD 13 while watching another program 9 S Safety tab 9 SAP Second Audio Program 29 Searching at various speeds 20 S Link 37 SmartFile 39 checking the contents of a tape 52 erasing the data of an unwanted program 60 labeling a recorded program and tape 53 protecting a recorde...

Page 76: ...R s TV VIDEO button until the VIDEO indicator in the display window goes off 2 Turn on your cable box 3 Set the TV to the cable box output channel usually 2 3 or 4 4 Set the cable box to the channel you want to watch Hookup 2 To play a tape 1 If you made A V connections set the TV to video input If you didn t use A V hookup Turn on the cable box Set the cable box to channel 3 or 4 Set the TV to th...

Reviews: