background image

22

Getting Started

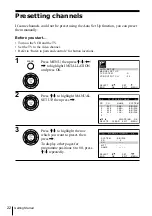
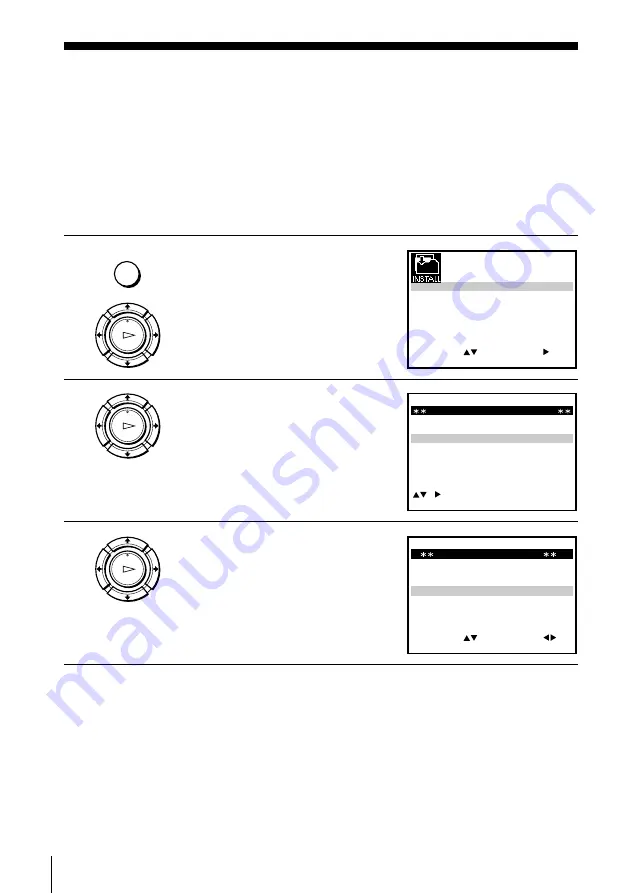
Presetting channels

If some channels could not be preset using the Auto Set Up function, you can preset
them manually.

Before you start…

• Turn on the VCR and the TV.
• Set the TV to the video channel.
• Refer to “Index to parts and controls” for button locations.

1

Press MENU, then press 

M

/

m

/

<

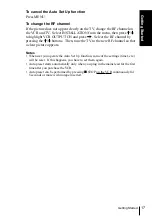
/

,

 to highlight INSTALLATION

and press OK.

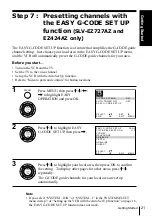
2

Press 

M

/

m

 to highlight MANUAL

SET UP, then press 

,

.

3

Press 

M

/

m

 to highlight the row

which you want to preset, then
press 

,

.

To display other pages for
programme positions 6 to 80, press

M

/

m

 repeatedly.

MENU

OK

PLAY

S E T

M E N U

:

:

O K

:

E N D

S E L E C T

A U T O   S E T   U P
M A N U A L   S E T   U P
T V   S Y S T E M

3 2

:

G

:

V C R   O U T P U T   C H

:

E X I T

OK

PLAY

E X I T

M E N U

:

C L E A R

:

D E L E T E

S W A P P I N G

O K

T V   S T A T I O N   T A B L E

:

5

4

3

2

1

0

0

0

0

3

3

2

2

2

0

9

7

I

C

L

A

J

D

M

A

K

E

N

B

B / G / D / K

B / G / D / K

B / G / D / K

B / G / D / K

P R

C H

N A M E

S Y S T E M

OK

PLAY

M E N U

:

O K

:

E N D

S E L E C T

P R

:

5

S Y S T E M

: B / G / D / K

M F T

:

N A M E

:

– – – –

:

S E T

:

E X I T

M A N U A L   T U N I N G

C H

:

– – –

Summary of Contents for SLV-EZ121AZ

Page 1: ...Operating Instructions Video Cassette Recorder 3 074 911 11 1 GB 2002 Sony Corporation SLV EZ727AZ PAL NTSC SLV EZ725AZ PAL NTSC4 43 SLV EZ424AZ PAL NTSC4 43 SLV EZ121AZ PAL NTSC4 43 ...

Page 2: ... not install the unit in an inclined position It is designed to be operated in a horizontal position only Keep the unit and cassettes away from equipment with strong magnets such as microwave ovens or large loudspeakers Do not place heavy objects on the unit If the unit is brought directly from a cold to a warm location moisture may condense inside the VCR and cause damage to the video head and ta...

Page 3: ...ing a tape 32 Recording TV programmes 36 Recording TV programmes using the Easy Timer 42 Recording TV programmes using the G CODE system SLV EZ727AZ and EZ424AZ only 45 Recording TV programmes using the timer Additional Operations 48 Playing searching at various speeds 49 Setting the recording duration time 50 Checking changing cancelling timer settings 52 Recording stereo and bilingual programmes...

Page 4: ...ote sensor 11 3 Tape compartment 4 A EJECT button 30 5 H PLAY button 30 48 6 x STOP button 17 30 62 7 z REC record button 33 49 62 8 X PAUSE button 30 41 62 9 M FF fast forward button 30 48 q m REW rewind button 30 48 qa EASY TIMER 36 qs PROGRAM TRACKING buttons 37 56 qd LINE 2 IN VIDEO AUDIO L R left right jacks 60 61 The H PLAY x STOP and PROGRAM TRACKING buttons have a tactile dot ...

Page 5: ...Remote sensor 11 4 Tape compartment 5 m REW rewind button 30 48 6 H PLAY button 30 48 7 M FF fast forward button 30 48 8 z REC record button 33 49 62 9 x STOP button 17 30 62 q X PAUSE button 30 41 62 qa EASY TIMER 36 qs PROGRAM TRACKING buttons 37 56 The PROGRAM TRACKING button has a tactile dot continued ...

Page 6: ...cator 40 5 YEAR indicator 6 NICAM indicator 53 7 STEREO indicator 52 8 Timer indicator 39 43 46 9 Recording indicator 33 q Time counter clock line programme position indicator 31 32 62 qa Tape speed indicators 32 38 SLV EZ727AZ and EZ725AZ only 3 1 4 5 2 6 7 8 9 0 qa Index to parts and controls continued ...

Page 7: ...4 2 LINE IN 1 AUDIO R L VIDEO audio right audio left video jacks 1 61 LINE IN 1 AUDIO VIDEO jacks 2 60 3 Mains lead 14 4 LINE OUT AUDIO R L VIDEO audio right audio left video jacks 1 LINE OUT AUDIO VIDEO jacks 2 15 5 out to tv connector 14 1 SLV EZ727AZ and EZ725AZ only 2 SLV EZ424AZ and EZ121AZ only continued 3 2 1 4 5 3 2 1 4 5 ...

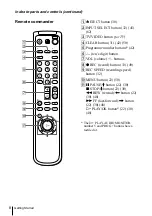
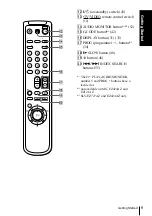
Page 8: ...ons 42 6 ten s digit button 7 VOL volume buttons 8 z REC record button 33 49 9 REC SPEED recording speed button 32 q MENU button 22 50 qa X PAUSE M button 22 30 x STOP m button 22 30 m REW rewind button 22 30 48 M FF fast forward button 22 30 48 H PLAY OK button 22 30 48 The H PLAY AUDIO MONITOR number 5 and PROG buttons have a tactile dot Index to parts and controls continued ...

Page 9: ...utton 1 2 52 qg G CODE button 3 42 qh DISPLAY button 31 33 qj PROG programme buttons 1 34 qk y SLOW button 48 ql 2 button 48 w INDEX SEARCH buttons 55 1 The H PLAY AUDIO MONITOR number 5 and PROG buttons have a tactile dot 2 not available on SLV EZ424AZ and EZ121AZ 3 SLV EZ727AZ and EZ424AZ only 1 2 3 4 5 6 7 8 9 0 ...

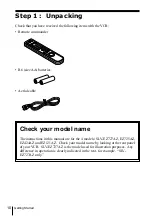
Page 10: ... Aerial cable Check your model name The instructions in this manual are for the 4 models SLV EZ727AZ EZ725AZ EZ424AZ and EZ121AZ Check your model name by looking at the rear panel of your VCR SLV EZ727AZ is the model used for illustration purposes Any difference in operation is clearly indicated in the text for example SLV EZ727AZ only ...

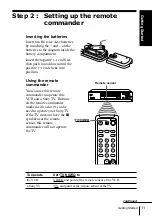
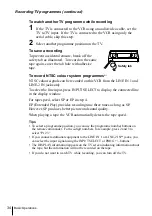
Page 11: ...cks into position Using the remote commander You can use this remote commander to operate this VCR and a Sony TV Buttons on the remote commander marked with a dot can be used to operate your Sony TV If the TV does not have the symbol near the remote sensor this remote commander will not operate the TV 1 2 3 4 5 6 7 8 9 0 Remote sensor TV VIDEO To operate Set TV VIDEO to the VCR VIDEO and point at ...

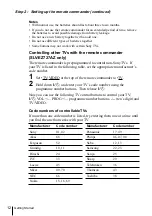
Page 12: ...ufacturer s code number 1 Set TV VIDEO at the top of the remote commander to TV 2 Hold down 1 and enter your TV s code number using the programme number buttons Then release 1 Now you can use the following TV control buttons to control your TV 1 VOL PROG programme number buttons ten s digit and TV VIDEO Code numbers of controllable TVs If more than one code number is listed try entering them one a...

Page 13: ...new code number the code number previously entered will be erased If the TV uses a different remote control system from the one programmed to work with the VCR you cannot control your TV with the remote commander When you replace the batteries of the remote commander the code number may change Set the appropriate code number every time you replace the batteries ...

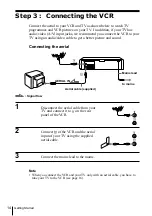
Page 14: ...o video cable to get a better picture and sound Connecting the aerial Mains lead AERIAL IN to mains Aerial cable supplied Signal flow 1 Disconnect the aerial cable from your TV and connect it to on the rear panel of the VCR 2 Connect of the VCR and the aerial input of your TV using the supplied aerial cable 3 Connect the mains lead to the mains Note When you connect the VCR and your TV only with a...

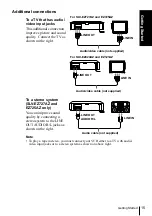
Page 15: ...improve sound quality by connecting a stereo system to the LINE OUT AUDIO R L jacks as shown on the right Note To play a tape in stereo you must connect your VCR either to a TV with audio video input jacks or to a stereo system as shown on above right LINE IN For SLV EZ727AZ and EZ725AZ LINE OUT LINE IN Audio video cable not supplied LINE OUT LINE IN LINE OUT AUDIO R L For SLV EZ424AZ and EZ121AZ ...

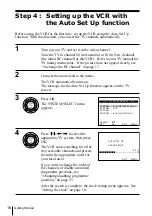
Page 16: ...F channel on page 17 2 Connect the mains lead to the mains The VCR automatically turns on The message for the Auto Set Up function appears on the TV screen 3 Press OK The SYSTEM SELECT menu appears 4 Press M m to select the appropriate TV system then press OK The VCR starts searching for all of the receivable channels and presets them in the appropriate order for your local area If you want to cha...

Page 17: ...t the RF channel by pressing the M m buttons Then tune the TV to the new RF channel so that a clear picture appears Notes Whenever you operate the Auto Set Up function some of the settings timer etc will be reset If this happens you have to set them again Auto preset starts automatically only when you plug in the mains lead for the first time after you purchase the VCR Auto preset can be performed...

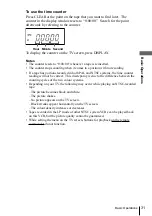
Page 18: ...r to Index to parts and controls for button locations 1 Press MENU then press M m to highlight CLOCK SET and press OK 2 Press M m to set the hour 3 Press to select the minutes and set the minutes by pressing M m MENU SET MENU OK END SELECT 1 2 0 1 JAN 0 2 0 TUE 0 2 EXIT OK PLAY SET MENU OK END SELECT 1 8 0 1 JAN 0 2 0 TUE 0 2 EXIT SET MENU OK END SELECT 1 8 3 1 JAN 0 2 0 TUE 0 2 EXIT OK PLAY OK PL...

Page 19: ...be set and press M m to select the digits then press The day of the week is set automatically 5 Press MENU to exit the menu Tip To change the digits while setting press to return to the item to be changed and select the digits by pressing M m OK PLAY SET MENU OK END SELECT 1 8 3 8 2 SEP 0 2 0 SAT 0 2 EXIT MENU ...

Page 20: ...tions 1 Press MENU then press M m to highlight INSTALLATION and press OK 2 Press M m to highlight TV SYSTEM then press 3 Press to select the appropriate TV system Select G in New Zealand or B in Australia 4 Press MENU to exit the menu MENU OK PLAY OK PLAY OK PLAY SET MENU OK END SELECT AUTO SET UP MANUAL SET UP TV SYSTEM 3 2 G VCR OUTPUT CH EXIT SET MENU OK END SELECT AUTO SET UP MANUAL SET UP TV ...

Page 21: ...s MENU then press M m to highlight EASY OPERATION and press OK 2 Press M m to highlight EASY G CODE SET UP then press 3 Press M m to highlight your local area then press OK to confirm the setting To display other pages for other areas press M m repeatedly The G CODE guide channels for your local area are set up automatically Note If you select SYSTEM D K or SYSTEM I in the SYSTEM SELECT menu in st...

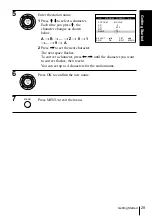
Page 22: ... Press M m to highlight MANUAL SET UP then press 3 Press M m to highlight the row which you want to preset then press To display other pages for programme positions 6 to 80 press M m repeatedly MENU OK PLAY SET MENU OK END SELECT AUTO SET UP MANUAL SET UP TV SYSTEM 3 2 G VCR OUTPUT CH EXIT OK PLAY EXIT MENU CLEAR DELETE SWAPPING OK TV STATION TABLE 5 4 3 2 1 0 0 0 0 3 3 2 2 2 0 9 7 I C L A J D M A...

Page 23: ...t the next character The next space flashes To correct a character press until the character you want to correct flashes then reset it You can set up to 4 characters for the station name 7 Press OK to confirm the station name 8 Press MENU to exit the menu OK PLAY MENU OK END SELECT PR 5 SYSTEM B G D K MFT NAME SET EXIT MANUAL TUNING CH 0 3 3 OK PLAY MENU OK END SELECT PR 5 SYSTEM B G D K MFT NAME ...

Page 24: ...uning MFT function After step 4 press M m to select MFT Press to get a clear picture then press MENU to exit the menu Notes If the TV sound is distored or noisy select the appropriate TV system G or B for your area see page 20 When adjusting MFT the menu may become difficult to read due to interference from the picture being received ...

Page 25: ...s MENU then press M m to highlight INSTALLATION and press OK 2 Press M m to highlight MANUAL SET UP then press 3 Press M m to highlight the row containing the programme position you want to change To display other pages for programme positions 6 to 80 press M m repeatedly MENU OK PLAY SET MENU OK END SELECT AUTO SET UP MANUAL SET UP TV SYSTEM 3 2 G VCR OUTPUT CH EXIT EXIT MENU CLEAR DELETE SWAPPIN...

Page 26: ... 5 7 Press MENU to exit the menu Disabling unwanted programme positions After presetting channels you can disable unused programme positions The disabled positions will be skipped later when you press the PROG buttons Before you start Turn on the VCR and the TV Set the TV to the video channel Refer to Index to parts and controls for button locations 1 Press MENU then press M m to highlight INSTALL...

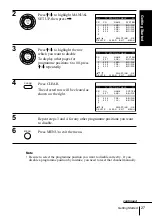
Page 27: ...ramme position you want to disable correctly If you disable a programme position by mistake you need to reset that channel manually continued OK PLAY EXIT MENU CLEAR DELETE SWAPPING OK TV STATION TABLE 5 4 3 2 1 0 0 0 0 3 3 2 2 2 0 9 7 I C L A J D M A K E N B B G D K B G D K B G D K B G D K PR CH NAME SYSTEM OK PLAY EXIT MENU CLEAR DELETE SWAPPING OK TV STATION TABLE 5 4 3 2 1 0 0 0 0 3 3 2 2 2 0 ...

Page 28: ...ht the row which you want to change or enter the station name then press To display other pages for programme positions 6 to 80 press M m repeatedly 4 Press M m to highlight NAME then press MENU OK PLAY SET MENU OK END SELECT AUTO SET UP MANUAL SET UP TV SYSTEM 3 2 G VCR OUTPUT CH EXIT OK PLAY EXIT MENU CLEAR DELETE SWAPPING OK TV STATION TABLE 5 4 3 2 1 0 0 0 0 3 3 2 2 2 0 9 7 I C L A J D M A K E...

Page 29: ... t 9 t A 2 Press to set the next character The next space flashes To correct a character press until the character you want to correct flashes then reset it You can set up to 4 characters for the station name 6 Press OK to confirm the new name 7 Press MENU to exit the menu MENU OK END SELECT PR 5 SYSTEM B G D K MFT NAME O SET EXIT MANUAL TUNING CH 0 3 3 OK PLAY OK PLAY MENU ...

Page 30: ...ress H PLAY When the tape reaches the end it will rewind automatically Additional tasks To Press Stop play x STOP Pause play X PAUSE Resume play after pause X PAUSE or H PLAY Fast forward the tape M FF during stop Rewind the tape m REW during stop Eject the tape Z EJECT To set the colour system If the playback picture has no colour or streaks appear during playback set COLOUR SYSTEM in the USER SE...

Page 31: ...ecorded in both PAL and NTSC systems the time counter reading will not be correct This discrepancy is due to the difference between the counting cycles of the two colour systems Depending on your TV the following may occur while playing an NTSC recorded tape The picture becomes black and white The picture shakes No picture appears on the TV screen Black streaks appear horizontally on the TV screen...

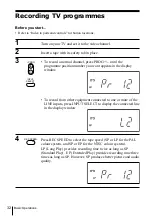
Page 32: ...ppears in the display window To record from other equipment connected to one or more of the LINE inputs press INPUT SELECT to display the connected line in the display window 4 Press REC SPEED to select the tape speed SP or LP for the PAL colour system and SP or EP for the NTSC colour system LP Long Play provides recording time twice as long as SP Standard Play EP Extended Play provides recording ...

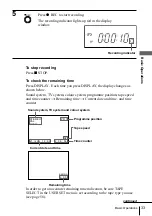
Page 33: ...ow Sound system TV system colour system programme position tape speed and time counter t Remaining time t Current date and time and time counter Sound system TV system and colour system continued Programme position Tape speed Time counter Current date and time Remaining time In order to get an accurate remaining time indication be sure TAPE SELECT in the USER SET menu is set according to the tape ...

Page 34: ...display the connected line in the display window For tape speed select SP or EP in step 4 EP Extended Play provides recording time three times as long as SP However SP produces better picture and sound quality When playing a tape the VCR automatically detects the tape speed Tips To select a programme position you can use the programme number buttons on the remote commander For two digit numbers fo...

Page 35: ...ding will not be correct This discrepancy is due to the difference between the counting cycles of the two video systems When you insert a non standard commercially available tape the remaining time may not be correct The remaining time is intended for rough measurement only About 30 seconds after the tape begins playback the tape remaining time will be displayed 1 SLV EZ727AZ only 2 SLV EZ727AZ an...

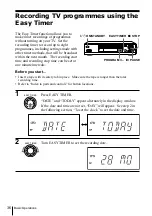
Page 36: ...recording stop time can be set at one minute intervals 1 ON STANDBY EASYTIMER x STOP PROGRAM X PAUSE Before you start Insert a tape with its safety tab in place Make sure the tape is longer than the total recording time Refer to Index to parts and controls for button locations 1 Press EASY TIMER DATE and TODAY appear alternately in the display window If the date and time are not set DAY will appea...

Page 37: ...tervals or adjust the time in one minute intervals by pressing the PROGRAM buttons 5 Press EASY TIMER STOP indicator and the recording stop time appear in the display window 6 Turn EASY TIMER to set the recording stop time You can set the recording stop time in 15 minute intervals or adjust the time in one minute intervals by pressing the PROGRAM buttons EASY TIMER EASY TIMER PROGRAM EASY TIMER EA...

Page 38: ...ment connected to one or more of the LINE inputs turn EASY TIMER or press INPUT SELECT to display the connected line in the display window 9 Press EASY TIMER The current tape speed mode appears in the display window 10 Turn EASY TIMER to set the tape speed SP LP or AUTO EASY TIMER EASY TIMER INPUT SELECT EASY TIMER EASY TIMER Recording TV programmes using the Easy Timer continued ...

Page 39: ...d the VCR switches on Remember to press 1 to reset the VCR to recording standby after using the VCR You can also do the following tasks while the VCR is recording Reset the counter page 31 Display tape information on the TV screen page 33 Check the timer settings page 50 Watch another TV programme page 34 To use the AutoTape Speed function In step 10 above turn EASY TIMER to select AUTO When you a...

Page 40: ...tting press x STOP on the VCR while you are making the setting To check change or cancel the programme setting see Checking changing cancelling timer settings on page 50 To record NTSC signals 1 in EP mode set the tape speed to LP Even when timer recording is set to LP mode NTSC signals are automatically recorded in EP mode Notes If eight programmes have already been set using the G CODE system 2 ...

Page 41: ...ordings Doing so may cause the settings to be inaccurate To activate the Demonstration Mode Press X PAUSE on the VCR while turning the EASY TIMER DEMO appears in the display window for a few seconds To cancel the Demonstration Mode Turn the power off and unplug the mains lead Although the Demonstration Mode is cancelled the timer settings entered while using the Demonstration Mode will remain Be s...

Page 42: ...imer methods Before you start Check that the VCR clock is set to the correct time and date Insert a tape with its safety tab in place Make sure the tape is longer than the total recording time Turn on your TV and set it to the video channel Refer to Index to parts and controls for button locations 1 Press the G CODE button The G CODE menu appears on the TV screen 2 Press the programme number butto...

Page 43: ...ore of the LINE inputs press INPUT SELECT to display the connected line in the PR position You will only have to do this operation once for the referred channel The VCR will then store your setting If the information is incorrect press CLEAR to cancel the setting 4 If you want to change the date and tape speed 1 Press to select the item you want to change 2 Press M m to reset it To record the same...

Page 44: ...and the remaining tape length becomes shorter than the recording time the recording tape speed is automatically changed to the LP mode or EP mode when you are recording NTSC signals Note that some noise will appear on the picture when the tape speed is changed To operate this function correctly the TAPE SELECT setting in the USER SET menu must be accurate see page 58 Tips To set the line input vid...

Page 45: ...MENU then press M m to highlight TIMER PROGRAMMING and press OK 2 Set the date start and stop times and tape speed 1 Press to select each item in turn 2 Press M m to set each item To correct a setting press to return to that setting and reset To record the same programme every day or the same day every week see Daily weekly recording on page 46 To record from other equipment connected to one or mo...

Page 46: ...icator turns off and the VCR switches on Remember to press 1 to reset the VCR to recording standby after using the VCR You can also do the following tasks while the VCR is recording Reset the counter page 31 Display tape information on the TV screen page 33 Check the timer settings page 50 Watch another TV programme page 34 To use the Auto Tape Speed function In step 2 above press m to select AUTO...

Page 47: ...l the programme setting see Checking changing cancelling timer settings on page 50 To record NTSC signals in EP mode set the tape speed to LP Even when timer recording is set to LP mode NTSC signals are automatically recorded in EP mode Note The and indicators flash in the display window when you press 1 with no tape inserted SLV EZ727AZ only ...

Page 48: ... fast forward hold down M FF During rewind hold down m REW Play at high speed During playback press M FF or m REW on the remote commander During playback hold down M FF or m REW When you release the button normal playback resumes Play at twice the normal speed During playback press 2 Play in slow motion During playback press y SLOW Play frame by frame During pause press M FF on the remote commande...

Page 49: ...ime in increments of 30 minutes In LP EP mode Each press advances the time as shown below 0 30 1 00 4 00 4 30 Normal recording 0 30 1 00 4 00 9 00 5 00 Normal recording The tape counter decreases minute by minute to 0 00 then the VCR stops recording and turns off automatically To extend the duration Press z REC repeatedly to set a new duration time To cancel the duration Press z REC repeatedly unt...

Page 50: ...CR to return to recording standby 3 Press M m to select the setting you want to change or cancel then press The PR number on the selected row flashes 4 To change the setting press to select the item you want to change then press M m to reset it To cancel the setting press CLEAR 5 Press MENU to exit the menu If any settings remain turn off the VCR to return to recording standby SET MENU OK END SELE...

Page 51: ...rst has priority and the second programme starts recording only after the first programme has finished If the programmes start at the same time the programme listed first in the menu has priority Programme 1 about 20 seconds Programme 2 will be cut off Programme 1 Programme 2 about 20 seconds will be cut off ...

Page 52: ...ual sound while recording Press AUDIO MONITOR to select the sound you want To listen to On screen display Display window Main MAIN STEREO Sub SUB STEREO Main and sub MAIN SUB STEREO Standard sound MONO STEREO Usually the main channel heard from both the left and right in bilingual programmes To select stereo programme while recording To listen to On screen display Display window Stereo STEREO STER...

Page 53: ...9 for details To select the sound while recording Press AUDIO MONITOR to select the sound you want Stereo programmes To listen to On screen display Display window Stereo NICAM STEREO NICAM STEREO Left channel NICAM LCH NICAM STEREO Right channel NICAM RCH NICAM STEREO Left and right channels NICAM LCH RCH NICAM STEREO Usually the mixed sound of left and right channels Bilingual programmes To liste...

Page 54: ...ate tracks Hi fi audio is recorded onto the main track along with the picture Monaural sound is recorded onto the normal audio track along the edge of the tape Stereo Bilingual Usually mixed left right channels Usually main sound Normal audio track monaural Hi fi audio track main track Stereo sound left right channels Main left channel Sub right channel Notes To listen to playback sounds in stereo...

Page 55: ...d tape into the VCR 2 Press INDEX SEARCH twice To search ahead press INDEX SEARCH twice To search backwards press INDEX SEARCH twice 3 Press INDEX SEARCH depending on the direction where your desired programme is located Each time you press the button the number increases or decreases up to 20 respectively 4 The VCR starts searching and playback starts automatically from that point To stop searchi...

Page 56: ...t it SET MENU OK END SELECT OSD TAPE SELECT ON OFF COLOUR SYSTEM E 1 8 0 AUTO NICAM POWER SAVE ON ASC ON EXIT TRACKING Tracking meter Adjusting the picture sharpness Auto Sharpness Control You can automatically adjust the sharpness of the picture 1 During playback press MENU then press M m to highlight USER SET and press OK 2 Press M m to highlight ASC then press 3 Press M m to set ASC to ON or OF...

Page 57: ...ht USER SET and press OK 2 Press M m to highlight POWER SAVE 3 Press to set to ON then press OK The power consumption is reduced to a minimum To turn on the indicators in the display window Set POWER SAVE to OFF in step 3 Note When the VCR stands by for recording the indicator in the display window remain lit even when POWER SAVE is set to ON SET MENU OK END SELECT OSD ON ON TAPE SELECT E 1 8 0 CO...

Page 58: ...ASY G CODE SET UP OFF OFF OSD ON to display the menu on the TV screen OFF to disappear the menu from the TV screen TAPE SELECT E180 to use an E 180 or shorter type tape E240 to use an E 240 type tape E260 to use an E 260 type tape E300 to use an E 300 type tape COLOUR SYSTEM AUTO to select the colour system automatically PAL to use the tape recorded in the PAL colour system B W to use the tape rec...

Page 59: ...ON to automatically adjust the sharpness of the picture OFF to manually adjust the sharpness of the picture EASY OPERATION Menu option Set this option to G CODE EXTEND 3 OFF to deactivate the G CODE Extend function 10 20 30 60 minutes to extend the time of the G CODE setting by the selected amount of time AUTO POWER OFF OFF to deactivate the Auto Power Off function 2HOUR 3HOUR to turn the VCR off ...

Page 60: ...order TV LINE 2 IN LINE OUT VMC 820HG audio video cable not supplied Other VCR Player Signal flow Connecting to a VCR or stereo system How to connect to record on this VCR Connect the line outputs of the other VCR to the input connector of this VCR Refer to the examples A through C and choose the connection that best suits your VCR Example A SLV EZ424AZ and EZ121AZ only ...

Page 61: ...he audio output jacks on the stereo system using the RK C510HG audio cable not supplied Notes Make sure you connect the plugs to jacks of the same colour If the other VCR is a monaural type leave the red plugs unconnected If you connect this VCR to both the LINE IN and LINE OUT jacks of the other VCR select the input correctly to prevent a humming noise When you connect another VCR to the LINE 2 I...

Page 62: ...o start playback and set it to playback pause 2 Insert a tape with its safety tab in place into this recording VCR Search for the point to start recording and press X PAUSE to set it to playback pause 3 Press z REC on this VCR to set it to recording pause 4 To start editing press the X PAUSE buttons on both VCRs at the same time To stop editing Press the x STOP buttons on both VCRs Tip To cut out ...

Page 63: ...onnections using the aerial cable only make sure the RF channel number is set correctly for your area The picture is not clear Existing broadcasts may interfere with the VCR Reset the RF channel output of your VCR see page 17 Adjust the tracking with the TRACKING buttons on the VCR The video heads are dirty see the last page of Troubleshooting Clean the video heads using the Sony T 25CLD E 25CLDR ...

Page 64: ... poor Make sure the aerial cable is connected securely Adjust the TV aerial Make sure the TV system is correctly set for your TV Make sure TV SYSTEM B G or B B in the INSTALLATION menu is set to the same system in your local area The recorded picture has no colour or unusual colour Set COLOUR SYSTEM in the USER SET menu according to your local colour system The tape starts playing as soon as it is...

Page 65: ...ake sure you are pointing the remote commander at the remote sensor on the VCR Replace all the batteries in the remote commander with new ones if they are weak Make sure the TV VIDEO remote control switch is set correctly The selected input line connector number does not appear in the display window Press INPUT SELECT to display the connected line The recording condition of the tape is very poor a...

Page 66: ...ditional Information Symptoms caused by contaminated video heads Normal picture Rough picture Unclear picture No picture or black white screen appears initial contamination terminal Troubleshooting continued ...

Page 67: ... VIDEO IN phono jack 1 Input signal 1 Vp p 75 ohms unbalanced sync negative AUDIO IN phono jack 2 Input level 327 mVrms Input impedance more than 47 kilohms General Power requirements 220 240 V AC 50 Hz Power consumption 15 W SLV EZ424AZ and EZ121AZ 17 W SLV EZ727AZ and EZ725AZ 3 W POWER SAVE is set to ON minimum Operating temperature 5 C to 40 C Storage temperature 20 C to 60 C Dimensions includi...

Page 68: ...arch 55 L LP mode 32 M Manual fine tuning 24 Monaural 53 Monitoring during playback 54 during recording 52 N NICAM broadcasts 53 Normal audio track 54 O Optional setting 58 P Playback 30 at various speeds 48 frame by frame 48 selecting the sound 52 slow motion 48 Power save 57 Presetting channels 22 R Recording 32 bilingual programmes 52 duration time 49 saving 34 stereo programmes 52 timer settin...

Reviews: