background image

C:\#WORK\@DPF\DPF-V1000N\Writer-OP\06_FinalDelivery\4155758111\4155758111DPFX1000NCEK\01GB-

DPFX1000NCEK\030C01.fm

Master: 

Left

DPF-X1000N, DPF-V1000N 4-155-758-

11

 (1)

GB

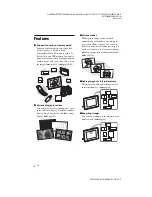
Features

x

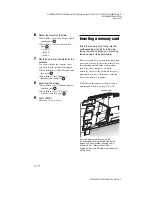
Support for various memory cards

*

Supports various memory cards and other 
devices, such as a “Memory Stick”, 
CompactFlash card, SD memory card, xD-
Picture Card, and USB memory. Just insert a 
memory card removed from a digital camera 
or other device, and you will be able to view 
the images immediately. (

.

page 20, 61)

x

Various display functions

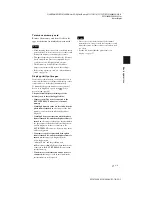
You can enjoy various viewing modes, such 
as the slideshow display, Clock and calendar 
display, Single view mode, and Index image 
display. (

.

page 22)

x

Various modes

The displayed image can be switched 
automatically as though you are turning the 
pages of an album yourself. You can select 
from various modes, including just images, a 
clock, or calendar view. You can also change 
playback settings such as the playback order. 
(

.

page 29)

x

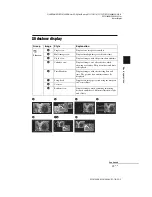
Adding images to internal memory

The images you add to the album are saved 
in internal memory. (

.

page 32)

x

Exporting images

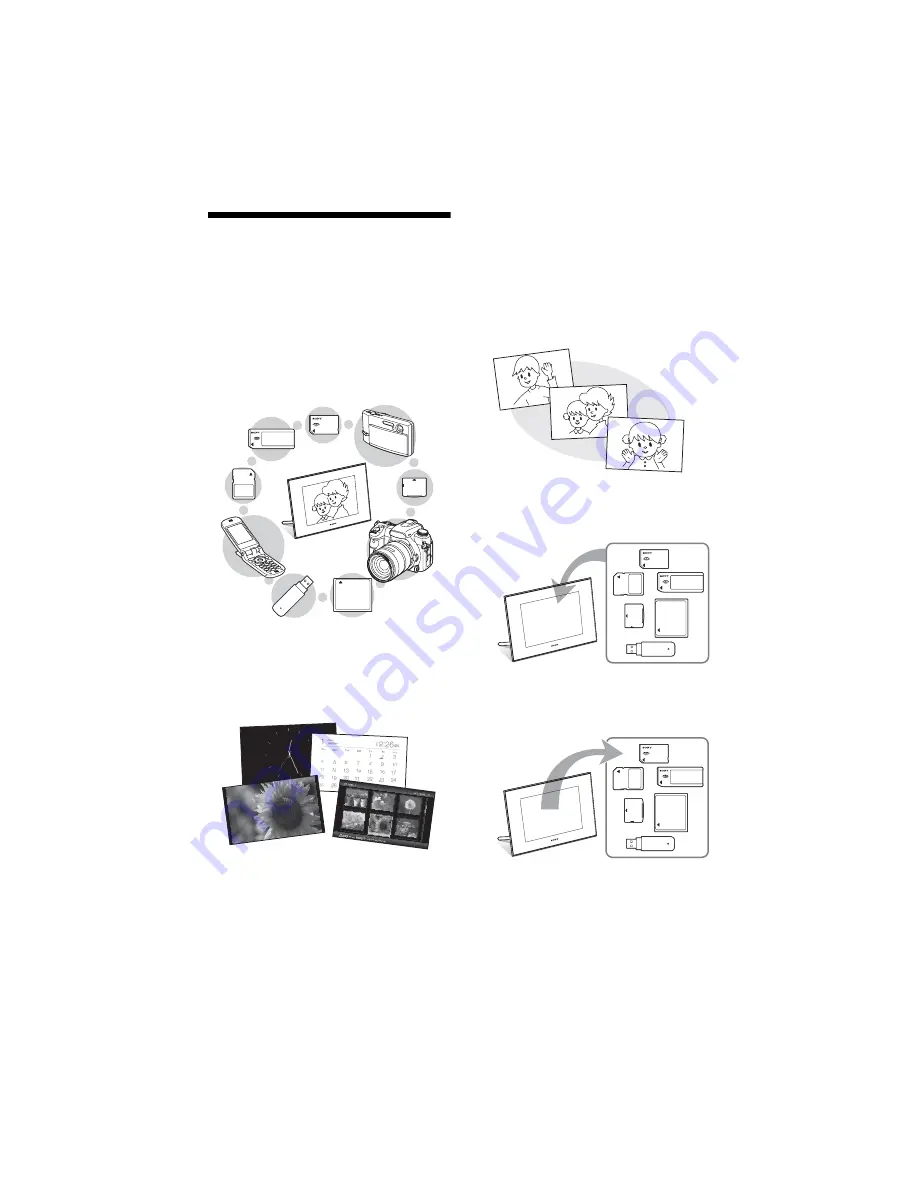
You can export images in the album to your 
memory card. (

.

page 34)

Summary of Contents for S-Frame 4-155-758-11 (1)

Page 1: ...a computer Error messages Troubleshooting Additional information C WORK DPF DPF V1000N Writer OP 06_FinalDelivery 4155758111 4155758111DPFX1000NCEK 01GB DPFX1000NCEK 010COV fm Master Right DPF X1000N DPF V1000N 4 155 758 11 1 Operating Instructions Before operating this unit please read this manual thoroughly and retain it for future reference These models are not available in every country and re...

Page 2: ...omagnetism causes data transfer to discontinue midway fail restart the application or disconnect and connect the communication cable USB etc again Disposal of Old Electrical Electronic Equipment Applicable in the European Union and other European countries with separate collection systems This symbol on the product or on its packaging indicates that this product shall not be treated as household w...

Page 3: ...ience Should the fuse in the plug supplied need to be replaced a fuse of the same rating as the supplied one and approved by ASTA or BSI to BS 1362 i e marked with or mark must be used If the plug supplied with this equipment has a detachable fuse cover be sure to attach the fuse cover after you change the fuse Never use the plug without the fuse cover If you should lose the fuse cover please cont...

Page 4: ...espective companies Furthermore and are not mentioned in each case in this manual This unit is equipped with face recognition feature Sony Face Recognition technology developed by Sony is used Notice for users Program 2009 Sony Corporation Documentation 2009 Sony Corporation All rights reserved This manual or the software described herein in whole or in part may not be reproduced translated or red...

Page 5: ...ing a slideshow 29 Changing the settings of the slideshow 29 Refresh mode 32 Adding images to the internal memory 32 Exporting an image 34 Deleting an image 36 Registering a mark 37 Searching for an image Filtering 39 Specifying the playback device 40 Auto Touch up 40 Adjusting the image size and position 42 Enlarging reducing an image 42 Rotating an image 42 Using the CreativeEdit function 43 Mak...

Page 6: ...g to a computer 64 System requirements 64 Connecting to a computer to exchange images 64 Disconnecting your computer 65 Error messages If an error message appears 66 Troubleshooting If trouble occurs 68 Additional information Precautions 73 Safety 73 Installation 73 Cleaning 73 Restrictions on duplication 74 Disposing of the photo frame 74 About memory cards 74 Memory Stick 74 SD memory card 75 xD...

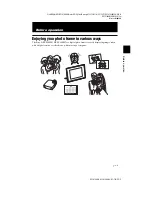
Page 7: ...EK 030C01 fm Master Right L0 DPF X1000N DPF V1000N 4 155 758 11 1 7 GB Before operation Before operation Enjoying your photo frame in various ways The Sony DPF X1000N DPF V1000N is a digital photo frame for easily displaying images taken with a digital camera or other device without using a computer ...

Page 8: ...es immediately page 20 61 xVarious display functions You can enjoy various viewing modes such as the slideshow display Clock and calendar display Single view mode and Index image display page 22 xVarious modes The displayed image can be switched automatically as though you are turning the pages of an album yourself You can select from various modes including just images a clock or calendar view Yo...

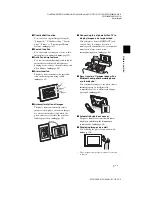
Page 9: ...to frame automatically rotates images to their proper orientation Images are also automatically rotated when the photo frame is set in either the portrait or landscape position page 15 xConnecting to a high definition TV to display images on a large screen Using the photo frame s HDMI OUT jack you can enjoy the images stored on a memory card external device or in internal memory on a large screen ...

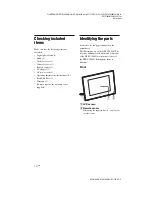
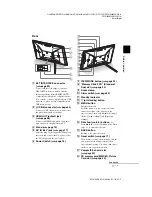
Page 10: ...ote control 1 AC adaptor 1 AC power cord 1 Operating Instructions this manual 1 Read This First 1 Warranty 1 In some regions the warranty is not supplied Identifying the parts For details see the pages indicated in the parentheses The illustrations are of the DPF X1000N The locations and names of buttons and connectors of the DPF V1000N are identical to those of the DPF X1000N although the shape i...

Page 11: ...sert the plug of the supplied AC adaptor to this jack and connect the AC power cord to the AC adaptor and the wall outlet F Power Switch page 18 G VIEW MODE button page 22 H Memory Stick PRO Standard Duo slot page 20 I Access lamp J Alarm switch page 52 K Standby indicator L 1 on standby button M MENU button Displays the menu From the menu you can operate the same functions as those of the buttons...

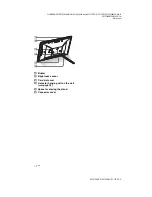
Page 12: ...5758111 4155758111DPFX1000NCEK 01GB DPFX1000NCEK 030C01 fm Master Left DPF X1000N DPF V1000N 4 155 758 11 1 12 GB S Buzzer T Brightness sensor U Card slot cover V Holes for hanging unit on the wall page 16 W Space for storing the stand X Connector cover ...

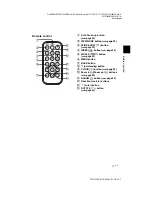
Page 13: ...GB Before operation Remote control A Auto Touch up button page 40 B VIEW MODE button page 22 C SLIDE SHOW button page 22 D INDEX button page 22 E SINGLE button page 22 F MENU button G BACK button H 1 on standby button I CLOCK button page 22 J Zoom in Zoom out buttons page 42 K ALBUM button page 32 L Direction B b v V buttons M enter button N ROTATE button page 42 ...

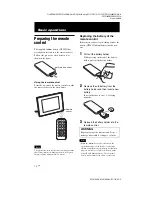
Page 14: ...l Replacing the battery of the remote control If the remote control stops working replace the battery CR2025 lithium battery with a new one 1 Pull out the battery holder While pressing in the tab of the battery holder pull out the battery holder 2 Remove the old battery from the battery holder and then insert a new battery Insert the battery so that is facing upwards 3 Reinsert the battery holder ...

Page 15: ...ng period of time remove the battery from the remote control to prevent leaking and corrosion Incorrectly inserting shorting dismantling or heating the battery or throwing it into a fire may cause the battery to rupture or leak About descriptions in this manual The operations described in this manual are based on remote control operation When an operation is performed differently for example with ...

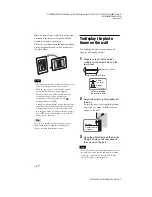
Page 16: ...sm such as a cash card or credit card near the photo frame If you place the photo frame near a CRT based television the color of the TV s display may be changed Tip It is easier to turn the stand if you wind or wrap a rubber band tightly around the stand when you remove the stand from the photo frame To display the photo frame on the wall You can hang the photo frame on the wall using the followin...

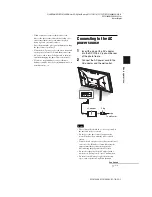
Page 17: ...dents or damage caused by defects of attachment misuse or natural disasters etc Connecting to the AC power source 1 Insert the plug of the AC adaptor into the DC IN 8 4 V jack on the rear of the photo frame 2 Connect the AC power cord to the AC adaptor and the wall outlet Notes The socket outlet should be as close as possible to the unit and easily accessible Do not place the photo frame in an uns...

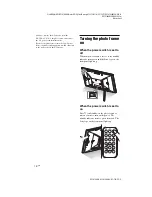
Page 18: ...oto frame is turned off AC power house current is still supplied to it while connected to the wall outlet via the AC adaptor Turning the photo frame on When the power switch is set to off When the power switch is set to on the standby indicator turns green and the Sony logo on the front panel lights up When the power switch is set to on Press 1 on standby on the photo frame or remote control to tu...

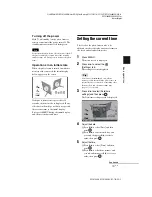
Page 19: ...een returns to the initial display First press MENU during the initial display and then set the date and time Setting the current time The clock of the photo frame needs to be adjusted in order to display an accurate time in the clock and calendar view modes 1 Press MENU The menu screen is displayed 2 Press B b to select the Settings tab The settings screen is displayed Tip You can use the B b but...

Page 20: ...12 hours or 24 hours and then press 9 Press MENU The menu screen is closed Inserting a memory card Insert the memory card firmly into the corresponding slot with its label side facing toward you when you are facing the back side of the photo frame The access lamp flashes when the memory card is inserted correctly Reinsert the memory card after checking the label side of the memory card if the acce...

Page 21: ...the images of the memory card in the following priorities Memory card The device connected to the EXT INTERFACE connector t internal memory If multiple memory cards are inserted when the photo frame is turned on the images of the first memory card you inserted take priority and are displayed If multiple devices are inserted while the photo frame is turned off and then the photo frame is turned on ...

Page 22: ... moving the cursor to the group area using B b v V when you operate the photo frame using the buttons on the photo frame 3 Press B b v V or VIEW MODE to select the style you want and then press Note If you have not operated the photo frame for an extended period of time the style the cursor is on will be selected automatically Group Explanation Slideshow Displays a slideshow display style Clock an...

Page 23: ...ages at the same time C Clock view Displays images with the present date and time D Calendar view Displays images one after another while showing a calendar The present date and time is displayed E Time Machine Displays images with the shooting date and time The present date and time cannot be displayed F Scrap book Displays an image processed using the template in CreativeEdit G Creative H Random...

Page 24: ...aved in internal memory demonstration mode starts automatically Demonstration mode ends if a button other than 1 on standby is pressed For details on the playback order in a slideshow display see page 56 You can set the interval effect listing order or color effect when you select the slideshow display Refer to Slideshow Settings page 31 You can select the single view mode when you press on the ph...

Page 25: ...lect only the Settings tab when the Clock and calendar display is displayed Tip You can use the VIEW MODE button on the photo frame Clock1 Clock2 Clock3 Clock4 Clock5 Clock6 Clock7 Clock8 Clock9 Clock10 Clock11 Calendar1 Calendar2 Calendar3 Lunar Calendar when you select Simplified Chinese in Language setting Arabic Calendar when you select Arabic in Language setting Farsi Calendar when you select...

Page 26: ...s are able to use the fit to screen mode You can use the VIEW MODE button on the photo frame Group Image Style Explanation A Entire image Displays an entire image in the screen You can switch the images to be displayed by pressing B b B Fit to screen Displays an image over the whole screen You can switch the images to be displayed by pressing B b C Entire image with Exif Displays image information...

Page 27: ...ice is connected the images in internal memory are displayed If no images are saved in internal memory demonstration mode starts automatically Demonstration mode ends if a button other than 1 on standby is pressed You can select the single view mode when you press on the photo frame when the image you want appears in the index image display You can use the VIEW MODE button on the photo frame Group...

Page 28: ...pixels width height Manufacturer name of image input device Model name of image input device Shutter speed e g 1 8 Aperture value e g F2 8 Exposure value e g 0 0EV Rotation information 4Setting information 5Image number folder file number This is displayed if the image is DCF compliant If the image does not comply with DCF the first 10 characters of its file name are displayed 6Shooting date time ...

Page 29: ...ayed 2 Press B b to select the Settings tab The settings screen is displayed 3 Press v V to select Slideshow Settings and then press The slideshow settings screen is displayed 4 Press v V to select the item and then press Refer to the tables on the next page for details on the setting items Notes Note the following when you select a slideshow using the image stored on the memory card Due to one of...

Page 30: ...FX1000NCEK 050C03 fm Master Left DPF X1000N DPF V1000N 4 155 758 11 1 30 GB When the screen is too bright it may make you feel nauseous Be careful that you do not make the brightness settings too bright when you use the photo frame Tip You can also use the VIEW MODE button on the photo frame ...

Page 31: ...ns to the next image as though the current image is being wiped off the screen to reveal the next image Random Uses the above five effects randomly Shuffle ON Displays images randomly OFF Displays images according to the Listing Order setting of General Settings Color effect Color Displays an image in color Sepia Displays an image in a sepia color Monochrome Displays an image in monochrome Auto To...

Page 32: ...ximately 5 minutes to refresh the internal memory Notes We recommend that you perform a backup of your data periodically to avoid losing it Do not run a slideshow with less than 10 images continuously if you have set the interval time for the slideshow to 3 seconds You may not be able to protect some images in the internal memory Adding images to the internal memory You can use the photo frame as ...

Page 33: ...age list During a search Displays all the images applicable to the criteria used for the search Other than during a search Displays all images in the device displayed on the screen Refer to Searching for an image Filtering page 39 1Press B b v V to select the image to add to the album and then press A check mark will be attached to the check box of each selected image Repeat this operation to add ...

Page 34: ...ng time or read many times may be subject to data error when read too often We recommend that you perform a backup of your data periodically to avoid losing it Exporting an image You can export the images in the internal memory to a memory card or external device 1 Press MENU when an image stored on the internal device is displayed on the screen The menu is displayed 2 Press B b to select the Edit...

Page 35: ... in the check box 2Press MENU The screen used for selecting the device to which to export is displayed 6 Press v V to select the device to which to export the image and then press 7 Press v V to select the folder you want to save to and press The confirmation screen used to decide whether to export or not is displayed Tip A new folder is created automatically when you select New folder 8 Press v V...

Page 36: ...ering page 39 1Press B b v V to select the image to delete and then press A check mark will be attached to the check box of each selected image Repeat this operation to delete multiple images at the same time To cancel the selection select images to cancel and then press to delete the check mark in the check box 2Press MENU The delete confirmation screen is displayed 6 Press v V to select Yes and ...

Page 37: ...mode 1 Press MENU when an image is displayed on the screen The menu is displayed 2 Press B b to select the Editing tab The screen used for editing is displayed 3 Press v V to select Marking and then press 4 Press v V to select the mark you want and then press 5 Press v V to select Mark this image Selected images or Mark all images and then press If you select Mark this image the image currently di...

Page 38: ...heck mark is removed from the check box of an image the mark will be removed from the image 7 Press v V to select Yes and then press The mark is attached to the selected image To delete the registration of a mark Select Unmark this image or Unmark all images and then press in step 5 You can also cancel the selection when you remove the check mark from the check box Unmark this image Removes a mark...

Page 39: ...want and then press Search by event Filters by the event Search by folder Filters by the folder Search by vertical horizontal Filters by the image orientation Search by mark Filters by the mark 5 Press v V to select the item you want and then press To cancel the search for an image Press the MENU button when an image is displayed on the screen and then select Exit search show all photo To change t...

Page 40: ...ing the following six corrections automatically at the same time Refer to page 55 for details on each level Red eye Correction Automatically corrects red eye caused by the flash Exposure Correction Adjusts the brightness by using the face detect function Focus Correction Improves the focus of an out of focus image to create a better focused image WB Correction Corrects a color which is reddish or ...

Page 41: ... used to decide whether to save an image or not is displayed 7 Press v V to select Yes and then press The image is saved 8 Press when the confirmation screen is displayed after saving is finished To return to the original image image before correction Select Cancel and then press in step 2 Notes The effect of the Auto Touch up function may not appear on the corrected images depending on the images...

Page 42: ... image If you select Save as new image the image is saved as a new image If you select Overwrite the image is overwritten A confirmation screen is displayed when you select Overwrite Go to step 4 on page 41 Notes You cannot overwrite files except for a JPEG file extension JPG Enlarging an image may reduce the quality depending on the image size It is not possible to enlarge an image using the butt...

Page 43: ...CreativeEdit function 1 Press MENU The menu is displayed 2 Press B b to select the Editing tab The screen used for editing is displayed 3 Press v V to select CreativeEdit and then press The screen used for CreativeEdit is displayed 1 From the CreativeEdit menu press B b v V to select Scrapbook and then press The window for selecting a theme is displayed 2 Press B b v V to select the desired theme ...

Page 44: ... others of the selected image Press B b to select the desired adjustment item then press 6 Press B b to select and then press The selected image is added to the image area To add an image for another image area repeat steps 4 and 5 To superimpose characters or stamps on the image proceed with step 7 7 Superimpose characters or stamps Press v V to select the desired setting such as stamp or charact...

Page 45: ...To flip the stamp press B b v V to select and then press The adjustments here are reflected on the next stamp x Superimposing characters 1Press v V to select Keyboard after selecting Text using B b and then press The keyboard is displayed 2Input characters Press B b v V to select the desired character and then press The selected characters are input in the character input box You can enter up to 5...

Page 46: ...ed Pressing saves the input characters in the memory You can register a maximum of 12 characters 5Adjust the input characters Press B b v V to select the desired adjustment item press and then adjust the size and position of the characters For how to adjust an image see step 5 on page 44 1 From the CreativeEdit menu page 43 press B b v V to select Calendar and then press The window used for select...

Page 47: ... to select Sunday or Monday Then press Date color Set the color of Saturday Sunday and holiday to be displayed in the calendar Press b and then v V to select the desired color for Sunday and Saturday Then press Modify Calendar You can add a stamp or desired color to a specific day in the calendar When adding a stamp Example 1 Press B b to select Stamp and press The stamp selection window is displa...

Page 48: ...ed for adjusting the image is displayed For how to adjust an image see step 5 on page 44 2Press B b to select and then press The preview window is displayed 3 Superimpose a handwritten or a standard format message over the background image x To superimpose a handwritten message 1Press B b to select Text then press The window used for selecting a method to create a message is displayed 2 To create ...

Page 49: ...of the selected image superimposed on the background image is displayed Pressing saves the handwritten illustration or message in the memory You can register a maximum of 12 messages which can be recalled from the history list in step 3 x Superimposing a standard format message 1Press B b to select Text then press The window used for selecting a standard format message is displayed when you select...

Page 50: ...d frame You can select the layout of the photo displaying as follows 2 panels 4 panels 9 panels 13 panels 16 panels 1 From the CreativeEdit menu page 43 press B b v V to select Layout Print and then press The Layout Print templates are displayed 2 Press B b v V to select the desired template then press A preview of the selected template is displayed 3 Select an image When you select a template wit...

Page 51: ...function finely in one minute increments Advanced Sets the auto power ON OFF function according to a day of the week by one hour units 5 Set the time setting Simple 1Press v V to select Auto power ON OFF and then press 2Press v V to select Enable and then press 3Set the auto on off timer Press v V to set the time you want AM or PM is displayed on the right of the screen when you select 12 hours on...

Page 52: ...rame The power is turned on automatically at the time you set for Auto power ON during the standby mode 2Press B b v V to select OK Using the alarm function You can use the photo frame as an alarm clock Set to the alarm switch on the rear panel to ON Under condition of main power switch set to On the alarm sound and alarm mode screen will appear at the scheduled alarm time To turn off the alarm Se...

Page 53: ...e current time page 19 Auto power on off will not function during alarm is set off When alarm sets off at scheduled time power will also turn on regardless of auto off settings Main power needs to be set at On for alarm to operate Changing the settings You can change the following settings Slideshow Settings Image Quality Alarm Setting Auto power ON OFF Date time settings General Settings Listing ...

Page 54: ...laying a slideshow some settings of some items cannot be changed They are displayed in gray and cannot be selected 5 Press v V to select a setting value and then press Each time you press v V v V from the photo frame the setting value changes In the case of a numerical value press V to increase the value and press v to decrease the value If you press the setting is confirmed 6 Press MENU The menu ...

Page 55: ...hich is reddish or bluish due to the light source at the time the photo was taken lighting to a color suitable for that light source You can select the setting from Strong Standard or OFF Auto Dodging Brightens the portion which is dark automatically Keeps the brightness of the portion which is bright You can select the setting from Strong Standard or OFF Skin Smoothing Adjusts the skin tone for a...

Page 56: ...ioration in image quality compared to the original images is noticeable when the images are displayed on a large monitor via the HDMI OUT jack or a computer Original Saves images to the internal memory without compressing them There is no deterioration but you can save fewer images Control for HDMI ON OFF Sets whether to enable or disable the HDMI control functions such as switching the TV s input...

Page 57: ...ialize Format internal memory You can format the internal memory Notes All the images added to the internal memory will be deleted Do not format the internal memory by using a connection to a PC or other external device Reset Returns all settings to their factory defaults except for the current date and time setting of the Date time settings Factory default settings Item Setting Description ...

Page 58: ...le portrayal of skin or a flower petal and the textures of sand and waves on a large screen Note Depending on the original images high definition display may not be possible 1 Connect the photo frame to the AC power source page 17 2 Prepare a commercially available HDMI cable Notes Use an HDMI cable that is less than 3 meters long Use an HDMI cable with the HDMI logo Connection to a TV input excep...

Page 59: ...rol for photo frame If your television supports the Control for HDMI you can use the remote control of your television to operate the photo frame Notes We cannot guarantee operation with all types of televisions When the remote control of your Sony TV is equipped with a link menu button you can use the remote control to operate the photo frame Otherwise you cannot use a TV remote control to operat...

Page 60: ... or by connecting the powered on photo frame to the television If the television is in the standby mode the television is also turned on You can perform photo frame operations using the TV remote control unit If you switch the language of the TV while the photo frame and the television are being connected you can also change the photo frame language automatically Note To enable the above functions...

Page 61: ... camera or external device If you are using a Cyber shot set USB Connect to Normal or Mass Storage 3 Turn the photo frame to ON page 18 4 Connect the digital camera or external device to the EXT INTERFACE connector Use the USB cable supplied with the digital camera or external device to connect to the photo frame 5 Select the playback device page 40 An image on the device is displayed on the scree...

Page 62: ...poses and product to be used To make Bluetooth communication possible the devices used in the communicated should support the same profile Compatible image file formats that can be displayed See page 77 Maximum number of pixels that can be handled See page 77 1 Connect the photo frame to the AC power source page 17 2 Turn the photo frame to ON page 18 3 Connect the Bluetooth adaptor optional to th...

Page 63: ...he product and the mobile phone or other product such as a human body metal objects or a wall Where a wireless LAN is established or a microwave oven is being used near by or other electromagnetic waves are emitted We cannot guarantee that this product works with all devices enabled with Bluetooth wireless technology Sony cannot assume any responsibility for any information leakage that may be cau...

Page 64: ...cur In such a case simplify the connections You cannot operate the photo frame from another USB device being used simultaneously Do not disconnect the USB cable during data communication Operation with all computers that satisfy the recommended system requirements is not guaranteed The photo frame has been demonstrated as operable when connected to PC or Sony digital photo printer When other devic...

Page 65: ... not make a folder you can only save up to 512 images In addition the number of images may be reduced depending on the file name length or character type A particular image may not be displayed in order of the shooting date on the index image display etc as the information on the shooting date may have been changed or lost when you edited or saved that image file on a computer When images from the...

Page 66: ...inserted An incompatible External Device is inserted An unsupported memory card is inserted Or an unsupported external device is connected to the EXT INTERFACE connector Use a memory card or external device that is supported by the photo frame No images on file There is no image file that can be displayed on the screen of the photo frame on the memory card or the external device Use a memory card ...

Page 67: ...Memory Stick Write error in the CompactFlash card Write error in the SD Memory Card Write error in the xD Picture Card Write error in the internal memory Write error in the External Device The Memory Stick is read only A Memory Stick ROM is inserted To save the images use the Memory Stick recommended The Memory Stick is protected A protected Memory Stick is inserted To edit and save the images use...

Page 68: ...ymptom Check item Cause Solutions No images are displayed on the screen Is a memory card inserted or an external device connected properly c Insert a memory card or connect an external device properly pages 20 62 Does the memory card contain images saved with a digital camera or other device Are images stored on the external device c Insert a memory card containing images or connect an external de...

Page 69: ...press to change the screen to the single image display If the mark on the left is displayed again the image cannot be displayed because the image file is not supported by the photo frame Does the mark displayed below appear in the index view c If the mark shown on the left is displayed the image file is supported by the photo frame but the thumbnail data or image itself cannot be opened Select the...

Page 70: ...nnot save an image Is the memory card write protected c Cancel write protection and try saving again Is the write protect switch of the memory card in the LOCK position c Slide the write protect switch to the enable position Is the memory card full c Replace the memory card with one with sufficient free space Or delete any unwanted images page 36 Is the internal memory full c Delete any unwanted i...

Page 71: ...deleted Symptom Check item Cause Solutions The camera is connected but nothing is displayed Is the cable connected properly c Connect the cable properly Is the photo frame turned on c Turn both the photo frame and the camera to ON Nothing happens even if the USB cable is disconnected and then re connected c An over current error may have occurred with the photo frame To recover from the error turn...

Page 72: ... you operate the remote control Is the battery inserted in the remote control properly c Replace the battery page 14 c Insert a battery page 14 c Insert a battery in the proper orientation page 14 c Point the top end of the remote control towards the remote sensor on the photo frame page 14 c Remove any obstruction between the remote control and the remote sensor Is there a protective sheet insert...

Page 73: ... power house current is still supplied to it while it is connected to the wall outlet via the AC adaptor Be sure to use the AC adaptor supplied with the photo frame Do not use other AC adaptors as this may cause a malfunction Do not use the supplied AC adaptor for other devices Do not use an electrical transformer travel converter as this may cause overheating or a malfunction In case the cord of ...

Page 74: ...less manufactured by Sony Corporation However we do not guarantee the operations of all the Memory Stick media 2 The photo frame is equipped with a slot compatible with both standard size and Duo size media Without a Memory Stick Duo adaptor you can use both a standard size Memory Stick and the compact size Memory Stick Duo 3 When using a Memory Stick Micro with the photo frame always insert it in...

Page 75: ...tents of the Memory Stick before initialization You cannot record edit or delete data if you slide the write protect switch to LOCK Do not attach any other material than the supplied label on the labelling position When you attach the supplied label be sure to attach it to the labelling position Be careful that the label does not stick out The SD memory card slot of the photo frame allows you to u...

Page 76: ...n using a card make sure to check the correct insertion direction of the card and the correct insertion slot When inserting the memory card it will only insert part of the way so do not try to force it as this could damage the memory card and or photo frame Do not remove a card or turn off the photo frame while the photo frame is reading or writing data or the access indicator is flashing Otherwis...

Page 77: ...xif 2 21 compatible BMP 1 4 8 16 24 32 bit Windows format RAW preview only 2 SRF SR2 ARW 2 0 or lower version Some image file formats are not compatible Maximum number of pixels that can be displayed 8 192 H 6 144 V pixels File system FAT12 16 32 sector size of 2 048 bytes or smaller Image file name DCF format 256 characters within 8th hierarchy Maximum number of files that can be handled 9 999 fi...

Page 78: ...wer consumption 18 W Rated output voltage 8 4 V Dimensions Approx 48 29 81 mm 1 15 16 1 3 16 3 1 4 inches width height depth excluding the protruding parts Mass Approx 140 g 5 oz See the label of AC adaptor for more details Design and specifications are subject to change without notice 1 Baseline JPEG with 4 4 4 4 2 2 or 4 2 0 format 2 RAW files are displayed as thumbnail preview 3 The capacity is...

Page 79: ...6 Exporting an image 34 EXT INTERFACE 62 F Features 8 Format internal memory 57 G General Settings 56 H HDMI OUT 58 High definition TV 58 I Image file size 56 Image Quality 55 Index image display 27 Initialize 57 L Language setting 56 M Mass storage compatible devices 61 Memory cards 74 Memory Stick 74 CompactFlash card 75 Notes on use 76 SD memory card 75 xD Picture Card 75 P Placing in portrait ...

Page 80: ...a C WORK DPF DPF V1000N Writer OP 06_FinalDelivery 4155758111 4155758111DPFX1000NCEK 01GB DPFX1000NCEK 110BCO fm Master Left DPF X1000N DPF V1000N 4 155 758 11 1 Printed using VOC Volatile Organic Compound free vegetable oil based ink ...

Reviews: