background image

19

Notes

It is recommended that you use the AC power 
adaptor (not supplied) for long recordings.

During monaural recording of a stereo sound 
source connected through the digital (optical) 
input jack, you can still monitor the recorded 
sound in stereo by using headphones/
earphones connected to the 

i

 jack.

When you record in LP4 mode, momentary 
noise may be produced on very rare occasions 
with certain sound sources. This is because of 
the special digital audio compression 
technology that enables a recording time 4 
times longer than normal. If noise is produced, 
it is recommended that you record in SP or 
LP2 mode to obtain better sound quality.

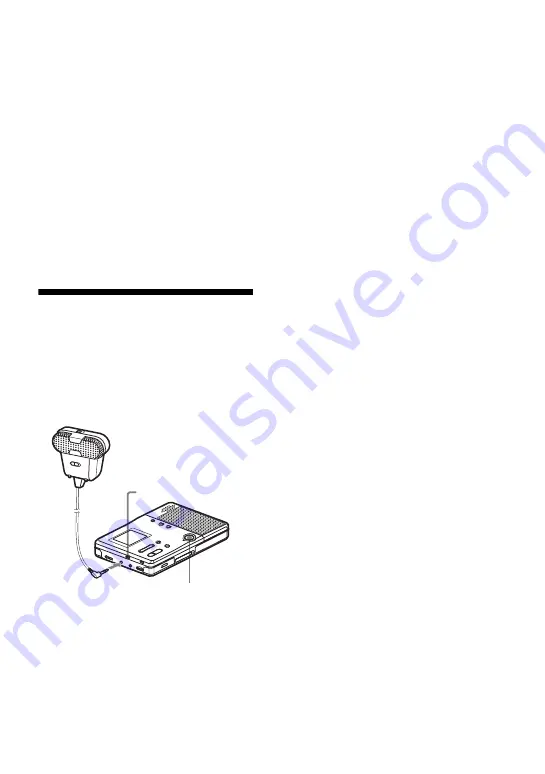
Recording from a 
stereo microphone

Connect a stereo microphone (ECM-719, 
etc.) to the MIC (PLUG IN POWER) 
jack. The recorder input automatically 
switches to the externally connected 
microphone input.

1

Insert a recordable disc and select the 
microphone sensitivity.

See “To select microphone 
sensitivity” (page 39).

2

Press REC MODE repeatedly until 
“SP”, “LP2”, “LP4”, or “MONO” 
lights up in the display.

For details on the recording mode, see 
“Long-time recording (MDLP)” 
(page 18).

3

Press REC.

For other operations on recording, see 
“Recording an MD right away!” 
(page 13).

z

When using a plug-in power-type microphone, 
the microphone can be operated even when its 
power switch is turned off since power is 
supplied from the recorder itself.
If you are using the optional stereo microphone 
ECM-719, set the power switch on the 
microphone to OFF to allow the recorder to 
provide power to the microphone. It is 
recommended that you set the switch on the 
microphone to OFF during use.

Notes

You cannot record through the externally 
connected microphone while an optical cable 
is connected to the LINE IN (OPTICAL) jack. 
The recorder automatically selects the 
recorder input in the following order of 
priority; optical input, externally connected 
microphone input, analog (line) input, and 
built-in microphones input.

The microphone may pick up the operating 
sound of the recorder itself (such as the sound 
of the motor). Use the microphone away from 
the recorder in such cases. Please note that the 
sound of recorder operations may be picked 
up if the microphone that you use has a short 
connector.

To MIC (PLUG IN 
POWER)

Stereo 
microphone 
(not supplied)

REC MODE

REC

Summary of Contents for MZ-B10 - Minidisc Voice Recorder

Page 1: ...7 850 16 1 Portable MiniDisc Recorder Operating Instructions Recorder Operation _____________________________ Troubleshooting and explanations __________________ page 8 page 48 2003 Sony Corporation MZ B10 ...

Page 2: ...el number is located at the front of the lid Record the serial number in the space provided below Refer to them whenever you call upon your Sony dealer regarding this product Model No MZ B10 Serial No Product registration Please register this product on line at www sony com productregistration http www sony com productregistration Proper registration will enable us to send you periodic mailings ab...

Page 3: ... that to which the receiver is connected Consult the dealer or an experienced radio TV technician for help You are cautioned that any changes or modifications not expressly approved in this manual could void your authority to operate this equipment Disposal of Old Electrical Electronic Equipment Applicable in the European Union and other European countries with separate collection systems This sym...

Page 4: ...a TV or radio Analog Recording 22 To start stop recording in sync with the sound source Synchro recording 23 Adding track marks while recording 24 Adding track marks manually 24 Adding track marks automatically Auto Time Mark 24 Various ways of playback 26 Changing the sound mode 26 Changing playback speed Speed Control 26 Selecting the play mode Single Play Repeat Play 27 Editing recorded tracks ...

Page 5: ...lease a group setting 35 Moving a track in a disc with group setting 35 Changing the order of a group on a disc Group Move 36 To erase a group 37 Other operations 38 Useful settings 38 How to use the menu items 38 Creating a new group when recording 39 To select microphone sensitivity 39 Starting an operation quickly Quick Mode 40 Using an optional foot control unit 40 List of menus 41 Power sourc...

Page 6: ...6 Troubleshooting and explanations 48 Troubleshooting 48 While recording 48 While playing 50 While Editing 51 While using group function 52 Others 52 Messages 53 Explanations 56 ...

Page 7: ...7 ...

Page 8: ...h applicable EMC standards 1 Open the clamp filter 2 Wind the AC power cord into the clamp filter as shown below 3 Close the clamp filter Headphones earphones 1 Carrying pouch 1 Handstrap 1 Clamp filter for the AC power adaptor 1 Attach the clamp filter when using the optional AC power adaptor LR6 size AA alkaline dry batteries 2 World model only Headphones earphones 1 Maximum length approx 4 cm 1...

Page 9: ...ding time G GROUP button 32 This button is used when cueing to a group or erasing a group H x STOP button 14 16 23 30 38 I N PLAY play button 15 16 The N PLAY button has a tactile dot J REC button 14 18 32 K REVIEW AMS CUE AMS search AMS buttons 15 17 23 26 29 33 38 L TRACK MARK button 29 Use this button to add track marks automatically or to divide a track into separate tracks M X PAUSE button 15...

Page 10: ...sable the buttons on the recorder To prevent the buttons from being accidentally operated when you carry the recorder use this function T OPEN switch 13 16 Back of the recorder A Battery compartment 12 Insert two alkaline dry batteries size AA here B ERASE button 31 37 During playback press this button to erase the track C ALL ERASE button 31 Press ERASE while pressing this button to erase the con...

Page 11: ...roup play Flashes while selecting a group E Battery level indication 42 F SOUND indication 26 Lights up when the sound mode SOUND 1 SOUND 2 is selected G Pause indication H REC indication 14 I SYNC synchro recording indication 23 J SP LP2 LP4 MONO indication 18 Shows the recording mode while recording and SP LP mode of a track while playing K REC REMAIN indication 18 Shows the remaining recordable...

Page 12: ... If you do recording may not be possible Insert the e and E poles of the battery correctly as shown on the recorder Check that the REC button is not depressed before inserting the alkaline dry batteries If a disc is inserted and the button is depressed recording may start when you insert the alkaline dry batteries If the REC button is depressed be sure to remove the disc before you insert the batt...

Page 13: ...D 1 Slide OPEN to open the lid 2 Insert a recordable MD to the direction of the arrow with the label side facing up and press down on the lid at the center of the front edge as shown above to close it firmly 2 Select microphone sensitivity The recorder is factory set to record material with a normal volume level SENS HIGH such as conversations When recording a sound source at close range such as a...

Page 14: ...x STOP button to stop the recorder the recorder will automatically turn off after about 30 seconds when using an alkaline dry battery or 3 minutes when using the AC power adaptor To monitor the sound during recording Connect the headphones earphones to the i jack You can adjust the volume by turning the VOL control This adjustment does not affect the recording level since the level is adjusted aut...

Page 15: ...u record through the microphone the various sounds made by the recorder may also be recorded The built in microphone do not operate whenever an optional microphone is connected into the MIC PLUG IN POWER jack on the recorder The built in microphone do not operate whenever an optical cable or a line cable not supplied is connected into the LINE IN OPTICAL jack on the recorder To Operation Record pa...

Page 16: ...se it firmly 2 Play an MD 1 Press N PLAY 2 Turn VOL to adjust the volume To stop play press x STOP Playback starts from the point you last stopped playing To start playback from the beginning of the disc press N PLAY for 2 seconds or more After you press the x STOP button to stop the recorder the recorder will automatically turn off after about 30 seconds when using an alkaline dry battery or 3 mi...

Page 17: ... REVIEW AMS Press REVIEW AMS repeatedly until you reach the beginning of the desired track Cue to the next track2 Press CUE AMS Go backwards or forward while playing Press and hold REVIEW AMS or CUE AMS Search for a point in a track while viewing the elapsed time Time search During pause press and hold REVIEW AMS or CUE AMS Search for a specific track while viewing track numbers or track names Ind...

Page 18: ...Recording an MD right away page 13 z If you record in SP LP2 or LP4 mode using an externally connected stereo microphone not supplied or other stereo equipment connected to the LINE IN OPTICAL jack the recording will be stereo If you record with the built in microphone the recording will be monaural the same sound is recorded to the left and right channels The recording mode can be changed during ...

Page 19: ...or details on the recording mode see Long time recording MDLP page 18 3 Press REC For other operations on recording see Recording an MD right away page 13 z When using a plug in power type microphone the microphone can be operated even when its power switch is turned off since power is supplied from the recorder itself If you are using the optional stereo microphone ECM 719 set the power switch on...

Page 20: ...broadcast e g digital TV are recorded Difference Digital optical input Analog line input Connectable source Equipment with an digital optical output jack Equipment with an analog line output jack Usable cord Optical cable with an optical or an optical mini plug page 21 Line cable with 2 phono plugs or a stereo mini plug page 22 Signal from the source Digital Analog Even when a digital source such ...

Page 21: ...ro recording the starting and stopping of recording is done automatically and in sync with the source material Notes You can make a digital recording with an optical cable only from an optical type output Note the following when recording from a portable CD player Some portable CD players may not be capable of digital out when the AC power adaptor is disconnected If this is the case connect the AC...

Page 22: ...C REC appears in the display the REC indicator lights up and the recording starts 4 Play the source sound For other operations on recording see Recording an MD right away page 13 Note A track mark is added at the point where you press the X PAUSE button again to resume recording while pausing recording thus the remainder of the track will be counted as a new track To LINE IN OPTICAL CD player cass...

Page 23: ...NC REC appears in the display and then press MENU ENTER 5 Press or until SYNC ON appears in the display and then press MENU ENTER SYNC appears in the display SYNC doesn t appear if optical cable is not connected to the LINE IN OPTICAL jack on the recorder 6 Press REC The recorder stands by for recording 7 Play the source sound The recorder starts recording automatically when it receives the playin...

Page 24: ... be done if the connecting cord is not an optical cable or if the cable is connected to the MIC PLUG IN POWER jack Adding track marks while recording You can add track marks track number while recording to divide the material into separate parts Adding track marks manually 1 While the recorder is recording press TRACK MARK Adding track marks automatically Auto Time Mark Use this feature to add tra...

Page 25: ...e interval thereafter Example When 12 minutes of recording has been completed when the Auto Time Mark is set A track mark will be added at the 12 minute point following the start of recording and after each 10 minute interval thereafter When the time interval for Auto Time Mark 10 minutes exceeds the elapsed recording time The recorder adds a track mark when 10 minutes has elapsed Example When 3 m...

Page 26: ...und distortion occurs when you turn the volume up while SOUND 1 or SOUND 2 turn the volume down again or change the sound setting The setting of SOUND 1 or SOUND 2 does not affect the sound being recorded You cannot change the sound mode while the playback speed is changed Changing playback speed Speed Control The speed control function is useful when you want to change the playback speed This fun...

Page 27: ...AMS button Notes When using this function you may hear noise or an echo in the playback When you change the playback speed the sound mode setting SOUND 1 or SOUND 2 will stop functioning When you change the playback speed back to normal 0 the sound mode setting will begin functioning again Selecting the play mode Single Play Repeat Play You can select single play single repeat or all repeat 1 Whil...

Page 28: ...n enters play mode indication lights up Note Group play mode in step 3 whenever you play a disc with group settings For more details see Playing a track in group play page 33 Indication Selected play mode Normal and RepeatOFF normal play 1 1 Track and RepeatOFF A single track is played Normal and RepeatON All the tracks are played repeatedly 1 1 Track and RepeatON A single track is played repeated...

Page 29: ...N appears in the display and a track mark is added The track number will increase by one Erasing a track mark When you erase a regular track mark the track numbers will change as follows 1 While playing the track with the track mark you want to erase press X PAUSE to pause To erase the third track mark play the third track and press X PAUSE 2 Find the track mark by pressing slightly Find the begin...

Page 30: ...e order of the recorded tracks Note To move tracks in a disc with group settings see page 35 Example Move track C from the third to the second track 1 While playing the track you want to move press MENU ENTER 2 Press or until EDIT appears in the display and then press MENU ENTER The recorder plays the selected track repeatedly 3 Press or until Move appears in the display and then press MENU ENTER ...

Page 31: ...track Pause playback at the point where you want to start erasing Then do steps 1 and 2 To erase a part of a track Add track marks at the beginning and the end of the part you want to erase then erase the part page 29 To erase the whole disc Note that once a recording has been erased you cannot retrieve it Be sure to verify the contents of the disc you want to erase 1 Play the disc you want to era...

Page 32: ...ion when recording Recording tracks to a new group During recording you can add a new group at the end of the currently recorded tracks on a disc 1 Press until End appears in the display 2 While pressing GROUP press REC 3 Play the source sound A new group will be added after the current contents on a disc To stop recording Press x STOP The material that was recorded up until x STOP was pressed is ...

Page 33: ...settings as belonging to the last group on the disc The last group is indicated in the display window on the recorder as Group Within a group the tracks appear in their order on the disc not their order within the group Playing a track in group play Start playback from the top group to the end and then stop after playback of the tracks which do not belong to a group Group 1 Do the procedure of Sel...

Page 34: ...r of characters that can be stored The tracks or groups must be sequential If the desired tracks or groups are not consecutive you must move them to make them consecutive before you can register them Moving recorded tracks Move page 30 1 While the recorder is stopped press MENU ENTER 2 Press or until EDIT appears in the display and then press MENU ENTER 3 Press or until Set appears in the display ...

Page 35: ...nt to release and check the contents see Playing a track in group play page 33 2 Press x STOP 3 Press MENU ENTER 4 Press or until EDIT appears in the display and then press MENU ENTER 5 Press or until Release appears in the display and press MENU ENTER Release and PushENTER appear in the display 6 Press MENU ENTER The group setting of the selected group is released To cancel the procedure Press x ...

Page 36: ... the display and then press MENU ENTER 6 Press or until the destination track number the track number within a group if the destination is a different group appears in the display and then press MENU ENTER to enter your selection To cancel moving Press x STOP for 2 seconds or more To return the preceding setting Press x STOP Changing the order of a group on a disc Group Move 1 While playing a trac...

Page 37: ... erase a group You can erase tracks in a selected group Note that once a recording has been erased you cannot retrieve it Be sure to check the contents of the group before you erase it 1 Select a group you want to erase and check the contents see Playing a track in group play page 33 2 Press x STOP 3 Press ERASE while pressing GROUP GP Erase and PushENTER appear alternately in the display 4 Press ...

Page 38: ...inute time interval page 24 Selecting the microphone sensitivity Sets the microphone sensitivity to suit the source sound page 39 Group recording Sets the recorder to create a new group with each recording operation page 39 Playing Changing the sound quality Selects to the desired sound mode page 26 Selecting the play mode Selects the play mode such as repeat play program play etc page 27 Starting...

Page 39: ... REC 2 Select REC ON To turn the setting to normal Select REC OFF To select microphone sensitivity 1 Enter the menu and select REC SET MIC SENS 2 Select SENS HIGH or SENS LOW SENS HIGH factory setting Use this setting when recording soft or normal volume sounds such as conversations SENS LOW Use this setting when recording loud sounds or sound at close range such as a narration or a music concert ...

Page 40: ...n including opening or closing of the lid occurs for one hour the recorder turns off For this reason the next time you start playback or do another operation the recorder will not respond quickly The unit however will return to quick mode afterwards Using an optional foot control unit If you connect the optional foot control unit FS 85B50 to the i jack on the recorder you can use your foot to star...

Page 41: ...indication may be displayed depending on the operating conditions and disc settings Menu 1 Menu 2 Menu 3 EDIT Set Release Move Move y Move PLAY MODE Normal RepeatOFF factory setting y RepeatON 1 Track Normal SOUND SOUND OFF SOUND 1 SOUND 2 REC SET TIME MARK MARK OFF factory setting y MARK ON MIC SENS SENS HIGH factory setting y SENS LOW REC REC OFF factory setting y REC ON SYNC REC SYNC OFF factor...

Page 42: ...conditions and the temperature of the location When recording1 2 Unit approx hours JEITA3 1 When using a Sony LR6 SG STAMINA alkaline dry batteries produced in Japan and PowerMode is set to NORMAL page 40 Setting PowerMode to QUICK result in a shorter battery life page 40 2 When recorded with the built in microphone Recording mode Approx hours SP 24 LP2 34 LP4 48 MONO 34 3 Measured in accordance w...

Page 43: ...sc before you connect the AC power adaptor For use in your house Use the AC power adaptor not supplied Do not use an AC power adaptor other than the recommended one since it may cause the recorder to malfunction There are regional differences in AC E30HG specifications For this reason you should verify that the power requirements and plug configuration are appropriate for your area before you purc...

Page 44: ...es while driving cycling or operating any motorized vehicle It may create a traffic hazard and is illegal in many areas It can also be potentially dangerous to play your recorder at high volume while walking especially at pedestrian crossings You should exercise extreme caution or discontinue use in potentially hazardous situations Preventing hearing damage Avoid using the headphones earphones at ...

Page 45: ...to close the disc compartment lid after inserting or ejecting an MD To obtain the best sound quality use a dry cloth to wipe the plug of the headphones earphones Dirty plug may cause sound distortion or intermittent breaks in the sound Note on maintenance Clean the terminals periodically with a cotton swab or a soft cloth as illustrated On the battery compartment lid The battery compartment lid is...

Page 46: ... any questions or problems concerning your recorder please consult your nearest Sony dealer If a trouble occurred when the disc was in the recorder we recommend that the disc be left in the recorder when you consult your Sony dealer so that the cause of trouble may be better understood Back of the MD Tab When the disc is record protected Recorded material is not protected Recorded material is prot...

Page 47: ...ck for optical digital input Outputs i stereo mini jack Maximum output DC 2 Headphones earphones 5 mW 5 mW 16 Ω Speakers monaural 140 mW 70 mW 2 General Power requirements AC power adaptor DC 3V LR6 size AA alkaline dry battery Battery operation time See Battery life page 42 Dimensions2 Approx 117 2 23 0 74 4 mm w h d 45 8 29 32 3 in not incl projecting parts and controls Mass Approx 150 g 5 3 oz ...

Page 48: ...ally from a portable CD player use the AC power adaptor and disable the anti skip function such as ESP on the CD player page 21 The analog recording was made using a connecting cord with an attenuator Use a connecting cord without an attenuator page 22 The power sources was disconnected or a power outage occurred during recording The recording result is not recorded on the disc Make recording agai...

Page 49: ...conds in LP4 stereo mode When recording is stopped the last unit of recording always uses this unit of 2 seconds 4 seconds or 8 seconds even if the actual recording is shorter Likewise when recording is restarted after the stop the recorder will automatically insert a blank space amounting to 2 seconds 4 seconds or 8 seconds before the next recording This is to prevent accidental erasing of a prev...

Page 50: ...was recorded in analog mode in digital mode the recording level is automatically set to the same level as that of the sound source Or you used a connecting cord with an attenuator such as an optional RK G128 RK G134 etc Use a correct connecting cord such as RK G129 RK G136 etc No sound comes through the headphones earphones The headphones earphones plug is not firmly connected Plug in the plug of ...

Page 51: ...en exhausted Set the power sources again or replace the exhausted battery with new ones and press x STOP Editing cannot be done The power source has been disconnected or a power outage has occurred during editing The editing done to that point is not saved to the disc Do the editing operation again Track marks cannot be erased This is due to the MiniDisc system limitations When the data of a track...

Page 52: ...t work or works poorly The volume is low Turn up the volume No disc is inserted Insert a recorded disc The HOLD function is turned on HOLD appears in the display when you press an operation button on the recorder On the recorder disable HOLD by sliding the HOLD switch to the opposite direction of the arrow The lid is not firmly closed Close the lid until it clicks Moisture has condensed inside the...

Page 53: ...DISC FULL The remaining recording time on the disc is 12 seconds SP 24 seconds LP2 or monaural 36 seconds LP4 or less Replace the disc ERROR There is an internal malfunction in the system Restart the operation by doing steps 1 to 3 on page 53 If the message appears again please consult your nearest Sony dealer GroupFULL You tried to create a 100th group while editing You can create only up to 99 g...

Page 54: ...r example You tried to overwrite a track marks NO SET You tried to make the following settings while recording Recording mode Selection of REC in menu Play mode while End appears in the display NoOPERATE You tried to make the Auto Time Mark setting while recording through digital connection You tried to press X PAUSE or TRACK MARK during synchro recording NO SIGNAL The recorder could not detect di...

Page 55: ...e recorder cool down TOC Edit The MD player is recording information track start and end position from the memory to the disk Wait until this process is completed Do not expose the recorder to physical shock nor disrupt power supply TOC ERR The recorder cannot read the disc information correctly Insert another disc If it is no problem to erase the entire disc do so page 31 TR FULL There is no more...

Page 56: ...r The meaning of no sound No sound describes a recorder condition in which the input level is about 4 8 mV during analog input or less than 89 dB during optical digital input with 0 dB as full bit the maximum recordable level for a MiniDisc Quick Random Access Like CDs MDs offer instantaneous random access to the beginning of any music track Premastered MDs are recorded with location addresses cor...

Page 57: ...orded MD by using the analog line out connections If you have any questions or problems concerning your recorder please consult your nearest Sony dealer If a trouble occurred when the disc was in the recorder we recommend that the disc be left in the recorder when you consult your Sony dealer so that the cause of trouble may be better understood Premastered software such as CDs or MDs Digital reco...

Page 58: ...58 ...

Page 59: ...59 ...

Page 60: ...Printed in Malaysia 3 2 4 7 8 5 0 1 1 6 This warranty is valid only in the United States ...

Reviews: