background image

50

Precautions

On operating voltage

Before operating the system, check that the
operating voltage of your system is identical with
the voltage of your local power supply.

On safety

• The unit is not disconnected from the AC power

source (mains) as long as it is connected to the
wall outlet, even if the unit itself has been turned
off.

• Unplug the system from the wall outlet (mains) if

it is not to be used for an extended period of time.
To disconnect the cord (mains lead), pull it out by
the plug. Never pull the cord itself.

• Should any solid object or liquid fall into the

component, unplug the stereo system and have
the component checked by qualified personnel
before operating it any further.

• The AC power cord must be changed only at the

qualified service shop.

On placement

• Place the stereo system in a location with adequate

ventilation to prevent heat build-up in the stereo
system.

• Do not place the unit in an inclined position.
• Do not place the unit in locations where it is;

— Extremely hot or cold
— Dusty or dirty
— Very humid
— Vibrating
— Subject to direct sunlight

On operation

• If the stereo system is brought directly from a cold

to a warm location, or is placed in a very damp
room, moisture may condense on the lens inside
the CD player. Should this occur, the system will
not operate properly. Remove the CD and leave
the system turned on for about an hour until the
moisture evaporates.

• When you move the system, take out any discs.

If you have any questions or problems concerning
your stereo system, please consult your nearest
Sony dealer.

Notes on CDs

• Before playing, clean the CD with a cleaning cloth.

Wipe the CD from the center out.

• Do not use solvents such as benzene, thinner,

commercially available cleaners or anti-static
spray intended for vinyl LPs.

• Do not expose the CD to direct sunlight or heat

sources such as hot air ducts, nor leave it in a car
parked in direct sunlight.

Additional Information

Cleaning the cabinet

Use a soft cloth slightly moistened with mild
detergent solution.

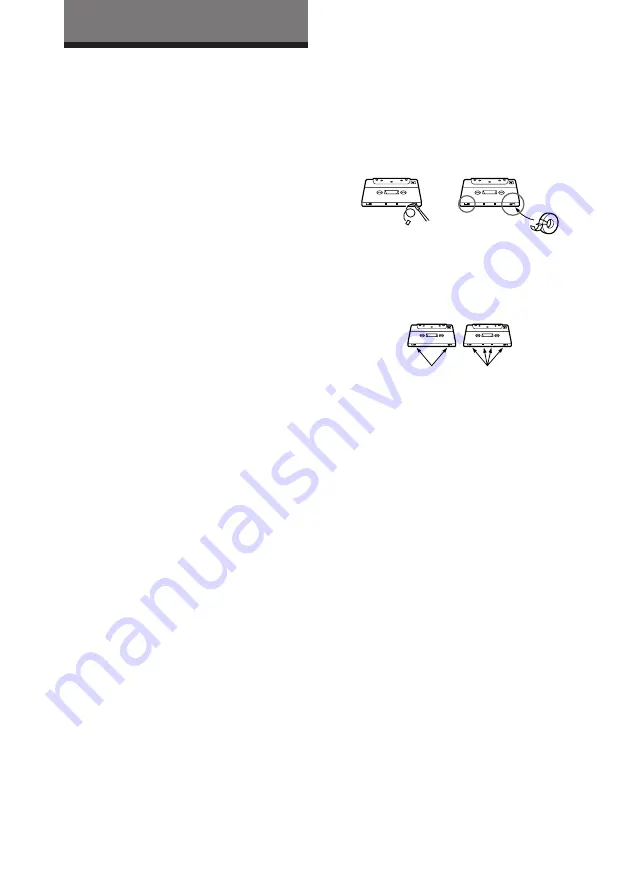
To save a tape permanently

To prevent a tape from being accidentally recorded
over, break off the cassette tab from side A or B as
illustrated. If you later want to reuse the tape for
recording, cover the broken tab with adhesive tape.

When you are using a TYPE II (CrO

2

) or TYPE IV

(metal) cassette, be careful not to cover the detector
slots which allow the tape player to automatically
detect the type of tape.

Before placing a cassette in the
tape deck

Take up any slack in the tape. Otherwise the tape
may get entangled in the parts of the tape deck and
become damaged.

When using a tape longer than 90
minutes

The tape is very elastic. Do not change the tape
operations such as play, stop, and fast-winding etc.
frequently. The tape may get entangled in the tape
deck.

Cleaning the tape heads

Clean the tape heads after every 10 hours of use.
When the tape heads become dirty

— the sound is distorted
— there is a decrease in sound level
— the sound drops out
— the tape does not erase completely
— the tape does not record

Make sure to clean the tape heads before you start
an important recording or after playing an old tape.
Use separately sold dry-type or wet-type cleaning
cassette. For details, refer to the instructions of the
cleaning cassette.

Demagnetizing the tape heads

Demagnetize the tape heads and the metal parts that
have contact with the tape every 20 to 30 hours of
use with a separately sold demagnetizing cassette.
For details, refer to the instructions of the
demagnetizing cassette.

Detector slots

Summary of Contents for LBT-V4800R

Page 1: ... 1997 by Sony Corporation Operating Instructions 3 860 928 11 1 Compact Hi Fi Stereo System LBT V4800R ...

Page 2: ...ssified as a CLASS 1 LASER product The CLASS 1 LASER PRODUCT MARKING is located on the rear exterior Thissystemcanplay thefollowingdiscs VIDEO CDs Audio CDs Disc logo Contents Audio Video Audio moving pictures Disc size 12 cm 8 cm 12 cm 8 cm Play time 74 min 20 min 74 min 20 min Note on VIDEO CDs This system conforms to VIDEO CDs without PBC functions Ver 1 1 and VIDEO CDs with PBC functions Ver 2...

Page 3: ...ducing distortion of the picture with advanced DNR 31 Setting the sharpness 32 Adding trails to moving pictures 32 Playing CD tracks repeatedly 33 Playing CD tracks in random order 33 Programming CD tracks 34 Playing CDs without interruption 36 The Tape Deck Recording on a tape manually 37 Recording CDs by specifying the track order 38 DJ Mix Looping part of a CD 40 Flashing part of a CD 40 Waving...

Page 4: ...s away from the antennas to prevent noise 2 Insert only the stripped portion of the cord Inserting the vinyl portion will interfere with the speaker connection and no sound will come from the speaker 2 Connect the FM AM antennas Set up the AM loop antenna then connect it Left speaker Right speaker AM loop antenna FM antenna To the video input AM loop antenna Extend the FM wire antenna horizontally...

Page 5: ...ff the system the color system will be set to NTSC automatically when you turn on the system again If the color system of your TV is NTSC Set SYSTEM SELECT to NTSC Picture recorded in the PAL color system will be stretched vertically and will be displayed with the upper and lower parts of the picture cut off If the color system of your TV is PAL Set SYSTEM SELECT to PAL Picture recorded in the NTS...

Page 6: ...lume TV VOL of the TV speaker s Tips With normal use the batteries should last for about six months When the remote no longer operates the system replace both batteries with new ones When you set the time the demonstration is deactivated To activate the demonstration again press DISPLAY DEMO while the system is off Note If you do not use the remote for a long period of time remove the batteries to...

Page 7: ... stations To tune in a station with a weak signal Press TUNING MODE repeatedly until MANUAL appears in step 2 then press TUNING to tune in the station To change the preset number Start over from step 1 To change the AM tuning interval The AM tuning interval is factory preset to 9 kHz To change the AM tuning interval to 10 kHz press TUNER BAND repeatedly until AM appears first then turn off the sys...

Page 8: ...d effect 3 Install the speakers or the turntable on a firm and stable surface 4 Press SUPER WOOFER repeatedly until the indicator on this button goes off To the audio output of the turntable Connecting a VCR Be sure to match the color of the plugs and the connectors To listen to the sound of the connected VCR press FUNCTION repeatedly until VIDEO appears By connecting the audio output jacks of you...

Page 9: ...eet insulated wire to the AM antenna terminal Leave the supplied AM loop antenna connected Important If you connect an outdoor antenna connect a ground wire to the y terminal with the screw clamp To prevent a gas explosion do not connect the ground wire to a gas pipe 75 ohm coaxial cable not supplied Screw clamp Ground wire not supplied AM FM75 Insulated wire not supplied Screw clamp Ground wire n...

Page 10: ...he operating instructions supplied with your TV if you need help 2 Press 6 OPEN and place a VIDEO CD on the disc tray If the disc is not placed properly it will not be recognized 3 Press DISC SKIP to place up to four more VIDEO CDs on the tray The disc tray rotates so you can insert other CDs 4 Close the front cover 5 Press one of the DIRECT PLAY buttons Playback starts If you press playback start...

Page 11: ...lockwise to go forward or counterclockwise to go back and release it when you reach the desired track 2 Press and hold 0 or or º on the remote during playback and release at the desired point Press one of the DIRECT PLAY buttons or D SKIP on the remote Press 1 ALL DISCS repeatedly until 1 DISC appears Press 1 ALL DISCS repeatedly until ALL DISCS appears Press 6 OPEN Turn VOLUME or press VOL on the...

Page 12: ...other CDs 3 Close the front cover 4 Press one of the DIRECT PLAY buttons Playback starts If you press playback starts from the CD in the playing position With the label side up When you play a CD single place it on the inner circle of the tray Disc number in the playing position Track number Elapsed time ª ª 6 P r 0 6 ª P p ª ª p 6 0 p 0 DOLBY NR OFF ALL DISC S 1 2 3 4 p P 0 1 ALL DISCS VOLUME Jog...

Page 13: ...e player NO DISC appears in the display You can change the CD in the loading position during playback Do this Press p or π on the remote Press P or on the remote Press again to resume playback During playback or pause turn the jog dial clockwise to go forward or counterclockwise to go backward and release it when you reach the desired track Or press to go forward or to go backward on the remote Pr...

Page 14: ...g stops at the end of the reverse side When you want to reduce the hiss noise in low level high frequency signals press DOLBY NR before step 7 so DOLBY NR B appears in the display To record with the surround effect press SURROUND so SUR appears in the display The equalizer settings will not be recorded Notes You cannot listen to other sources while recording You cannot record from a VIDEO CD with ...

Page 15: ...he last received station One Touch Play You can switch from another source to the radio just by pressing TUNER BAND Automatic Source Selection If an FM program is noisy press STEREO MONO so MONO appears in the display There will be no stereo effect but the reception will improve Press this button again to restore the stereo effect To improve broadcast reception move the supplied antennas Frequency...

Page 16: ... sides 7 Press P on deck B Recording starts To stop recording Press p on deck B With the side you want to record on facing forward Frequency Preset number DOLBY NR OFF TUNED STEREO PRESET ALL DISC S MHz ª ª 6 P r 0 6 ª ª p 0 p You can record a radio program on a tape by tuning in a preset station You can use TYPE I normal or TYPE II CrO2 tapes 1 Press TUNER BAND repeatedly until the band you want ...

Page 17: ...ce the hiss noise in low level high frequency signals press DOLBY NR before step 7 so DOLBY NR B appears in the display To record with surround effect press SURROUND so SUR appears in the display The equalizer settings will not be recorded If noise is heard while recording from the radio move the appropriate antenna to reduce the noise Playing a tape You can play any type of tape TYPE I normal TYP...

Page 18: ...ss Press ª to play the reverse side The tape starts playing The deck stops automatically after playing both sides five times Relay Play always plays according to the following sequence Deck A front side Deck A reverse side Deck B front side Deck B reverse side To Do this Stop play Press p or π on the remote Pause Deck B only Press P or on the remote Press again to resume play Fast forward Press wh...

Page 19: ...the tapes in both decks reverse together You don t have to set DOLBY NR since the tape in deck B is automatically recorded in the same state as the tape in deck A Note You cannot record the surround effect Recording from a tape High speed Dubbing You can use TYPE I normal or TYPE II CrO2 tapes 1 Press 6 EJECT and insert a recorded tape in deck A and a blank tape in deck B 2 Press H SPEED DUB Deck ...

Page 20: ... follows KARAOKE PON n MPX R n MPX L EFFECT OFF ON h appears in the display when the karaoke mode is activated To Reduce the singer s voice on a CD or tape Reduce the left channel on a multiplex CD or tape Reduce the right channel on a multiplex CD or tape 4 Start playing the music and adjust the volume 5 Turn MIC LEVEL to adjust the microphone volume When you use VIDEO CDs Turn on your TV and swi...

Page 21: ...teps 3 0 to 3 0 Notes If you press EFFECT or select a sound effect the karaoke mode is canceled The instrumental sound may be reduced as well as the singer s voice when the source sound was recorded monaurally The singer s voice may not be reduced when only a few instruments are playing a duet is being sung the source has strong echoes or chorus the singer s voice deviates from the center the voic...

Page 22: ...ELECT 3 Continue according to the instructions on the menus to enjoy interactive playback To Do this Stop play Press p or π on the remote See the rest of a menu Press NEXT or NEXT on the remote Go back to the top of Press PREV or PREV a menu on the remote Go back to a previous Press ˆ RETURN menu PBC OFF ON PREV NEXT Playing a VIDEO CD with PBC functions Ver 2 0 PBC Play The PBC PlayBack Control f...

Page 23: ...e remote during playback When you press PLAY MODE during playback n n n n Using the CD display You can check the remaining time of the current track or the whole CD Press DISPLAY DEMO during playback Each time you press this button in Normal Play the display changes as follows nElapsed time on the current track Remaining time on the current track Remaining time on the current CD 1 DISC mode or PLA...

Page 24: ...urrent operating status and disc information of VIDEO CDs or audio CDs during playback or in stop mode by superimposing a display on top of the images on your TV screen Press ON SCREEN Each time you press this button the on screen display changes as follows n ON SCREEN 1 n ON SCREEN 2 ON SCREEN OFF N ON SCREEN 3 N ON SCREEN 1 display Momentary display of the operating status when you perform an op...

Page 25: ...r During stop mode except for Program Play 1 Play mode 2 Advanced DNR status 3 ACTIVE COMET or no display 4 For discs that have not been played 5 For a VIDEO CD 6 Track numbers on the disc 7 For an audio CD During stop mode in Program Play Display is the same as ON SCREEN 1 ON SCREEN OFF No display except for special menus Notes Normally leave the display mode set to either ON SCREEN 1 2 or 3 When...

Page 26: ...scene has an assigned scene number This function lets you start playback from a specific scene 1 Start playing a VIDEO CD with PBC functions Ver 2 0 2 Press SPECIAL MENU 3 Press 1 to select 1 SCENE SEARCH SCENE and the total number of scenes appear on the TV screen 4 Press the numerical buttons 1 10 0 on the remote to select the scene you want To enter scene number 103 Press 1 m 10 0 m 3 The selec...

Page 27: ...s you start playback from a specific point of a track or disc with index numbers This function cannot be used during menu playback of VIDEO CDs with PBC functions Ver 2 0 1 Start playing an audio CD or VIDEO CD 2 Press SPECIAL MENU 3 Press 2 to select 2 V INDEX SEARCH or 2 INDEX SEARCH for audio CDs 4 Press the numerical buttons 1 10 0 on the remote to select the index you want The selected index ...

Page 28: ...yback Press π To use Time Search with VIDEO CDs with PBC functions Ver 2 0 Stop playback and press PBC OFF ON on the remote repeatedly until the AUTO PBC indicator goes off before step 1 Note Playback may not start from the exact time you selected depending on the CD Locating the track you want Disc Digest You can select the track you want by viewing the first frame of each track Up to 9 different...

Page 29: ... frame To stop playback Press π To display the next 9 tracks Press NEXT The first frame of tracks 10 through 18 are displayed When there are more tracks in the disc appears in the upper right corner of the TV screen To display previous tracks press PREV To switch to the digest of another disc during Disc Digest Press D SKIP during Disc Digest To use Disc Digest with VIDEO CDs with PBC functions Ve...

Page 30: ...layed by pressing SELECT CD Note Tracks less than 40 seconds long may be divided into fewer than 9 sections Locating a specific part of a disc continued Playing a VIDEO CD from where it was last stopped Resume Play When playing a VIDEO CD the CD player will remember where playback was stopped Therefore you can play a VIDEO CD starting from the point where it was last stopped 1 Press p or π on the ...

Page 31: ... Switching the play mode Pressing p or π on the remote during stop mode Reducing distortion of the picture with advanced DNR You can select the level of the advanced DNR function to reduce either flickering pictures or block noise Press DNR on the remote Each time you press this button the display changes as follows To reduce the block noise more effectively select DNR HIGH To cancel advanced DNR ...

Page 32: ...e When you turn the system off EFFECT OFF is selected automatically ACTIVE COMET Adding trails to moving pictures COMET You can set the unit to add trails to moving pictures COMET The COMET function gives atmosphere to the picture Press ACTIVE COMET to select COMET Each time you press this button the display changes as follows See Setting the sharpness To cancel COMET Press ACTIVE COMET repeatedly...

Page 33: ...le CD or all CDs in Normal Play Shuffle Play and Program Play This function cannot be used during menu playback of VIDEO CDs with PBC functions Ver 2 0 Press REPEAT repeatedly during playback until REPEAT appears in the display Repeat Play starts The following table describes the various repeat modes To repeat All the tracks on the current CD All the tracks on all CDs Only one track You can t repe...

Page 34: ... Disc Shuffle Play Tips You can start Shuffle Play during Normal Play by pressing PLAY MODE repeatedly until SHUFFLE appears in the display To skip a track turn the jog dial clockwise or press on the remote Programming CD tracks Program Play You can create a program of up to 32 tracks from all the CDs in the order you want them to be played This function cannot be used during menu playback of VIDE...

Page 35: ... number of the track to be cleared lights up then press CLEAR 1 Press DISC SKIP to select a CD 2 Turn the jog dial to select a track 3 Press PLAY MODE p once in stop mode or twice while playing 1 Place CDs and close the front cover 2 Press FUNCTION repeatedly until CD appears in the display 3 Press PLAY MODE repeatedly until PROGRAM appears in the display 4 Press DISC SKIP to select a CD 5 Turn th...

Page 36: ...ing between tracks You cannot use this function with VIDEO CDs 1 Press FUNCTION repeatedly until CD appears in the display 2 Press CD NON STOP so the indicator on this button lights up 3 Press To cancel CD Non Stop Play Press CD NON STOP so the indicator on this button goes off 1 3 2 ...

Page 37: ...green 4 Press DIRECTION repeatedly to select A to record on one side or ß or RELAY to record on both sides Recording on a tape manually The Tape Deck 5 Press P on deck B Recording starts 6 Start playing the source to be recorded To Press Stop recording p on deck B Pause recording P on deck B Tips If you want to record on the reverse side press ª on deck B so the indicator on the ª button for the r...

Page 38: ... the display 4 Press PLAY MODE repeatedly until PROGRAM appears in the display 5 Press DISC SKIP to select a CD 6 Turn the jog dial until the desired track appears in the display 7 Press PLAY MODE once The track is programmed STEP and the programmed playing order appear followed by the total playing time 8 Repeat steps 5 through 7 to program additional tracks to be recorded on side A Skip step 5 t...

Page 39: ...llow the above procedure 9 Press P to insert a pause at the end of side A P appears in the display and the total playing time resets to 0 00 in the display 10Repeat steps 5 through 7 to program the tracks to be recorded on side B Skip step 5 to select tracks from the same disc 11Press CD SYNC Deck B stands by for recording the CD player stands by for playback and the indicator on the button for th...

Page 40: ...p lengths With the flash function you can flash the CD sound during playback This lets you create original recordings You cannot use this function with VIDEO CDs Press and hold CD FLASH during playback at the point you want to start the Flash function and release to resume normal playback To adjust the flash length Turn the jog dial while holding CD FLASH or press MUSIC MENU while holding FLASH on...

Page 41: ... to a source This effect can be used with any source but it cannot be recorded Press and hold WAVE while listening to a source at the point you want to start the Wave function and release to resume normal playback To adjust the wave length Turn the jog dial while holding WAVE to select different wave lengths WAVE Jog dial ...

Page 42: ... the headphones to the PHONES jack No sound will come from the speakers n You can reinforce the bass create a more powerful sound and listen with headphones To reinforce the bass DBFB Press DBFB Each time you press this button the DBFB level display changes as follows DBFB n DBFB n display off DBFB reinforces the bass more than DBFB DBFB Dynamic Bass Feedback For a powerful sound GROOVE Press GROO...

Page 43: ...mote repeatedly to select the audio emphasis you desire The audio emphasis name appears in the display To cancel the audio emphasis Press EFFECT or MUSIC MENU ON OFF on the remote repeatedly so the indicator on the EFFECT button goes off Music menu options SUR appears if you select an audio emphasis with a surround effect Press To select GEQ 4 MENU 1 MENU 2 GEQ ROCK MOVIE POP GAME JAZZ NIGHT DANCE...

Page 44: ...tedly to select a frequency band 4 Press GEQ 4 to adjust the level 5 Repeat steps 3 and 4 to adjust the other frequency bands 6 Press ENTER when finished Note If you choose another audio emphasis other than EFFECT OFF the adjusted sound effect is lost To retain the adjusted sound effect for future use store it in a personal file see Making a personal audio emphasis file Activating the surround eff...

Page 45: ...ile You can create personal files of audio patterns surround effect and graphic equalizer and store them in the unit s memory Later call up an audio pattern to play a favorite tape CD or radio program You can create up to five audio files Before operation first select the basic audio emphasis you want for your sound 1 Create the sound effect you want by using the graphic equalizer and surround eff...

Page 46: ...ION repeatedly to select the source you desire and set it to pause mode 3 Press r REC 4 Press P 5 Press to start playing the CD or tape in deck A Playback starts Start singing along with the music To stop recording Press p on deck B Tips If acoustic feedback howling occurs move the microphone away from the speakers or change the direction of the microphone If you want to record your voice through ...

Page 47: ... Timer You can set the system to turn off at a preset time so you can fall asleep listening to music You can preset the remaining time in 10 minute increments Press SLEEP Each time you press this button the minutes display the remaining time changes as follows AUTO n 90min n 80min n 70min OFF N 10min 50min N 60min When you choose AUTO The system turns off when the current CD or tape finishes playb...

Page 48: ...r in turn before the original display returns 9 Turn off the system DOLBY NR OFF 1 ALL DISC S DOLBY NR OFF 1 ALL DISC S To check the setting 1 Press the timer button you have set DAILY 1 or DAILY 2 2 TIMER OFF appears in the display 3 Press DAILY 1 or DAILY 2 again To cancel the timer operation 1 Press the timer button you have set DAILY 1 or DAILY 2 2 TIMER OFF appears in the display Notes The sy...

Page 49: ... display Notes The system turns on 15 seconds before the preset time If the system is on at the preset time the recording will not be made You cannot set the timer if the timer on and off times are the same When you set the Sleep Timer the Timer recording will not start until the Sleep Timer turns off the system You cannot activate the Wake up Timer and Timer recording at the same time Recording s...

Page 50: ...solvents such as benzene thinner commercially available cleaners or anti static spray intended for vinyl LPs Do not expose the CD to direct sunlight or heat sources such as hot air ducts nor leave it in a car parked in direct sunlight Additional Information Cleaning the cabinet Use a soft cloth slightly moistened with mild detergent solution To save a tape permanently To prevent a tape from being ...

Page 51: ...ion of the speaker cord into the SPEAKER jack Inserting the vinyl portion of the speaker cord will interfere with the speaker connection There is no microphone sound Turn VOLUME or MIC LEVEL to adjust the microphone volume Make sure the microphone is connected to the MIC jack correctly There is severe hum or noise A TV or VCR is placed too close to the stereo system Move the stereo system away fro...

Page 52: ...epeatedly until DNR OFF appears An after image of the last picture remains the screen or the picture is unclear Press ACTIVE COMET repeatedly until EFFECT OFF appears The CD tray does not rotate A CD is not placed properly A CD will not play The CD is not lying flat in the disc tray The CD is dirty The CD is inserted label side down Moisture condensation has built up Remove the CD and leave the sy...

Page 53: ...ideo CD CD player section System Compact disc digital audio and video system Laser Semiconductor laser λ 780 nm Emission duration continuous Laser output Max 44 6 µW This output is the value measured at a distance of 200 mm from the objective lens surface on the Optical Pick up Block with 7 mm aperture Wavelength 780 790 nm Frequency response 2 Hz 20 kHz 0 5 dB Signal to noise ratio More than 90 d...

Page 54: ... frequency 10 7 MHz AM tuner section Tuning range 531 1 602 kHz with the tuning interval set at 9 kHz 530 1 710 kHz with the tuning interval set at 10 kHz Antenna AM loop antenna External antenna terminals Intermediate frequency 450 kHz General Power requirements 220 240 V AC 50 60 Hz Power consumption 170 watts Dimensions w h d Approx 355 425 435 mm incl projecting parts and controls Mass Approx ...

Page 55: ...a picture or a music piece on disc Each track is assigned a track number to help you locate the track you want VIDEO CD A compact disc which contains moving pictures VIDEO CDs contain compact picture information using the MPEG 1 format one of the world wide standards of digital compact technology The picture information is compressed about 120 times Consequently a 12 cm VIDEO CD can contain up to ...

Page 56: ...ording 49 Repeat Play 33 Resetting the system 53 S Saving recordings 50 Searching Index Search 27 Scene Search 26 Time Search 28 Selecting the audio emphasis 43 the color system 5 Setting the time 6 Shuffle Play 33 Sleep Timer 47 Sound adjustment 42 Speakers 4 Surround effect 44 T U Tape Select Edit 39 Timer falling asleep to music 47 timer recording 49 waking up to music 47 Troubleshooting 51 Tun...

Reviews: