background image

21

MODO

Customized picture

viewing

CONTRASTE

Picture Adjustment

BRILHO

Picture Adjustment

COR

Picture Adjustment

MATIZ

Picture Adjustment

NITIDEZ

Picture Adjustment

You can set different IMAGEM menu values for each MODO except DINÂMICO
and store them in memory. Select each MODO individually when restoring it to the
factory setting.
DINÂMICO: Select for enhanced picture contrast and sharpness.
ESPORTE: Select to display a vivid, bright picture.
PESSOAL: Select to customize the values from IMAGEM menu according to your
personal preference.
PREFERENCIAL: Select to store the MODO or customized values from the
IMAGEM menu for up to 12 channels to which you have added captions using the
CANAL PREFERENCIAL feature. When selecting this mode, you have to add a
caption with the CANAL PREFERENCIAL, otherwise you cannot customize each
value in the IMAGEM menu. (For details, see “Customizing the Channel Names”
on page 26)

Adjust slider 

>

 to increase picture contrast and create more vivid color.

Adjust slider 

.

 to decrease picture contrast and soften the color.

Adjust slider 

>

 to the brighten picture.

Adjust slider 

.

 to darken the picture.

Adjust slider 

>

 to increase color intensity.

Adjust slider 

.

 to decrease color intensity.

Adjust slider 

>

 to increase the green tones.

Adjust slider 

.

 to decrease the green tones.

Adjust slider 

>

 to sharpen the picture.

Adjust slider 

.

 to soften the picture.

Sliders

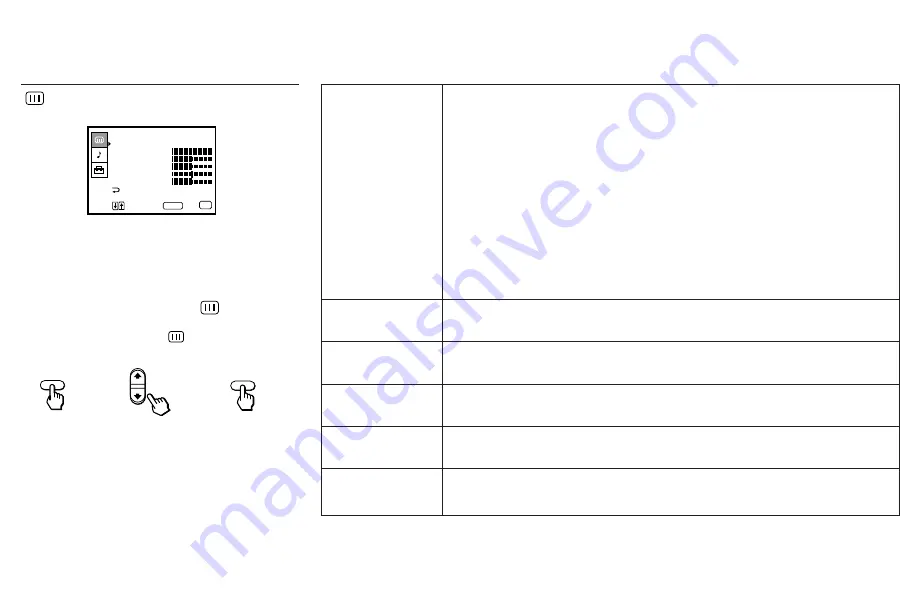
 Using the IMAGEM Menu

For detailed information on using the remote
control to modify menu settings, refer to
“Learning Menu Selection” on page 20.

To select the IMAGEM 

 menu:

Display 


/


 Highlight  


/


 Select

}

IMAGEM

CONTRASTE
BRILHO
COR

NITIDEZ

Mover

Sair

MENU

MATIZ

MENU

MODO :  DINÂMICO

Selecionar

SELECT

MENU

SELECT

To restore the factory settings

Press RESET on the remote control while the
IMAGEM menu is selected.

Tip


 z

Press PRESET PICTURE to modify the MODO setting
directly.

Summary of Contents for KV29T80

Page 1: ... 1998 by Sony Corporation KV 29T80 KV 34T80 Operating Instructions 3 862 612 51 1 Trinitron Color TV ...

Page 2: ...R with a cable box 9 Connecting a DBS Direct Broadcast Satellite receiver 10 Connecting a DBS Direct Broadcast Satellite receiver and a VCR 10 Connecting an audio system 11 Connecting an AV receiver 11 Connecting two VCRs for tape editing using MONITOR OUT 12 Connecting a DVD Player 13 Connecting a camcorder 14 Basic Set Up Inserting Batteries 15 Using the Remote Control 15 Adjusting Sliders 15 On...

Page 3: ...see Watching the TV on page 18 Remote Control MUTING page 18 POWER page 18 TV VIDEO page 19 ENTER PRESET PICTURE page 19 CURSOR page 15 MENU RESET JUMP page 18 1 2 3 4 5 6 7 8 0 9 CH VOL RESET SELECT MENU JUMP PRESET PICTURE ENTER DISPLAY TV VIDEO MUTING POWER SLEEP STEREO SAP DISPLAY page 19 SLEEP page 19 SELECT page 15 VOL page 18 0 9 Buttons page 18 CH page 18 STEREO SAP page 19 ...

Page 4: ...10 cm entre ele e as paredes que o cercam Não instale o televisor em lugar quente ou úmido ou em local em que fique exposto a quantidades excessivas de poeira ou a vibrações mecânicas Para assegurar a dissipação do calor interno do aparelho não coloque objetos ou toalhas decorativas sobre as aberturas para ventilação Observação Closed Caption Este televisor permite ver texto sobreposto às imagens ...

Page 5: ...auções de segurança Proteção ao televisor Observação Closed Caption Observações para o instalador de sistema de cabo CATV ATENÇÃO Open Here for Important Safety Info and Remote Control Graphics Aviso Limpeza Reembalagem Registro do usuário ...

Page 6: ...the order provided to ensure that you fully understand the operation of your new TV 1 Installing and Connecting the TV This section will guide you through your initial set up It will show you how to connect your new components connect to your antenna or cable and connect any accessories 2 Basic Set Up This section will teach you the basic skills needed to operate your new TV It will show you how t...

Page 7: ...r electric shock Always turn the set off when it is not to be used When the set is left unattended and unused for long periods of time unplug it from the wall outlet as a precaution against the possibility of an internal malfunction that could create a fire hazard Object and Liquid Entry Never push objects of any kind into the set through the cabinet slots as they may touch dangerous voltage point...

Page 8: ...ere it is exposed to direct sunlight Installation Water and Moisture Do not use power line operated sets near water for example near a bathtub washbowl kitchen sink or laundry tub in a wet basement or near a swimming pool etc Accessories Do not place the set on an unstable cart stand table or shelf The set may fall causing serious injury to a child or an adult and serious damage to the set Use onl...

Page 9: ...ter If the set has been subject to excessive shock by being dropped or the cabinet has been damaged If the set does not operate normally when following the operating instructions Adjust only those controls that are specified in the operating instructions Improper adjustment of other controls may result in damage and will often require extensive work by a qualified technician to restore the set to ...

Page 10: ...ble TV system or outdoor antenna is recommended Connecting a VHF antenna with twin lead cable 1 Connect the end of the 300 ohm twin lead cable to the antenna connector 2 Connect the antenna connector to the VHF UHF antenna terminal Connecting to VHF and UHF antennas with twin lead cables 1 Connect the end of the 300 ohm twin lead cable VHF to the antenna connector 2 Connect the end of the 300 ohm ...

Page 11: ... VHF antenna with coaxial cable and a UHF antenna with twin lead cable 1 Connect the end of the coaxial cable to the antenna connector following steps 1 and 2 mentioned in the diagram above Note If the end of the coaxial cable of your VHF antenna has an F type plug connect it directly to the VHF UHF mixer not supplied in this case ignore steps 1 and 2 described in the diagram above and follow step...

Page 12: ... of TV VHF UHF Connecting a cable box Some pay cable TV systems use scrambled or encoded signals that require a cable box to view all channels Please contact your local CATV or DBS provider for cable box or DBS receiver connection ...

Page 13: ...hite AUDIO Left Red AUDIO Right 3 Using a coaxial connector connect OUT on your VCR to VHF UHF on your TV Connecting to an S Video equipped VCR 1 Attach the coaxial connector from your cable or antenna to IN on your VCR 2 Using AUDIO connectors connect AUDIO OUT on your VCR to AUDIO IN on your TV White AUDIO Left Red AUDIO Right 3 Using a coaxial connector connect OUT on your VCR to VHF UHF on you...

Page 14: ... a cable box 1 2 Perform as described above 3 Using AUDIO connectors connect AUDIO OUT on your VCR to AUDIO IN on your TV White AUDIO Left Red AUDIO Right 4 Using an S VIDEO connector connect S VIDEO on your VCR to S VIDEO on your TV Note To view scrambled channels through your cable box select the video input which your cable box is connected to by pressing TV VIDEO on the remote control Disconne...

Page 15: ...BS receiver 2 Attach the coaxial connector from your cable or antenna to VHF UHF on your TV 3 Using AUDIO VIDEO connectors connect AUDIO and VIDEO OUT on your DBS receiver to AUDIO and VIDEO IN on your TV Connecting a DBS Direct Broadcast Satellite receiver and a VCR 1 Connect the cable from your satellite antenna to your DBS receiver 2 Attach the coaxial connector from your cable or antenna to VH...

Page 16: ... see FALANTES and AUDIO OUT on page 22 Connecting an AV receiver KV 34T80 only For greater control of all audio and video equipment connect your AV receiver 1 Using AUDIO VIDEO connectors connect VIDEO 1 IN on your TV to Monitor AUDIO and VIDEO OUT on your AV receiver 2 Using AUDIO VIDEO connectors connect MONITOR AUDIO and VIDEO OUT on your TV to TV AUDIO and VIDEO IN on your AV receiver Disconne...

Page 17: ...tions on page 8 of this manual 2 Using AUDIO VIDEO connectors connect AUDIO and VIDEO IN on your VCR intended for recording to MONITOR AUDIO and VIDEO OUT on your TV Notes Do not change the input signal while editing through MONITOR OUT When connecting a single VCR to the TV if VCR LINE OUT is connected to TV VIDEO IN do not connect the TV MONITOR OUT jacks to the VCR LINE INPUT see right Doing so...

Page 18: ...gh other video equipment will cause unwanted picture noise VIDEO 1 IN VIDEO 3 IN MONITOR OUT 1 3 L R MONO S VIDEO AUDIO VIDEO VHF UHF VER FIX LINE OUT S VIDEO OUT S LINK DIGITAL OUT R AUDIO 1 L VIDEO OPTICAL COAXIAL R Y Y B Y COMPONENT VIDEO OUT AUDIO R red AUDIO L white VIDEO yellow VMC 810S 820S not supplied Model KV 34T80 is used here for illustration purpose For model KV 29T80 connect the cabl...

Page 19: ... to VIDEO 2 IN on the front panel of your TV Yellow VIDEO White AUDIO Left Red AUDIO Right Note If you are connecting a monaural camcorder connect only the single audio output to the left MONO input on your TV AUDIO L white AUDIO R red VIDEO yellow AV output VMC 810S 820S not supplied Model KV 34T80 is used here for illustration purpose For model KV 29T80 connect the cables to the corresponding te...

Page 20: ...Avoid dropping it getting it wet or placing it in direct sunlight near a heater or where the humidity is high Using the Remote Control Point the remote control at the remote sensor on the main unit Adjusting Sliders When menu items present a slider or press and SELECT to adjust the setting On Line Help Instructions Several menu windows will provide prompts and instructions to assist you in navigat...

Page 21: ...ee SELEÇÃO DE CANAL on page 24 4 Make sure the cursor z is to SELEÇÃO DE CANAL and press SELECT 5 If your TV receives signals from the antenna skip to step 8 If your TV receives cable TV channels proceed from step 6 6 Make sure the cursor z is to TV A CABO and press SELECT MENU IMAGEM CONTRASTE BRILHO COR NITIDEZ Mover Sair MENU MATIZ MENU MODO DINÂMICO Selecionar SELECT AJUSTES SELEÇÃO DE CANAL C...

Page 22: ...d the TV starts scanning and presetting channels automatically When all the receivable channels are stored the lowest numbered channel is displayed 9 Press MENU to return to the original screen SELEÇÃO DE CANAL TV A CABO SIM AUTO PROGRAMAÇÃO Mover Sair MENU CANC INCLUI CANAL Selecionar SELECT MENU AUTO PROGRAMAÇÃO SELECT SELECT ...

Page 23: ... VIDEO until a channel number appears Use for direct channel selection Press 0 9 to select a channel for example to select channel 10 press 1 and 0 the channel will change after 3 seconds or you can press ENTER for immediate selection Every time you press this button the channel will change up or down Channel Surf 1 Press and hold to change the channel number 2 Release to display the selected chan...

Page 24: ...ayed SAP indication disappears after three seconds Caption Vision Caption Vision will be displayed on the screen if the broadcaster offers this service see CC TEXT on page 25 To cancel the display press DISPLAY repeatedly until DISPLAY OFF appears DISPLAY OFF disappears after three seconds Press repeatedly to cycle through available video inputs TV VIDEO 1 VIDEO 2 and VIDEO 3 KV 34T80 only Press t...

Page 25: ...emote control to exit the menu screens Note Pressing MENU on the remote control will allow you to exit from the menus at any time Adjusting your SET UP menus IMAGEM CONTRASTE BRILHO COR NITIDEZ Mover Sair MENU MATIZ MENU MODO DINÂMICO Selecionar SELECT AJUSTES SELEÇÃO DE CANAL CANAL PREFERENCIAL CANAL FAVORITO SISTEMA DE COR Mover Sair MENU CC TEXT CC1 LEGENDA ENTRADA Selecionar SELECT MENU PORTUG...

Page 26: ...mize each value in the IMAGEM menu For details see Customizing the Channel Names on page 26 Adjust slider to increase picture contrast and create more vivid color Adjust slider to decrease picture contrast and soften the color Adjust slider to the brighten picture Adjust slider to darken the picture Adjust slider to increase color intensity Adjust slider to decrease color intensity Adjust slider t...

Page 27: ...s alone or the TV speakers and a separate stereo system NÃO Select to turn off the TV speakers and listen to the TV s sound only through external audio system speakers AUDIO OUT can only be set when FALANTES is set to NÃO VARIÁVEL Sound output varies according to the TV settings VOLUME AGUDOS GRAVES and BALANCO are adjusted through the TV Useful when you want to use your remote control to control ...

Page 28: ...vate a surround like effect INDICAÇÃO VOLUME BAR Select to indicate the sound level with slider NUM Select to indicate the sound level with number between 0 min and 63 max Tip z When watching a program with subtitles set to NUM The number indication appears in the bottom left corner of the screen so as not to cover the subtitles AUTO ESTÉREO SIM Select to return to main sound automatically when no...

Page 29: ...he TV to automatically program all receivable channels For details on how to set up this feature see Presetting the Channels Automatically on page 16 CANC INCLUI CANAL With the CANC INCLUI CANAL window open 1 Place the cursor next to CANCELAR or INCLUIR 2 Select the desired channel using CH or by selecting with the 0 9 buttons and pressing ENTER 3 Press SELECT The CANAL PREFERENCIAL feature allows...

Page 30: ...Caption Vision Captions may appear with a white box or other errors instead of intended text Caption Vision and the status display cannot be used at the same time CAPTION VISION CC TEXT Closed Caption Mover Sair MENU Selecionar SISTEMA DE COR VIDEO 1 AUTO TV AUTO VIDEO 2 AUTO VIDEO 3 AUTO MENU SELECT The CANAL FAVORITO feature allows your TV to memorize your favorite channels easily For details on...

Page 31: ... page 21 5 Repeat steps 2 4 to caption other channels 6 Press MENU to return to the original screen After you customize the channel the channel caption appears green To erase a caption In step 3 press RESET Notes If the CANAL PREFERENCIAL menu appears in gray the TV is set to a video input and you cannot select CANAL PREFERENCIAL Press ANT so that a channel number appears If more than 90 seconds e...

Page 32: ...select the channel that you want to set as your favorite channel and press SELECT 5 Press MENU to return to the original screen Notes If the CANAL FAVORITO menu appears in gray the TV is set to a video input and you cannot select CANAL FAVORITO Press TV VIDEO so that a channel number appears If more than 90 seconds elapse after you press a button the menu disappears automatically Setting and Selec...

Page 33: ...to select the favorite channel you want to watch and press SELECT The selected channel appears on the screen To cancel the CANAL FAVORITO menu Press or to select Sair and press SELECT Mover Sair MENU Selecionar Sair 5 4 2 CULT SBT 42 32 SELECT Adjusting your SET UP menus continued SELECT SELECT ...

Page 34: ...ES menu Normally set it to AUTO see SISTEMA DE COR on page 25 Cannot receive upper channels UHF when using an antenna Make sure TV A CABO is NÃO in the AJUSTES menu see SELEÇÃO DE CANAL on page 24 Use AUTO PROGRAMAÇÃO to add receivable channels that are not preset in the TV memory see Presetting the Channels Automatically on page 16 No color Adjust the COR in the IMAGEM menu see COR on page 21 Bla...

Page 35: ... volume when using a cable box Increase the volume at the cable box Then adjust the TV s volume CANAL FAVORITO does not display your choices Verify that MODO is set to MANUAL in the CANAL FAVORITO menu see Setting and Selecting CANAL FAVORITO on page 27 TV cannot receive stereo broadcast signal Set MTS to ESTÉREO in the SOM menu see OPÇÕES on page 23 TV turned off automatically The Auto Switch Off...

Page 36: ...V 34T80 Actual Screen size 27 inch picture measured diagonally KV 29T80 32 inch picture measured diagonally KV 34T80 Supplied accessories Remote control RM Y155B 1 Batteries 2 size AA R6 Antenna connector 1 Optional accessories Connecting cables RK 74A RKG 69HG VMC 10HG VMC 720M VMC 810S 820S YC 15V 30V TV Stand SU 000 VHF UHF mixer 000 Power requirements Number of inputs outputs Video 1 S Video 2...

Page 37: ...8 L Language selection 25 LEGENDA ENTRADA 25 M MATIZ 21 MENU button 16 Menu selection 20 AJUSTES menu 24 IMAGEM menu 21 Learning menu selection 20 SOM menu 22 MODO DINÂMICO 21 ESPORTE 21 PESSOAL 21 PREFERENCIAL 21 MONITOR OUT 11 12 MTS ESTÉREO 23 MONO 23 SAP 23 MUTING button 18 N NITIDEZ 21 Number buttons 18 O On Line Help 15 OPÇÕES 23 AV receiver 11 cable box and cable 7 camcorder 14 DBS receiver...

Page 38: ...ESET button 21 22 S Safety 2 4 SELECT button 15 SELEÇÃO DE CANAL 24 SISTEMA DE COR 25 SLEEP button 19 Sliders 15 SOM menu operations 22 Specifications 31 STEREO SAP button 19 Supplied accessories 31 SURROUND 23 S Video cable 5 T U Troubleshooting 29 30 TV A CABO 24 TV VIDEO button 19 Twin lead cable 5 6 V W X Y Z VHF UHF mixer 5 6 VOL buttons 18 ...

Page 39: ...34 ...

Page 40: ...35 ...

Page 41: ...36 ...

Page 42: ...37 ...

Page 43: ...juntamente com o Termo preenchido b o produto for ligado em rede elétrica fora dos padrões especificados ou sujeita a flutuação excessiva de voltagem c o produto tiver seu lacre violado for aberto para conserto manuseado ou tiver o circuito original alterado por técnico não autorizado ou não credenciado d o número de série do produto for removido ou alterado e o produto for utilizado em ambientes ...

Reviews: