background image

– 11 –

KV
-HA14L80/HA14P50

RM-969

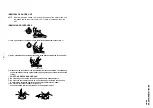
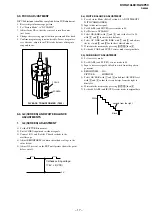
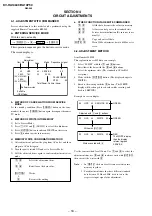
2-6. REPLACEMENT OF PARTS

For replacements of light guide,unscrew them,
exchange with new parts and fix them with
screws respectively.

2-6-2. Replacement of Power Button

2-6-1. Replacement of Light Guide

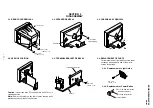
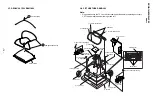
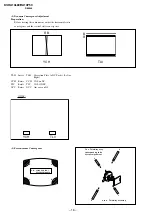
2-5. TERMINAL  BRACKET REMOVAL

SECTION 2

DISASSEMBLY

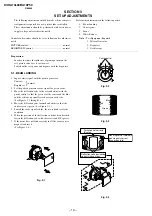
2-1. REAR COVER REMOVAL

2-2. SPEAKER REMOVAL

2-3. CHASSIS ASSY REMOVAL

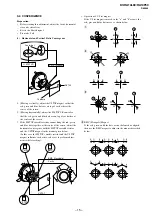
2-4. SERVICE POSITION

Caution:

 Do not take out CRT support block while TV set in

standing position.

Note:

 Undress necessary wires that creates tension while

placing the chassis into Service Position.


1

 Six screws

     (+BVTP 4 

× 

16)

1

 Two screws

     (+BVTP 4 

× 

16)

2

 Rear cover

Speaker

1

 Two screws 

     step tapping

A board

Terminal board bracket

One screw
(+BVTP 4 

× 

16)

One screw
(+BVTP 3 

× 

8)

1

 Push the claw to direction 

     of arrow and remove

2

 Spring compression

3

 Power Button

Summary of Contents for KV-HA14L80

Page 1: ...DEST CHASSIS NO CHASSIS TRINITRON COLOR TV SERVICE MANUAL BG2T MODEL COMMANDER DEST CHASSIS NO KV HA14L80 RM 969 ME SCC U67H A KV HA14P50 RM 969 GE SCC U69E A TV 1 2 3 4 6 7 8 9 0 5 JUMP SOUND MODE SPACE SOUND PROGR 2 ...

Page 2: ...C 50 60 Hz Power consumption W Indicated on the rear of the TV Television system B G Color system PAL PAL 60 NTSC3 58 AV IN NTSC4 43 SECAM KV HA14L80 PAL PAL 60 NTSC3 58 AV IN NTSC4 43 KV HA14P50 Channel coverage B G VHF E2 to E12 UHF E21 to E69 CATV S01 to S03 S1 to S41 Antenna 75 ohm external terminal Audio output Speaker 3W 3W Number of terminal D Video Input 2 Output 1 Phono jacks 1 VP P 75 oh...

Page 3: ...ent 17 3 4 G2 SCREEN and White Balance Adjustments 17 4 CIRCUIT ADJUSTMENTS 4 1 Adjustment With Commander 18 4 2 Adjustment Method 18 4 3 Picture Quality Adjustment 24 4 4 Deflection Adjustment 24 4 5 A Board Adjustment After IC003 MEMORY Replacement 24 4 6 Picture Distortion Adjustment 25 Section Title Page Section Title Page 5 DIAGRAMS 5 1 Block Diagram 26 5 2 Circuit Boards Location 28 5 3 Sche...

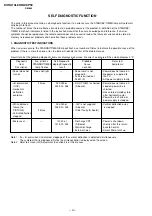
Page 4: ... turn on B overcurrent OCP Horizontal deflection overdrive White balance failure no PICTURE Vertical deflection stopped Micro reset Detected Symptoms Power does not come on No power is supplied to the TV AC power supply is faulty Power does not come on Load on power line is shorted Has entered standby state after horizontal raster Power line is shorted or power supply is stopped Vertical deflectio...

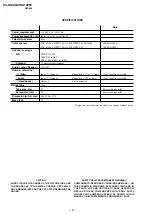
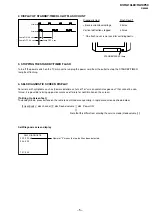
Page 5: ...of failure for confirmation on the screen To Bring Up Screen Test In standby mode press buttons on the remote commander sequentially in rapid succession as shown below Screen display channel 5 Sound volume Power ON Note that this differs from entering the service mode mode volume Self Diagnosis screen display STANDBY SLEEP lamp SONY Lamp ON 0 3 sec Lamp OFF 3 sec Lamp OFF 0 3 sec 2 times 4 times D...

Page 6: ...iagnostic screen turn off the power switch on the remote commander or the main unit 6 SELF DIAGNOSTIC CIRCUIT B overcurrent ªOCPº Occurs when an overcurrent on the B 135 line is detected by Q500 If Q500 go to ON and the voltage to pin 50 of IC301 more than 3 5V when V SYNC is more than seven verticals in a period the unit will automatically turn off Vertical deflection stopped Occurs when an absen...

Page 7: ...expose the TV to rain or moisture Do not operate the TV if any liquid or solid object falls into it Have it checked immediately by qualified personnel only Do not open the cabinet and the rear cover of the TV as high voltages and other hazards are present inside the TV Refer servicing and disposal of the TV to qualified personnel Your TV is recommended for home use only Do not use the TV in any ve...

Page 8: ... setup Contact a Sony dealer for advice Select the appropriate color system See J Adjust the color level See K Check the antenna setup Contact a Sony dealer for advice Keep external speakers or other electrical equipment away from the TV Press main power to turn off the TV for about 15 minutes then turn it on again to demagnetize the TV Count the number of times the 1 standby indicator flashes Pre...

Page 9: ...picture mode Press PIC MODE to select the desired picture mode Select To DYNAMIC view high contrast pictures STANDARD view normal contrast pictures SOFT view mild pictures Selecting the sound mode Press SOUND MODE to select the desired sound mode Select To 9 DYNAMIC listen to dynamic and clear sound that emphasizes the low and high sound 9 DRAMA listen to sound that emphasizes vocals and backgroun...

Page 10: ...cture position The or icon on the screen flashes while adjusting Note To reduce the slanting picture keep external speakers or other electrical equipment away from the TV or SELECT Slanting Optimal SPACE SOUND Good morning Good morning Selecting the space sound mode Press SPACE SOUND Select To ON listen to monaural sound with a stereo like effect OFF turn off space sound mode Note You can also tur...

Page 11: ... REMOVAL 2 2 SPEAKER REMOVAL 2 3 CHASSIS ASSY REMOVAL 2 4 SERVICE POSITION Caution Do not take out CRT support block while TV set in standing position Note Undress necessary wires that creates tension while placing the chassis into Service Position 1 Six screws BVTP 4 16 1 Two screws BVTP 4 16 2 Rear cover Speaker 1 Two screws step tapping A board Terminal board bracket One screw BVTP 4 16 One scr...

Page 12: ...emagnetization coil 1 Tension spring Picture tube º Demagnetic coil 2 Two screws step tapping 1 Speaker 12 5cm 7 Speaker 12 5cm 5 Tension spring Chassis assy 3 Deflection yoke 4 C board Anode cap Coating earth assy 9 Picture tube 6 Cushion 8 Two screws step tapping Holder DGC Cushion 50x550 DGC Cushion 50x550 DGC Beznet Hook PWB Bracket Two screws 5 tapping Two screws 5 tapping CRT Support Block C...

Page 13: ...d by the arrow b 3 When one side of the rubber cap is separated from the anode button the anode cap can be removed by turning up the rubber cap and pulling it up in the direction of the arrow c HOW TO HANDLE AN ANODE CAP 1 Do not damage the surface of anode caps with sharp shaped objects 2 Do not press the rubber too hard so as not to damage the inside of anode cap A metal fitting called the shatt...

Page 14: ...ANDING 1 Input a white signal with the pattern generator Contrast Brightness 2 Set the pattern generator raster signal to a green raster 3 Move the deflection yoke to the rear and adjust with the purity control so that the green is at the center and the blue and the red take up equally sized areas on each side See Figures 3 1 through 3 4 4 Move the deflection yoke forward and adjust so that the en...

Page 15: ... together at the center of the screen adjust the horizontal convergence with the H STAT variable resistor and the V STAT magnet in the manner given below In this case the H STAT variable resistor and the V STAT magnet influence each other so be sure to perform adjust ments while tracking 1 3 R G B G R B Center dot C3 board RV 702 V STAT Magnet H STAT VR BMC Hexapole V STAT Purity V STAT BMC Purity...

Page 16: ... YCH Rotate YCH VOL on DY TLV Rotate TLV VOL ON DY XCV Rotate XCV Adj core on DY ON DY 2 Dynamic Convergence Adjustment Preparation Before starting this adjustment adjust the horizontal static convergence and the vertical static convergence RB TLV YCH B R YCH TLV a d c b a to d Permalloy assembly Fix a Permalloy assy corresponding to the misconverged areas ...

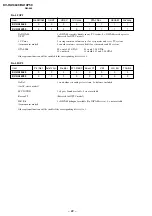
Page 17: ...age 175 V 2 VDC 2 a WHITE BALANCE ADJUSTMENT 1 Set to Service Mode Refer Section 4 1 ADJUSTMENTS WITH COMMANDER 2 Input white raster signal 3 Set 49 ABL and IF VP2 service mode to 00 4 Set Picture to DYNAMIC 5 Select OB RDR with 1 and 4 and set the level to 25 with 3 and 6 for best white balance 6 Select OC GDR and OD BDR with 1 and 4 and adjust the level with 3 and 6 for the best white balance 7 ...

Page 18: ...s 1F for PAL reception 4 Write with the MUTING button The display changes to WRITE 5 Execute the writing with the button The WRITE display will be changed to red color while excuting and back to SERVICE Example on screen display e OTHER FUNCTION VIA REMOTE COMMANDER 7 All the data becomes the values in memory 8 All user control goes to the standard state 5 Service data initialization Be sure not t...

Page 19: ... 5 0 5 1 1 5 1 O F 0 0 3 0 t n a t s n o C e m i T 1 0 t x e t e l e T o e d i V V T 2 3 0 0 6 1 T G A 0 0 F 3 r e v O e k a T C G A t x e t e l e T o e d i V V T 0 5 3 1 7 1 W S V 0 0 1 0 h c t i w S e t u M o e d i V t x e t e l e T o e d i V V T 6 3 1 8 1 R O F 3 0 3 0 y c n e u q e r F d l e i F d e c r o F 6 7 1 0 9 1 L D 0 0 1 0 e c a l r e t n i e D 5 1 0 A 1 C O P 0 0 1 0 e d o M o r h c n...

Page 20: ... B 3 D V T F 3 F 7 t f i h S e g d E e v i t c A c n y s V C 3 L P H 1 0 1 0 n o i t a r u g i f n o C y t i r a l o P c n y s H e v i t a g e N 1 0 e v i t i s o P 0 0 D 3 L P V 1 0 1 0 n o i t a r u g i f n o C y t i r a l o P c n y s V e v i t a g e N 1 0 e v i t i s o P 0 0 E 3 L P F 1 0 1 0 n o i t a r u g i f n o C y t i r a l o P d l e i F e n i l f l a h t s r i f c n y s V 1 0 e n i l f l...

Page 21: ...namic skin control on off 1 on 0 off 1A 3 DSA Dynamic skin control angle 1 correction angle 117 degrees 0 correction angle 123 degrees 1A 2 EBS Extended Blue Stretch 1 on 0 off 1A 0 BLS Blue stretch 1 on 0 off 18 4 BKS Black stretch 1 on 0 off 18 3 BB Blue back when no video signal is identified 1 on 0 off 18 0 AKB Black current stabilisation 1 not active 0 active 02 6 BPS Bypass of chroma base ba...

Page 22: ...e corresponding bit is set to 1 No 50 OP3 No Bal 1 no balance in analog select items 0 balance included for AV stereo model SPC SOUND 1 Space Sound available 0 not available Korean ST Reserved for NTSC model H K Bil 1 NICAM bilingual available No NICAM stereo 0 not available for monaural model Other optional function will be enable if the corresponding bit is set to 1 No 4F OP2 Item KV HA14L80 KV ...

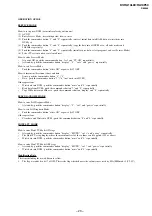
Page 23: ... into NVM push the commander button mute and 0 sequentially Read data from NVM push the commander button 7 and 0 sequentially Copy 50Hz data into 60Hz area push the commander button display and 0 sequentially SELF DIAGNOSIS MODE How to enter Self Diagnosis Mode At stand by push the commander button display 5 vol and power sequentially How to exit Self Diagnosis Mode Push the commander button other...

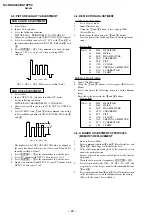
Page 24: ...2 VB3 VB4 4 4 DEFLECTION ADJUSTMENT NORMAL MODE 50Hz 1 Set to Service mode 2 Input PAL color bar 3 Using the 1 and 4 button select category GEO Service Mode 4 Raise lower the data using the 3 and 6 buttons Select and adjust the following items to obtain optimum image Service Item GEO 00 HPS H POSITION 01 HSZ H SIZE 02 PAP PIN AMPLITUDE 03 CPN CORNER PIN 04 TLT TILT 05 VSL V SLOPE 06 VAP VERTICAL A...

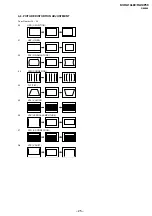
Page 25: ...P50 RM 969 4 6 PICTURE DISTORTION ADJUSTMENT Item Number 00 08 01 HSZ H SIZE 04 TLT TILT 06 VAP VERTICAL AMPLITUDE 00 HPS H POSITION 02 PAP PIN AMPLITUDE 03 CPN CORNER PIN 05 VSL V SLOPE 08 VPS V SHIFT 07 SCO S CORRECTION ...

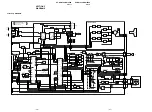
Page 26: ... 43MHz X358 3 58MHz IF OUT CVBS IN INT 6 13 H PROT Q004 Q800 H DRIVE 3 1 PIN CONT IC850 IC851 Q802 PIN OUT IC551 V OUT 5 1 7 Q801 H OUT L802 DUMPER D804 D851 S801 H SENT FV HV 135V 13V 15V T503 FBT Q561 X RAY 135V D561 D591 D1505 H H H H V V DY1 2 1 4 200V 1000V H1 CN851 CN300 CN703 3 2 1 5 Q712 Q711 Q710 Q706 Q705 Q704 R DRIVE G DRIVE B DRIVE R AMP G AMP B AMP Q709 Q708 Q707 IK LIMIT IK LIMIT IK ...

Page 27: ... 28 KV HA14L80 HA14P50 RM 969 5 2 CIRCUIT BOARDS LOCATION A BOARD C BOARD ...

Page 28: ...SC 3 58 Readings are taken with a 10 MΩ digital multimeter Voltage are dc with respect to ground unless otherwise noted Voltage variations may be noted due to normal produc tion tolerances All voltage are in Volt Cannot be measured Circled numbers are waveform references B bus B bus signal path Reference information RESISTOR RN METAL FILM RC SOLID FPRD NONFLAMMABLE CARBON FUSE NONFLAMMABLE FUSIBLE...

Page 29: ... CHIP 0 001 B CHIP 0 001 B CHIP 0 001 B CHIP 0 001 B CHIP 0 001 B CHIP 0 001 B CHIP 0 001 B CHIP 0 001 B CHIP 0 001 B CHIP 0 001 B CHIP 0 001 B CHIP 0 001 B CHIP 0 001 B CHIP 0 001 B CHIP 0 001 B CHIP 0 001 B CHIP 0 001 B CHIP 0 001 B CHIP 0 001 B CHIP 0 001 B CHIP 0 0022B CHIP 0 0047 B CHIP 0 0047 B CHIP 0 0047 B CHIP 0 0047 B CHIP 0 01 25V B CHIP 0 01 25V B CHIP 0 01 25V B CHIP 0 01 F CHIP 0 01 ...

Page 30: ...0 R722 R724 R716 R717 R718 0 0047 2kV E 0 001 B 4 7 250V 0 022 400V PP 470p B 470p B 470p B 470p B 470p B 470p B 100 16V 100p B 100 16V 680p B 470p B 470p B 470p B 5P WHT S MICRO 1P T AB 6P WHT S MICRO 1P TAB SOCKET EL0607 2SC2611 2SC2611 2SC2611 2SA1091 0 2SA1091 0 2SA1091 0 100k 1 2W 8 2k 3W RS 8 2k 3W RS 8 2k 3W RS 3 9k 3 9k 3 9k 180 180 180 33 33 33 100 1 2W 100 100 100 JW 5MM JW 5MM JW 5MM 11...

Page 31: ...5 11 4 5 12 4 5 13 4 5 14 4 5 15 4 5 16 4 5 17 4 5 18 4 5 19 4 5 20 0 21 4 6 22 4 6 23 4 5 24 9 25 0 26 3 8 27 3 8 28 4 5 IC203 1 0 2 0 3 20 3 4 0 5 0 6 0 7 9 8 8 0 4 9 0 10 21 11 9 7 12 9 7 IC301 1 0 7 2 3 7 3 0 4 4 0 4 5 2 6 3 6 6 2 9 4 6 7 4 8 8 4 8 9 6 7 10 0 11 3 4 12 8 1 13 3 8 4 4 14 0 Ref Pin No Voltage v Ref Pin No Voltage v 15 2 9 16 0 5 17 3 4 3 9 18 6 2 19 2 6 20 2 6 21 2 7 22 2 4 2 1 ...

Page 32: ...6 B 0 C 3 9 E 0 6 Q201 B 0 4 4 7 C 8 9 E 5 3 Q202 B 6 3 3 C 0 1 3 E 13 13 4 Q203 B 5 5 5 2 C 13 E 6 1 5 8 Q204 B 16 5 C 16 5 E 15 8 Q205 B 4 8 0 2 C 0 0 2 E 0 4 8 Q208 B 1 3 C 1 4 E 4 8 Q301 B 3 0 3 6 C 0 E 2 3 3 9 Q303 B 2 3 3 7 C 7 7 6 1 E 2 9 4 2 Q305 B 3 0 4 0 C 2 3 3 5 E 2 3 3 6 Q309 B 1 7 3 8 C 4 5 9 0 E 2 9 4 7 Q315 B 2 6 C 8 9 E 0 Q318 B 2 1 C 0 4 5 4 E 2 7 Q320 B 0 C 3 3 E 0 Q400 B 13 3 C...

Page 33: ...L NTSC3 58 11 11 PAL 12 PAL 13 14 PAL 15 C BOARD VOLTAGE LIST Ref Pin No Voltage v J701 G2 260 4 258 4 H2 KB 120 KG 120 125 KR 117 119 Q704 B 8 9 C 121 7 123 2 E 8 3 6 3 Q705 B 8 9 C 8 3 124 4 E 8 3 0 3 Q706 B 8 9 C 119 E 8 3 6 Q707 B 122 125 2 C 7 3 E 120 125 2 Ref Pin No Voltage v Q708 B 120 7 123 4 C 7 4 E 118 2 124 3 Q709 B 119 120 1 C 7 3 8 E 116 119 8 Q710 B 2 7 C 8 3 E 2 0 Q711 B 2 7 C 8 3 ...

Page 34: ...6 R729 R730 R731 R755 R738 R733 R725 R756 R757 R713 R715 R705 R728 CN704 CN705 D701 CN703 R727 R761 R721 Q711 CN702 D713 D714 D715 R706 R707 C706 L710 L711 RV702 L712 R708 JW701 JW702 JW703 JW704 CN706 EY701 EY702 EY705 EY706 CN707 CN708 CN709 R711 EY703 EY704 JW707 JW705 JW706 JW708 EY707 CN701 R734 R703 L701 L706 R720 R722 R724 C712 C713 C714 C716 C717 C718 C719 C703 C736 C737 C746 D717 R710 R71...

Page 35: ... Q305 Q309 Q311 C303 C302 Q302 C329 C306 Q405 Q404 Q402 Q403 C403 C406 C343 C344 C345 C346 C348 Q319 C350 C351 D308 C352 C353 C355 C356 C357 C358 C129 IC002 C049 C047 C051 D100 Q104 C116 Q103 C115 C117 C111 C110 Q101 C359 C361 C362 C363 C342 Q318 C102 C103 C409 C414 C408 C411 C341 C340 C304 C339 C337 C330 C328 C327 C313 Q315 C312 C314 D305 D307 C320 C319 C318 C317 C316 Q314 Q407 Q406 C801 IC400 IC...

Page 36: ... T1 RU4AM T3 1SS119 25 D3SB60F3 BY228 UPC574J ANODE CATHODE CATHODE ANODE CATHODE ANODE GRN ANODE GRN TRANSISTOR 2SC2785 HFE E C B LETTER SIDE 2SA1091 0 E C B 2SC2611 E LETTER SIDE C B MSD601 RT1 MSB709 RT1 UN2211 UN2213 UN2216 E B C 2SC3209LK E C B 2SD2624 CA 1 2 3 IC IRF614 005 2SC3779C S D G E B C M24C08 BN6 A 8 PIN CXP85224A 080S CXP85224A 085S TDA7438D013TR 1 TOP VIEW DIP Dual In line Package...

Page 37: ... 40 KV HA14L80 HA14P50 RM 969 MM1319AFBE NJM2903M Small Outline L Leaded Pin 8 98 1 TOP VIEW SOP AN5522 STR F6707A TDA8843 Zig zag In line Package Pin 6 99 MARKING SIDE VIEW 1 1 2 4 6 3 5 7 IC ...

Page 38: ...TROL KV HA14L80 X 4039 870 1 DOOR ASSY CONTROL KV HA14P50 4 8 735 570 05 PICTURE TUBE A34LRG70X 5 1 452 032 00 MAGNET DISC 6 4 083 989 01 COVER REAR 7 3 704 372 11 HOLDER HV CABLE 8 4 081 577 01 SPACER S DY 9 4 077 228 02 PIECE TLH CONVERGENCE 10 8 451 401 11 DEFLECTION YOKE Y14RSA S 11 1 900 212 58 LEAD ASSY FOCUS 12 A 1332 226 A C BOARD MOUNTED 13 4 365 808 01 SCREW 5 TAPPING 4 14 4 078 765 01 S...

Page 39: ...11 ELECT 3 3UF 20 00 50V C046 1 162 995 11 CERAMIC CHIP 0 022UF 50V C047 1 113 619 11 CERAMIC CHIP 0 47UF 10V C048 1 126 965 91 ELECT 22UF 20 00 50V C049 1 163 038 91 CERAMIC CHIP 0 1UF 25V C050 1 162 964 11 CERAMIC CHIP 0 001UF 10 00 50V C051 1 163 038 91 CERAMIC CHIP 0 1UF 25V C052 1 126 935 11 ELECT 470UF 20 00 10V C053 1 126 935 11 ELECT 470UF 20 00 10V C054 1 104 666 11 ELECT 220UF 20 00 25V ...

Page 40: ...32 1 126 933 11 ELECT 100UF 20 00 16V C335 1 126 947 11 ELECT 47UF 20 00 16V C337 1 163 038 91 CERAMIC CHIP 0 1UF 25V C339 1 163 038 91 CERAMIC CHIP 0 1UF 25V C342 1 163 038 91 CERAMIC CHIP 0 1UF 25V C343 1 162 917 11 CERAMIC CHIP 15PF 5 00 50V C344 1 162 917 11 CERAMIC CHIP 15PF 5 00 50V C345 1 162 967 11 CERAMIC CHIP 0 0033UF 10 00 50V C346 1 163 038 91 CERAMIC CHIP 0 1UF 25V C347 1 126 933 11 E...

Page 41: ...7 1 162 966 11 CERAMIC CHIP 0 0022UF 10 00 50V C868 1 162 995 11 CERAMIC CHIP 0 022UF 50V C869 1 115 339 11 CERAMIC CHIP 0 1UF 10 00 50V C870 1 162 960 11 CERAMIC CHIP 220PF 10 00 50V C872 1 163 038 91 CERAMIC CHIP 0 1UF 25V C873 1 162 974 11 CERAMIC CHIP 0 01UF 50V C874 1 162 974 11 CERAMIC CHIP 0 01UF 50V C875 1 163 038 91 CERAMIC CHIP 0 1UF 25V FILTER CF355 1 234 686 21 FILTER BAND PASS F5 5C C...

Page 42: ...58CD JACK J200 1 770 786 11 JACK J400 1 779 850 11 JACK BLOCK PIN 6P J401 1 770 329 11 JACK PIN 3P CHIP CONDUCTOR JR001 1 216 295 91 SHORT 0 JR003 1 216 295 91 SHORT 0 JR006 1 216 295 91 SHORT 0 JR013 1 216 295 91 SHORT 0 JR014 1 216 295 91 SHORT 0 JR015 1 216 295 91 SHORT 0 JR016 1 216 295 91 SHORT 0 JR018 1 216 295 91 SHORT 0 JR020 1 216 295 91 SHORT 0 JR035 1 216 295 91 SHORT 0 JR036 1 216 295 ...

Page 43: ...5 1 10W R032 1 216 049 11 RES CHIP 1K 5 1 10W R033 1 216 073 91 RES CHIP 10K 5 1 10W R034 1 216 057 00 RES CHIP 2 2K 5 1 10W R035 1 216 057 00 RES CHIP 2 2K 5 1 10W R036 1 216 057 00 RES CHIP 2 2K 5 1 10W R037 1 216 049 11 RES CHIP 1K 5 1 10W R038 1 216 049 11 RES CHIP 1K 5 1 10W R039 1 216 043 91 RES CHIP 560 5 1 10W R042 1 216 039 00 RES CHIP 390 5 1 10W R043 1 216 025 11 RES CHIP 100 5 1 10W R0...

Page 44: ...70 5 1 10W R429 1 216 073 91 RES CHIP 10K 5 1 10W R430 1 216 063 91 RES CHIP 3 9K 5 1 10W R431 1 216 091 00 RES CHIP 56K 5 1 10W R432 1 216 121 11 RES CHIP 1M 5 1 10W R433 1 216 091 00 RES CHIP 56K 5 1 10W R434 1 216 049 11 RES CHIP 1K 5 1 10W R203 1 216 053 00 RES CHIP 1 5K 5 1 10W KV HA14L80 R203 1 216 065 91 RES CHIP 4 7K 5 1 10W KV HA14P50 R204 1 216 061 91 RES CHIP 3 3K 5 1 10W R205 1 216 081...

Page 45: ... R623 1 216 053 00 RES CHIP 1 5K 5 1 10W R624 1 260 125 11 CARBON 150K 5 1 2W R626 1 216 349 00 METAL OXIDE 1 5 1W R627 1 220 820 31 CEMENTED 1 5 5 10W R800 1 216 049 11 RES CHIP 1K 5 1 10W R801 1 216 081 00 RES CHIP 22K 5 1 10W R802 1 215 918 00 METAL OXIDE 1 5K 5 3W R803 1 260 332 51 CARBON 2 2K 5 1 2W R806 1 216 295 91 SHORT 0 R808 1 249 421 11 CARBON 2 2K 5 1 4W R810 1 215 886 11 METAL OXIDE 1...

Page 46: ...1 19 1SS119 25 D707 8 719 911 19 1SS119 25 D708 8 719 911 19 1SS119 25 D709 8 719 911 19 1SS119 25 D716 8 719 911 19 1SS119 25 D717 8 719 070 16 NNCD9 1A T1 JACK J701 1 540 071 22 SOCKET CRT COIL L701 1 412 529 11 INDUCTOR 22UH L706 1 414 191 11 INDUCTOR 150UH TRANSISTOR Q704 8 729 326 11 2SC2611 Q705 8 729 326 11 2SC2611 Q706 8 729 326 11 2SC2611 Q707 8 729 200 17 2SA1091 O Q708 8 729 200 17 2SA1...

Page 47: ...on Sony Technology Malaysia Sdn Bhd Visual Products General Area 9 872 276 01 1 569 008 21 ADAPTOR CONVERSION 2P KV HA14L80 4 085 263 01 INDIVIDUAL CARTON 4 085 657 01 CUSHION UPPER 4 392 859 01 BAG PROTECTION 4 085 922 11 MANUAL INSTRUCTION KV HA14P50 4 085 449 11 MANUAL INSTRUCTION KV HA14L80 English 2001 12 BATTERY COVER REMOTE COMMANDER 1 477 047 11 REMOTE COMMANDER RM 969 4 084 290 01 BATTERY...

Reviews: