background image

18

Connecting Optional Equipment

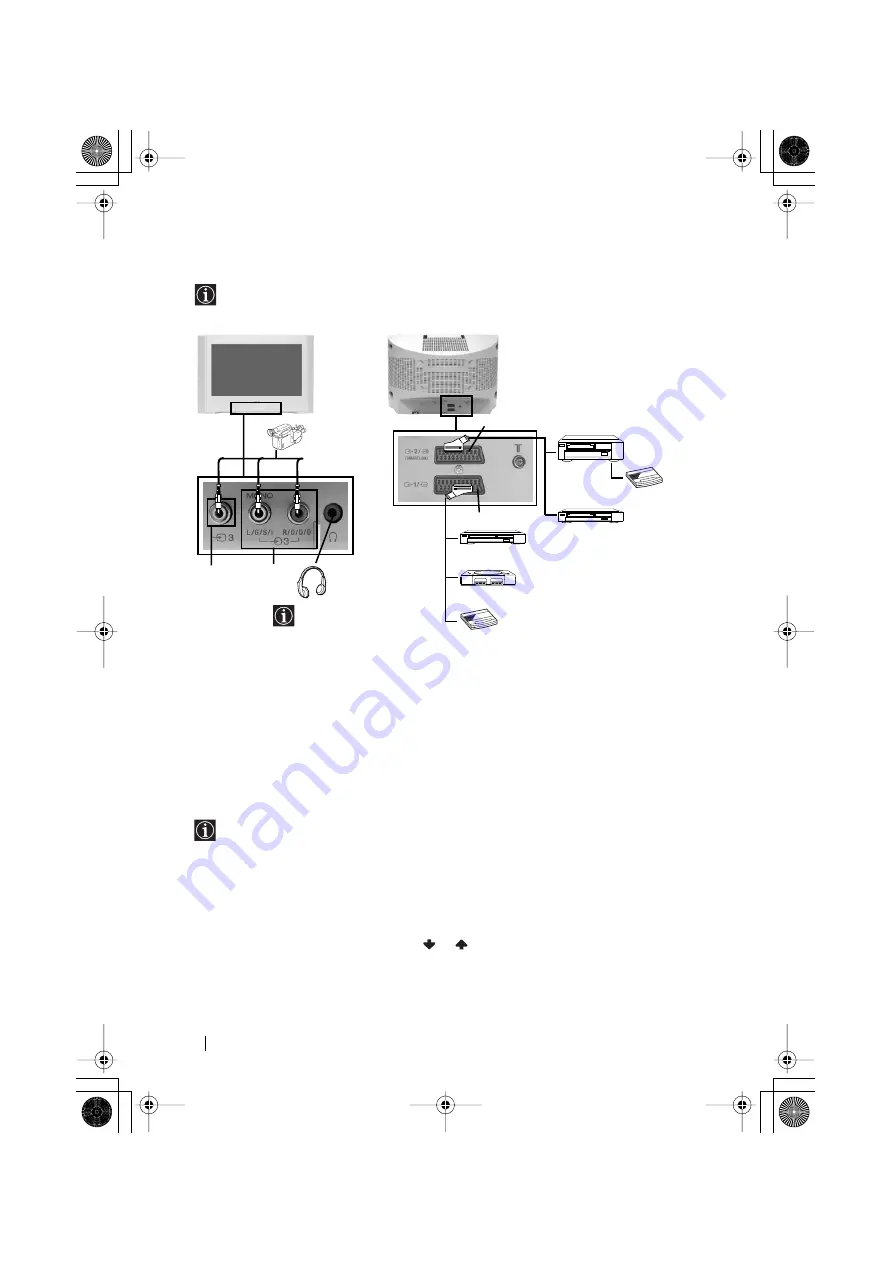
Using the following instructions you can connect a wide range of optional equipment to


your TV set. (Connecting cables are not supplied).

Connecting a VCR:

To connect a VCR, please refer to the section “Connecting the aerial and VCR” of this instruction 
manual. We recommend you connect your VCR using a scart lead. If you do not have a scart 
lead, tune in the VCR test signal to the TV programme number “0” by using the “Manual 
Programme Preset” option. (for details of how to manually programme these presets, see page 
14, step a).
Refer to your VCR instruction manual to find out how to find the output channel of your VCR.

Connecting a VCR that supports SmartLink:

SmartLink is a direct link between the TV set and the VCR. For more information on 
SmartLink, please refer to the instruction manual of your VCR.
If you use a VCR that supports SmartLink, please connect the VCR by using a Scart lead 
to the Scart 

:

2/

q


D

.

If you have connected a decoder to the Scart 

:

2/

q

 or through a VCR 

connected to this Scart:

Select the “Manual Programme Preset” option in the “Set Up” menu and after entering in the 
“Decoder**” option, select “On” (by using

or

). Repeat this option for each scrambling 

signal.

**This option is only available depending on the country you have selected in the 
   “Language/Country” menu.

Additional Information

continued...

A

B

1

2

D

“PlayStation”*

Decoder

Decoder

C

VCR

DVD

VCR

DVD

8mm/Hi8/

DVC

camcorder

VCR

When you connect the 
headphones, the TV 
speakers will automatically 
be muted.

* “PlayStation” 

is a product of 

Sony Computer 
Entertainment, Inc.

*


“PlayStation

” is a trademark 

of Sony Computer 
Entertainment, Inc.

02GBKV28CL10B.fm  Page 18  Friday, January 31, 2003  4:57 PM

Summary of Contents for KV-28CL10B

Page 1: ...R 4 093 788 61 1 FD Trinitron Colour Television KV 28CL10B 2003 by Sony Corporation Instruction Manual GB 00COKV28CL10B fm Page 1 Friday January 31 2003 4 55 PM ...

Page 2: ...he following instructions The wires in this mains lead are coloured in accordance with the following code Blue Neutral Brown Live As the colours of the wires in the mains lead of this apparatus may not correspond with the coloured markings identifying the terminals in your plug proceed as follows The wire which is coloured blue must be connected to the terminal which is marked with the letter N or...

Page 3: ...d Using the Menu System 10 Menu Guide Picture Adjustment 10 Sound Adjustment 11 Sleep Timer 12 Language Country 12 Auto Tuning 12 Programme Sorting 12 Programme Labels 13 AV Preset 13 Manual Programme Preset 14 Auto Format 15 Noise Reduction 15 AV2 Output 16 RGB Centring 16 Picture Rotation 16 Teletext 17 Additional Information Connecting Optional Equipment 18 Using Optional Equipment 19 Specifica...

Page 4: ...face up Do not cover the ventilation openings of the TV with items such as curtains or newspapers etc Safety Information Never push objects of any kind into the set as this could result in a fire or electric shock Never spill liquid of any kind on the set If any liquid or solid object does fall through do not operate the TV Have it checked immediately by qualified personnel For environmental and saf...

Page 5: ... manual on page 17 6 Displaying the menu system Press to display the menu on the TV screen Press again to remove the menu display from the TV screen 7 Menu selection When MENU is switched on Scroll Up Scroll Down Previous menu or selection Next menu or selection OK confirms your selection When MENU is switched off OK Shows a channel overview Press or to select the channel and then press again the ...

Page 6: ...r Down Buttons Selects TV channels Volume control buttons Video Input jack Audio Input jacks Headphones jack Auto Start Up Button Selecting Input source Push up the flap on the front of the TV to reveral the front control panel 02GBKV28CL10B fm Page 6 Friday January 31 2003 4 57 PM ...

Page 7: ...atteries using the correct polarities Always remember to dispose of used batteries in an environmental friendly way Installation For more details of VCR connection please refer to the section Connecting Optional Equipment of this instruction manual on page 18 OUT IN VCR Scart lead is optional or 02GBKV28CL10B fm Page 7 Friday January 31 2003 4 57 PM ...

Page 8: ...he first time you press this button a Language menu displays automatically on the TV screen 2Press the or button on the remote control to select the language then press the OK button to confirm your selection From now on all the menus will appear in the selected language 3The Country menu appears automatically on the TV screen Press the or button to select the country in which you will operate the...

Page 9: ...een a If you wish to keep the broadcast channels in the tuned order go to step 8 b If you wish to store the channels in a different order 1 Press the or button to select the programme number with the channel TV Broadcast you wish to rearrange then press the button 2 Press the or button to select the new programme number position for your selected channel TV Broadcast then press 3 Repeat steps b 1 ...

Page 10: ...his after selecting the item you want to alter press then press or repeatedly to adjust it and finally press OK to store the new adjustment Level 1 Level 2 Level 3 Function This menu also allows you to customise the picture mode based on the programme you are watching Mode Personal for individual settings Live for live broadcast programmes DVD and Digital Set Top Box receivers Movie for films Brig...

Page 11: ...advertisements TV Speakers Off Sound from external amplifier connected to the audio outputs on the rear of the TV set On Sound from the TV set Treble and Bass can only be altered if Personal mode is selected Select Reset and press OK to reset the sound to the factory preset levels In case of a bilingual broadcast select Dual Sound and set A for sound channel 1 B for sound channel 2 or Mono for mon...

Page 12: ... to change the order in which the channels TV Broadcast appear on the screen To do this after selecting the option press and then proceed in the same way as in step 7b of the section Switching On the TV and Automatically Tuning on page 8 Level 1 Level 2 Level 3 Function continued Menu System Set Up Language Country Auto Tuning Programme Sorting Progamme Labels AV Preset Manual Programme Preset Det...

Page 13: ...predefined label CABLE GAME CAM DVD VIDEO or SAT press or to select the desired label and finally press OK to store b If you want to set a different label select Edit and press Then with the first element highlighted press or to select a letter number or for a blank then press to confirm this character Select the other four characters in the same way and finally press OK to store Level 1 Level 2 L...

Page 14: ...ter Select the other four characters in the same way After selecting all the characters press OK twice to store c Normally the automatic fine tuning AFT is operating however you can manually fine tune the TV to obtain a better picture reception in the case that the picture is distorted To do this while watching the channel TV Broadcast you wish to fine tune select the AFT option and press Next pre...

Page 15: ...he position of the image on the screen e g to read subtitles NOISE REDUCTION The Noise Reduction option in the Detail Set Up menu allows you to automatically reduce the picture noise visible in the broasdcast signal To do this after selecting the option press Then press or to select Auto Finally press OK to confirm and store To cancel this function afterwards select Off instead of Auto in the step...

Page 16: ...firm and store PICTURE ROTATION Because of the earth s magnetism the picture may slant In this case you can correct the picture slant by using the option Picture Rotation in the Detail Set Up menu To do this after selecting the option press Then press or to correct any slant of the picture between 5 and 5 and finally press OK to store Level 1 Level 2 Level 3 Function Set Up Language Country Auto T...

Page 17: ...t available In that case input another page number To access the next or preceding page Press PROGR or PROGR To superimpose teletext on to the TV Whilst you are viewing teletext press Press it again to cancel teletext mode To freeze a teletext page Some teletext pages have sub pages which follow on automatically To stop them press Press it again to cancel the freeze To reveal concealed information...

Page 18: ...d the VCR For more information on SmartLink please refer to the instruction manual of your VCR If you use a VCR that supports SmartLink please connect the VCR by using a Scart lead to the Scart 2 q D If you have connected a decoder to the Scart 2 q or through a VCR connected to this Scart Select the Manual Programme Preset option in the Set Up menu and after entering in the Decoder option select O...

Page 19: ...a RGB source has been connected 2 Audio video input signal through the Scart connector D 2 S Video input signal through the Scart connector D 3 Video input signal through the phono socket A and Audio input signal through B 4 Press button on the remote control to return to the normal TV picture For Mono Equipment Connect the phono plug to the L G S I socket on the front of the TV and select 3 input...

Page 20: ...lectable audio video output and SmartLink interface Front Terminals 3 video input phono jack 3 audio input phono jacks headphones jack Design and specifications are subject to change without notice Ecological Paper Totally Chlorine Free Sound Output 2 x 10 W music power 2 x 5 W RMS Power Consumption 90 W Standby Power Consumption 0 5 W Dimensions w x h x d Approx 788 x 517 x 523 mm Weight Approx 4...

Page 21: ...creen see page 19 Press the button on the remote control Check that TV Speakers is On on the Sound Adjustment menu see page 11 Check that headphones are not connected Using the menu system select the Picture Adjustment menu and select Reset to return to factory settings see page 10 Turn off any equipment connected to the Scart connector on the rear of the TV Using the menu system enter to the Lang...

Page 22: ...http www sony net Printed in Spain Ecological Paper Totally Chlorine Free 03BCKV28CL10B fm Page 1 Friday January 31 2003 5 00 PM ...

Reviews: