background image

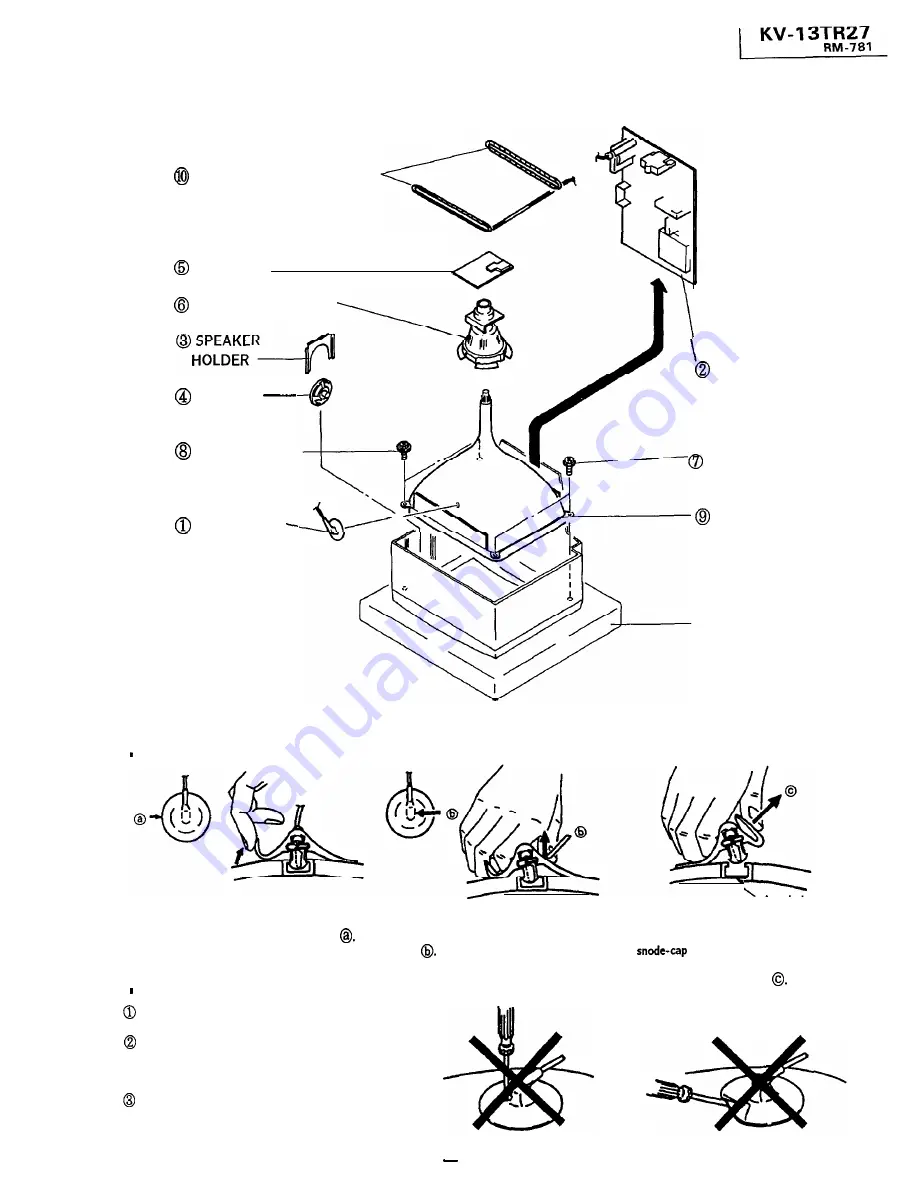
2-2. PICTURE TUBE REMOVAL

Note :

Follow the disassembly procedure in the

numerical order given.

 COIL DEMAGNETIZATION

 C BOARD

 DEFLECTION YOKE

 SPEAKER 

 TWO SCREWS

 ANODE CAP 

REMOVAL OF ANODE-CAP

 REMOVING PROCEDURES

 A BOARD

 TWO SCREWS

 PICTURE TUBE

CUSHION

Anode 

button

@Turn up one side of the rubber cap in

@Using a thumb pull up the rubber cap

@When one side of the rubber cap is

the direction indicated by the arrow 

firmly in the direction indicated by the

separated from the anode button, the

arrow 

 can be removed by turning

up the rubber cap and pulling up it in

the direction of the arrow 

 HOW TO HANDLE AN ANODE-CAP

Don’t hurt the surface of anode-caps with

sharp shaped material!

Don’t press the rubber hardly not to hurt

inside of anode-caps!

A material fitting called as shatter-hook

terminal is built in the rubber.

Don’t turn the foot of rubber over hardly!

The shatter-hook terminal will stick out or

hurt the rubber.

 11 

Summary of Contents for KV-13TR27

Page 1: ...mensions W e i g h t 812 Approx 2W Approx 356X 331 X 407 mm w h d Approx 10 5kg Cable TV 1 125 Mirror black Trinitron tube 13 inch picture measured diagonally 14 inch picture tube measured diagonally VIDEO IN phono jack lVp p 75ohms unbalanced sync negative AUDIO IN phono jack 408mVrms 100 modulation impedance 47k ohms 120V AC 60Hz 97W Max 3W STAND BY Remote Commander RM 781 with 2 size AA R6 batt...

Page 2: ...Y PARTS WHOSE PART NUMBERS APPEAR AS SHOWN IN THIS MANUAL OR IN SUPPLEMENTS PUBLISHED BY SONY CIRCUIT ADJUSTMENTS THAT ARE CRITICAL TO SAFE OPERATION AkE IDENTIFIED IN THIS MANUAL FOLLOW THESE PRO CEDURES WHENEVER CRITICAL COMPONENTS ARE REPLACED OR IMPROPER OPERATION IS SUSPECTED Section 4 SAFETY RELATED ADJUSTMENT 15 5 ELECTRICAL ADJUSTMENTS 5 1 A Board Adjustment 17 6 DIAGRAMS 6 1 Circuit Board...

Page 3: ...scribed below LEAKAGE TEST The AC leakage from any exposed metal part to earth ground and from all exposed metal parts to any exposed metal part having a return to chassis must not exceed 0 5 mA 500 microampers Leakage current can be measured by any one of three methods 1 A commercial leakage tester such as the Simpson 229 or RCA WT 540A Follow the manufacturers instructions to use these instru me...

Page 4: ...esetting buttons AUTO PGM ADD ERASE Channel number buttons DISPLAY button PICTURE I buttons VOL volume I buttons S L E E P button POWER switch Picture adjusting buttons SELECT RESET LEVEL 1 CABLE button TV VIDEO button 6 ENTER button JUMP button CH channel buttons The functions of these buttons are also available on ihe TV In normal operaton batteries will last up to half a year lf the Commander d...

Page 5: ... so that a channel umber appears the dewed channeis on the next Page ENTER 1 Press the channel number button s and then ENTER to select the channel to be added or erased 2 To add channels Press A ADD a A appears ior a moment This channel has now bee added to the channel scan memory To erase channels Press ERASE ERASE T3 A appears for a moment Thus channel has now bee erased from the channel scan m...

Page 6: ...set To select a channel dwectly channels in numerICal press the channel number SeCf e Ce I button s and then ENTER press CH I I For example to select channel 1 10 press 1 0 and ENTER f o 0 PICTURE LEVEL no r I RM 781 decrease 1 1 k 1 TO mcrease c o l o r mterwty L color lntenslty BRIGHT brightness LEVEL IO 1 D a r k e r 1 y Srlghter SHARP sharpness LEVEL 4 press VOL or to adlust the volume f 0 Not...

Page 7: ...he Internalclock IS set the current time will appear on the screen It IS necessary to set the clock correctly to activate the program stalt TIMER and channel Program start TlMER Makes a program of yourchoice appear on the screen automatically at the dewed time Channel BLOCK Blocks a channel from appearmg on the screen for 12 hours Use channel BLOCK to mevent children from watchma undesirable proar...

Page 8: ...OCK Example To set the BLOCK for a program which begins at 930 AM on channel 9 1 Press TIMER BLOCK three times to change from normal page to BLOCK page TIMEWBLOCK BLOCK page indications m red 2 Press 0 9 3 0 ENTER 0 necessary Numbers will wmk to Indicate that the time has been Set Press 8 ENTER 0 not necessary Numbers will wmk to Indicate that the channel has been Set The BLOCK has now been set If...

Page 9: ...annel I remam m fhe W s memory A the preset tme the selected channel WI appear on the screen and the TIMER lamp wtll go out The TIMER w operate whether you are wa ch ng a TV Program or a VCR playback or eve If you have turned OR the TV If you want to preset the same channel at the same time for a MUE de press OFF EPEAT me TIMER lamp w lght p lo indwte hai the TIMER has been r acWa ed If no button ...

Page 10: ...SECTION 2 DISASSEMBLY 2 l SERVICE POSITION Pull out and turn up the A board in the direction shown by the arrow 10 ...

Page 11: ...er cap is the direction indicated by the arrow firmly in the direction indicated by the separated from the anode button the arrow snode cap can be removed by turning up the rubber cap and pulling up it in the direction of the arrow 6 1 HOW TO HANDLE AN ANODE CAP 0 Q 0 Don t hurt the surface of anode caps with sharp shaped material Don t press the rubber hardly not to hurt inside of anode caps A ma...

Page 12: ...n 0 0 1 2 3 4 5 6 7 8 9 10 Feed in the white pattern Before starting degauss the entire screen Loosen deflection yoke screw Adjust purity control as shown in Fig 3 1 Slide deflection yoke as far forward as it will go Turn the raster signal of the pattern generator to red Adjust purity control to center vertical red band as shown in Fig 3 2 Slide deflection yoke back for a uniform red screen Check ...

Page 13: ...reen and blue dots do not coincide on the center of screen with H STAT VR perform horizontal convergence adjustment using H STAT VR and V STAT magnet as shown below In this case H STAT VR and V STAT magnet effect each other Tilt the V STAT magnet and adjust static con vergence to open or close the V STAT magnet When the V STAT magnet is moved in the direction of arrow and Red Green and Blue dots m...

Page 14: ... visible cross hatch 3 5 WHITE BALANCE Feed in the cross hatch pattern 1 2 3 Set BRIGHTNESS and PICTURE controls to miniium Turn RV704 B DRIVE and RV702 G DRIVE fully counterclockwise Set RV701 R BKG RV703 G BKG RV 705 B BKG and RV709 SUB BRT to mechanical center 7 3 Screen corner Convergence Turn RV706 SCREEN slowly to obtain a faintly visible cross hatch Note the color that frost becomes visible...

Page 15: ...erminal of TP85 via lT40 from the DC stabilized power source Confirm that the minimum voltage is less than 30 7V whereby the raster disappears during of hold down circuit NOTE when the hold down circuit starts operating switch OFF the POWER of the set im mediately T503 F B T I TP85 3 Hold down readjustment When step 2 is not satisfied readjustment should be performed by altering the resistance val...

Page 16: ... smaller resistance value a component marked with a Use a digital multimeter who input impedance is over 100MQ when confirming the voltage of TP85 B VOLTAGE CONFIRMATION The following adjustments should always be perform ed w hen replacing IC601 1 Supply 130tgV AC to with variable auto trans former 2 Receive Monoscope signals 3 Set the PICTURE and BRIGHTNESS controls in to Initial Reset 4 Confirm ...

Page 17: ...onnector blue out 5 Adjust RV303 SUB CONT so that voltage is 2 1 rt o o5vp p whrte 1 Receive an off air signal 2 Connect circuit between pin of IC301 H IN and pin of IC301 VCCZ with a jumper wire 3 Connect the frequency counter across Base of Q 550 and ground 4 Adjust RV501 for 15 734kHz t50Hz on the fre quency counter 5 Disconnect a jumper wire from IC301 Iv FREQ ADJUSTMENT v502 j 1 Receive an of...

Page 18: ...KV 13TR27 RM 781 MEMO ...

Page 19: ...6 l When replacing the part in below table be sure to per form the related adjustment Voltages are dc with respect to ground unless otherwise noted All voltages are in V Reading are taken with a color bar signal input Reading are taken with a NTSC 358 color bar signal input 9 Voltage variations may be noted due to normal produc tion tolerances B bus m 8 B bus signal path Voltage in audio circuit a...

Page 20: ......

Page 21: ......

Page 22: ... ES B3 U05G Vl QCS R E c 2SC3271 P CATmaE 4WWE CAT59Cll HP QCPL 3209 PC81 7 B 0 I m s 2SC3311 A QRS RGP02 17 CXAI 013AS STR D3035 KEY COOSV F RMllC IJ PD6325C 2SD2089 LBSONY LM7805CT LM7812CT M5F78M05L 2SAlOQl 0 2SB1212 P 2SC255 1 RO 2SDl812 P 2SDl812 Q 2SD2096 EF RU 3AM MC14066BCP 2SAll75 HFE 2SC2785 HFE TVR4J 27 ...

Page 23: ...48 79 n BVTP4x16 7 68566379 unetrame etune marque sontcritiques pourla securite Ne les remplacerque parune REF NU PART NO DESCRZPfION _ REMARK REF NO PART NO ___ I DESCRIPTION _ REMARh X 4030 231 1 CABINET SUB ASSY WITH BEZEL SUB ASSY 2j 18 4 029 195 01 BOSS A ADHESIVE iA 1331 045 A C BOARD COMPLETE 4 393 158 02 PANEL ORNAMENTAL 4 393 151 02 PLATE LIGHT GUIDE 4 393 157 01 EMBLEM N0 6 SONY 4 393 15...

Page 24: ... CERAMIC Cl35 l 102 074 00 CERAMIC Cl36 r 124 903 11 ELECT Cl37 l 124 903 11 ELECT Cl39 I 124 477 11 ELECT Cl40 l 102 121 00 CERAMIC C143 I 136 159 00 FILM Cl44 l 136 157 00 FILM Cl90 l 126 101 11 ELECT C201 l 126 101 11 ELECT C204 l 102 121 00 CERAMIC C241 l 124 907 11 ELECT IOMF O OOIMF 470MF 6iYF 0 047MF 47MF IOMF 7HF 47PF h olMF 1NF 47MF 0 0022MF E IDOMF IOOMF 0 0022MF REMARK 5ov E 5ov 5ov 2oo...

Page 25: ...CK FILM DIODE DlOf 8 719 123 25 DIODE RD33ES L3 0103 1 808 919 11 LED UNIT LEDU 9 with part number REMARK LEF NO PART NO DESCRIPTION _ D113 8 719 911 19 DIODE ISSI19 D114 8 719 911 19 DIODE lSS119 0115 g 719 109 74 DIODE RD4 3ES B D126 8 719 911 19 DIODE lSSII9 D127 8 719 911 19 DIODE lSSl19 D128 8 719 911 19 DIODE ISS119 D157 8 719 911 19 DIODE ISS119 D159 8 719 911 19 DIODE lSS119 0241 8 719 110...

Page 26: ... 8460 8 729 119 78 TRANSISTOR2SC2785 HFE 9501 8 729 140 50 TRANSISTOR2SC3209LK 8502 8 729 231 95 TRANSISTOR2SD2089 LBSONY 4 341 752 01 EYELET 8502 Q561 8 729 200 17 TRANSISTOR 2SA1091 0 Q562 8 729 119 78 TRANSISTOR 2SC2785 HFE 8601 8 729 209 03 TRANSISTOR 2SC2551 RO RESISTOR ROOI I 249 421 11 CARBON g f 1 4w R002 I 249 413 11 CARBON R004 I 249 413 11 CARBON 470 5 i R005 I 249 413 11 CARBON 470 5 1...

Page 27: ...K 5 R429 1 249 421 11 CARBON 223 I I R431 I 249 421 11 CARBON j l 249 420 11 CARBON 1 8K 5 I 247 887 00 CARBON 220K 5 1 4w R434 I 249 415 11 CARBON 680 5 p 1 4w R435 l 202 730 00 SOLID R436 1 249 423 11 CARBON g y 1 2w R437 1 249 429 11 CARBON K 5 i R438 I 249 417 11 CARBON 5 1 4w R439 1 249 429 11 CARBON 10K 5 1 4w R440 I 249 417 11 CARBON I 4W R441 1 249 421 11 CARBON 2K I 1 4w R445 I 249 423 11...

Page 28: ... RES ADJ CARBON IOK RV303 l 238 019 11 RES ADJ CARBON 47K RV401 I 238 012 11 RES ADJ CARBON IK RV402 1 238 012 11 RES ADJ CARBON 1K RV501 I 228 728 00 RES ADJ CERAMIC CARBON IOOK RV502 1 238 020 11 RES ADJ CARBON 1OOK RV503 l 238 014 11 RES ADJ CARBON 3 3K RELAY O SU T H A _LL OIJER 5102 I 571 532 21 SWITCH TACTIL S103 l 571 532 21 SWITCH TACTlL S104 1 571 532 21 SWITCH TACTIL S105 I 571 532 21 SW...

Page 29: ...722 00 RES ADJ CERAMIC CARBON 3 3K RV703 l 228 723 00 RES ADJ CERAMIC CARBON 4 7K RV704 I 228 722 00 RES ADJ CERAMIC CARBON 3 3K RV705 I 228 723 00 RES ADJ CERAMIC CARBON 4 7K RV706 l 230 641 11 RES ADJ METAL GLAZE 2 2N I I RV707 l 230 641 11 RES ADJ METAL GLAZE 2 2 I RV709 I 228 725 00 RES ADJ CERAMIC CARBON 22K I t MISCELLANEOUS t I X X x I ACCESSORIES AND PACKING MATERIALS XlfS f i PART NO DESC...

Reviews: