background image

9

 GB

KLV-37/32/26S550A/KLV-32S530A

4-130-985-

13

(1)

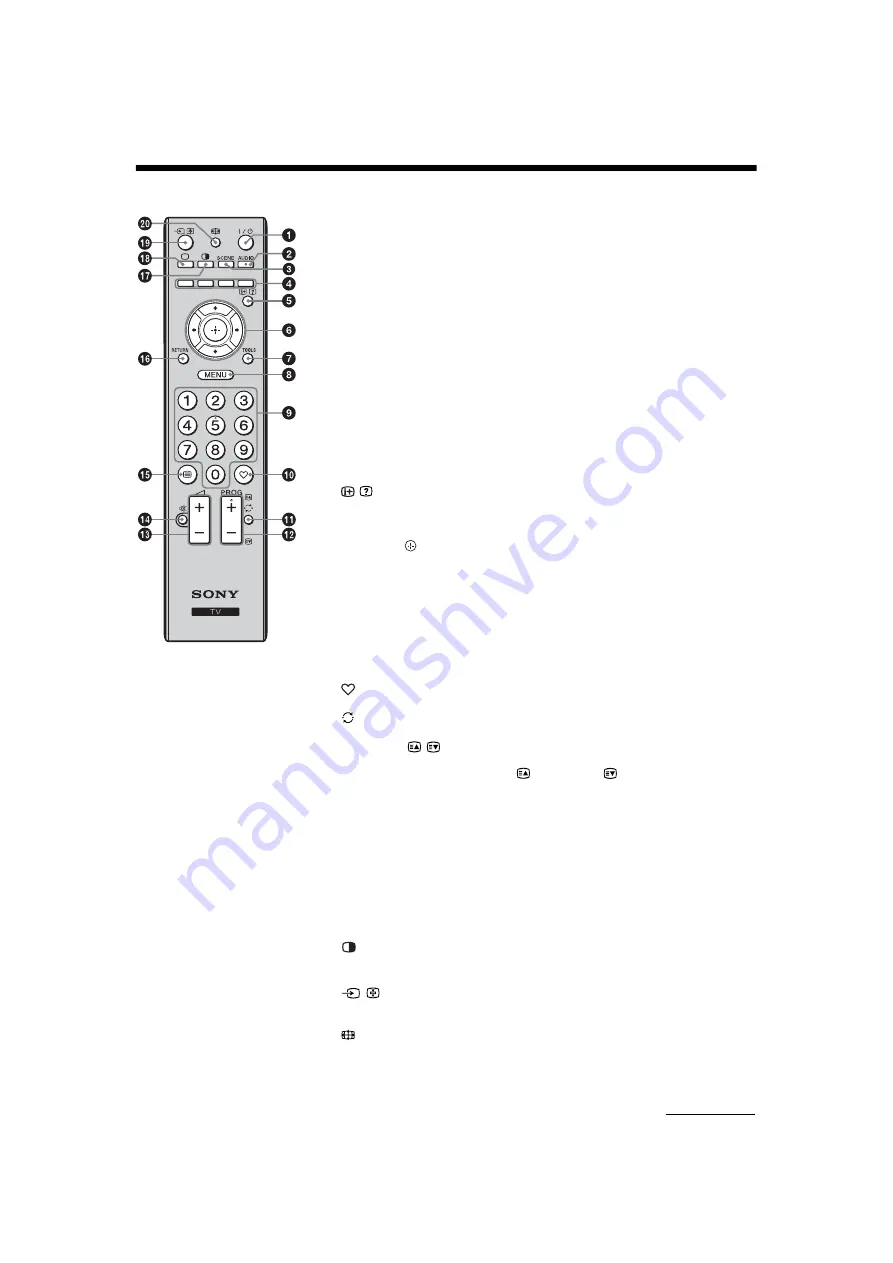
Overview of the remote

1

"/1

 – TV standby

Press to turn the TV on or to switch to standby mode.

2

AUDIO – Dual Sound (page 18)

3

SCENE – Scene Select mode

Press to display the “Scene Select” menu. When you select the desired scene 
option, the optimum sound and picture quality for selected scene are automatically 
set.

Sports:

 Delivers picture scenes that let you experience realistic picture and sound 

like those in a stadium.

Game:

 Delivers picture scenes that let you enjoy your game-playing experience 

to the fullest with superb picture and sound quality.

Cinema:

 Delivers picture scenes just like those in a theatre-like atmosphere with 

dynamic sound.

Music:

 Delivers sound effects that let you experience dynamic and clear sound 

like that at a concert.

General:

 Current user settings.

4

Coloured buttons

In Text mode: Accesses the corresponding coloured Fastext menu quickly and 
easily. The Fastext feature can be used only when the Fastext broadcast is 
available.

5

/

 – Info / Text reveal

• Displays information. Press once to display current channel number, scene 

mode and screen mode. Press again to remove the display from the screen.

• In Text mode: Reveals hidden information (e.g. answers to a quiz).

6

F

/

f

/

G

/

g

/

 – Item select / OK

• Selects or adjusts items.
• Confirms selected items.

7

TOOLS (page 10)

8

MENU

Displays or cancels the menu.

9

Number buttons

• Selects channels. For channel numbers 10 and above, enter the next digit 

quickly (page 21).

• In Text mode: Enters the three digit page number to select the page.

q;

 – Favourite list

Display the Favourite list that you have specified (page 16).

qa

 – Previous channel

Returns to the previous channel watched (for more than five seconds).

qs

PROG +/–/

/

• Selects the next (+) or previous (-) channel.
• In Text mode: Selects the next (

) or previous (

) page.

qd

2

 +/– – Volume

Adjusts volume.

qf

%


– Mute

Press to mute the sound. Press again to restore the sound.

z

• In standby mode, if you want to turn on the TV without sound, press this button.

qg

/

 – Text

In Text mode: Displays Text broadcast.
Each time you press 

/

, the display changes cyclically as follows:

Text 

t

 Text over the TV picture (mix mode) 

t

 No Text (exit the Text service)

qh

RETURN

Returns to the previous screen of any displayed menu.

qj

 – Twin Picture / PIP (page 14)

qk

a

 – TV mode

Exit Text mode, or switches to a TV display when displaying external input.

ql

/

 – Input select / Text hold

• Displays the connected equipment list and selects the input source (page 13).
• In Text mode: Holds the current page.

w;

 – Wide Mode

Changes the picture size. Press repeatedly to select the desired wide mode.

z

• The number 5,


PROG + and 

AUDIO buttons have tactile 
dots. Use the tactile dots as 
references when operating 
the TV.

Continued

Summary of Contents for KLV-26S550A

Page 1: ... 2009 Sony Corporation 4 130 985 13 1 KLV 37 32 26S550A KLV 32S530A 4 130 985 13 1 KLV 37S550A KLV 32S550A KLV 32S530A KLV 26S550A Operating Instructions LCD Colour TV ...

Page 2: ...ERGY RATING is a programme designed to promote energy efficient products and practices When the TV is initially set up it is designed to meet ENERGY RATING requirements while maintaining optimum picture quality Changes to certain features settings and functionalities of this TV e g Picture Sound and Eco settings can slightly change the power consumption Depending upon such changed settings the pow...

Page 3: ...icators 11 12 Using Optional Equipment Connecting optional equipment 12 Viewing pictures from the connected equipment 13 Viewing Twin Picture 14 Viewing PIP Picture in Picture 14 Using MENU Functions Navigating through menus 15 Listening to the FM Radio 15 Using the Favourite List 16 Settings adjustment 17 Picture menu 17 Sound menu 18 Screen menu 19 Set up menu 19 PC Settings menu 20 Channel Set ...

Page 4: ... people should place the TV onto the stand If using an electric screwdriver set the tightening torque at approximately 1 5N m 15kgf cm Ensure the AC power cord is away from screw holes during stand installation to avoid damage to the AC power cord 2 Connecting an antenna cable VCR Connecting an antenna cable Push and lift the cover to open 8 8 8 8 Connecting an antenna cable and VCR Antenna cable ...

Page 5: ... 4 Bundling the cables Do not bundle the AC power cord together with other cables 5 Performing the initial set up 1 Connect the TV to your AC power outlet 110 240 V AC 50 60 Hz New Zealand and Tunisia only 220 240 V AC 50 60 Hz 2 Press 1 on the TV When the TV is in standby mode the 1 standby indicator on the TV front panel is red press 1 on the remote to turn on the TV When you turn on the TV for ...

Page 6: ...ed on the TV go to step 8 8 Press MENU to exit The TV has now tuned in all the available channels 9 Press G g to select the desired setting in Display this menu next time dialogue then press to exit z If Yes is selected and the TV is turned off by pressing 1 on the TV or is disconnected from the AC power outlet the initial set up procedure restarts the next time the TV is turned on Watching TV 1 P...

Page 7: ...hown below AC power cord Handle the AC power cord and outlet as follows in order to avoid any risk of fire electrical shock or damage and or injuries Use only Sony supplied AC power cords not those of other brands Insert the plug fully into the AC power outlet Operate the TV set on a 110 240 V AC supply only New Zealand and Tunisia only 220 240 V AC When wiring cables be sure to unplug the AC powe...

Page 8: ...ubes Follow your local ordinances and regulations for disposal Handling and cleaning the screen surface cabinet of the TV set Be sure to unplug the AC power cord connected to the TV set from AC power outlet before cleaning To avoid material degradation or screen coating degradation observe the following precautions To remove dust from the screen surface cabinet wipe gently with a soft cloth If dus...

Page 9: ... G g Item select OK Selects or adjusts items Confirms selected items 7 TOOLS page 10 8 MENU Displays or cancels the menu 9 Number buttons Selects channels For channel numbers 10 and above enter the next digit quickly page 21 In Text mode Enters the three digit page number to select the page q Favourite list Display the Favourite list that you have specified page 16 qa Previous channel Returns to t...

Page 10: ...l 1 Stretches the original picture to fill the screen vertically Full 2 Stretches the Full 1 picture horizontally to fill the 16 9 screen Using the Tools menu Options Description Picture Mode See page 17 Sound Mode See page 18 Intelligent Picture See page 22 MPEG Noise Reduction See page 17 Speaker See page 19 Add to Favourites You can add the current channel to the favourite list Sleep Timer See ...

Page 11: ...lume In TV menu Moves through the options right or left 4 Input select OK Displays the connected equipment list and selects the input source page 13 In TV menu Selects the menu or option and confirms the setting 5 Displays or cancels the menu 6 Remote sensor Receives IR signals from the remote 7 Timer indicator Lights up in amber when the timer is set page 20 8 1 Standby indicator Lights up in red...

Page 12: ...ect a wide range of optional equipment to your TV The below terminals vary depending on TV models S VHS Hi8 DVC camcorder Digital video camcorder DVD player with HDMI output Home theatre system Blu ray disc player Video game equipment DVD player without component video output VCR DVD player with component video output DVD recorder PC VCR For service use only Headphones Not available for KLV 32S530...

Page 13: ...o the L MONO jack 1 D Connect to the video output jack to record the image from the TV Connect to the audio output jacks to record the sound from the TV on DVD recorder or VCR To turn off the sound of the TV speakers set Speaker to Audio System page 19 If you connect mono equipment connect to the L jack The monitor output jacks cannot support Component HDMI and PC signals source pictures also digi...

Page 14: ... feature by selecting Twin Picture from the Tools menu page 10 Viewing PIP Picture in Picture You can view two pictures PC input and TV programme on the screen simultaneously Connect a PC page 12 and make sure that images from a PC appear on the screen page 13 1 Press Two pictures are displayed simultaneously 2 Press number buttons or PROG to select the TV channel To return to single picture mode ...

Page 15: ...a channel select Edit Programme Labels then see page 21 3 External Inputs Selects equipment connected to your TV To watch the desired external input select the input source then press To assign a label to an external input select Edit Video Labels then see page 19 4 FM Radio Listens to the FM Radio page 15 5 Settings Displays the Settings menu where most of the advanced settings and adjustments ar...

Page 16: ... Radio appears display the Channel Set up menu and select FM Radio Set up to preset the desired FM radio stations page 23 To Do this The Favourite feature lets you select programmes from a list of up to 16 favourite channels that you specify 1 Press MENU 2 Press F f to select Favourites then press 3 Perform the desired operation as shown in the following table or displayed on the screen Favourite ...

Page 17: ...ed tones Hue can only be adjusted for an NTSC colour system e g U S A video tapes Colour Temperature Adjusts the whiteness of the picture Cool Gives the white colours a blue tint Neutral Gives the white colours a neutral tint Warm 1 Warm 2 Gives the white colours a red tint Warm 2 gives a redder tint than Warm 1 Warm 1 and Warm 2 are not available when Picture Mode is set to Vivid Sharpness Sharpe...

Page 18: ...level of the current input relative to other inputs Surround Choose either On surround Simulated Stereo stereo like monaural sound or Off Dual Sound Selects the sound from the speaker for a stereo or bilingual broadcast The selection varies depending on the Broadcasting If the signal is very weak the sound becomes monaural automatically If the stereo sound is noisy when receiving a NICAM programme...

Page 19: ...when Wide Mode is set to Wide Zoom or Zoom Set up menu Auto Start up Starts the initial set up procedure Usually you do not need to do this operation because it was done when the TV was first installed page 5 However this option allows you to repeat the process e g to retune the TV after moving house or to search for new channels that have been launched by broadcasters Language Selects the languag...

Page 20: ...preset data and the FM Radio preset data After completing this process the initial set up screen is displayed the next time you turn on the TV Completing auto tuning in initial set up will reset these settings To keep them select Cancel in the auto tuning confirmation dialogue Be sure not to turn the TV off during this period it takes about 30 seconds or press any buttons PC Settings menu Wide Mod...

Page 21: ...te Set up Allows you to set your favourite channels by assigning the desired channel numbers 1 Press F f to select your favourite channel number then press 2 Press F f to select your desired channel then press To reset the Favourite channels Select _ _ then press Repeat the procedure above to set other favourite channels Auto Tuning Tunes in all the available channels This option allows you to ret...

Page 22: ...l has been found the search will stop To continue searching press G g Repeat the procedure above to preset other channels manually Label Assigns a name of your choice up to five letters or numbers to the selected channel This name will be displayed briefly on the screen when the channel is selected To input characters follow steps 2 to 4 of Programme Labels page 21 AFT Allows you to fine tune the ...

Page 23: ... be able to improve the sound quality by pressing G g Press twice to store the FM radio station 3 You may edit the FM radio station label Press F f to select alphanumeric characters for the label then press 4 Repeat steps 1 to 3 to preset other FM radio stations To enable this feature access to FM Radio mode by using MENU page 15 then preset your desired FM radio stations according to the steps me...

Page 24: ...s supplied with the Wall Mount Bracket to properly carry out the installation Refer to Detaching the Table Top Stand from the TV page 6 Refer to TV installation dimensions table page 25 Refer to Screw and Hook locations diagram table page 26 Place the TV on the Table Top Stand when securing the Mounting Hook 2 0 1 5 1 0 5 0 2 0 1 5 1 0 5 0 Square hole SU WL500 Mounting Hook Screw PSW 6 16 Mounting...

Page 25: ... a c Screen centre point SU WL500 SU WL50B Screen centre point Model Name Display dimensions Screen centre dimension Length for each mounting angle Angle 0 Angle 20 A B C D E F G H SU WL500 SU WL50B SU WL500 SU WL50B SU WL500 SU WL50B SU WL500 only KLV 37S550A 927 574 140 193 432 484 156 157 324 542 468 KLV 32S550A KLV 32S530A 807 508 172 200 430 458 154 155 300 485 466 125 SU WL100 Screen centre ...

Page 26: ... KLV 26S550A a b a b a c b a c b c b a a c a b c c b a Screw location When installing the Mounting Hook on the TV SU WL500 Hook location When installing the TV onto the Base Bracket SU WL500 Base Bracket Hook SU WL50B SU WL50B SU WL100 Hook location a cannot be used for the models in the table below Hook location b cannot be used for the models in the table below Hook location a cannot be used for...

Page 27: ...the end of its serviceable life three to five years in normal use one to two years at the seaside Distorted picture dotted lines or stripes Keep the TV away from electrical noise sources such as cars motorcycles hair dryers or optional equipment When installing optional equipment leave some space between the optional equipment and the TV Check the antenna cable connection Keep the antenna cable aw...

Page 28: ...Output jacks Antenna 75 ohm external terminal 1 2 Video input phono jack 1 2 Audio input phono jacks 500 mVrms Impedance 47 kilohms Supported formats 1080p 50 60 Hz 1080i 50 60 Hz 720p 50 60 Hz 576p 576i 480p 480i Y 1 Vp p 75 ohms 0 3V sync negative PB CB 0 7 Vp p 75 ohms PR CR 0 7 Vp p 75 ohms Audio input phono jacks 500 mVrms Impedance 47 kilohms Video output phono jack Audio output phono jacks ...

Reviews: