background image

15

G

e

tting Started

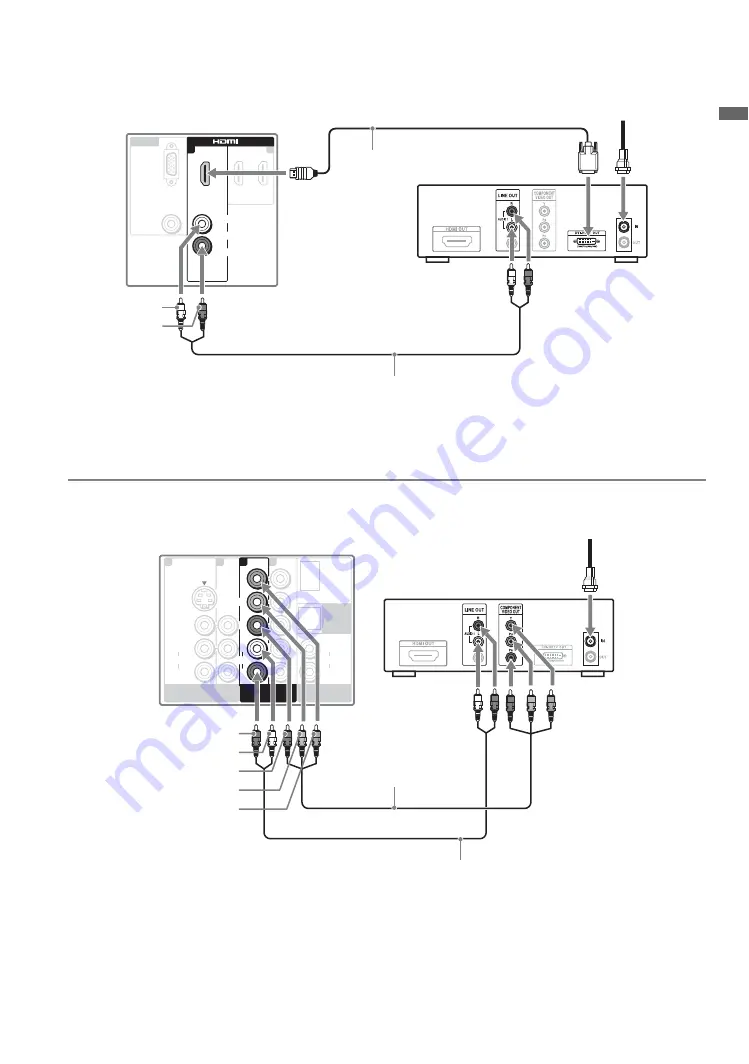
Shown with DVI Connection

~

• If the equipment has a DVI jack and not an HDMI jack, connect the DVI jack to the HDMI IN 1 (with DVI-to-HDMI 

cable or adapter) jack and connect the audio jack to the AUDIO IN (L/R) jacks of HDMI IN 1. For details, see 
page 13.

AUDIO

L

R

RGB

PC IN

AUDIO

1

2

IN

1

IN

AUDIO

L

R

Rear of TV

AUDIO-R 
(red)

AUDIO-L 
(white)

Audio cable

DVI-to-HDMI 
cable

HD cable box/
HD satellite box

CATV/Satellite 
antenna cable

VIDEO IN

AUDIO OUT

(VAR/FIX)

DIGITAL

OUT

(OPTICAL)

COMPONENT IN

(1080p/1080I/       

720p/480p/480I)

S VIDEO

VIDEO

AUDIO

L

(MONO)

R

AUDIO

L

R

AUDIO

L

R

P

R

P

B

Y

1

1

3

2

COMPONENT IN

AUDIO

L

R

P

R

P

B

Y

1

DMex/SERVICE

(1080p/1080i/       

720p/480p/480i)

Component video cable

Rear of TV

CATV/Satellite antenna cable

P

B

 (blue)

AUDIO-L (white)

AUDIO-R (red)

HD cable box/HD satellite box

Y (green)

P

R

 (red)

Audio cable

Shown with Component Connection

Summary of Contents for KDL-40VL130 - 40" Bravia Vl-series Lcd Television

Page 1: ... 2007 Sony Corporation LCD Digital Color TV 3 215 019 13 1 KDL 40VL130 KDL 46VL130 Operating Instructions ...

Page 2: ... may be blurred or show poor color due to moisture condensation In this case please wait a few hours to let the moisture evaporate before turning on the TV s To obtain the best picture do not expose the screen to direct illumination or direct sunlight It is recommended to use spot lighting directed down from the ceiling or to cover the windows that face the screen with opaque drapery It is desirab...

Page 3: ...Other Equipment 17 Using HDMI Control for BRAVIA Theatre Sync 18 Bundling the Connecting Cables 18 4 Setting Up the Channel List Initial Setup 19 Using the TV Features Remote Control and TV Controls Indicators 20 Inserting Batteries into the Remote Control 20 Remote Control and TV Controls 20 Indicators 24 Using P P Feature 25 To Display the Sub Window 25 To Change Inputs or Channels in the Window...

Page 4: ...d and cut causing a short circuit and resulting in a fire or an electric shock s Do not convert or damage the power cord s Do not allow anything to rest on or roll over the power cord s Do not move the TV with the power cord plugged in s Keep the power cord away from heat sources s When you disconnect the AC power cord disconnect it from the wall outlet first s Be sure to grasp the plug when disco...

Page 5: ...set Unplug the AC power cord when cleaning this TV If not it may result in electric shock Clean the cabinet of the TV with a dry soft cloth To remove dust from the screen wipe it gently with a soft cloth Stubborn stains may be removed with a cloth slightly dampened with a solution of mild soap and warm water Never use strong solvents such as thinner or benzine for cleaning If using a chemically pr...

Page 6: ...the Wall Mount Bracket be sure to use qualified contractors If not properly secured during installation or removal from the Wall Mount Bracket the TV may fall and cause serious injury Optional wall mount Observe the following when installing the TV using a Wall Mount Bracket s Be sure to follow the operating instructions supplied with the Wall Mount Bracket when installing the TV s Be sure to atta...

Page 7: ...e this condition s Do not expose the LCD screen surface to direct sunlight Doing so may damage the LCD panel s Do not push or scratch the LCD screen or place objects on top of the TV The image may be uneven or the LCD panel may be damaged s If the TV is used in a cold place a smear may occur in the picture or the picture may become dark This does not indicate a failure These phenomena improve as t...

Page 8: ...etup Guide enclosed separately illustrates how to connect other optional equipment Picture Quality and Aspect Ratio You can enjoy crisp clear images smooth movement and high impact visuals from 1080 HD signals When you compare a high definition signal to a standard analog signal you will notice a big difference The 1080 HD signals provide more than twice the vertical resolution of the standard TV ...

Page 9: ...tings timer picture sound screen and other options see page 28 for customization options TV Channels available channels are displayed on the vertical Category Object Bar External Inputs cable satellite VCR DVD players or other inputs can also be selected from the Category Object Bar for the External Inputs This manual is for the 40 and 46 inch BRAVIA KDL V Series models with screen size measured d...

Page 10: ...om the TV 3 Secure the Mounting Hook to the rear of the TV 4 Adjust the angle of the Mounting Hook 5 When screws are removed lift the TV off the stand Make sure that you carry out this task with at least two people Do not attempt to lift the TV by yourself Do not remove the Table Top Stand for any reason other than to wall mount the TV When using an electric screwdriver set the torque setting to a...

Page 11: ...lug adapter not supplied While headphones are connected the TV speakers are muted 2 VIDEO IN 2 VIDEO R AUDIO L MONO Connects to the composite video and audio output jacks on your camcorder or other video equipment such as a VCR or video game equipment If you have mono equipment connect its audio output jack to the TV s L MONO audio input jack VIDEO IN 2 VIDEO AUDIO L MONO R 1 2 ...

Page 12: ... Macintosh computers it may be necessary to use an adapter not supplied If this is the case connect the adapter to the computer before connecting the HD15 HD15 cable with ferrite core If the picture is noisy flickering or not clear adjust Phase and Pitch of Screen settings on page 32 VIDEO IN AUDIO OUT VAR FIX DIGITAL OUT OPTICAL COMPONENT IN 1080p 1080i 720p 480p 480i S VIDEO VIDEO AUDIO L MONO R...

Page 13: ...omposite video 5 connection If both composite video and S VIDEO are connected S VIDEO signal has priority 5 VIDEO IN 1 3 VIDEO L MONO AUDIO R Connects to the composite video and audio output jacks on your A V equipment such as a VCR or other video equipment A third composite video and audio VIDEO IN 2 is located on the left side of the TV 6 COMPONENT IN 1 2 1080p 1080i 720p 480p 480i L AUDIO R Con...

Page 14: ...een the cable and over the air antenna programming as indicated below Be sure to set the Cable setting to On or Off in the Channel settings for the type of input signal you choose see page 33 You can also enjoy high definition programming by subscribing to a high definition cable service or a high definition satellite service For the best possible picture make sure you connect this equipment to yo...

Page 15: ... AUDIO R red AUDIO L white Audio cable DVI to HDMI cable HD cable box HD satellite box CATV Satellite antenna cable VIDEO IN AUDIO OUT VAR FIX DIGITAL OUT OPTICAL COMPONENT IN 1080p 1080I 720p 480p 480I S VIDEO VIDEO AUDIO L MONO R AUDIO L R AUDIO L R PR PB Y 1 1 3 2 COMPONENT IN AUDIO L R PR PB Y 1 DMex SERVICE 1080p 1080i 720p 480p 480i Component video cable Rear of TV CATV Satellite antenna cab...

Page 16: ...ced signals For the best picture quality it is recommended to use the signals boldfaced in the above chart with a 60 Hz vertical frequency from a personal computer In plug and play signals with a 60 Hz vertical frequency will be detected automatically PC reboot may be necessary PC AUDIO L R RGB PC IN AUDIO 1 2 IN HD15 HD15 cable analog RGB Audio cable stereo mini plugs Rear of TV Connect to an HDM...

Page 17: ... RGB PC IN AUDIO 1 3 IN VIDEO IN AUDIO OUT VAR FIX DIGITAL OUT OPTICAL COMPONENT IN 1080p 1080i 720p 480p 480i S VIDEO VIDEO AUDIO L MONO R AUDIO L R 1 1 RGB PC IN AUDIO 1 2 IN AUDIO L R PR PB Y VIDEO IN 2 VIDEO AUDIO L MONO R DVD player Personal computer Digital satellite receiver VHF UHF CABLE Digital audio equipment Analog audio equipment A V Receiver Home Theater Digital recorder VCR Camcorder...

Page 18: ...available Turn off the equipment automatically when you turn off the TV When the connected equipment is turned on by One Touch Play the TV will automatically turn on and select the respective HDMI input Automatically turn on equipment listed under the External Inputs on the XMB when selected see pages 9 and 26 When a Sony A V receiver with BRAVIA Theatre Sync is connected the following additional ...

Page 19: ...turned back on The Auto Program may be canceled while the channels are being scanned Press RETURN first then press either B b on the remote control highlight Yes to cancel or No to resume Auto Program To Run Initial Setup Again or Auto Program at a Later Time Select the Initial Setup feature from the XMB or refer to the Initial Setup described on page 38 To run Auto Program see page 34 To Add Digi...

Page 20: ...he TV displays the time in minutes Off 15min 30min 45min 60min 90min or 120min that you want the TV to remain on before shutting off To cancel Sleep Timer press SLEEP repeatedly until Off appears 3 THEATER Press to turn on and off the Theater Mode The picture settings will be set for a cinema like experience and the audio will be switched to the audio output of the attached speakers of your BRAVIA...

Page 21: ...e of Channel removed from Favorites will appear for a few seconds Your Favorites list will be cleared each time you run Auto Program see pages 19 and 34 for Auto Program 6 RETURN Press to go back to the previous screen or exit from the screen when displaying menu items and settings While the P P feature is active pressing RETURN will exit from the screen see page 25 7 HOME Press to display the TV ...

Page 22: ... Wide Mode settings can be also accessed in the Screen settings see page 31 Changing the Wide Screen Mode For PC timing see below Changing the Wide Screen Mode for PC Timing Button Description qs qd qf qa 4 3 Original source Standard definition source 16 9 Original source High definition source m m Wide Zoom Wide Zoom Normal Normal Full Full Zoom Zoom Incoming PC signal Incoming PC signal m m Norm...

Page 23: ...convenient functions and menu shortcuts The option menu items vary based on input and content Detailed information of digital rating will appear if Digital Rating is selected when an icon to inform you the digital rating information appears ql CC Press to turn on and off Closed Captions CC To change or customize CC Display see page 34 w JUMP Press to jump back and forth between two channels The TV...

Page 24: ...tails see page 28 3 STANDBY LED Lights up in red when your TV is in PC standby mode If the LED blinks in red continuously this may indicate the TV needs servicing see contacting Sony information on the back cover 4 POWER LED Lights up in green when the TV is turned on 5 IR Infrared Receiver Light Sensor Receives IR signals from the remote control Senses room light level and adjusts the screen brig...

Page 25: ...80p signal cannot be displayed for Component 1 2 in the sub window Press B b to highlight the window to change and press INPUT to select the input to watch or press CH to change channels or enter the channel number using the 0 9 numeric buttons You may also press JUMP to change channels Inputs with Skip applied will not appear in the list of External Inputs see page 37 for External Inputs settings...

Page 26: ...ons vary depending on the situations and conditions applied Unavailable options are grayed out or not displayed Watching TV Select a channel You can also select a TV channel using the number 0 9 or CH buttons see remote control section pages 21 and 23 Accessing the Equipment Connected to Your TV Watch a movie play a game record a program or work on your PC Assign a label using the Label Inputs fea...

Page 27: ...RETURN or HOME to exit HOME Settings Available channels are listed under the TV icon Select inputs from Video1 3 Component 1 2 HDMI 1 2 PC under the External Inputs icon Available TV settings and features are listed under the Settings icon CC Product Support page 28 Clock Timers page 28 Picture page 28 Sound page 30 Screen page 31 Video Options page 32 Audio Options page 33 Channel page 33 Closed ...

Page 28: ...me you set After this is executed the TV will turn off at the specified time you set 1 Use the V v B b button to highlight the Timer icon and press 2 Press to select On to set the timer 3 Use the V v B b button to set the following Day of the Week Time Duration Channel and TV On Volume 4 Press RETURN to display the confirmation screen 5 Select Yes or No to save changes you made Selecting Yes will ...

Page 29: ... DVDs and Digital TV channels DRC Mode High Density Creates a high resolution picture with 4 x density for high quality sources i e DVD player satellite receiver Progressive Recommended for still pictures Off Turns off DRC Mode DRC Mode is available only with 480i source DRC Mode is not available when Game Text Mode is set to On DRC Palette Allows you to customize the level of detail Reality and s...

Page 30: ...oise Reduction MPEG Noise Reduction DRC Mode DRC Palette and Detail Enhancer are not available Sound Settings Sound Mode Dynamic Enhances treble and bass Standard Suitable for spoken dialog Custom Customizes the sound settings including the Sound Booster setting Sound Mode can also be accessed by pressing OPTIONS on the remote control Reset Resets the current Sound Mode setting to the default valu...

Page 31: ... you select Off Off Turns off Auto Wide Choose a screen mode from the Wide Mode option 4 3 Default Select the default screen mode to use for 4 3 sources Wide Zoom Enlarges the 4 3 picture to fill the 16 9 screen displaying as much of the original image as possible Normal Displays the 4 3 picture in its original aspect ratio Full Enlarges the 4 3 picture horizontally only to fill the screen Zoom En...

Page 32: ...entering then press Wide Mode Normal Displays the picture in its original resolution and aspect ratio Full 1 Enlarges the picture to fill the screen while maintaining its original aspect ratio Full 2 Enlarges the picture to fill the screen Wide Mode can also be accessed by pressing WIDE on the remote control See WIDE button description on page 22 for accessing Wide Mode Screen settings for PC Timi...

Page 33: ...an external audio system for the TV sound By selecting this option you are disabling the TV speakers Audio Out Easy control of volume adjustment Fixed Select to fix the audio output and allow you to adjust the volume with your audio system s remote control The TV s remote control s VOL and MUTING buttons have no effect on Audio Out Variable Select to control the Audio Out s volume and muting with ...

Page 34: ...nnel Labels Assigns labels such as station call letters to channel numbers 1 Press V v to scroll through the channel numbers Then press to select the channel number to assign a label 2 Press V v to scroll through the label characters A Z 0 9 etc Press b to move to the next character Repeat to add up to 7 characters to the label Press to set it To assign labels to more channels repeat steps 1 2 Clo...

Page 35: ...ting Off Turns off Parental Lock No programs are blocked from viewing based on their ratings Child Maximum ratings permitted are U S TV Y TV G G Canada C G TV Y Youth Maximum ratings permitted are U S TV PG PG Canada C8 PG 8 ans TV PG Young Adult Maximum ratings permitted are U S TV 14 PG 13 Canada 14 13 ans TV 14 Custom Sets ratings manually U S See page 36 for details Canada See page 36 for deta...

Page 36: ... TV Rating Block programs by their rating content or both Age Based Ratings TV Y All children TV Y7 Directed to children age 7 and older TV G General audience TV PG Parental guidance suggested TV 14 Parents strongly cautioned TV MA Mature audience only Content Based Ratings FV Fantasy violence D Suggestive dialogue L Strong language S Sexual situations V Violence To ensure maximum blocking capabil...

Page 37: ... from the following labels for each input Video 1 3 Component 1 2 and HDMI 1 2 DVD Cable Box Satellite BD VCR Receiver DVR Game Camcorder PC Skip PC Skip indicates that no labels are assigned HDMI Settings HDMI Control On Off feature allows your TV to communicate with other equipment that supports HDMI Control Device Auto Power Off Select On to have your connected HDMI Control equipment to power o...

Page 38: ...must be set to On Power Saving Reduces the power consumption by adjusting the backlight brightness This also enhances the black level Select from Off Low High and Picture Off Light Sensor Enables the automatic picture screen brightness control Light Sensor measures the room brightness which allows the TV to automatically adjust the backlight brightness based on the picture settings and the ambient...

Page 39: ...re from some video sources Check the connection between the optional video equipment and the TV Press INPUT on the remote control see page 23 Press HOME on the remote control Select your desired input from the External Inputs list Poor picture The quality of the images is not as good as what I saw at the store Picture quality depends on the signal content See Quick Setup Guide supplied to display ...

Page 40: ...o other than Off If you want to lock in Wide Mode selected with the WIDE button on the remote control set 4 3 Default to Off in the Screen settings see page 31 Check Auto Wide in the Screen settings see page 31 Suddenly the picture gets smaller The picture gets smaller during the commercials this is due to the method the provider broadcasts their contents When HD content channels switch to SD defi...

Page 41: ...cable channels Check with your cable company for more information The digital cable channel may be set to Hidden in the Show Hide Channels setting see page 34 Lost password Select the Password settings on the Parental Lock settings then enter the following master password 4357 The master password clears your previous password and allows you to enter a new password see page 35 How to reset the TV t...

Page 42: ...80 24p Audio Two channel linear PCM 32 44 1 and 48 kHz 16 20 and 24bits Dolby Digital AUDIO HDMI IN 1 only 500 mVrms 100 modulation Impedance 47 kilohms AUDIO OUT 500 mVrms 100 modulation Fixed 1 Vrms at the maximum volume setting Variable DIGITAL OUT OPTICAL Optical Digital Audio Output PCM Dolby Digital PC IN D sub 15 pin analog RGB 0 7 Vp p 75 ohms positive See the PC Input Signal Reference Cha...

Page 43: ...ecuring screw 1 Wood screw 1 Cable holder 1 attached to the TV Operating Instructions 1 Quick Setup Guide 1 Installing the Wall Mount Bracket 1 Warranty Card 1 Online Registration Card U S A only 1 Optional accessories Headphones plug adapter Connecting cables Wall Mount Bracket SU WL500 KDL 40VL130 KDL 46VL130 TV Stand RHT G800 KDL 40VL130 KDL 46VL130 SU FL300M KDL 40VL130 KDL 46VL130 SU FL300L K...

Page 44: ... the TV on a wall 10 J JUMP button 23 L Label Inputs 37 Language 38 Light Sensor 38 M Movie Rating 36 MPEG Noise Reduction 29 MTS 33 MUTING button 22 N Noise Reduction 29 O OPTIONS button 23 P P P 25 Password 35 PC IN jack 12 PC Power Management 38 Phase 32 PIC OFF TIMER LED 24 Picture 29 PICTURE button 23 Picture Mode 28 Pitch 32 POWER button 22 POWER LED 24 Power Saving 38 R Rating 35 Reset 29 3...

Page 45: ......

Page 46: ......

Page 47: ......

Page 48: ...de z Experience difficulty operating your television Contact Sony Customer Support at http www sony com tvsupport or to speak with a support representative United States 1 800 222 SONY 7669 Canada 1 877 899 SONY 7669 Sony will work to resolve your questions more quickly than your retailer or place of purchase Please Do Not Return the Product to the Store Printed in U S A ...

Reviews: