background image

34

GB

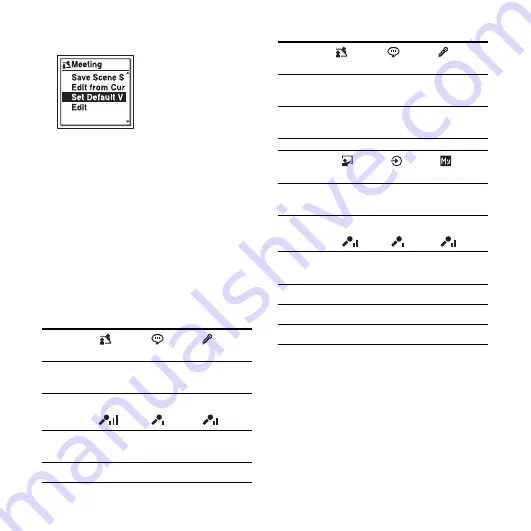
“Default Value?” will be displayed.

2

Press 

v

 or 

V

 on the control button to 

select “Execute,” and then press 

N

/

ENT.

The menu item settings will be set to the 
default settings.

3

Press 

x

STOP to exit the menu mode.

Default settings

For details on the menu items and settings, 
see pages 70 through 71.

(Meeting)

 (Voice 

Notes)

(Interview)

REC Mode MP3 

192kbps

MP3 
128kbps

MP3 
192kbps

Mic 
Sensitivity

High

Low

Medium

LCF(Low 
Cut)

ON

ON

ON

VOR

OFF

OFF

OFF

SYNC 
REC

OFF

OFF

OFF

Select 
Input

MIC IN

MIC IN

MIC IN


(Lecture)

(Audio 

IN)

 (My 

Scene)

REC Mode

MP3 
192kbps

MP3 
192kbps

MP3 
192kbps

Mic 
Sensitivity

Medium

Low

Medium

LCF(Low 
Cut)

OFF

OFF

OFF

VOR

OFF

OFF

OFF

SYNC REC OFF

ON

OFF

Select Input MIC IN

Audio IN MIC IN

(Meeting)

 (Voice 

Notes)

(Interview)

Summary of Contents for ICD-UX512

Page 1: ...IC Recorder Operating Instructions Getting Started Basic Operations Other Recording Operations Other Playback Operations Editing Files About the Menu Function Utilizing Your Computer Additional Information Troubleshooting Index ...

Page 2: ...ence by one or more of the following measures Reorient or relocate the receiving antenna Increase the separation between the equipment and receiver Connect the equipment into an outlet on a circuit different from that to which the receiver is connected Consult the dealer or an experienced radio TV technician for help You are cautioned that any changes or modifications not expressly approved in thi...

Page 3: ...r IC recorders The recorded music is limited to private use only Use of the music beyond this limit requires permission of the copyright holders Sony is not responsible for incomplete recording downloading or damaged data due to problems of the IC recorder or computer Depending on the types of the text and characters the text shown on the IC recorder may not be displayed properly on device This is...

Page 4: ...emark of Sony Corporation Nuance the Nuance logo Dragon Dragon NaturallySpeaking and RealSpeak are trademarks and or registered trademarks of Nuance Communications Inc and or its affiliates in the United States and or other countries US and foreign patents licensed from Dolby Laboratories All other trademarks and registered trademarks are trademarks or registered trademarks of their respective hol...

Page 5: ...tions Recording 19 Listening 23 Erasing 28 Other Recording Operations Changing the Recording Settings 30 Selecting a recording scene for each situation 30 Starting to record automatically in response to sound the VOR function 35 Recording on a Memory Card 36 Recording via Other Devices 40 Recording with an external microphone 40 Recording from other equipment 41 Operation during Recording 44 Monit...

Page 6: ...nu 66 Menu Settings 67 Utilizing Your Computer Using the IC Recorder with Your Computer 80 Connecting the IC recorder to your computer 80 Structure of folders and files 81 Disconnecting the IC recorder from your computer 85 Copying Files from the IC Recorder to Your Computer 86 Copying Music Files from Your Computer to the IC Recorder and Playing Them Back 87 Copying a music file from your compute...

Page 7: ...necting the IC recorder from the AC outlet 96 Precautions 97 Specifications 100 System requirements 100 Design and specifications 101 Battery life 104 Troubleshooting Troubleshooting 105 Message List 114 System Limitations 118 Display Window Guide 119 Index 124 ...

Page 8: ...pport cable 1 If the IC recorder cannot be connected to a computer directly use the supplied USB connection support cable NH AAA size AAA rechargeable battery 1 Battery case 1 Application software Sound Organizer CD ROM 1 Operating Instructions You are cautioned that any changes or modifications not expressly approved in this manual could void your authority to operate this equipment ...

Page 9: ...tton H folder button I MENU NOISE CUT button J m microphone jack K i headphone jack L ERASE button M VOL volume button N repeat A B button O T MARK Track mark button Rear P Strap hole A strap is not supplied Q Speaker R USB slide lever S HOLD POWER switch T DPC SPEED CTRL switch U M2 microSD memory card slot V Battery compartment These buttons and the jack have a tactile dot Use it as a reference ...

Page 10: ...ll appear for approximately 3 seconds indicating that all the button operations are disabled To release the IC recorder from the HOLD status Slide the HOLD POWER switch towards the center P Note When the HOLD function is activated during recording all the button operations are disabled To stop recording cancel the HOLD function first z Tip Even if the HOLD function is activated you can stop the al...

Page 11: ...battery 1 1 Insert a rechargeable battery Slide and lift the battery compartment lid insert an NH AAA rechargeable battery with correct polarity and close the lid 2 Connect the IC recorder to your computer Slide the USB slide lever on the back of the IC recorder in the direction of the arrow and insert the USB DIRECT connector into the USB port of a running computer 2 While the battery is charging...

Page 12: ... to Trash and drop it there For details on disconnecting the IC recorder from your computer refer to the operating instructions supplied with your computer 3 Disconnect the IC recorder from the USB port of the computer and slide the USB slide lever in the direction of the arrow to retract the USB DIRECT connector 1 This is an approximation for the time it takes to charge from no remaining battery ...

Page 13: ...ed or alarm settings are not erased even when you remove the battery When replacing the battery the clock continues moving for about 1 minute after you remove the battery Recharging the battery using a USB AC adaptor You can also charge the battery by using an AC U501AD USB AC adaptor etc not supplied page 95 When to charge replace the battery The battery indicator on the display shows the battery...

Page 14: ...onds and Power Off animation is displayed z Tips When you are not going to use the IC recorder for a long time we recommend to turn off the IC recorder When the IC recorder is in the stop mode and you leave the IC recorder without attempting an operation for a certain length of time the auto power off function will take effect The length of time before auto power off is set to 10min when you purch...

Page 15: ...ns to flash in the clock setting display window Setting the clock after recharging the battery 1 Press v or V on the control button to set the year month day hour and minute in sequence and then press N ENT Select the last two digits of the year when you set the year 2 Press x STOP to return to the stop mode display Setting the clock using the menu While the IC recorder is in the stop mode you can...

Page 16: ... N ENT When you selected Auto the clock is automatically adjusted using the clock in the computer connected to the IC recorder and on which the supplied Sound Organizer software is started When you select Manual proceed to the next steps 3 Press v or V on the control button to select 10y1m1d and then press N ENT 4 Press v or V on the control button to set the year month day hour and minute in sequ...

Page 17: ...entering the clock setting data the clock setting mode is canceled and the window will return to the display of the stop mode To display the current date and time While the IC recorder is in the stop mode press x STOP to display the current date and time for about 3 seconds ...

Page 18: ... names etc from 3 languages 1 Select the IC recorder setting tab t Language in the menu and then press N ENT 2 Press v or V on the control button to select the language that you want to use and then press N ENT You can select the following languages English Español Spanish Français French 3 Press x STOP to exit the menu mode x STOP N ENT v V ...

Page 19: ...ch as your finger etc accidentally rubs or scratches the IC recorder during recording z Tip Before you start recording we recommend you make a trial recording first or monitor the recording page 44 Selecting a folder 1 Slide the HOLD POWER switch towards the center to release the IC recorder from the HOLD status page 10 2 Press to display the folder selection window ...

Page 20: ... recorder The Music tab and the Podcast tab will be displayed when you transfer files from your computer page 87 91 The Built in memory tab will be displayed when you insert a memory card into the IC recorder page 37 4 Press v or V on the control button to select the folder in which you want to record files When you purchase the IC recorder there are 5 folders already available FOLDER01 05 v V v V...

Page 21: ...lt in microphones face the direction of the source to be recorded 2 Press z REC PAUSE in the stop mode The operation indicator lights in red You do not need to press and hold z REC PAUSE while recording The new file will be automatically recorded after the last recorded file N ENT Operation indicator z REC PAUSE ...

Page 22: ...ing file pause recording Press z REC PAUSE During recording pause the operation indicator flashes in red and begins to flash in the display window release pause and resume recording Press z REC PAUSE again Recording resumes from that point To stop recording after pausing recording press x STOP review the current recording instantly Press N ENT Recording stops and playback starts from the beginning...

Page 23: ...enter to release the IC recorder from the HOLD status page 10 2 Press 3 Press on the control button press v or V on the control button to select the Voice tab the Music tab or the Podcast tab and then press on the control button 4 Press v or V on the control button to select the folder v V v V ...

Page 24: ... to select the file you want to play 7 Press N ENT Playback will start soon and the operation indicator will light in green When LED is set to OFF in the menu page 76 the operation indicator does not light 8 Press VOL to adjust the volume v V Operation indicator N ENT VOL ...

Page 25: ...p mode keep the button pressed to go back the files continuously 3 skip to the next file Press on the control button once 1 2 skip to the succeeding files Press on the control button repeatedly During the stop mode keep the button pressed to skip the files continuously 3 1 When a track mark is set the IC recorder goes backward or forward to the track mark before or after the current point page 59 ...

Page 26: ...c files transferred from your computer Podcast Playback only area This is the area used to manage podcast files transferred from your computer Built in memory or External memory You can switch between the built in memory and external memory memory card of the IC recorder page 38 Only the Voice tab will be displayed when you purchase the IC recorder The Music tab and the Podcast tab will be display...

Page 27: ...ding date Date recorded Recording time Time recorded C Remaining recording time Displays the remaining recording time in hours minutes and seconds If there is more than 10 hours time remaining the time is displayed in hours If there is more than 10 minutes and less than 10 hours time remaining the time is displayed in hours and minutes If there is less than 10 minutes time remaining the time is di...

Page 28: ...OWER switch towards the center to release the IC recorder from the HOLD status page 10 2 Select the file you want to erase when the IC recorder is in the stop or playback mode 3 Press ERASE Erase is displayed and the specified file is played back for confirmation 4 Press v or V on the control button to select Execute ERASE v V ...

Page 29: ...first page 62 and then proceed with steps 2 through 5 in Selecting a file and erasing it 5 Press N ENT The Erasing animation appears in the display window and the selected file will be erased When a file is erased the remaining files will advance so that there will be no space between files 1 Select Cancel in step 4 of Selecting a file and erasing it and then press N ENT N ENT N ENT ...

Page 30: ...age 70 etc to the recommended settings in bulk You can change the settings for each item 1 Select the Recording tab t Scene Select in the menu and then press N ENT The Scene Select window will be displayed 2 Press v or V on the control button to select a scene you want and then press N ENT 3 Press v or V on the control button to select Save Scene Setting and then press N ENT 4 Press x STOP to exit...

Page 31: ...an record with clear low noise sound without vibration noise from the desk Meeting To record in a variety of situations such as recording in a spacious conference room Voice Notes To record dictation with a microphone in front of your mouth Interview To record human voice at a distance of 1 to 2 meters 40 to 80 in Lecture To record a wide range of sound such as a lecture in a classroom or a chorus...

Page 32: ...music performance By attaching a tripod not supplied or placing the recorder on a stand or table you can adjust the angle of the IC recorder and the built in microphones more precisely When recording a chorus or piano performance for example place the IC recorder on a table approximately 2 to 3 meters 80 to 120 in from the performer s Set up the IC recorder with the display window facing up and wi...

Page 33: ...utton to select a setting item and then press N ENT For details on the menu items and settings see pages 70 through 71 4 Press v or V on the control button to select Edit Complete and then press N ENT 5 Press x STOP to exit the menu mode P Note Even if the settings are changed the selection of the scene will be continued To set the menu item settings of the Scene Select to the default values 1 Sel...

Page 34: ...settings see pages 70 through 71 Meeting Voice Notes Interview REC Mode MP3 192kbps MP3 128kbps MP3 192kbps Mic Sensitivity High Low Medium LCF Low Cut ON ON ON VOR OFF OFF OFF SYNC REC OFF OFF OFF Select Input MIC IN MIC IN MIC IN Lecture Audio IN My Scene REC Mode MP3 192kbps MP3 192kbps MP3 192kbps Mic Sensitivity Medium Low Medium LCF Low Cut OFF OFF OFF VOR OFF OFF OFF SYNC REC OFF ON OFF Sel...

Page 35: ...urchase the IC recorder 3 Press x STOP to exit the menu mode 4 Press z REC PAUSE appears in the display window The recording pauses when no sound is detected and flashes When the IC recorder detects sound again the recording starts again To cancel the VOR function Set VOR to OFF in step 2 P Notes The VOR function is affected by the sound around you Set Mic Sensitivity in the menu according to the ...

Page 36: ...ted The microSD microSDHC cards that have been tested according to our standards are as follows microSD microSDHC cards a Operation tested Operation not tested As of September 2010 For ICD UX512 the operational tests performed were using memory cards available as of September 2010 N ENT x STOP v V Insert M2 with the terminal side facing toward you Insert microSD card with the label side facing tow...

Page 37: ...ains no data 1 Open the cover of the memory card slot in the stop mode 2 Insert an M2 or microSD card in the direction shown in the illustration on page 36 securely to the end of the slot until it clicks into place Then close the cover To remove a memory card Push the memory card into the slot When it pops out remove it from the memory card slot Structure of folders and files 5 folders are created...

Page 38: ... the Built in memory tab and then press N ENT 3 Press v or V on the control button to select Memory Card and then press N ENT The Built in memory tab changes to the External memory tab and then the folder selection window will be displayed 4 Press x STOP to return to the stop mode display To use the built in memory Select Built In Memory in step 3 To switch the IC recorder destination to the memor...

Page 39: ...eed to step 5 3 When the memory card is not formatted select the IC recorder setting tab t Format in the menu and then press N ENT Erase All Data will be displayed 4 Press v or V on the control button to select Execute and then press N ENT 5 Press x STOP to exit the menu mode To use the built in memory Select Built In Memory in step 2 To start recording Select the folder and then press z REC PAUSE...

Page 40: ...n to select MIC IN and then press N ENT Select Input is set to MIC IN when you purchase the IC recorder 3 Press x STOP to exit the menu mode 4 Press z REC PAUSE to start recording The built in microphones are automatically cut off If the input level is not strong enough adjust the Mic Sensitivity setting on the IC recorder When a plug in power type microphone is connected power is automatically su...

Page 41: ...f the beep of the telephone or a dial tone is recorded the conversation may be recorded with lower level of sound In this case start recording after the conversation has started The VOR function page 35 may not work depending on the kind of telephone or the line condition We assume no responsibility whatsoever for any inconvenience even if you cannot record a conversation using the IC recorder Rec...

Page 42: ...t menu the SYNC REC is already set to ON 1 Select the Recording tab t SYNC REC in the menu and then press N ENT 2 Press v or V on the control button to select ON and then press N ENT SYNC REC is set to OFF when you purchase the IC recorder 3 Press x STOP to exit the menu mode 4 Connect other equipment to the IC recorder when the IC recorder is in the stop mode Connect the audio output connector st...

Page 43: ...not pause recording page 22 record with the VOR function page 35 and add a track mark page 59 Depending on the piece of equipment connected to the IC recorder the synchronized recording function may not operate properly due to a difference in the audio input level When recording from other equipment the Mic Sensitivity setting cannot be changed To record without using the synchronized recording fu...

Page 44: ...he recording You can adjust the monitoring volume by pressing VOL but the recording level is fixed P Note When the cord of the headphones touches the IC recorder while you are monitoring the recording the IC recorder may record a rustling noise The rustling noise can be reduced by holding the cord away from the IC recorder i headphone jack VOL ...

Page 45: ... is useful for locating a desired point in a long recording Searching forward backward during playback Cue Review To search forward Cue Press and hold on the control button during playback and release it at the point you wish to resume playback To search backward Review Press and hold on the control button during playback and release it at the point you wish to resume playback The IC recorder sear...

Page 46: ...th clear sound quality because the noise of all frequency bands including a human voice is reduced P Notes The effect of the noise cut function may be different depending on the condition of the recorded voice When you are using the built in speaker the noise cut function does not work When the noise cut function is effective the effect function does not work When you are listening an AAC LC and W...

Page 47: ... the playback speed in a range from 0 50 times to 2 00 times The file is played back in natural tones by means of a digital processing function 1 Slide the DPC SPEED CTRL switch to ON 2 During playback press v or V on the control button to adjust the playback speed V Decreases the speed by 0 05 times each time this button is pressed from 0 50 to 1 00 v Increases the speed by 0 10 times each time t...

Page 48: ...LC files If you attempt to adjust the playback speed beyond this range NO FAST appears in the display window Selecting the sound effect You can set the effect you want for the playback in the menu 1 Select the Playback tab t Effect in the menu when the IC recorder is in the stop or playback mode and then press N ENT 2 Press v or V on the control button to select effect you want for the playback an...

Page 49: ... or V on the control button The setting can be adjusted in 7 steps from 3 to 3 3 Press N ENT 4 Press x STOP to exit the menu mode P Notes When you are using the built in speaker this setting is invalid When the noise cut function is effective the effect function does not work Pop Stresses middle ranges ideal for vocals Rock Emphasizes high and low ranges for a powerful sound Jazz Emphasizes high r...

Page 50: ...e control button to select 1 ALL 1 or ALL and then press N ENT 3 Press x STOP to exit the menu mode Play Mode is set to when you purchase the IC recorder N ENT v V x STOP A B 1 A file is played back Files in one folder are played back continuously ALL All the files are played back continuously 1 One file is played back repeatedly Files in one folder are played back repeatedly ALL All the files are...

Page 51: ...played and the specified section is played back repeatedly To resume normal playback Press N ENT To stop A B repeat playback Press x STOP To change the segment specified for A B repeat playback During A B repeat playback press repeat A B again to specify a new starting point A Then specify a new finishing point B as in step 2 P Note You cannot set the points A and B near the beginning of a file or...

Page 52: ... then press N ENT 2 Press v or V on the control button to select ON and then press N ENT 3 Set the alarm date and time 1 Press v or V on the control button to select Date a day of the week or Daily and then press N ENT 2 When you select Date Set the year month day hour and minute in sequence as described in Step 4 Setting the Clock on page 15 When you select a day of the week or Daily Press v or V...

Page 53: ...larm pattern is set to Beep Play or Play the IC recorder will stop at the beginning of the selected file To stop the alarm playback Press any button other than VOL while the alarm sound is heard If the HOLD function is activated you can stop the alarm playback by pressing any button P Notes You can set only one alarm each one file When the clock has not been set or no files are recorded you cannot...

Page 54: ...t the connected equipment to the recording mode A file from the IC recorder will be recorded on the equipment connected 3 Press x STOP on the IC recorder and the connected equipment at the same time to stop recording z Tip If the volume of the recorded sound is not strong enough adjust the playback sound of the IC recorder page 24 Optional audio connecting cables not supplied Tape recorder Mini di...

Page 55: ...utton press v or V on the control button to select the Voice tab or the Music tab and then press 4 Press v or V on the control button to select the folder that you want to move the file into and then press N ENT Moving File animation is displayed and the file is moved to the last position in the destination folder When you move a file to another folder the original file in the previous folder will...

Page 56: ...o be used for copying into the memory card slot 1 Select the file you want to copy When you want to copy a file from a memory card to the built in memory set the source memory media to Memory Card page 38 2 Select the Edit tab t File Copy in the menu and then press N ENT The Copy to Memory Card Select Folder or the Copy to Built In Memory Select Folder animation appears and the folder selection wi...

Page 57: ...press x STOP P Notes Before starting to copy the target file make sure to check the battery indicator If the battery is weak you may not be able to copy files If the remaining memory capacity of the destination memory media is insufficient you may not be able to copy files You cannot copy the podcast files Do not remove or insert a memory card or turn off the IC recorder while copying Files may be...

Page 58: ...er will be displayed 3 Press v or V on the control button to select Execute and then press N ENT The Erasing animation appears in the display window and all files in the selected folder will be erased 4 Press x STOP to exit the menu mode To cancel erasing Select Cancel in step 3 and then press N ENT ...

Page 59: ...ecorded using the IC recorder However when you edit files using the supplied Sound Organizer software adding a track mark to the files may not be possible You cannot add a track mark at a point within 0 5 seconds from another track mark You cannot add a track mark at the very beginning or at the very end of the file If there are already 98 track marks in a file you cannot add any more track marks ...

Page 60: ...e displayed 3 Press v or V on the control button to select Execute and then press N ENT The Erasing animation appears in the display window and the selected track mark will be erased The track mark just before the stop position will be erased 4 Press x STOP to exit the menu mode To cancel erasing Select Cancel in step 3 and then press N ENT x STOP N ENT v V Stop position Erase track mark ...

Page 61: ...ack Marks in the menu and then press N ENT Erase All Track Marks will be displayed 3 Press v or V on the control button to select Execute and then press N ENT The Erasing animation appears in the display window and all the track marks will be erased at one time 4 Press x STOP to exit the menu mode To cancel erasing Select Cancel in step 3 and then press N ENT x STOP N ENT v V ...

Page 62: ...s the maximum number allowed 1 Stop the file at the position where you want to divide a file 2 Select the Edit tab t Divide Current Position in the menu and then press N ENT Divide will be displayed 3 Press v or V on the control button to select Execute and then press N ENT The Dividing animation appears and the divided files will be suffixed with a sequential number _1 for the original file and _...

Page 63: ...ible Once a file is divided you cannot return it to the original status again If you divide a file at the position within 0 5 seconds from a track mark the track mark will be erased Because of the system limitations you cannot divide a file at the very beginning or at the very end of the file To cancel dividing Select Cancel in step 3 and then press N ENT Dividing a file at all the track mark posi...

Page 64: ...t all the remaining track marks press x STOP The files that have been divided before the cancellation remain divided P Notes You need a certain amount of free space in the memory media to divide a file When you divide a file with a title and artist name the newer part has the same title and artist name You cannot divide files other than those recorded using the IC recorder e g a file transferred f...

Page 65: ...dit tab t Protect in the menu when the IC recorder is in the stop mode and then press N ENT Set Protection will be displayed 3 Press v or V on the control button to select Execute and then press N ENT The file is protected A protected file is marked with the protect indicator 4 Press x STOP to exit the menu mode To release protection Select the protected file and then proceed with steps 2 through ...

Page 66: ... V on the control button to select the menu item for which you want to make setting and then press N ENT 4 Press v or V on the control button to select the setting that you want to set and then press N ENT 5 Press x STOP to exit the menu mode P Note If you do not press any button for 60 seconds the menu mode is automatically canceled and the window will return to the normal display To return to th...

Page 67: ...k mode Recording mode Recording Scene Select a REC Mode a Mic Sensitivity a a LCF Low Cut a a VOR a a SYNC REC a Select Input a Playback Noise Cut a a Effect a a Easy Search a a Play Mode a a Alarm a Edit Protect a Divide Current Position a Move File a File Copy a Erase Track Mark a Erase All Track Marks a Divide All Track Marks a Erase All a ...

Page 68: ...a IC recorder setting Select Memory a Language a Date Time a Time Display a Beep a USB Charge a Auto Power Off a Format a Tabs Menu items Operation mode a the setting can be made the setting cannot be made Stop mode Playback mode Recording mode ...

Page 69: ...letes the menu operation process Edit from Current Setting Changes the settings that is pre set in the menu Set Default Value Changes the settings to the default settings Execute Changes the settings to the default settings and completes the process Cancel Completes the process without changing the settings Edit Changes the settings from the settings in the selected scene item z Tip You can edit t...

Page 70: ...cording mode MP3 8kbps MONO MP3 compressed in long play monaural recording mode Mic Sensitivity Sets the microphone sensitivity High To record a sound far away from the IC recorder or a low sound such as recording in a spacious room Medium To record the sound of a normal conversation or meeting such as recording in a meeting space or during interview Low To record dictation with a microphone in fr...

Page 71: ...is activated when z REC PAUSE is pressed OFF The VOR function does not work 35 SYNC REC When set to ON the IC recorder enters the recording pause mode when no sound is detected for more than 2 seconds and the IC recorder starts recording again as a new file when any sound is detected ON The synchronized recording function is activated OFF The synchronized recording function is canceled 42 Select I...

Page 72: ...want for the playback Pop Stresses middle ranges ideal for vocals Rock Emphasizes high and low ranges for a powerful sound Jazz Emphasizes high ranges for lively sound Bass1 The bass sound is emphasized Bass2 The bass sound is emphasized even more Custom You can design your own custom sound level for 5 bands of EQ 100 Hz 300 Hz 1 kHz 3 kHz and 10 kHz in 7 steps 3 to 3 OFF The effect function does ...

Page 73: ...nt in a long recording OFF The easy search function does not work When you press or on the control button a file will be moved forward or backward 45 Play Mode Sets the playback mode 1 A file is played back Files in one folder are played back continuously ALL All the files are played back continuously 1 One file is played back repeatedly Files in one folder are played back repeatedly ALL All the f...

Page 74: ... a file that has already been protected cancel the protection Cancel Protection or cancel protection is not executed 65 Divide Current Position Divides a file into two Execute A file will be divided into two Cancel Division is not executed 62 Move File Moves the selected file to the selected folder Before attempting to move a file select the file to be moved and then go to the menu window 55 File ...

Page 75: ...s executed Cancel The track mark division is not executed 63 Erase All Erases all files in the selected folder Press to return to the folder window before erasing the files and select a folder from which all files are to be erased and then go to the menu window Execute All files in the selected folder will be erased Cancel All files will not be erased 57 Display Display Changes the display mode El...

Page 76: ...f ON The backlight in the display window lights up for approx 10 seconds OFF The backlight in the display window does not light even during operation IC recorder setting Select Memory Selects the memory media on which you want to store a file or which contains the file you want to play edit or copy Built In Memory The built in memory of the IC recorder is selected Memory Card The memory card inser...

Page 77: ... adjusted according to that computer Manual Sets the clock by setting year month day hour and minute in sequence 15 Time Display Sets the clock display 12 Hour 12 00AM midnight 12 00PM noon 24 Hour 0 00 midnight 12 00 noon Beep Sets whether a beep will be heard or not ON A beep will sound to indicate that an operation has been accepted or an error has occurred OFF No beep sound will be heard P Not...

Page 78: ...dless this setting Auto Power Off If the IC recorder is on and left for the period you have set the IC recorder turns off automatically 5min The IC recorder will be turned off after approx 5 minutes 10min The IC recorder will be turned off after approx 10 minutes 30min The IC recorder will be turned off after approx 30 minutes 60min The IC recorder will be turned off after approx 60 minutes OFF Th...

Page 79: ...emory media will be formatted Cancel The memory media will not be formatted P Notes Use the IC recorder formatting function to format the memory media Switch the memory media to the one to be formatted before you start the format operation page 38 When you format the memory media all the data which you have stored on the IC recorder will be erased Once the memory media has been erased you cannot r...

Page 80: ...using the Sound Organizer software page 90 The supplied Sound Organizer software allows you to transfer the files that you have recorded using the IC recorder to your computer to manage and edit them You can also transfer music files and podcast files stored on your computer to the IC recorder System requirements for your computer For details on the system requirements for your computer see page 9...

Page 81: ...n support cable P Notes If you connect more than two USB devices to your computer normal operation will not be guaranteed Use of this IC recorder with a USB hub or a USB cable other than the supplied USB connection support cable is not guaranteed A malfunction may occur depending on the USB devices connected at the same time Before connecting the IC recorder to your computer check that the battery...

Page 82: ...ately they are classified as being in No Folder z Tips The title or artist name etc registered in the music files can be displayed on the IC recorder It is useful if you input the ID3 tag information using the software you use to make the music files on your computer If no title or artist name has been registered Unknown will be displayed in the display window of the IC recorder When connecting th...

Page 83: ...m your computer VOICE FOLDER01 FOLDER05 Conversation MUSIC POP J POP LPCM AAC LC MP3 AAC LC LPCM MP3 MP3 WMA PODCASTS NEWS MSSONY MEMORY CARD Folder for files recorded using the IC recorder Folder transferred from your computer VOICE FOLDER01 FOLDER05 Conversation MUSIC POP J POP LPCM AAC LC MP3 AAC LC LPCM MP3 MP3 WMA PODCASTS NEWS Sony PRIVATE ...

Page 84: ...ecorder folders under the VOICE folder will be displayed P Note Even if a file is transferred directly under the VOICE folder it will not be displayed on the Voice tab of the IC recorder Folders displayed on the Music tab of the IC recorder The following folders will be displayed among the folders forwarded from a computer Folders under the MUSIC folder which contains a file when some folders have...

Page 85: ...rocedures below otherwise data may be damaged 1 Make sure that the operation indicator of the IC recorder does not light 2 Perform the following operation on your computer On a Windows screen left click the icon at the bottom of the desktop of the computer t Left click Eject IC RECORDER The icon and menu displayed can be different on different operating systems On a Macintosh screen drag IC RECORD...

Page 86: ...he IC recorder to your computer page 80 2 Copy files or folders you want to transfer to your computer Drag and drop the files or folders you want to copy from IC RECORDER or MEMORY CARD to the local disk on your computer z To copy a file or folder Drag and drop 3 Disconnect the IC recorder from your computer page 85 1 Click and hold 2 drag 3 and then drop ...

Page 87: ...corder to your computer page 80 2 Copy the folder in which the music files are stored to the IC recorder On a Windows screen using Explorer or on a Macintosh screen using Finder drag and drop the folder containing the music files onto IC RECORDER or MEMORY CARD The IC recorder can recognize up to 400 folders You can copy up to 199 files to one folder Moreover the IC recorder can recognize up to a ...

Page 88: ...from your computer can be played back with the IC recorder Dividing a file and setting a track mark however may not be performed If you have copied music files using your computer those files may not be copied in order of transfer because of system limitations If you copy music files from your computer to the IC recorder one by one you can display and play back the music files in copied order Disp...

Page 89: ...d to your computer image data or text data on the computer as well as files recorded using the IC recorder can be temporarily stored on the IC recorder Your computer must meet the specified system requirements to use the IC recorder as USB memory For details on the system requirements see page 100 ...

Page 90: ...ere recorded with an IC recorder into Sound Organizer The imported files are saved to the computer Importing songs from a music CD You can import the songs of a music CD into Sound Organizer The imported songs are saved to the computer Importing songs on the computer You can import music and other files saved to the computer into Sound Organizer Subscribing to and updating podcasts You can subscri...

Page 91: ...l software and send a recording file attached to mail You can use the voice recognition software Dragon NaturallySpeaking not supplied which is compatible with Sound Organizer to perform voice recognition for a file and convert the voice to text System requirements for your computer The following shows the system requirements for using Sound Organizer Operating systems Windows 7 Ultimate Windows 7...

Page 92: ...ore than 400 MB may be used Also free space for handling music data is required Display settings Screen resolution 800 600 pixels or higher 1 024 768 pixels is recommended Screen color High Color 16 bit or higher Sound card A SoundBlaster compatible card is recommended USB port A compatible USB port is required to use devices and media Operation via a USB hub is not guaranteed except for models fo...

Page 93: ...d CD ROM into the CD ROM drive The Sound Organizer InstallShield Wizard menu starts up automatically and the Welcome to Sound Organizer Installer window appears If the Welcome to Sound Organizer Installer menu does not start up open Windows Explorer right click the CD ROM drive double click SoundOrganizerInstaller exe and then follow the instructions on the screen 3 Make sure that you accept the t...

Page 94: ...cast Displays a list of podcasts C The file list of the IC recorder Displays the files saved to the connected IC recorder or memory card D Edit Mode button Displays the edit area so that you can edit a file E Quick Operation Guide button Displays the Quick Operation Guide to receive guidance on the basic features of Sound Organizer F Sidebar Import Transfer IC Recorder Displays the transfer screen...

Page 95: ... the USB slide lever on the back of the IC recorder and connect the USB DIRECT connector to the USB AC adaptor While the battery is charging the battery indicator is displayed in an animation Now you can use the IC recorder while charging the battery This is an approximation for the time it takes to charge from no remaining battery power to full battery power at room temperature It varies dependin...

Page 96: ... operation indicator lights or flashes in red or accessing data the operation indicator flashes in orange the IC recorder should not be connected to or disconnected from the USB AC adaptor connected to the AC outlet the USB AC adaptor connected to the IC recorder should not be connected to or disconnected from the AC outlet Doing so may damage the data If the IC recorder is required to process a l...

Page 97: ...water and may get wet When you use the unit in an environment where the unit is exposed to rain snow or humidity In circumstances where you get sweaty If you touch the unit with wet hands or if you put the unit in the pocket of sweaty clothes the unit may get wet You may feel pain in your ears if you use the headphones when the ambient air is very dry This is not because of a malfunction of the he...

Page 98: ...patible M2 please refer to the Sony web site page 101 MagicGate is the collective name of content protection technologies developed by Sony The IC recorder does not support data recording playback that requires MagicGate functions The IC recorder does not support parallel data transfer You cannot use a ROM read only memory type or write protected memory card Data may be corrupted in the following ...

Page 99: ...itions including locations such as the hot interior of a car parked in the sun and or in the summer the outdoors exposed to direct sunlight or a place near a heater Humid locations or locations with corrosive substances present When using a memory card make sure to check the correct insertion direction into the memory card slot ...

Page 100: ... 7 Home Premium Windows 7 Home Basic Windows 7 Starter Windows Vista Ultimate Service Pack 2 or higher Windows Vista Business Service Pack 2 or higher Windows Vista Home Premium Service Pack 2 or higher Windows Vista Home Basic Service Pack 2 or higher Windows XP Media Center Edition 2005 Service Pack 3 or higher Windows XP Media Center Edition 2004 Service Pack 3 or higher Windows XP Media Center...

Page 101: ...vailable capacity is approximately 1 80 GB 1 932 735 283 bytes Frequency range LPCM 44 1kHz 16bit 50 Hz 20 000 Hz MP3 192kbps 50 Hz 20 000 Hz MP3 128kbps 50 Hz 16 000 Hz MP3 48kbps MONO 50 Hz 14 000 Hz MP3 8kbps MONO 60 Hz 3 400 Hz Bit rate and sampling frequencies for MP3 files 1 Bit rate 32 kbps 320 kbps VBR Sampling frequencies 16 22 05 24 32 44 1 48 kHz File extension mp3 1 The playback of MP3...

Page 102: ... NH AAA rechargeable battery supplied 1 2 V DC One LR03 size AAA alkaline battery not supplied 1 5 V DC Operating temperature 5 C 35 C 41 F 95 F Dimensions w h d not incl projecting parts and controls JEITA 4 Approx 36 6 mm 102 0 mm 14 6 mm 1 1 2 in 4 1 8 in 19 32 in Mass JEITA 4 Approx 59 g 2 1 8 oz including one NH AAA rechargeable battery 4 Measured value by the standard of JEITA Japan Electron...

Page 103: ...ing scene 7 Built in memory Memory card ICD UX512 2 GB 4 GB 8 GB 16 GB 32 GB LPCM 44 1kHz 16bit 3 hr 0 min 3 hr 0 min 6 hr 0 min 12 hr 5 min 24 hr 15 min 48 hr 40 min MP3 192kbps Meeting Interview Lecture Audio IN My Scene 22 hr 20 min 22 hr 20 min 44 hr 40 min 89 hr 25 min 178 hr 0 min 357 hr 0 min MP3 128kbps Voice Notes 33hr 30 min 33 hr 30 min 67 hr 5 min 134 hr 0 min 268 hr 0 min 536 hr 0 min...

Page 104: ...4 1kHz 16bit 21 hr 0 min 16 hr 0 min 34 hr 0 min MP3 192kbps 23 hr 0 min 17 hr 0 min 41 hr 0 min MP3 128kbps 23 hr 0 min 17 hr 0 min 41 hr 0 min MP3 48kbps MONO 24 hr 0 min 17 hr 0 min 41 hr 0 min MP3 8kbps MONO 29 hr 0 min 17 hr 0 min 41 hr 0 min Music file 128 kbps 44 1kHz 17 hr 0 min 41 hr 0 min REC Mode Recording Playback through speaker 2 Playback using the headphones LPCM 44 1kHz 16bit 22 hr...

Page 105: ...an the plug The plug of the connected headphones is dirty Clean the plug Noise may be heard during recording pause of an MP3 file VOR recording or synchronized recording When you are listening an AAC LC and WMA file the noise cut function does not work You cannot charge the battery by connecting the IC recorder to your computer When you connect the IC recorder to a computer which is not running th...

Page 106: ...conds when the IC recorder is stopped page 14 The IC recorder cannot be turned on The power to the IC recorder is off Slide the HOLD POWER switch in the direction of POWER for more than 1 second page 14 The battery has been inserted with incorrect polarity page 11 The IC recorder is powered off automatically When the IC recorder is in the stop mode and you leave the IC recorder without attempting ...

Page 107: ...ome from the speaker Unplug the headphones and then insert them securely The operation indicator does not light LED is set to OFF Display the menu and set LED to ON page 76 The Memory Full animation is displayed and you cannot start recording The memory is full Erase some of the files page 28 or erase all the files after you store them on the other memory media or on your computer The File Full an...

Page 108: ...icrophone jack of the IC recorder and adjust the volume level on the piece of equipment connected to the IC recorder Playback speed is too fast or too slow The playback speed is adjusted in DPC Slide the DPC SPEED CTRL switch to OFF or press v or V on the control button to adjust the speed in DPC again page 47 You cannot divide a file You need a certain amount of free space in the memory to divide...

Page 109: ...e or recording mode page 67 The remaining time displayed in the display window is shorter than that displayed in the supplied Sound Organizer software The IC recorder requires a certain amount of memory for system operation That amount is subtracted from the remaining time which is the reason for the difference The battery life is short The battery life on page 104 is based on playback with the vo...

Page 110: ...Charge and discharge the rechargeable battery using the IC recorder several times Replace the old rechargeable battery with a new one The battery indicator is displayed only for a short time however the rechargeable battery is not charged completely It takes about 3 hours 30 minutes to fully charge an exhausted battery Menu does not reflect the change in settings If the battery is removed just aft...

Page 111: ...USB hub or USB extension cable other than supplied USB connection support cable Connect the IC recorder directly to your computer or use the supplied USB connection support cable Operation is not guaranteed if you use any system requirements other than those described on page 100 Depending on the USB port position the IC recorder may not be recognized If this happens try another port The file tran...

Page 112: ...Make sure to log on using a user name with computer administrator privileges The IC recorder cannot be properly connected Check that the installation of the software has been successful Also check the connection as follows When using an external USB hub connect the IC recorder directly to the computer or use the supplied USB connection support cable Disconnect and then connect the IC recorder Conn...

Page 113: ... noise is heard This happens when you play back files that you divided Store a file on your computer first and then add it to the IC recorder Select the saving file format that suits the IC recorder you use Operation is slow when there are many files When the total number of files increases the operation becomes slower regardless of the length of the recording time Display does not work during sav...

Page 114: ... memory card Memory Card Not Supported A memory card that the IC recorder does not support is inserted See About compatible memory cards on page 36 Memory Card Locked The memory card is write protected A write protected memory card cannot be used with the IC recorder Read Only Memory Card A read only memory card is inserted A read only memory card cannot be used with the IC recorder Memory Card Ac...

Page 115: ...e Time Set the clock otherwise you cannot set the alarm Track Marks are Full You can set up to 98 track marks for a file Cancel unwanted track marks page 60 No File The selected folder does not have any files You cannot move a file or set the alarm etc because of this No Track Marks There are no track marks when you attempt to erase a track mark or track marks or divide a file at all the track mar...

Page 116: ...rent one The file name has reached the maximum number of characters you cannot divide the file Shorten the file name The Divide All Track Marks function cannot be used because there is a track mark within 0 5 seconds from the dividing position The Divide All Track Marks function cannot be used because there is a track mark within 0 5 seconds from the beginning of a file or the end of a file The fi...

Page 117: ...ame already exists in the folder when a file is divided or a file is copied or moved No Memory Card There is no memory card inserted into the memory card slot when you attempt to set the Select Memory or File Copy menus Erased Track Marks too near Divide Point When there is a track mark set within 0 5 seconds from the dividing position the track mark is automatically erased No operation with Memor...

Page 118: ...the IC recorder one by one you can display and play back the music files in transferred order A file is divided automatically The file being recorded has reached the maximum size limit 2 GB for an LPCM file and 1 GB for an MP3 file Therefore it is automatically divided You cannot enter lower case characters Depending on the combination of the characters used for the folder name that was made on yo...

Page 119: ... folder for playback only A folder for podcast files Title name Artist name File name D Microphone sensitivity indicator High Medium Low E File information Displays the information for each file according to the file information type folder name title name artist name file name F File information switch operation guide You can switch the file information display in order by pushing v or V on the c...

Page 120: ...played in the numerator and the total number of files in the folder is displayed in the denominator L Recording mode indicator Displays the recording mode set using the menu when the IC recorder is in the stop mode and displays the current recording mode when the IC recorder is in the playback or recording mode LPCM file recorded or transferred with the IC recorder MP3 file recorded or transferred...

Page 121: ...there is more than 10 hours time remaining the time is displayed in hours If there is more than 10 minutes and less than 10 hours time remaining the time is displayed in hours and minutes If there is less than 10 minutes time remaining the time is displayed in minutes and seconds Display when recording R Recording progress animation display Displays the progress of an auto AGC VOR or synchronized ...

Page 122: ...s when all the files are played back continuously 1 Appears when one file is played back repeatedly Appears when files in one folder are played back repeatedly ALL Appears when all the files are played back repeatedly T Noise cut Effect indicator Appears when the noise cut function is effective or Effect is set in the menu Noise cut Pop Rock Jazz Bass1 Bass2 Custom ...

Page 123: ...oting Display in the HOLD status U HOLD indicator Appears when the IC recorder is in the HOLD status to prevent unintentional operations To release the HOLD status slide the HOLD POWER switch towards the center page 10 ...

Page 124: ... media 56 67 74 Copying files to your computer 86 Copying music files to the IC recorder 87 Cue 45 D Display the current date and time 17 Dividing a file at all the track mark positions 63 67 75 Dividing a file at the current position 62 67 74 DPC Digital Pitch Control 47 E Easy search 45 67 73 Editing files 55 Effect 48 67 72 Erasing 28 Erasing a track mark 60 67 75 Erasing all files in a folder ...

Page 125: ...fect 67 72 Erase All 67 75 Erase All Track Marks 67 75 Erase Track Mark 67 75 File Copy 67 74 Format 68 79 Language 68 77 LCF Low Cut 67 71 LED 68 76 Making settings 66 Menu settings 67 Mic Sensitivity 67 70 Move File 67 74 Noise Cut 67 72 Play Mode 67 73 Protect 67 74 REC Mode 67 70 Scene Select 67 69 Select Input 67 71 Select Memory 68 76 SYNC REC 67 71 Time Display 68 77 USB Charge 68 78 VOR 67...

Page 126: ...Recording with other equipment 54 Review 22 45 S Scene selection 30 Selecting a folder 19 Setting the clock 15 68 77 Setting the language 18 68 77 Sound Organizer 90 Specifications 100 Switching the memory 38 68 76 Synchronized recording 42 67 71 System limitations 118 System requirements 91 100 T Tab view 26 Track mark 59 Troubleshooting 105 U USB AC adaptor 95 USB memory 89 Using the IC Recorder...

Page 127: ...127GB Index ...

Page 128: ... 2011 Sony Corporation Printed in China ...

Reviews: