background image

Basic Operations

17

GB

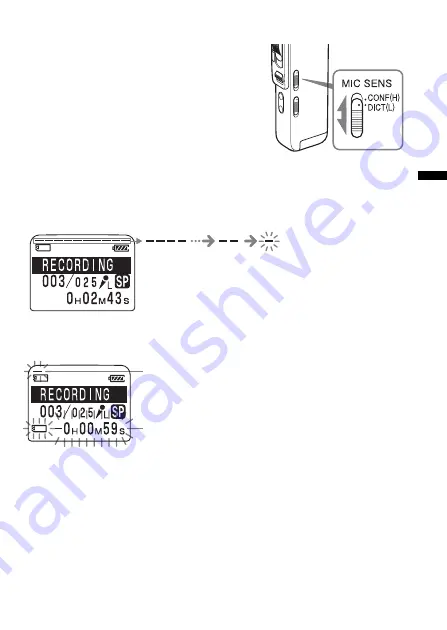
Selecting the microphone sensitivity

Slide the MIC SENS (microphone
sensitivity) switch during stop or
recording mode according to the
recording conditions:
• CONF(H) (high): To record a small

sound at a conference or in a quiet and/
or spacious place.

• DICT(L) (low): To record for dictation.

Using the memory remain indication

During recording, the remaining memory indicator decreases one by one.
When the remaining recording time reaches 5 minutes, the remaining
memory indication flashes.

When the remaining time reaches 1 minute, the remaining time indication
will flash in the display window regardless of the display mode (page 26).

When the memory is full, recording automatically stops and “NO
MEMORY SPACE” will be displayed with an alarm sound.  Please slide
the control key to STOP.
To continue recording, erase some of the messages (page 28) or replace the
“Memory Stick”.

Note

When you set the BEEP (page 51) to OFF, an alarm sound (beep) does not
sound.

Memory indicator flashes.

Remain time indication flashes.

Summary of Contents for ICD-BM1A - Memory Stick Media Digital Voice Recorder

Page 1: ...tions Owner s Record The model number and the serial number are located on the back of the unit Record the serial number in the space provided below Refer to these numbers whenever you call upon your Sony dealer regarding this product Model No ICD BM1 Serial No ...

Page 2: ...n the user is encouraged to try to correct the interference by one or more of the following measures Reorient or relocate the receiving antenna Increase the separation between the equipment and receiver Connect the equipment into an outlet on a circuit different from that to which the receiver is connected Consult the dealer or an experienced radio TV technician for help For Memory Stick This devi...

Page 3: ...LOSSES OR EXPENSES RESULTING FROM ANY DEFECTIVE PRODUCT OR THE USE OF ANY PRODUCT Disposal of Old Electrical Electronic Equipment Applicable in the European Union and other European countries with separate collection systems This symbol on the product or on its packaging indicates that this product shall not be treated as household waste Instead it shall be handed over to the applicable collection...

Page 4: ...External Microphone or Other Equipment 18 Recording with an External Stereo Microphone 18 Recording from Other Equipment 19 Recording with Other Equipment 19 Playing Back Messages 20 Using the Display Window 24 Selecting the Display Mode 26 Editing Messages Erasing Messages 28 Erasing Messages one by one 28 Erasing All Messages in a Folder 30 Dividing a Message into Two 31 Adding Erasing Folders 3...

Page 5: ...igital Voice Editor Software 52 What You Can Do Using the Digital Voice Editor Software 52 Installing the Software 54 Connecting the IC Recorder to your Computer 56 Referring to the Help Files 57 Additional Information Precautions 59 Troubleshooting 61 IC Recorder 61 Digital Voice Editor 64 Error messages of the IC Recorder 67 System Limitations 69 Specifications 71 Index to Parts and Controls 72 ...

Page 6: ...splay appears when you insert batteries for the first time or after the unit has been without batteries for a certain period of time Please refer to steps 3 to 6 in Step 2 Setting the Clock on pages 8 and 9 to set the date and time Using on house current Connect the AC power adaptor AC E30HG not supplied to the DC IN 3V jack of the unit and to the wall outlet Do not use any other AC power adaptor ...

Page 7: ...will remain Do not charge dry batteries When you are not going to use the unit for a long time remove the batteries to prevent damage from battery leakage and corrosion Battery remain indication Replace both of the two batteries with new ones m The LOW BATTERY is displayed and the unit will stop operation Battery life Using Sony alkaline batteries LR03 SG Recording mode ST SP LP In continuous reco...

Page 8: ...attery for the first time or when you insert battery after the unit has been without battery for a certain period of time In this case proceed from step 4 1 Slide POWER to ON The IC recorder is turned on 2 Press MENU The menu mode will be displayed in the display window 3 Press the jog lever up or down to select DATE TIME MENU Press up Press down ENTER CANCEL POWER ...

Page 9: ...d the time in sequence then press ENTER The menu mode will be displayed again 6 Press MENU The window will return to the normal display To cancel the operation Press CANCEL to return to the previous step of the operations To display the current time Press ENTER while the unit is in the stop mode page 27 The current time will be displayed for three seconds Note When no Memory Stick is inserted or t...

Page 10: ...k The OPR indicator flashes in orange 1 Slide and open the Memory Stick slot cover 2 Insert a Memory Stick into the Memory Stick slot with the terminal side facing inside the recorder Insert it firmly until it clicks into place Notes Do not insert a Memory Stick in a different direction It may cause malfunction of the unit To insert a Memory Stick Duo use the supplied adaptor 3 Close the Memory St...

Page 11: ...r and push the Memory Stick into the slot so that the Memory Stick pops out Remove the Memory Stick from the slot as shown below The types of Memory Stick you can use with this IC Recorder You can also use the following Memory Stick of a 4 MB to 128 MB capacity instead of the supplied Memory Stick Duo The maximum recording time varies depending on the capacity of the Memory Stick Memory Stick Memo...

Page 12: ...r 4MB 8MB 16MB 32MB 64MB 128MB ST 10min 20min 40min 1hr 25min 2hr 50min 5hr 50min SP 30min 1hr 2hr 10min 4hr 20min 8hr 50min 17hr 45min LP 1hr 20min 2hr 50min 5hr 45min 11hr 45min 23hr 35min 47hr 25min Number 456 950 963 1 016 1 016 1 016 of Messages ST High quality recording mode hr hours min minutes stereo sound with an external stereo microphone not supplied SP Standard play recording mode mona...

Page 13: ...der FOLDER POWER 1 Press FOLDER 2 Press the jog lever up or down to display the folder in which you wish to record messages ENTER Selected folder Continued 3 Press ENTER to select the folder To cancel the selection press CANCEL To add a new folder see page 33 Jog lever 1 2 ...

Page 14: ...k into the built in microphone Remaining memory Recording mode Current message number Built in microphone Microphone sensitivity Recording Messages continued OPR indicator lights in red during recording Counter display The display selected with the DISPLAY button page 26 appears Notes While the OPR indicator flashes or when it turns orange do not remove the Memory Stick the batteries or the AC ada...

Page 15: ...you can add an overwrite recording to the current message Tips You can select the overwrite recording mode using the menu page 41 The overwrite recording will be added in the same recording mode as the original message regardless of the current recording mode setting Note Playback after the overwrite recording starts from the beginning of the message Playback after a stop starts from the point whe...

Page 16: ...iver near the microphone while monitoring recording the microphone may pick up the sound from the ear receiver causing acoustic feedback howling sound Starting recording automatically in response to the sound Advanced VOR function Slide the VOR voice operated recording switch to ON during stop or recording mode Set the control key to REC Recording starts when the unit detects sound and VOR appears...

Page 17: ...e When the remaining recording time reaches 5 minutes the remaining memory indication flashes When the remaining time reaches 1 minute the remaining time indication will flash in the display window regardless of the display mode page 26 When the memory is full recording automatically stops and NO MEMORY SPACE will be displayed with an alarm sound Please slide the control key to STOP To continue re...

Page 18: ...nal stereo microphone to the MIC microphone jack You can enjoy the stereo recording by using a stereo microphone When you connect an external microphone the built in microphone is automatically cut off When a plug in power type microphone is connected power is automatically supplied to the microphone from the IC recorder 1 Recommended types of microphones You can use the ECM DS70P Sony electret co...

Page 19: ...level is large sound may be recorded interrupted if you use an audio connecting cable without register Use a registered audio connecting cable When the audio recording level is small do not use a registered audio connecting cable Recording with Other Equipment To record the sound of the IC recorder with other equipment connect the i headphones jack of the IC recorder to the audio input connector m...

Page 20: ...er The number of message in a folder Press the jog lever up or down to display the desired message number Press up for next message number Press down for previous message number Counter display Playing Back Messages When playing back a previously recorded message start from Step 1 When playing back a message you have just finished recording start from Step 3 Select the folder 1 FOLDER ENTER 2 The ...

Page 21: ...of each message a beep will sound When the unit reaches to the end of the last message in a folder MSG END will flash 3 times with a beep and playback stops Move the control key to STOP 1 To listen from an ear receiver Connect the supplied ear receiver to the i headphones jack The built in speaker will be automatically disconnected 1 To listen from an external speaker Connect an active or passive ...

Page 22: ...age Playing back a message rapidly or slowly in natural tone DPC Digital Pitch Control When you adjust the playback speed with the DPC in the menu pages 39 and 40 you can play back a message rapidly or slowing by sliding the DPC switch to ON When you set the playback speed faster or slower of the normal speed FAST PLAY or SLOW PLAY appears You can change the setting during playback Searching forwa...

Page 23: ... lever up to go to the end of the message and then press the jog lever down to go back to the desired point Quickly locating the point at which you wish to start playback Easy Search When EASY S is set to ON page 51 in the menu you can quickly locate the point you wish to start playback by pressing the jog lever up or down repeatedly during playback You can go back approximately 3 seconds by press...

Page 24: ...ity recording mode stereo sound with an external stereo microphone not supplied SP Standard play recording mode monaural sound LP Long play recording mode monaural sound 0 Microphone sensitivity indication 17 Displays the current microphone sensitivity setting with the MIC SENS microphone sensitivity switch H high CONF H position is selected to record at a meeting or in a quiet spacious place L lo...

Page 25: ... playback mode such as DPC play the mode flashes in the display When the DPC switch is set to ON to start playback rapidly Display examples xDisplay during setting the menu In menu setting mode the item with the cursor B is selected The current setting is displayed In the mode menu LP recording mode is being selected In alarm or clock setting you can change the item while it is flashing xRemain in...

Page 26: ...ecording time of one message x REMAIN TIME remaining time In the playback mode The remaining time indication of the message In the stop and recording mode The remaining recording time indication x REC DATE recorded date The date the current message was recorded If the clock has not been set Y M D will be displayed x REC TIME recorded date and time The date and time the current message was recorded...

Page 27: ... to the right regardless of the display mode setting 1 To display the current time Press ENTER while the unit is in the stop mode The current time will be displayed with the clock icon for three seconds 1 To turn off the display Make sure to set the control key to STOP and then slide POWER to OFF Every thing on the display will disappear If you press a button while the power is off POWER IS OFF fl...

Page 28: ...Once a recording has been erased you cannot retrieve it Erasing Messages one by one Be sure to erase unnecessary messages only When a message is erased the remaining messages will advance and be renumbered so that there will be no space between messages ERASE FOLDER ENTER CANCEL Erase Message 3 Message 1 Message 2 Message 3 Message 4 Message 5 Message 1 Message 2 Message 3 Message 4 Jog lever ...

Page 29: ... played back and ERASE is flashing The message is erased and the remaining messages will be renumbered For example if you erase Message 3 Message 4 will be renumbered as Message 3 When erasing is completed the unit will stop at the current position To cancel erasing Press CANCEL before step 2 To erase other messages Repeat steps 1 and 2 To erase a message partially First divide the message see pag...

Page 30: ...es on page 13 2 While pressing FOLDER press ERASE for more than 1 second ERASE ALL will flash for 10 seconds If no messages are recorded in a folder ERASE FOLDER will flash and you can erase the folder itself see page 34 3 While ERASE ALL is flashing press ENTER All the recorded messages contained in the folder are erased The folder itself will not be deleted For how to erase a folder see page 34 ...

Page 31: ...ges in a folder becomes 999 While playing back a message press DIVIDE at the point you want to divide DIVIDE flashes for 3 times The message is divided into two at the point you pressed the button and the new message number is added to the divided message The message numbers of the following messages will increase by one DIVIDE Control key PLAY STOP The message numbers increase A message is divide...

Page 32: ... in the memory to divide a message For more information see System Limitations on page 69 If you divide a message with priority mark s priority mark s will be added to both parts of the divided message If you divide a message with alarm setting the alarm setting will remain with the first part of the divided message If you divide a labeled message the other part of the divided message will have th...

Page 33: ...OLDER FULL is displayed in the display window when you cannot add any folder because of the system limitations of the IC recorder page 69 Adding Folders 1 Press MENU The menu mode will be displayed 2 Press the jog lever up or down to select NEW FOLDER and then press ENTER The new folder creation window will be displayed 3 Press the jog lever up or down to select YES and then press ENTER NEW FOLDER...

Page 34: ...he folder you want to erase For information on selecting a folder see step 2 of Recording Messages on page 13 Note You cannot erase a folder that has some recorded messages First erase all messages in the folder see page 30 or move them see the next page 2 While pressing FOLDER press ERASE for more than 1 second The message number and ERASE FOLDER will flash for 10 seconds 3 While ERASE FOLDER is ...

Page 35: ...kground 3 Press the jog lever up or down to select the folder you want to move the message into and then press ENTER The message is moved in the destination folder Messages are sorted in order of the recorded date and time or the number of the priority marks in the folder To cancel moving the message s Press CANCEL before step 3 Note The move function does not duplicate a message in another folder...

Page 36: ... vv v and no priority mark You can add priority marks both in the stop mode and in playback mode 1 Select or play back the message you want to mark 2 Press PRIORITY PRIORITY will flash on the display window 3 Press the jog lever up or down to select the number of priority mark s v while PRIORITY is flashing 4 Press ENTER The setting is finished and the messages will be renumbered To cancel setting...

Page 37: ...ssages with the same number of priority marks in a folder these messages are sorted by the recorded date and time The oldest one comes first e g When there are 3 messages in a folder Note You can also add priority mark s using the supplied Digital Voice Editor software But messages are not sorted in order of the number of the priority marks unless you sorted by the number of priority marks using t...

Page 38: ...r up or down to select FOLDER NAME and then press ENTER The folder name input window will be displayed You can select the folder name from the following templates ACTION APPOINTMNT appointment DICTATION E MAIL FOLLOW UP LECTURES LETTERS MEETINGS MEMOS NOTES PERSONAL REPORTS SCHEDULE TO DO TRAVEL OTHERS 3 Press the jog lever up or down to select a template name and press ENTER to set the name 4 Pre...

Page 39: ...Jog lever Playing back a message rapidly or slowly Slide DPC to ON FAST PLAY or SLOW PLAY flashes for 3 seconds and the message is played back at the speed you specified with the menu To resume normal playback Slide the DPC switch to OFF Setting the playback speed You can set the playback speed when the DPC switch is set to ON The setting for the playback speed holds effective until you change the...

Page 40: ...d speed as 0 3 Press ENTER The playback speed setting mode will be displayed To return to the previous step press CANCEL 4 Press the jog lever up or down to set the playback speed Fast play up to 100 in increments of 10 Press up Slow play down to 50 in decrements of 5 Press down 5 Press ENTER The specified playback speed is confirmed 6 Press MENU to exit the menu mode The normal display appears ...

Page 41: ... to select OVER WT overwrite then press ENTER The overwrite mode selection window is displayed OVER The portion left after the overwrite recording will remain in the message Jog lever The remaining portion in Message 2 Added overwrite recording in Message 2 Message 2 Message 3 Message 3 Message 2 Starting point of the overwrite recording Stopping point for the overwrite recording Message 1 Message...

Page 42: ... overwrite recording page 15 the recording will be added in the selected overwrite mode To cancel setting Press CANCEL The window returns to that of the previous step The remaining portion in Message 2 Added overwrite recording in Message 2 Message 2 Message 3 Message 3 Message 2 Starting point of the overwrite recording Stopping point for the overwrite recording Message 1 Message 1 Setting the Ov...

Page 43: ...t set or no messages are recorded you cannot set the alarm 1 Select the message you want to play back For more information about selecting the desired message see step 1 and 2 of Playing Back Messages on page 20 2 Enter the alarm setting mode 1 Press MENU The menu mode will be displayed in the display window 2 Press the jog lever up or down to select ALARM OFF If the alarm has been already set to ...

Page 44: ...ired date 1 Press ENTER while DATE is displayed The year digits will flash 2 Press the jog lever up or down to select the year digits and press ENTER The month digits will flash 3 Set the month day and the time in sequence then press ENTER To play back once a week Press the jog lever up or down to select the day of the week SUN for Sunday to SAT for Saturday Then press ENTER To play back at the sa...

Page 45: ... normal display is displayed when the message having an alarm setting is selected To go back to the previous step In steps 2 through 5 press CANCEL to go back to the previous step When the set date and time comes At the set time the alarm will sound for about 10 seconds and the selected message will be played back If you have selected BEEP ONLY in step 5 only the alarm will sound During alarm play...

Page 46: ...ed back with an alarm the playback stops and the new message will be played back If the alarm time comes during recording the alarm will sound after the recording is finished will flash when the alarm time comes If more than one alarm time comes during recording only the first message will be played back When the alarm time comes when the unit is in the menu mode alarm will sound and the menu mode...

Page 47: ... Stick Because a commercially available Memory Stick has already been formatted at the factory you do not need to format a Memory Stick before the first use The supplied Memory Stick Duo has also already been formatted 1 Press MENU The menu mode will be displayed 2 Press the jog lever up or down to select FORMAT 3 Press ENTER The formatting window will be displayed 4 Press the jog lever up or down...

Page 48: ...al display After formatting three folders are automatically made in the Memory Stick This is the same after inserting a Memory Stick for the first time To cancel formatting Select NO in the step 4 or press CANCEL while OK is displayed in step 5 Notes You cannot format when the write protect switch on the Memory Stick is set to LOCK There is no write protect switch on the supplied Memory Stick Duo ...

Page 49: ...yed 2 Press the jog lever up or down to select the menu item for which you want to change setting 3 Press ENTER The setting mode of the selected menu item will be displayed 4 Press the jog lever up or down to select the setting that you want to set and then press ENTER The setting will be changed 5 Press MENU to exit the menu mode The window will return to the normal display To go back to the prev...

Page 50: ...me monaural sound REPEAT Displays the window to set the repeat playback mode ON You can play back a message repeatedly until you stop playback OFF When a message is played back the next message will be played back normal playback mode OVER WT Displays the window to set the overwrite recording mode OVER CUT See page 41 Displays whether you can change the setting in each operation mode NO MS stop mo...

Page 51: ...the jog lever down or advance for approx 10 seconds by pressing the jog lever up OFF You can go back or forward the messages by pressing the jog lever down or up DPC Displays the window to set the playback speed ON OFF See page 39 BEEP ON A beep will sound to indicate that operation has been accepted OFF No beep sound will be heard except for the alarm ALARM Displays the window to set the alarm ON...

Page 52: ...ding a voice e mail message using MAPI e mail software Using the transcribing keys to play back a message and transcribe it using a word processor or an editor s window Transcribing your IC recorder message using Dragon NaturallySpeaking speech recognition software Only when Dragon NaturallySpeaking version 5 0 or higher Preferred or Professional Edition is installed on your computer Using the CD ...

Page 53: ...rvice Pack 2 or higher Windows XP Media Center Edition 2004 Service Pack 2 or higher Windows XP Media Center Edition Service Pack 2 or higher Windows XP Professional Service Pack 2 or higher Windows XP Home Edition Service Pack 2 or higher Windows 2000 Professional Service Pack 4 or higher installation You cannot use this software with Windows 95 Windows 98 Windows 98 Second Edition Windows Millen...

Page 54: ...r name of Administrator When installing or uninstalling the software in Windows XP Media Center Edition 2005 Windows XP Media Center Edition 2004 Windows XP Media Center Edition Windows XP Professional Windows XP Home Edition log on as a user name with the Computer administrator user account To find if the user name has a Computer administrator user account open the User Accounts from the Control ...

Page 55: ...d instructions When the Restart dialog box appears click OK to restart the computer Now the installation is completed When the dialog box to select the help language is displayed Click the desired language you want to use for the help When the dialog box used to input the owner name is displayed Input the owner name for privilages and limitations in the Digital Voice Editor usage Notes You cannot ...

Page 56: ...ou can also start up the uninstaller by clicking Start and then selecting Settings Control Panel and Add Remove Programs Uninstallation does not remove the message files Connecting the IC Recorder to your Computer You can transfer the IC recorder data onto your computer by connecting the IC recorder to the computer Use the USB connecting cable supplied with the IC recorder to connect the USB conne...

Page 57: ...Use of this IC recorder with a USB hub or a USB extension cable is not guaranteed A malfunction may occur depending on the USB devices connected at any one time Before connecting the IC recorder to the computer check that batteries are inserted in the IC recorder When you connect the IC recorder to the computer make sure that the IC recorder is in the stop mode It is recommend that you disconnect ...

Page 58: ...refer to the help files supplied with the voice recognition software you are using To obtain maximum recognition accuracy hold the IC recorder so that the microphone is about an inch 2 3cm from the corner of your mouth To minimize the sound of your breach in the recordings do not hold the microphone directly in front of your mouth To obtain maximum recognition accuracy avoid recording in a noisy p...

Page 59: ...operating it any further On noise Noise may be heard when the unit is placed near an AC power source a fluorescent lamp or a mobile phone during recording or playback Noise may be recorded when an object such as your finger etc rubs or scratches the unit during recording On maintenance To clean the exterior use a soft cloth slightly moistened in water Do not use alcohol benzine or thinner If you h...

Page 60: ...disassemble or modify the Memory Stick Do not let the Memory Stick get wet Do not use or keep the Memory Stick in locations that are Extremely hot such as in a car parked in the sun Under direct sunlight Very humid or subject to corrosive gases When you carry or store a Memory Stick put it in its case About write protect of a Memory Stick Write protect switch You cannot record or erase data when t...

Page 61: ...he Memory Stick is full Erase some of the messages page 28 There is no Memory Stick inserted The write protect switch on the inserted Memory Stick is set to LOCK page 60 999 messages have been recorded in the selected file Select another file or erase some of the messages page 28 The write protect switch on the inserted Memory Stick is set to LOCK page 60 The message or the folder which contains t...

Page 62: ...atched the unit during recording so that noise was recorded The unit was placed near an AC power source a fluorescent lamp or a mobile phone during recording or playback Plug of the connected microphone was dirty when recording Clean the plug Ear receiver headphones plug is dirty Clean the plug The MIC SENS switch is set to DICT L Set it to CONF H page 17 This unit is designed to automatically adj...

Page 63: ...ng will not be displayed if you recorded the message when the clock was not set There are some menu items which are not displayed because a Memory Stick is not inserted page 50 The unit cannot support and display some characters which are entered using the supplied Digital Voice Editor software Unless you sort messages using the supplied Digital Voice Editor software messages are sorted in the uni...

Page 64: ...onal Windows XP Home Edition you log on as a user name belonging to a user account with limitations Make sure to log on as a user name with the Computer administrator user account In Windows 2000 Professional make sure to log on as the user name of Administrator Check that the installation of the software has been successful Also check the connection as follows When using an external USB hub conne...

Page 65: ...saved using the Increase Volume feature of the Microsoft Sound Recorder You cannot play back a message whose file format the Digital Voice Editor software does not support Depending on the file format you cannot use part of editorial features of the software This happens when you play back messages that you divided combined overwrote or added a recording Save a message in the hard disk first and t...

Page 66: ...th the IC recorder Otherwise the computer operations become unstable or the data inside the IC recorder may be damaged There may be conflict between the software and other driver or application Do not install the Memory Stick Voice Editor software and the Digital Voice Editor Ver 2x software after you installed the Digital Voice Editor software The Digital Voice Editor software may not operate pro...

Page 67: ...e Memory Stick slot cover is open During operation make sure to close it Messages have been set to Read only in the computer You cannot edit or erase messages and folders including these Read only messages Remove the check for Read only under Properties of files that are opened by Windows Explorer You cannot delete a folder when there is only one folder in the Memory Stick You cannot add a folder ...

Page 68: ...s set to LOCK page 60 You cannot record edit or format in this condition Release the switch and insert the Memory Stick again The control key is at a position other than STOP although the unit stops To proceed with the operations make sure to slide the control key to STOP Because there are already 999 messages in a folder or the remaining memory of the Memory Stick is short you cannot record a mes...

Page 69: ...serted Memory Stick Due to the minimum recording unit if the length of each message cannot be divided by the minimum recording unit the remaining recording time may decrease by more than the total length of the messages The maximum recording time varies depending on the number of folders or messages You cannot divide a message in a folder which has 999 messages Remaining memory of the inserted Mem...

Page 70: ...4 seconds 11 seconds 8 MB 2 seconds 4 seconds 11 seconds 16 MB 2 seconds 8 seconds 22 seconds 32 MB 2 seconds 8 seconds 22 seconds 64 MB 2 seconds 8 seconds 22 seconds 128 MB 2 seconds 8 seconds 22 seconds About the maximum recording time and the maximum number of messages or folders A Memory Stick saves not only recorded messages but also the information about division and the number of folders T...

Page 71: ...h d not incl projecting parts and controls Mass 98 g 3 5 oz incl batteries and a Memory Stick Supplied accessories Memory Stick Duo with an adaptor x 1 Digital Voice Editor CD ROM x 1 Ear receiver x 1 USB connecting cable x 1 Carrying case x 1 Clamp filter x 1 Optional accessories Stereo ear receiver MDR EX71SL Active speaker SRS T88 SRS T80 Electret condenser microphone ECM DS70P ECM CS10 Audio c...

Page 72: ... button 31 0 CANCEL button qz PRIORITY button 36 Index to Parts and Controls Refer to the pages indicated in parentheses for details Front qs Built in microphone 14 qd NEW FILE button 15 qf OPR operation indicator 14 21 qg Jog lever review fast backward cue fast forward qh Control key REC record STOP PLAY B SPACE qj DPC switch 22 39 qk POWER ON OFF switch 8 13 ql VOL volume buttons 21 w Speaker ...

Page 73: ...Memory Stick slot cover 10 ws MIC SENS microphone sensitivity switch 17 CONF H conference high DICT L dictation low wd VOR voice operated recording ON OFF switch 16 wf DC IN 3V jack 6 wg USB connector 56 wh Battery compartment 6 Continued ...

Page 74: ... the procedures below You must affix the ferrite cores to comply with the applicable standards 1 Open the clamp filter 2 Wind the cable into the clamp filter as show below Attach the clamp filter on one end of the cable As close to the plug as possible that is connected to DC IN jack Wind the cable one and a half times 3 Close the clamp filter Make sure the clasps are fully engaged ...

Page 75: ...phone 18 F Folder adding erasing 33 Folder labeling 38 Folder selecting 13 20 Folder name 38 Format 47 L Labeling folders 38 LP mode 7 12 50 M Maximum number of messages 12 70 Maximum recording time 12 70 Memory Stick format 47 Memory Stick inserting 10 Memory Stick notes on use 60 Memory Stick types 11 Memory Stick write protect switch 60 Menu 49 Message dividing 31 Message erasing 28 Message mov...

Page 76: ...ge 15 Recording mode 7 12 50 Recording with other equipment 19 Remaining battery 7 Remaining memory 17 Remaining time display 26 Repeat playback 23 50 Review 16 22 S Searching forward backward 22 Setting the clock 8 SP mode 7 12 50 Specifications 71 ST mode 7 12 50 System limitations 69 System requirements 53 T Troubleshooting 61 Turning on power 8 13 U USB cable 56 Using the house current 6 V VOR...

Page 77: ...ration MagicGate Memory Stick is the trademark of Sony Corporation US and foreign patents licensed from Dolby Laboratories Music Identification Technology and associated data will be supplied from the Gracenote Gracenote MusicID is the industry standard for digital music identification for both CDs and individual music files For details see the following web site www gracenote com Gracenote is a r...

Page 78: ......

Page 79: ......

Page 80: ...Printed in China Printed on 70 or more recycled paper using VOC Volatile Organic Compound free vegetable oil based ink ...

Reviews: