background image

Appendix

Appendix

A-3

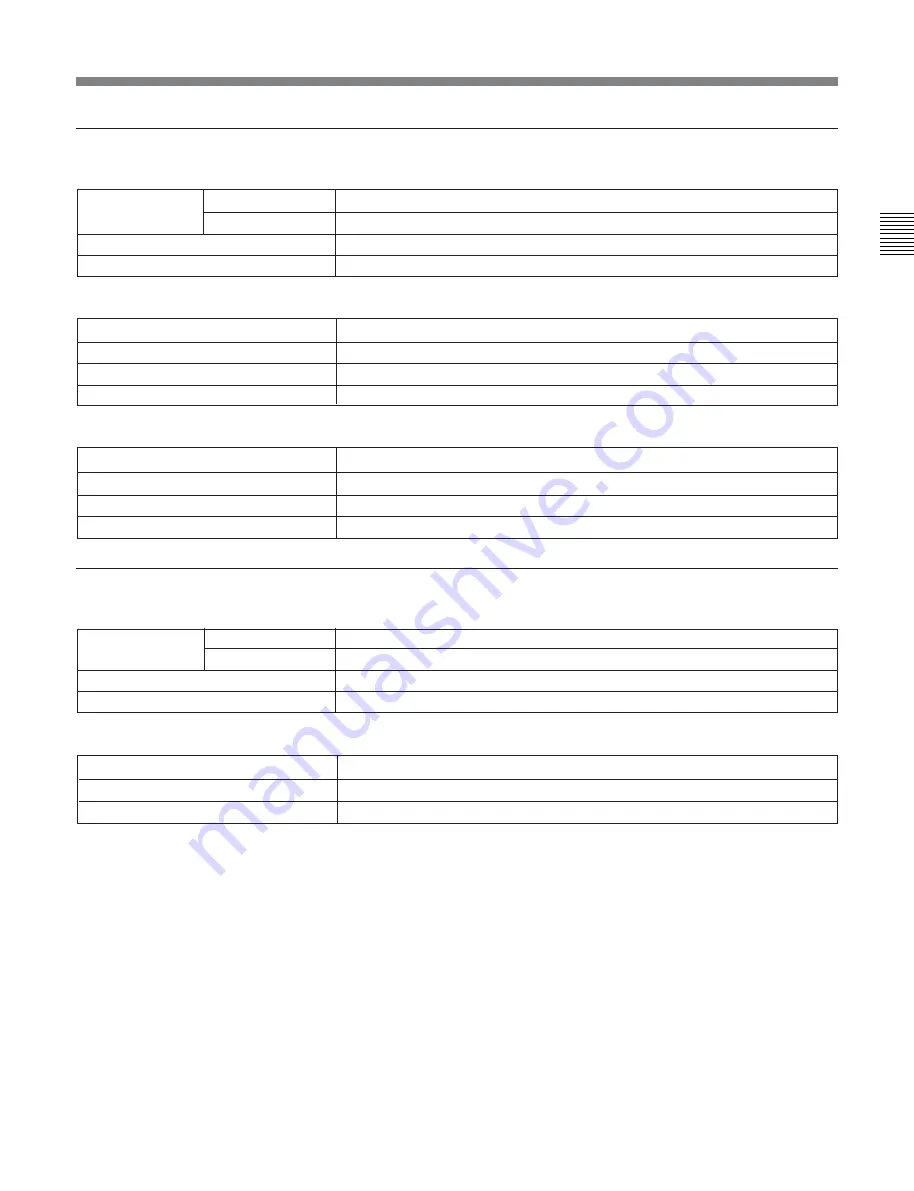
Digital Betacam playback

Video

Digital Audio (CH1 to CH4)

Analog Audio (cue track)

MPEG IMX playback

Video

Digital Audio (CH1 to CH8)

Bandwidth

Y

0 to 5.75 MHz +0.5 dB/–0.5 dB

K factor

R–Y/B–Y

0 to 2.75 MHz +0.5 dB/–0.5 dB

S/N ratio

62 dB or more

1% or less

Frequency response

20 Hz to 20 kHz +0.5 dB/–1.0 dB

Dynamic range

95 dB (at 1 kHz, emphasis on)

Distortion

0.05% rms (emphasis on)

Wow and flutter

Below measurable level

Frequency response

100 Hz to 12 kHz + 3 dB/–3 dB

S/N ratio

45 dB or more (at 3% distortion level)

Distortion

2% or less (THD 1 kHz, reference level)

Wow and flutter

0.2% rms or less

Frequency
response

Y

R–Y/B–Y

S/N ratio

K factor

0 to 5.75 MHz +0.5 dB/–2.0 dB

0 to 2.75 MHz +0.5 dB/–2.0 dB

56 dB or more

1% or less

Frequency response

Dynamic range

Distortion

20 Hz to 20 kHz +0.5 dB/–1.0 dB(0 dB at 1 kHz)

90 dB or more (1 kHz, emphasis on, 16 bits/48 kHz)

0.05% or less (1 kHz, emphasis on, reference level (+4 dBm))

Summary of Contents for HDW-D2000

Page 1: ...HD DIGITAL VIDEOCASSETTE RECORDER HDW D2000 OPERATION MANUAL English 1st Edition Revised 1 ...

Page 2: ...ied below DO NOT USE ANY OTHER POWER CORD Plug Cap Parallel blade with ground pin NEMA 5 15P Configuration Cord Type SJT three 16 or 18 AWG wires Length Less than 2 5 m 8 ft 3 in Rating Minimum 10 A 125 V Using this unit at a voltage other than 120V may require the use of a different line cord or attachment plug or both To reduce the risk of fire or electrical shock refer servicing to qualified se...

Page 3: ... 3 6 1 Notes on Memory Stick 3 10 Chapter 4 Recording and Playback 4 1 Recording 4 1 4 1 1 Preparations for Recording 4 1 4 1 2 Recording Time Code and User Bit Values 4 2 4 1 3 Recording Procedure 4 4 4 2 Playback 4 5 4 2 1 Preparations for Playback 4 5 4 2 2 Playback Procedures 4 6 4 2 3 Dynamic Motion Control DMC Playback 4 10 Chapter 5 Editing 5 1 Automatic Editing 5 1 5 1 1 Overview 5 1 5 1 2...

Page 4: ...fying Attribute Data 7 11 Chapter 8 UMID Functions 8 1 Overview of UMID Functions 8 1 8 2 Recording UMIDs 8 2 8 3 UMID Output and Display 8 4 8 3 1 UMID Output Settings 8 4 8 3 2 UMID Display 8 4 Chapter 9 Function Menu 9 1 Overview 9 1 9 1 1 Function Menu Configuration 9 1 9 1 2 Using the Function Menu 9 2 9 2 Function Menu Item List 9 3 Chapter 10 Setup Menus 10 1 Setup Menu Configuration 10 1 1...

Page 5: ...TE 292M which are converted into parallel data and then compressed into HDCAM format The audio signals are based on AES EBU format and are subjected to digital signal processing without being compressed The unit is equipped with a high definition to standard definition HD to SD downward converter and has the following interfaces as standard equipment for ease of connection to different external de...

Page 6: ...ing this allows editing with the audio IN and OUT points to be displaced from the video edit points Preread editing This allows you to play back prerecorded video and audio material edit it by applying effects with an external device and then rerecord in real time on the same tape Cross fade editing In audio editing to avoid unnatural effects at edit points you can fade the audio track You can sel...

Page 7: ...an example of use 1 2 Example System Configuration Digital cassette BVE series editor Tape control HDSDI Analog composite Audio monitor Analog composite component Video monitor Audio video server system SDTI optional HDSDI SDI Analog audio HDW D2000 SDTI optional HDSDI HD VTR SD VTR ...

Page 8: ...nlock buttons Upper control panel see page 2 2 Lower control panel see page 2 3 Switch panel access by opening the lower control panel see page 2 14 To open the lower control panel Push in the lower control panel unlock buttons to open the lower control panel You can fix the lower control panel in any of five positions between vertical and horizontal To close the lower control panel Push up the fo...

Page 9: ...P connector The button lights when pressed RS 232C indicator This indicator lights when this unit is controlled through the RS 232C connector 3 EJECT button To eject the cassette press this button While the cassette is being ejected this button lights When using the lower control panel as remote control panel press the DELETE button and STOP button at the same time to eject the cassette Note Eject...

Page 10: ...3 Menu control buttons see page 2 6 4 Time data menu display section see page 2 7 5 MULTI CONTROL knob and PUSH SHIFT indicator see page 2 8 6 RESET button see page 2 8 7 Search control section see page 2 8 9 Tape transport control section see page 2 10 q Editing mode setting section see page 2 11 qa ALARM indicator and KEY INHI indicator see page 2 12 qd Editing control section see page 2 12 qf S...

Page 11: ...signal selection mode see the descriptions of the audio monitor signal selection buttons 4 on page 2 5 2 DISPLAY FULL FINE button Pressing this button toggles the display mode of the level meters in the audio setting display section between FULL and FINE FULL The display covers the range 60 dB to 0 dB or 40 dB to 20 dB as selected using setup menu item 806 In this mode the segment of the display c...

Page 12: ...ting mode the MIX indicator flashes The buttons in the lower row REC row select the tracks audio channels on the tape to contain the mixed signals In the audio setting display section the MIX indicator for the corresponding track flashes The buttons in the upper row EXT row select the input channel signals to record on the corresponding track By pressing two buttons at the same time you can specif...

Page 13: ...back signal is good Yellow The playback signal is somewhat deteriorated but playback is possible Red The playback signal is deteriorated When this indicator remains on head cleaning or an internal inspection is necessary 3 Menu control buttons These buttons are used for function menu see the following section Overview of the function menu and setup menu see Chapter 10 operations The page buttons V...

Page 14: ...ator lights when VITC values are being read or recorded Capstan lock mode indicator This indicates the capstan lock mode 2F or 4F set in function menu page 4 or in setup menu item 106 System frequency indicator This indicator shows the current system frequency Tape format line standard indicator This shows information about the tape format and the line standard conversion status Following are some...

Page 15: ...following appear when the top or end of the tape is reached BOT Returned to top of tape EOT Reached end of tape IN video IN point OUT video OUT point AIN audio IN point AOUT audio OUT point DUR duration value TCG time code generator time code generated by the internal time code generator 2 Menu display This displays the function menu and setup menu For details on the function menu see Chapter 9 an...

Page 16: ...ible in the following ranges HDCAM 1 to 2 times normal speed Digital Betacam 1 to 3 times normal speed MPEG IMX 1 to 3 times normal speed Playback modes using the search dial Setting setup menu item 101 see page 10 10 to KEY enables you to use only the SHUTTLE JOG and VAR buttons to select shuttle jog variable speed modes Playback mode Operations and functions Shuttle Press the SHUTTLE button or t...

Page 17: ...ressing this button to cue up to the corresponding edit point 2 REC record button To start recording press this button together with the PLAY button turning it on Monitoring in E E mode When the unit is in stop mode pressing the REC button lights the button and allows you to monitor the video and audio in E E mode To return to the original state press the STOP button During playback search fast fo...

Page 18: ... button To rewind the tape press this button turning it on q Editing mode setting section 1 ASSEMBLE button Press this button turning it on to carry out assemble editing 1 All signals video signals audio signals time code signals and so on are recorded together Press the button again turning it off to exit from assemble editing mode Note When even one of the INSERT buttons is lit the ASSEMBLE butt...

Page 19: ...EW button 7 AUTO EDIT button qa ALARM indicator and KEY INHI indicator ALARM indicator This lights when a hardware error is detected on the unit and goes off when the error is resolved When this indicator is lit an error message appears in the time data menu display section If you are using the HDSDI OUTPUT 3 SUPER SDI OUTPUT 3 SUPER or COMPOSITE VIDEO OUTPUT 3 SUPER connector then when the settin...

Page 20: ...n To set a video IN point or OUT point Hold down the IN button or OUT button and press this button To set an audio IN point or OUT point Hold down the AUDIO IN button or AUDIO OUT button and press this button 6 REVIEW button Use this button to review the editing results after carrying out automatic editing 7 AUTO automatic EDIT button After edit point setting to carry out automatic editing recordi...

Page 21: ...ONT Enables the control panel connected to the CONTROL PANEL connector on the switch panel REAR Enables the control panel connected to the CONTROL PANEL connector on the connector panel When setup menu item 117 is set to PARA this switch position also enables the control panel connected to the CONTROL PANEL connector on the switch panel 3 KEY INHI switch Moving this switch to the ON position disab...

Page 22: ...00Ω CH3LEVEL LOW OFF HIGH ON 600Ω CH4LEVEL AUDIO OUTPUT CH1 LOW OFF HIGH ON 600Ω IN LEVEL OUT CH2 CH3 CH4 1 AUDIO INPUT CH1 to CH4 connectors 2 AUDIO INPUT CH1 to CH4 LEVEL switches 3 AUDIO OUTPUT CH1 to CH4 connectors 2 AUDIO INPUT CH1 to CH4 channels 1 to 4 LEVEL switches Set these for each channel as shown in the following table according to the audio input levels to the AUDIO INPUT CH1 to CH4 ...

Page 23: ...etting of F4 CHARA in function menu page 4 is ON connector 3 SUPER outputs a signal with superimposed time code menu settings alarm messages and other text information 75Ω REF INPUT INPUT 1125 525 OFF ON VIDEO OUTPUT COMPOSITE COMPONENT 3 SUPER 2 1 B Y R Y Y 1 REF VIDEO INPUT connectors and 75Ω termination switch 3 Digital audio input output section 1 AUDIO INPUT AES EBU connectors BNC type Input ...

Page 24: ...ls SDI HDSDI INPUT OUTPUT OUTPUT OUTPUT 1 2 3 SUPER 1 2 3 SUPER SDTI INPUT INPUT MONITOR 1 2 1 HDSDI INPUT connectors 3 SDTI INPUT connector 4 SDTI OUTPUT connectors 5 SDI OUTPUT connectors 5 SDI Serial Digital Interface OUTPUT connectors BNC type These connectors output D1 format video audio signals When the setting of F4 CHARA in function menu page 4 is ON connector 3 SUPER outputs a signal with...

Page 25: ...l cable from the other unit to this connector Depending on the setting of setup menu item 211 you can use this connector alone or in a loop through configuration with the REMOTE 1 OUT 9P connector 6 REMOTE 1 OUT 9P connector D sub 9 pin This provides the loop through output for remote control signals from the REMOTE 1 IN 9P connector Depending on the setting of setup menu item 211 you can use this...

Page 26: ...tor signal selection buttons in the audio control section If multiple tracks have been set to R the signals of those tracks are mixed for output 2 MONITOR OUTPUT L connector XLR 3 pin male This outputs the audio signals whose output destination was set to L with the audio monitor signal selection buttons in the audio control section If multiple tracks have been set to L the signals of those tracks...

Page 27: ...I OUTPUT SDI OUTPUT 3 HDSDI INPUT REF VIDEO INPUT REF VIDEO INPUT REF VIDEO INPUT 3 1 Connections to External Devices Chapter 3 Preparations 3 1 1 Connections to Digital Devices Reference signal HDW M2100 M2100P player BVM D24 series video monitor example shows the connections with another HDW M2100 M2100P unit as a player with this unit used as recorder 75Ω termination switch ON 75 Ω termination ...

Page 28: ...ically between REF and INPUT depending on the menu F2 OUTREF setting Menu item 309 setting Menu item 334 setting Unit s operational status a Reference signal setting EXT NORMAL EE REF PB EDIT REC INPUT EE INPUT PB REF EDIT REC REF AUTO1 NORMAL EE PB EDIT REC INPUT INPUT EE PB REF EDIT REC INPUT INPUT EE PB EDIT REC REF AUTO2 NORMAL EE REF PB EDIT INPUT REC INPUT EE PB REF EDIT INPUT REC INPUT EE P...

Page 29: ...HDW D2000 recorder 75 Ω termination switch OFF 75 Ω termination switch ON HDSDI INPUT REF VIDEO INPUT 75Ω Reference signal Switcher or signal generator HDW D2000 75 Ω termination switch ON HDW M2100 M2100P player Notes When there are no HD SDI signal or SDTI signal option input whereas INPUT is selected for OUTREF the unit synchronizes to the input reference video signal When there is no reference...

Page 30: ... Chapter 3 Preparations Connections for playback SDI OUTPUT COMPOSITE COMPONENT REF VIDEO INPUT HDSDI OUTPUT 75Ω HD video monitor SD video monitor HDW D2000 75 Ω termination switch ON Reference signal 3 2 Reference Sync Signals ...

Page 31: ...elating to preroll Items relating to tape protection Items relating to the time code generator Items relating to video control Items relating to audio control Items relating to digital processing For detailed information about the items except for the basic setup menu items relating to the hours meter of these menus and how to use them see Chapter 10 Setup Menus For detailed information about menu...

Page 32: ...item 005 allows different time data to be displayed in the lower line of the display For details see Section 10 3 Items in the Basic Setup Menu page 10 7 1 Type of time data Note If the time data or user s bits cannot be read correctly they will be displayed with an asterisk For example T R U R T R or U R Display Meaning CTL CTL counter data TCR LTC reader time code UBR LTC reader user s bits TCR ...

Page 33: ...Block C displays a mark to indicate an edit section during automatic editing Display Block A Block B Operation mode TAPE UNTHREAD Cassette is not loaded STANDBY OFF Standby off mode T RELEASE Tape tension released STOP Stop mode F FWD Fast forward mode REW Rewind mode PREROLL Preroll mode PLAY Playback mode servo unlocked PLAY Playback mode servo locked LOCK PLAY Variation from normal speed Capsta...

Page 34: ...eck that there is no slack in the tape The cassette is drawn into the unit and the STANDBY and STOP buttons light Removing slack from the tape Press in one of the reels with a finger and turn gently in the direction shown by the arrows until there is no slack in the tape Ejecting a cassette Press the EJECT button Note Ejecting is a local operation It is not possible to eject a cassette in another ...

Page 35: ...te Press in the red record inhibit plug ON Return this plug to its original position to enable recording on the tape again OFF 3 5 3 Preventing Accidental Erasure of Recordings To prevent a tape from being inadvertently erased press in the red record inhibit plug on the cassette ...

Page 36: ...y that exceeds that of a floppy disk Memory Stick is specially designed for exchanging and sharing digital data among Memory Stick compatible products Because it is removable Memory Stick can also be used for external data storage Types of Memory Stick There are two types of Memory Stick MagicGate Memory Stick that is equipped with the MagicGate copyright protection technology and general Memory S...

Page 37: ...ry Stick Do not let the Memory Stick get wet Do not use or keep a Memory Stick in locations that are Extremely hot such as in a car parked in the sun Under direct sunlight Very humid or subject to corrosive gases When you carry or store a Memory Stick keep it in its case During access to data While data are being read from or written to the Memory Stick do not shake the VTR or subject it to shock ...

Page 38: ...GSET CTL TC MENU 59 94 POWER switch I side on Audio selection function selector buttons see page 2 4 Select the input audio signal REMOTE buttons see page 2 2 off REC controls see page 2 6 Adjust the audio recording levels PB EE setting see page 9 3 PB CTL TC setting see page 9 3 Select the time data to be displayed VID IN setting see page 9 3 Select the input video signal RECINH setting see page ...

Page 39: ... playback of the recorded video and audio signals Set the CONFI to ENABLE see page 9 3 to light the CONFI indicator It is now possible to simultaneously monitor the video and audio signals being recorded To use the emphasis function To add emphasis to the analog input audio signal or analog playback audio signal set the EMPHSS to ON see page 9 6 When the signal to which emphasis has been applied i...

Page 40: ...the time code value to the real time With the settings in function menu page 1 set as follows carry out the foregoing procedure under the heading Setting an initial time code value In steps 3 and 4 set the value slightly after the current time then carry out step 6 at the instant the real time catches up with the setting TCG F1 INT PR RGN F2 PRESET RUN FREE DF DF 59 94i 29 97PsF mode only Setting ...

Page 41: ... rewound and stops To synchronize the internal time code generator to an external signal Use this method to synchronize the time code generators of a number of VTRs or to record the playback time code signal from an external VTR without deterioration of the signal waveform In this case the RUN and DF settings are ignored You can synchronize the internal time code generator to either of the followi...

Page 42: ...h setting see the pages indicated in parenthesis Z EE TC VID IN PB EE CONFI SDI DISABL TCGSET CTL TC MENU 59 94 Audio monitor signal selection buttons see page 2 5 Select the audio channel s to be monitored POWER switch I side on TCR setting see page 9 4 Select the time code to be displayed REMOTE buttons see page 2 2 off PB controls see page 2 6 Adjust the audio playback levels PB EE setting see ...

Page 43: ...huttle mode Variable speed playback with the speed determined by the angular position of the search dial Playback in variable speed mode Variable speed playback with the speed finely determined by the angular position of the search dial Playback using the capstan override function The playback speed is adjusted temporarily according to the angular position of the search dial to align the playback ...

Page 44: ...mode In shuttle mode you can control the speed of playback by the angular position of the search dial The range of playback speed is as follows HDCAM 50 times normal speed 59 94i 29 97PsF mode 58 times normal speed 50i 25PsF mode 60 times normal speed 24PsF 23 98PsF mode Digital Betacam 50 times normal speed MPEG IMX 78 times normal speed There are detents on the search dial at the still position ...

Page 45: ...speed mode return the search dial to the center position or press the STOP button To return to normal speed playback Press the PLAY button To alternate between normal speed playback and variable speed mode playback Set the search dial to the position corresponding to the desired variable playback speed then switch between normal speed playback and variable speed playback by pressing the PLAY and V...

Page 46: ...lower control panel of this unit as well as in the character information display on the video monitor screen 3 Press the PLAY button while holding down the DMC EDIT button 4 Press the PLAY button or perform any other operation to exit the tape speed override mode See Section 10 2 Setup Menu Operations page 10 2 for details of setup menu operations For details of character information displayed on ...

Page 47: ...oint Speed variation start point Speed variation end point On air end point Stop Press the REVIEW button Press the REVIEW button again at the on air cue Normal speed playback DMC playback Normal speed playback Stop Starting DMC playback immediately after preroll Normal speed playback DMC playback Normal speed playback Press the PREVIEW button Z 2 5 1 4 7 3 3 4 6 4 2 3 Dynamic Motion Control DMC Pl...

Page 48: ...hat point It is therefore not possible to memorize more speed variation The maximum capacity is a duration of 120 seconds To amend the stored speed variation Press the PREVIEW button The interval between the speed variation start and end points is automatically played back at the stored speed Operate the search dial as required to adjust the playback speed Setting the initial speed to normal speed...

Page 49: ...EW button lights and after preroll DMC playback is carried out for the section from the speed variation start point then playback continues at normal speed from the speed variation end point To stop the tape during DMC playback Press the STOP button To exit DMC playback mode Press the DMC EDIT button and the DELETE button simultaneously 4 2 Playback ...

Page 50: ... code must be recorded on the tape in correct time sequence i e the sections must be in strictly ascending time order If the time code values are all in correct time sequence then if there are any discontinuities in the time code the unit allows them to be interpolated using the CTL counter Recording time code For automatic editing regardless of the TCG F1 and PR RGN F2 settings time code is recor...

Page 51: ... audio signal Recorder settings REMOTE buttons see page 2 2 1 9P ASSEMBLE button see page 2 11 lit Player settings POWER switch I side on REMOTE buttons see page 2 2 1 9P PB controls see page 2 6 Adjust the audio playback levels REC controls see page 2 6 Adjust the audio recording levels VID IN setting see page 9 3 Select the input video signal RECINH setting see page 9 7 OFF CTL TC setting see pa...

Page 52: ... set the IN point or OUT point hold down the ENTRY button and press the IN button or OUT button When the IN point or OUT point is set the IN button or OUT button respectively lights 4 Repeat steps 1 to 3 until all the necessary edit points are set When the IN points on both the recorder and player are set the PREVIEW button and AUTO EDIT button flash and it becomes possible to carry out a preview ...

Page 53: ...order and player the DELETE button starts to flash to indicate that such a setup is impossible Delete all unnecessary edit points using the DELETE button For details of how to delete edit points see the section Deleting an edit point page 5 6 Automatic setting of edit points in split editing Split editing requires a total of eight edit points four video edit points player IN and OUT and recorder I...

Page 54: ... AUDIO OUT button according to the edit point you wish to check While you hold down the button the corresponding indicator lights in the upper line of time data display area 2 and the time value of the edit point is displayed To display the duration of an edit segment You can display the duration between two edit points in the following three cases in the time data menu display section see page 2 ...

Page 55: ...AUDIO OUT button corresponding to the edit point you wish to modify and press the TRIM buttons or While you hold down the button the time value for the edit point appears in time data display area 2 pressing the button increases the value by one frame and pressing the button decreases it by one frame Deleting an edit point To delete an edit point use the following procedure You can use the same pr...

Page 56: ...ngth before the edit IN point Note that for automatic editing the preroll time setting on the recorder takes precedence For details of menu item 001 see Section 10 3 Items in the Basic Setup Menu page 10 7 5 1 7 Preview When you have set the edit points the PREVIEW button flashes indicating that you can carry out a preview To carry out a preview use the following procedure 1 Press the RECORDER but...

Page 57: ...bove to copy the video and audio signals between the IN and OUT points on the player to the segment between the IN and OUT points on the recorder Monitor output During execution of an automatic edit as during a preview on a monitor connected to the recorder you can monitor the following video and audio From the preroll point to the IN point you can monitor the playback from the recorder From the I...

Page 58: ...OUT point after starting automatic editing operation After starting the automatic editing operation to end the operation before the preset OUT point hold down the ENTRY button and press the OUT button The position where you pressed the button becomes the OUT point and editing ends To abandon automatic editing Press the STOP button The automatic editing operation is abandoned At the same time the P...

Page 59: ...dit points and reexecute the edit Hold down the DELETE button and press the ENTRY button to recall the edit points After adjusting the edit points press the AUTO EDIT button to carry out the edit again For details of how to adjust edit points see Section 5 1 5 Modifying and Deleting Edit Points page 5 6 ...

Page 60: ... assemble editing but not for audio split editing Tape movement during DMC editing The following figure illustrates how the tapes move on the player and recorder during DMC editing Preroll IN point OUT point IN point Postroll Recorder Playback DMC editing Playback Stop Preroll time x initial speed Postroll time x final speed Tape moves at initial speed Playback at stored varying speed Tape moves a...

Page 61: ...e is prerolled and then the recorder starts operating at normal speed and the player at the set initial speed 9 On passing the IN point the MEMORY indicator begins to flash turn the search dial to vary the playback speed While the MEMORY indicator is flashing the speed variations are stored in memory On passing the OUT point the MEMORY indicator changes from flashing to continuously lit and the va...

Page 62: ...p 1 after setting the recorder or player IN point press the PREVIEW button 5 3 2 Continuous Editing After an automatic editing operation the recorder automatically returns to the OUT point For the second and subsequent editing operations you can continue editing by simply specifying the IN and OUT points on the player In this case the current OUT point on the recorder becomes the new IN point Afte...

Page 63: ...the PLAY button The recorder begins playback Note It takes about two seconds until the playback video stabilizes For this reason start the playback from before the segment of video you wish to use 5 At the editing start point the recorder IN point press the EDIT button and PLAY button simultaneously Editing starts 6 At the editing end point the recorder OUT point press the PLAY button Editing ends...

Page 64: ...ode of this unit no E E video output is available When the PREREAD is set to OFF after preread editing however if the loop connection remains and an E E signal is output feedback will occur To prevent this select PB mode for the video and digital audio channels in all the modes before the preread editing as follows 1 Set F2 PB EE in function menu HOME page to PB 2 Set the F6 PREREAD see page 9 7 i...

Page 65: ...ot data display When the tape includes shot data camera time and other information captured at the time of shooting you can read this in and display the details on a monitor It is also possible to display the shot mark list and shot data simultaneously Sorting shot marks by cassette When the tape includes shot data this unit recognizes which cassette each shot mark comes from You can therefore sor...

Page 66: ...g settings is the same as for the setup menus Note however the operations in To change the settings of menu items with sub items page 10 3 for items G02 and G03 For details of the setup menu operations see Section 10 2 Setup Menu Operations page 10 2 G04 G02 LISTING TYPE For each type of shot mark select whether to read into the list ON or not read OFF rec start mark shot mark 1 shot mark 2 post m...

Page 67: ... long as the total does not exceed 200 shot marks For example if 190 shot marks have already read in only 10 shot marks will be read from the new tape In the shot mark list see page 6 5 the data from different cassettes is separated by a row of dashes 6 3 2 Writing Shot Marks Writing recording start marks during recording In item G03 of the shot mark operation menu page 6 2 for each of the three r...

Page 68: ...RY button and press the MARK button A post mark is written the instant you pressed the MARK button While the mark is being written the message RECORD SHOT MARK appears on the monitor and the REC ERASE indicator flashes Erasing a shot mark Select the shot mark from the shot mark list and then carry out the deletion operation For details of the procedure see page 6 6 6 3 3 Shot Mark List Operations ...

Page 69: ...You can also use the following procedure to specify whether shot marks that have been read are displayed or not 1 With the shot mark list displayed press the F5 SETING button You can now select the shot mark types The function menu display changes as follows EXIT PREV NEXT OFF ON SHT MRK 2 Press the F1 PREV or F2 NEXT button to select a shot mark type 3 Press the F4 ON or F3 OFF button to switch b...

Page 70: ... the tape To erase a shot mark use the following procedure Note Once you erase a shot mark from the tape it cannot be read back in 1 With no shot mark list displayed hold the MARK button down for at least 2 seconds The REC ERASE indicator lights indicating that you can rewrite or erase shot marks 2 Display the shot mark list 3 Turn the MULTI CONTROL knob to select on the list the shot mark you wis...

Page 71: ...on PLAY button The tape is played back and the shot data displayed To delete the shot data Once again hold down the ENTRY button and press the PLAY button Example of shot data display The shot data display appears as shown below The details in the shot data depend on the shooting conditions If because of the devices used there is no shot data on a part of the tape it appears as blank Displaying th...

Page 72: ...r example if shot marks have been read in twice from the same cassette these can be collated as shown in the following figure Before sorting 180 NO TIME CODE SHOT MARKER 012345 DNW_ 0123 4567 011 S1 10 04 05 11 012 V 10 07 05 02 017 R 10 05 35 24 013 R 10 08 35 04 014 S2 10 09 05 11 015 R 10 10 35 24 016 R 10 10 36 00 180 NO TIME CODE SHOT MARKER 012345 DNW_ 0123 4567 011 S1 10 04 05 11 016 V 10 0...

Page 73: ...can be attached to cassettes as a memory label Memory capacity 1 KB user area rewritable Data transfer speed 100 kbps Security functions Reading and writing authorization can be controlled through multiple passwords and permission settings Memory label Data management in clip units In Tele File data is managed in units called clips A clip consists of the following data items whose settings can be ...

Page 74: ...nd when the current function menu page is HOME HOME2 or page 1 to page 6 the Tele File menu opens automatically whenever a Tele File label is detected on a cassette loaded into the VTR For details about setup menu item 134 see Section 10 4 Items in the Extended Setup Menu page 10 10 Configuration of the Tele File menu The Tele File menu has a tree structure as illustrated below When the menu first...

Page 75: ...k Mark R Strt Recording start point IN IN point OUT OUT point Take Take number Cut Cut number Scene Scene number Comnt Comment Cue ATTRIB SELECT UNDO WR EXT HOME TEL E F F1 F2 F3 F4 F5 F6 2001 07 21 No 0001 48 Cue Point WP Mark R TELE FILE TEST 01 00 00 02 10 ON KEEP 00 00 31 10 00 00 57 10 Menu display section Tele File menu indicator Data type indicator Setting display area Menu items functions ...

Page 76: ...elect a data modification mode When setup menu item 133 is set to REMOTE When the memory label itself is write protected For more information about clip data modifications see Section 7 3 3 Modifying Clip Data page 7 7 F3 T Selects data in a clip With each press the cursor moves to select the previous data item The display scrolls to the left when the cursor moves to data that is not currently dis...

Page 77: ...Mark R Recording start point IN Point IN point OUT Point OUT point Tk Take number Cut Cut number Scn Scene number Comment Comment Clip data No 0001 Data is displayed for 1 clip per line Clips are assigned consecutive numbers beginning with No 0001 for the clip on the top line To select clips Rotate the MULTI CONTROL knob in clip data display mode The data for the selected clip appears in the menu ...

Page 78: ...p Using Clip Data In clip data display mode you can use clip data to preroll and cue up To preroll to the cue point IN point or OUT point 1 Select a clip 2 Select the cue point the IN point or the OUT point 3 Press the PREROLL button The unit exits from the Tele File menu and prerolls to the position of the selected data The preroll time is according to the setting of setup menu item 001 Note The ...

Page 79: ...essage appears Press one of the following buttons to confirm or cancel the operation F1 CANCEL Cancels the deletion and returns to clip data display mode F2 OK Executes the deletion and returns to clip data display mode F4 DEL LN Deletes the selected clip A confirmation message appears Press one of the following buttons to confirm or cancel the operation F1 CANCEL Cancels the deletion and returns ...

Page 80: ...set time code data Proceed as follows to make or change settings for cue point IN point and OUT point data 1 Select a clip 2 Select cue point IN point or OUT point 3 Press the F2 SELECT button The unit enters clip data modification mode 4 Press the F2 MODIFY button The two most significant digits begin to flash and the data can be set or modified 5 Press the F3 T or F4 t button until the digit tha...

Page 81: ...dification mode 4 Press the F2 MODIFY button The data entry area begins to flash and the data can be set 5 Select the data by pressing the F3 or F4 button or rotating the MULTI CONTROL knob 6 Press the F2 SET button The data setting is confirmed and the unit returns to clip data display mode To make take number cut number and scene number settings Proceed as follows to make take number cut number ...

Page 82: ... after the place where you want to insert starts flashing and then press the F6 INSERT button 8 Press the F2 OK button The comment is confirmed and the unit returns to clip data display mode 7 3 4 Undo Resume Functions Undo function The undo function cancels all modifications and returns the data to the state it was in when first read Press the F5 UNDO button in clip data display mode A confirmati...

Page 83: ... Serial number The serial number of the VTR that recorded most recently to the tape Video final recording date Write inhibit setting Whether the entire Tele File is write inhibited The write inhibit setting can be modified Thread count The thread count value recorded on the tape Number of cue points The number of cue points recorded in the Tele File You can check the cue point values in clip data ...

Page 84: ...ss the F2 SET button The change to the setting is confirmed Note In the following cases the SELECT item does not appear and it is not possible to select a data modification mode When setup menu item 133 is set to REMOTE When the memory label itself is write protected 7 3 Tele File Menu To format the Tele File memory You can format the Tele File memory erase all modifiable data However the memory c...

Page 85: ...he 8 1 Overview of UMID Functions device that recorded the material and whether the material is the original or a copy The Source Pack section contains information about when where who recorded the material A UMID with a Basic section only is called a Basic UMID A UMID with both Basic and Source Pack sections is called an Extended UMID The following figure shows a general overview of the informati...

Page 86: ...of the number of copies 1 byte or it can be generated from a 24 bit pseudo random number Select the method used to generate the Instance Number by using setup menu item 654 UMID GENERATE METHOD See page 10 22 for more information about setup menu item 654 Selecting the SDI VANC line to inset the UMID You can select the VANC1 line into which the generated UMID should be inserted Make this selection...

Page 87: ...and then setting a time zone to indicate the difference from global UTC standard time allows correct UMIDs to be generated To set the time zone display the HOME page of the function menu and proceed as follows See Section 9 1 2 Using the Function Menu page 9 2 for more information about function menu operations 1 With the ENTRY button in the editing control section held down press the F5 MENU butt...

Page 88: ...o monitor connected to the COMPOSITE VIDEO OUTPUT 3 SUPER connector or the SDI OUTPUT 3 SUPER connector on the connector panel displays all UMID items at once The display of each line is explained below 1 Instance Number generation method and Instance Number The generation method is displayed as follows CP 16 16 bit PRS pseudo random sequence Copy No method 24PRS 24 bit PRS method others Other tha...

Page 89: ...shown for Target position data 2nd character Indicates higher than sea level indicates lower than sea level XXXXXXXm Altitude data unit meters Y The number of satellites used to calculate position data hexadecimal D DOP dilution of precision value between Y and D Displayed when a supportive apparatus was used A space blank is displayed when no supportive apparatus was used 6 Longitude Following W ...

Page 90: ...refers to this as F1 VID IN in function menu HOME page is set to SDI VID IN PB EE CONFI CTL TC SDI EE DISABL TC MENU TCGSET HOME F1 F2 F3 F4 F5 F6 Settings values Menu items functions HOME2 page user defined function keys Up to six function keys can be defined i e six functions can be assigned to the F1 to F6 buttons in the HOME2 page You can select and define the following function keys Functions...

Page 91: ...ou can change the setting value by rotating the MULTI CONTROL knob To change the function menu page Press either of the page buttons V v The V button selects the next page in the order HOMEt1t2t3t4t5t6tHOME The v button selects the next page in the order HOMEt6t5t4t3t2t1tHOME Settings which do not appear in the menu display section In the HOME page see the figure in Section 9 1 1 Function Menu Con...

Page 92: ...display in time data display area 1 see page 2 7 TC Playback time code read by the internal time code reader or recording time code The LTC or VITC time data type indicator see page 2 7 lights b UB User bits data of playback time code or recording time code The LUB or VIUB time data type indicator lights depending on whether the time code is LTC or VITC b CTL The running time of the tape being pla...

Page 93: ...d by control panel operation or by remote control from the device connected to the REMOTE1 IN 9P connector This operation is enabled when F1 TCG is set to INT At other times the operation is the same as when LTC is selected LTC Regenerate by synchronizing to the LTC time code value read by the internal time code reader VITC Regenerate by synchronizing to the VITC time code value read by the intern...

Page 94: ...l to 3 dB PRESET Regardless of manually set values the chroma signal is set to the standard level Manual setting With the displayed setting flashing you can rotate the MULTI CONTROL knob to adjust the value for the chroma signal output level F4 HUE 59 94i 29 97PsF mode C PHAS 50i 25PsF 23 98PsF 24PsF mode Sets the color phase phase relative to burst PRESET Regardless of manually set values sets th...

Page 95: ...utput signal subcarrier phase Setting method With the displayed setting flashing you can rotate the MULTI CONTROL knob to adjust the output signal subcarrier phase across the range 200 ns relative to this unit s input reference signal Adjust this item when you are using composite signals in editing and want to adjust the output signal subcarrier phase precisely to match a reference signal Even whe...

Page 96: ... fields For tape output color framing matches the reference signal selected with the F2 OUTREF In assemble editing color framing is continuous at edit points Note The setting is automatically fixed at 2F when operating in 24PsF or 23 98PsF mode and this cannot be changed F2 OUTREF Selects the reference signal of this unit according to the settings of setup menu items 309 and 334 and this unit s op...

Page 97: ...Page 5 9 2 Function Menu Item List Item Setting F1 TELE F Displays the Tele File menu For details of the Tele File menu see Section 7 3 Tele File Menu page 7 3 F2 UMID Displays UMID information during recording playback For details of UMID see Chapter 8 ...

Page 98: ...of hours the unit has been powered on and other information collected by the digital hours meter Settings relating to the preroll time superimposed text information system frequency etc Settings relating to the menu banks for saving menu settings Item group Items 100 to 199 Items 200 to 299 Items 300 to 399 Items 400 to 499 Items 500 to 599 Items 600 to 650 Items 651 to 699 Items 700 to 799 Items ...

Page 99: ...F4 CHARA to ON in function menu page 4 allows you to display setup menus on the monitor connected to the COMPOSITE VIDEO OUTPUT 3 SUPER connector HDSDI OUTPUT 3 SUPER connector or SDI OUTPUT 3 SUPER connector of this unit When a setup menu appears on the monitor a cursor indicates the currently selected menu item Displaying a desired menu item When the menu item number displayed in the menu displa...

Page 100: ...ing value 3 When all required changes have been made press the F5 SET button This makes the new settings effective To abandon making changes and exit from the setup menu display Press the F6 EXIT button To change the settings of menu items with sub items When a selected menu item has sub items select a desired sub item using the procedure described in the section To display a desired sub item on t...

Page 101: ...o allow switching of the system frequency between 59 94i 50i 29 97PsF 25PsF 24PsF and 23 98PsF 2 Switch the setting then press the F5 SET button 3 Turn the unit off The next time the unit is turned on it will operate in the new mode Switching the line conversion function menu item 018 This operation is valid in 59 94i and 29 97PsF modes only It is not available in other mode To change the line con...

Page 102: ...lect the conversion mode in setup menu item 917 ACTIVE LINE 1080 CONVERT MODE 1035 k 1080 CONV Convert the active scan lines from 1035 to 1080 without changing the aspect ratio 1035 k 1080 PANEL Convert the active scan lines from 1035 to 1080 Insert the 1035 lines into 1080 lines then compress horizontally Menu bank operations menu items B01 to B13 This unit allows menu settings to be saved in wha...

Page 103: ...ed in menu bank 4 select bank 4 with menu item B20 PRESET SETUP For details about menu bank 4 refer to the Maintenance Manual The current active setup menu settings as well as settings saved in menu banks are stored in separate storage areas for 59 94i 29 97PsF 23 98PsF and 50i 25PsF 24PsF modes Current active menu settings Recall B01 Recall B02 Recall B03 Save B11 Menu bank 1 Menu bank 2 Menu ban...

Page 104: ... on the control panel are enabled when this unit is controlled from external equipment DIS All buttons and switches are disabled S E F Only the STOP button EJECT button and F1 to F6 buttons are enabled ENA All buttons and switches are enabled MAP Follow the LOCAL KEY MAP setting For information about setting the LOCAL KEY MAP see menu item 023 LOCAL KEY MAP page 10 9 005 DISPLAY INFORMATION SELECT...

Page 105: ...tween 59 94i 50i 29 97PsF 25PsF 24PsF and 23 98PsF OFF Disable switching ON Enable switching When ON is selected the menu display changes to allow switching of the setting between 59 94i 50i 29 97PsF 25PsF 24PsF and 23 98PsF For the procedure for switching the system frequency see page 10 4 Note For the basic and extended setup menus separate settings are saved for 59 94i 29 97PsF 23 98PsF and 50i...

Page 106: ... PLAY Select whether the PLAY button functions 3 REC EDIT Select whether the REC and EDIT buttons function 4 STANDBY Select whether the STANDBY button functions 5 EJECT Select whether the EJECT button functions 6 JOG Select whether the JOG button functions 7 SHUTTLE Select whether the SHUTTLE button functions 8 VAR Select whether the VAR button functions 9 FF REW Select whether the F FWD and REW b...

Page 107: ...or which audio muting occurs when the unit switches to playback either from stopped or from still playback in the search mode OFF Set the audio muting time to zero i e no muting 0 1S to 1 0S Set the audio muting time from 0 1 second to 1 0 second in 0 1 second increments 105 REFERENCE SYSTEM ALARM Select whether or not to display a warning when the video audio reference signal selected by the func...

Page 108: ...pe speed varies stepwise as shown in figurea below over the range 3 to 3 Characterized by a zone around 1 and 1 where the tape speed is independent of the search dial rotation rate When playing back an HDCAM tape however tape speed characteristic TYPE 4 applies TYPE3 Tape speed varies linearly over the range 3 to 3 as shown in figureb below TYPE4 Tape speed varies stepwise as shown in figurec belo...

Page 109: ...normal speed 120 CTL LOCK IN VAR SHTL Select whether the tape transport should be phase locked to the CTL signal during playback in variable speed or shuttle mode OFF Not phase locked ON Phase locked at the following speeds 1 0 5 0 5 1 0 and 2 0 times normal 121 DT MODE Select field or frame mode for variable speed playback FIELD Always field playback FRAME Frame playback in the noiseless playback...

Page 110: ...her in local or remote mode OUT Only the OUT connector is effective whether in local or remote mode PANEL Allows you to select i o in or out using the function menu Note When selecting PANEL first define user defined function key RMT1 in the HOME2 page On how to define user defined function keys in the HOME2 page refer to the Maintenance Manual Volume 1 201 Item number Item name Settings PARA RUN ...

Page 111: ...lerating ACCEL Lock by accelerating 304 EDIT FIELD SELECT Select with which fields to start and end editing using tape 1F Start editing with field 1 and end with field 2 2F Start editing with field 2 and end with field 1 1F 2F Start and end editing depending on the timing of command reception Note The setting is always 1F in the following cases In PsF mode When SDTI option is selected Item number ...

Page 112: ...e speed determined by the rotation of the search dial PLAY Normal playback speed STILL Stationary 0 03 to 1 2 Speed set in the range 0 03 to 2 select from 2 1 0 5 0 2 0 1 0 03 Item number Item name Settings 310 REC INHIBIT Select the conditions under which recording is inhibited when F5 RECINH is set to ON in function menu page 4 ALL All tape recording is inhibited CRASH Normal tape recording is i...

Page 113: ...ACE FOR CH3 314 ANALOG AUDIO EDIT PRESET REPLACE FOR CH4 315 ANALOG AUDIO EDIT PRESET REPLACE FOR CUE 318 EDIT RETRY For two VTR editing set when this unit is used as the recorder Selects the operation if the recorder was not synchronized in time OFF Editing is not carried out and the unit stops ON The editing is automatically retried up to twice 319 PREREAD SELECT Specify the preread operation A ...

Page 114: ... PHASE Set the audio AES EBU and analog and time code output phase HD Sync with HDSDI output phase SD Sync with SD output phase Note When operating in 24PsF or 23 98PsF mode the setting is HD and this item is not displayed Item number Item name Settings 401 FUNCTION MODE AFTER CUEUP Select the state that the unit goes into after a cuing up operation STOP Stop the stop mode STILL Still playback in ...

Page 115: ...ITC in For SD output 12H to 16H to 20H Select any line from 12 to 20 Note You can insert the VITC signal in two places To insert it in two places set both items 601 and 602 In 50i 25PsF mode Select a line to insert the VITC in For SD output 9H to 19H to 22H Select any line from 9 to 22 Note You can insert the VITC signal in two places To insert it in two places set both items 601 and 602 Continued...

Page 116: ... from the ID code setting mode 604 ID CODE SW Select whether or not to record the ID code set using menu item 603 in the user bits OFF Record the normal data in the user bits ON Record the ID code in the user bits 605 TCG REGEN MODE Select the signals to be regenerated when the time code generator is in the regeneration mode i e when the function menu item PR RGN F2 is set to LTC or VITC or the un...

Page 117: ...gardless of the settings of F1 TCG and F2 PR RGN in function menu page 1 the time code generator regenerates according to the time code on the tape ASSEM In automatic editing carried out in assemble mode with this unit as the recorder regardless of the settings of F1 TCG and F2 PR RGN in function menu page 1 the time code generator regenerates according to the time code on the tape MANU Regardless...

Page 118: ... the ID code setting mode 25F STARTING TC SEL In 24PsF or 23 98PsF mode only Not displayed when operating in 720P line mode Select one of the following settings for time code conversion from 25F to 24F OFF Do not set the starting TC ON Set the starting TC To set the 25F starting TC Press the F5 SET button with this menu item displayed in the menu display to enter the starting TC setting mode You c...

Page 119: ...al if it is present Even when INPUT is selected a new UMID is generated if the input signal does not contain UMID data the same behavior as when NEW is selected When recording with inherited data the Instance Number is newly generated according to menu item 654 changing to a value that indicates that this is a copy When the UMID in the input signal is a Basic UMID a Basic UMID is recorded even if ...

Page 120: ...V 700 mV 705 EDGE SUBCARRIER REDUCER MODE Invalid in 24PsF or 23 98PsF mode During recording and playback of a composite signal in the playback circuit the edge subcarrier reducer ESR is automatically switched on or off according to the VTR operation When recording a Non Standard signal for example if the color edges are not as good as with a proper signal the ESR can be forced on This item makes ...

Page 121: ... not to carry out a picture shift OFF No picture shift ON Carry out picture shift Note To eliminate the adverse effect of the residual chrominance subcarrier component in the Y signal that is the result of the Y C separation this unit automatically applies a shift to the playback image in the H direction so that even in 2 field playback a satisfactory image can be obtained 713 VIDEO SETUP REFERENC...

Page 122: ...s item is valid for both HD and SD outputs when sub item D2 SETUP of menu item 212 VIDEO REMOTE CONTROL SELECT is set to black Menu items in the range 700 to 799 relating to video control Continued Items 715 to 720 Settings for controlling the SD video processing system according to the menu settings SYSTEM PHASE SC Invalid in 24PsF or 23 98PsF mode 720 Adjust the SD output signal subcarrier phase...

Page 123: ...u items in the range 700 to 799 relating to video control Continued 740 MASTER LEVEL HD Adjust the high definition video signal output from the HDSDI OUTPUT connector This adjusts the Y PB and PR levels simultaneously 0 0 0H to 100 800H to 141 3 B4EH 741 Y LEVEL HD Adjust the Y level of the high definition video signal output from the HDSDI OUITPUT connector 0 0 0H to 100 800H to 141 3 B4EH 732 CO...

Page 124: ...onnector ADD Simple addition RMS Root mean square AVE Simple average 806 LEVEL METER SCALE Select the mode in which digital audio levels are displayed PEAK0 Displays the audio level as negative values with the maximum level set to 0 dB REF 0 Displays the audio level as positive and negative values with the reference level set to 0 dB 803 DIGITAL AUDIO FADE TIME Specify the time for cross fade or f...

Page 125: ...eration of the internal audio test signal generator OFF No operation SILNC Silent signal 1KHZ At 1 kHz 20 dB FS sine wave is supplied to all audio input channels To turn on the internal audio test signal generator set this menu item to other than OFF then hold the audio monitor signal selection button for CH1 channel 1 for three seconds or more When the test signal generator is turned on the input...

Page 126: ...dio output channels 3 and 4 tr3 4 Tracks 3 and 4 assigned to audio output channels 3 and 4 tr5 6 Tracks 5 and 6 assigned to audio output channels 3 and 4 tr7 8 Tracks 7 and 8 assigned to audio output channels 3 and 4 825 AUDIO ADVANCE MODE Set the audio output phase OFF Same as the video output phase ON One frame ahead of the video output phase Sub item 0 ALL CH DEFAULT Use the following settings ...

Page 127: ... Holding the DELETE button and pressing the TRIM button carries out a freeze The freeze continues even after the buttons are released To update the freeze image Hold the DELETE button and press the TRIM button again To end the freeze Hold the DELETE button and press the TRIM button 905 AUTO FREEZE CONTROL Set the auto freeze function operation conditions for ending a freeze etc In dynamic tracking...

Page 128: ... or 23 98PsF mode Select the down converter mode crop Select the edge crop mode l box Select the letter box mode squez Select the squeeze mode 931 DOWN CONVERTER LETTER BOX MODE Invalid in 24PsF or 23 98PsF mode Select the aspect ratio of the down converter output when menu item 930 is set to l box 16 9 Set the aspect ratio of the HD SD converter output to 16 9 14 9 Set the aspect ratio of the HD ...

Page 129: ... slope of the correction curve 0 to 80H to 100H 942 V FILTER SELECT Invalid in 24PsF or 23 98PsF mode Set the vertical interpolation filter coefficient for HD SD converter output The vertical resolution increases as the setting grows larger 1 to 3 943 CROSS COLOR CRISP Invalid in 24PsF or 23 98PsF mode Set the cross color crisp level for HD SD converter output 0 to 4 to FH 950 UP CONVERTER MODE In...

Page 130: ...sF mode Carry out the up converter image enhancer adjustment Set the central frequency and frequency characteristic for edge enhancement 3 2MHz 3 2 MHz 1 1 MHz 4 5MHz 4 5 MHz 1 4 MHz 5 0MHz 5 0 MHz 0 7 MHz 4 0MHz 4 0 MHz 2 0 MHz 959 H V RATIO UC Invalid in 24PsF or 23 98PsF mode Carry out the up converter image enhancer adjustment Set the horizontal vertical ratio for edge enhancement 0 to 3 to 7 ...

Page 131: ...the video heads and audio heads always use the special purpose Sony BCT HD12CL cleaning cassette If you insert the cleaning cassette it is automatically ejected after a head cleaning operation which lasts for 10 seconds Follow the instructions with the cleaning cassette carefully as inappropriate use of the cleaning cassette can damage the heads For details refer to Section 1 17 in the Installatio...

Page 132: ...The error message and code also appear superimposed on a monitor connected to the COMPOSITE VIDEO OUTPUT 3 SUPER connector HDSDI OUTPUT 3 SUPER connector or SDI OUTPUT 3 SUPER connector Depending on the error code an indication of the source of the problem may appear as a secondary error message ERROR 01 REEL TROUBLE 1 Error message displays To display error messages and codes superimposed on the ...

Page 133: ...sly 12 TAPE TOP SENSOR Malfunction of tape top sensor has been detected 13 TAPE END SENSOR Malfunction of tape end sensor has been detected 14 FAN MOTOR Malfunction of cooling fan motor has been detected 20 CASS COMP MOTOR Malfunction of cassette compartment up or down operation has been detected 21 REEL SFT MOTOR Malfunction of movement of the reel table corresponding to the cassette size has bee...

Page 134: ...nsation occurs ERR 10 appears in time data display area 1 If this happens the drum and capstan motors stop and the cassette is automatically ejected Then the drum starts to rotate again to dry its surface In this state the unit is not operable When the moisture has evaporated the error message disappears and the ALARM indicator goes off If ERR 10 appears and the ALARM indicator lights immediately ...

Page 135: ...and still mode in units of 1 hour H04 THREADING mode Displays the total number of times tape has been threaded in the unit H12 DRUM RUNNING mode resettable Same as H02 except that the count is resettable This can be used as a guide in determining when to replace the drum H13 TAPE RUNNING mode resettable Same as H03 except that the count is resettable This can be used as a guide in determining when...

Page 136: ...R R Replace at interval of 4000 hours R 11 5 Regular Checks 11 5 2 Maintenance Timings Use the following table as a timing guide for checking and replacing components of the unit These intervals are not guaranteed lifetimes the timing for replacing components depends on the particular conditions of use In particular depending on the degree of dirt contamination and abrasion pinch rollers and clean...

Page 137: ...ayback time 124 minutes with BCT 124L MPEG IMX record playback time 184 minutes with BCT 184MXL 525 59 94 220 minutes with BCT 184MXL 625 50 Fast forward rewind time Approx 3 minutes with BCT 124HDL Search speed Shuttle mode HDCAM playback Still to approx 50 times normal playback speed 59 94i 29 97PsF Still to approx 58 times normal playback speed 50i 25PsF Still to approx 60 times normal playback...

Page 138: ... frequency 48 kHz synchronized with video Quantization 20 bits sample Wow and flutter Below measurable level Headroom 20 dB or 18 dB selectable Emphasis T1 50 µs T2 15 µs on off selectable in recording mode Analog input output CH1 to CH4 A D D A quantization 20 bits sample Frequency response 20 Hz to 20 kHz 0 5 dB 1 0 dB 0 dB at 1 kHz Dynamic range 95 dB or more at 1 kHz emphasis on Distortion 0 0...

Page 139: ...n Distortion 0 05 rms emphasis on Wow and flutter Below measurable level Frequency response 100 Hz to 12 kHz 3 dB 3 dB S N ratio 45 dB or more at 3 distortion level Distortion 2 or less THD 1 kHz reference level Wow and flutter 0 2 rms or less Frequency response Y R Y B Y S N ratio K factor 0 to 5 75 MHz 0 5 dB 2 0 dB 0 to 2 75 MHz 0 5 dB 2 0 dB 56 dB or more 1 or less Frequency response Dynamic r...

Page 140: ...nced AUDIO INPUT AES EBU CH1 2 3 4 BNC 2 Complies with AES 3id 1995 TIME CODE IN XLR 3 pin female 1 0 5 to 18 Vp p 10 kΩ balanced Output connectors HDSDI OUTPUT BNC 3 including 1 for character superimposition Serial digital 1 485 Gbits s SMPTE 292M SDTI OUTPUT BNC 2 optional SMPTE 305M SDTI COMPONENT VIDEO OUTPUT BNC 3 for 1 set Y 1 0 Vp p Sync negative R Y B Y 0 7 Vp p 75 Ω with 100 or 75 color b...

Page 141: ...03 Control Panel Extension Kit RCC 5G 9 pin remote control cable BVR 50 50P Video Remote Control Unit HKDV 900 Video Remote Control Unit RMM 131 Rack Mount Adaptor BCT HD12CL Cleaning Cassette Tape AC power cord For customers in the U S A and Canada Part No 1 557 377 11 Plug holder 3 613 640 01 For customers in the United Kingdom Part No 1 782 165 11 Plug holder 3 613 640 01 For customers in Europ...

Page 142: ...54 DETAIL GAIN UC b LIMITTER 936 LIMITER DC 955 LIMITER UC b CRISP 937 CRISP THRESHOLD DC 956 CRISP THRESHOLD UC b DEPEND 938 LEVEL DEPEND THRESHOLD DC 957 LEVEL DEPEND THRESHOLD UC b FREQUENCY 939 H DETAIL FREQUENCY DC 958 H DETAIL FREQUENCY UC b H V RATIO 940 H V RATIO DC 959 H V RATIO UC b GAMMA 941 GAMMA LEVEL DC 960 GAMMA LEVEL UC b CROP 930 DOWN CONVERTER MODE 950 UP CONVERTER MODE b LETTER ...

Page 143: ...eference signal 90H Output with the phase delayed by 90H HD with respect to the reference signal M3A1 SD PHASE SEL Select the SD video output signal phase with respect to the reference signal 0H or 2H SD advanced 0H Output in sync with the reference signal 2H Output with the phase delayed by 2H SD with respect to the reference signal M3A2 SD UPCNV SEL Select whether the SD video output signal phas...

Page 144: ...ng 5 11 playback 4 10 Drop frame mark 3 7 mode 9 4 E EDIT button 2 10 Edit point 5 3 cue up and preroll 5 7 modifying and deleting 5 6 setting buttons 2 13 Editing automatic editing 5 1 carrying out 5 8 continuous editing 5 13 control section 2 12 cross fade editing 10 16 manual editing 5 14 mode setting section 2 11 preread editing 5 14 quick editing 5 13 selecting the editing mode 5 3 special me...

Page 145: ...ontrol section 2 8 Search dial 2 9 SERVO indicator 2 11 Setup 3 5 SETUP function menu 9 5 Setup menu basic menu items 10 7 configuration 10 1 extended menu items 10 10 menu bank operations 10 5 operations 10 2 Shot data 6 7 Shot mark function cuing up 6 6 list operations 6 4 operation menu 6 2 operations 6 3 overview 6 1 reading 6 3 sorting 6 8 writing 6 3 Shot mark section 2 13 SHUTTLE button 2 9...

Page 146: ... for use by the purchasers of the equipment described in this manual Sony Corporation expressly prohibits the duplication of any portion of this manual or the use thereof for any purpose other than the operation or maintenance of the equipment described in this manual without the express written permission of Sony Corporation ...

Page 147: ... 2004 HDW D2000 SYL 3 863 974 02 1 Sony Corporation ...

Reviews: