background image

GB

16

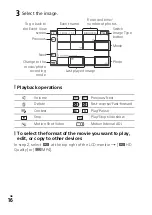
Playback operations

To select the format of the movie you want to play, 
edit, or copy to other devices

In step 2, select 

 at the top right of the LCD monitor 


[

HD 

Quality] or [

MP4].

3

Select the image.

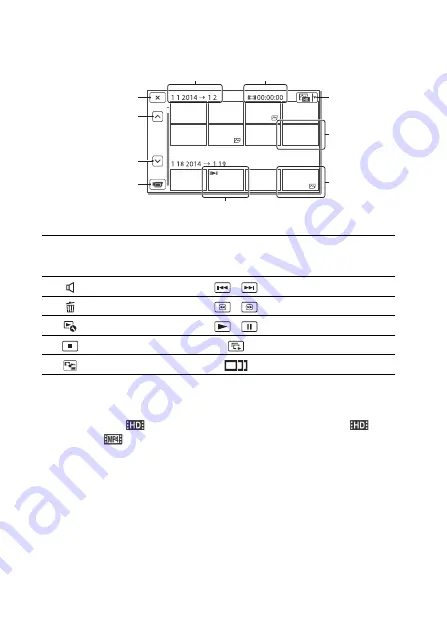
Volume

/

Previous/Next

Delete

/

Fast-reverse/Fast-forward

Context

/

Play/Pause

Stop

Play/Stop slide show

Motion Shot Video

Motion Interval ADJ

To go back to

the Event View

screen

Previous

Next

Change to the

movie/photo

recording

mode

Event name

Recorded time/
number of photos

Movie

Photo

Last played image

Switch 
Image Type 
button

Summary of Contents for Handycam HDR-CX330

Page 1: ...30 CX330E PJ330E PJ340 PJ340E PJ350E Getting started Recording Playback Saving images Customizing your camcorder Others Digital HD Video Camera Recorder Operating Guide Please also refer to http www sony net SonyInfo Support ...

Page 2: ...e like SAVE THESE INSTRUCTIONS DANGER TO REDUCE THE RISK OF FIRE OR ELECTRIC SHOCK CAREFULLY FOLLOW THESE INSTRUCTIONS Read these instructions Keep these instructions Heed all warnings Follow all instructions Do not use this apparatus near water Clean only with dry cloth Do not block any ventilation openings Install in accordance with the manufacturer s instructions Do not install near any heat so...

Page 3: ...burst cause a fire or even chemical burns Observe the following cautions Do not disassemble Do not crush and do not expose the battery pack to any shock or force such as hammering dropping or stepping on it Do not short circuit and do not allow metal objects to come into contact with the battery terminals Do not expose to high temperature above 60 C 140 F such as in direct sunlight or in a car par...

Page 4: ...h for an uncontrolled environment and meets the FCC radio frequency RF Exposure Guidelines in Supplement C to OET65 and RSS 102 of the IC radio frequency RF Exposure rules This equipment has very low levels of RF energy that are deemed to comply without testing of specific absorption ratio SAR If you have any questions about this product you may call Sony Customer Information Center 1 800 222 SONY...

Page 5: ...the receiving antenna Increase the separation between the equipment and receiver Connect the equipment into an outlet on a circuit different from that to which the receiver is connected Consult the dealer or an experienced radio TV technician for help The supplied interface cable must be used with the equipment in order to comply with the limits for a digital device pursuant to Subpart B of Part 1...

Page 6: ...ertain batteries this symbol might be used in combination with a chemical symbol The chemical symbols for mercury Hg or lead Pb are added if the battery contains more than 0 0005 mercury or 0 004 lead By ensuring these products and batteries are disposed of correctly you will help prevent potentially negative consequences for the environment and human health which could otherwise be caused by inap...

Page 7: ... external media device 19 Using the Wi Fi function 20 Customizing your camcorder 24 Using the menus 24 Others 25 Precautions 25 Specifications 26 Parts and controls 30 Learning more about the camcorder Help Guide Help Guide is an on line manual Refer to it for in depth instructions on the many functions of the camcorder 1 Access the Sony support page http www sony net SonyInfo Support 2 Select you...

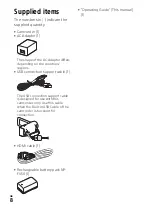
Page 8: ... Adaptor differs depending on the countries regions USB connection support cable 1 The USB connection support cable is designed for use with this camcorder only Use this cable when the Built in USB Cable of the camcorder is too short for connection HDMI cable 1 Rechargeable battery pack NP FV50 1 Operating Guide This manual 1 ...

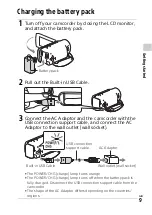
Page 9: ...nection support cable and connect the AC Adaptor to the wall outlet wall socket The POWER CHG charge lamp turns orange The POWER CHG charge lamp turns off when the battery pack is fully charged Disconnect the USB connection support cable from the camcorder The shape of the AC Adaptor differs depending on the countries regions Battery pack Built in USB Cable USB connection support cable AC Adaptor ...

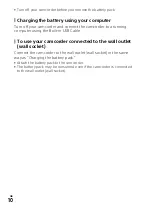
Page 10: ...er to a running computer using the Built in USB Cable To use your camcorder connected to the wall outlet wall socket Connect the camcorder to the wall outlet wall socket in the same way as Charging the battery pack Attach the battery pack to the camcorder The battery pack may be consumed even if the camcorder is connected to the wall outlet wall socket ...

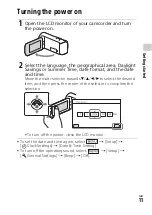
Page 11: ...eneral Settings Beep Off 1 Open the LCD monitor of your camcorder and turn the power on 2 Select the language the geographical area Daylight Savings or Summer Time date format and the date and time Move the multi selector towards to select the desired item and then press the center of the selector to complete the selection To turn off the power close the LCD monitor ...

Page 12: ...insert the memory card until it clicks The Preparing image database file Please wait screen appears if you insert a new memory card Wait until the screen disappears Insert the memory card straight in the right direction so that the camcorder can recognize it SD Speed Class Capacity operation verified microSD memory card microSDHC memory card microSDXC memory card Class 4 or faster Up to 64 GB Memo...

Page 13: ...etwork or for uploading to the Web You can check the recording time of a medium on the LCD monitor in the shooting mode To change the image quality of the movies you record select Image Quality Size REC Mode Recording movies 1 Open the lens cover 2 Open the LCD monitor and press START STOP to start recording To stop recording press START STOP again You can record photos during movie recording by p...

Page 14: ...pen the lens cover 2 Open the LCD monitor and select MODE Photo 3 Press PHOTO lightly to adjust the focus then press it fully When the focus is adjusted properly AE AF lock indicator appears on the LCD monitor Power zoom lever ...

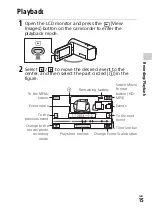
Page 15: ... mode 2 Select to move the desired event to the center and then select the part circled in the figure To the MENU screen Event name To the previous event Remaining battery To the next event Time line bar Change Event Scale button Events Change to the movie photo recording mode Play short movies Switch Movie Format button HD MP4 ...

Page 16: ...HD Quality or MP4 3 Select the image Volume Previous Next Delete Fast reverse Fast forward Context Play Pause Stop Play Stop slide show Motion Shot Video Motion Interval ADJ To go back to the Event View screen Previous Next Change to the movie photo recording mode Event name Recorded time number of photos Movie Photo Last played image Switch Image Type button ...
Page 17: ...the TV using an AV cable sold separately Using the built in projector HDR PJ330E PJ340 PJ340E PJ350E 1 Press the PROJECTOR button page 30 2 Select Image Shot on This Device 3 Follow the operating guide on the LCD monitor and then select Project 1 Adjust the focus of the projected image 2 Use the power zoom lever to move the selection frame that appears on the projected image then press the PHOTO b...

Page 18: ...lowing URL www sony net pm To check the computer system You can check the computer requirements for the software at the following URL www sony net pcenv What you can do with PlayMemories Home Viewing images on Calendar Sharing images on PlayMemories Online Import images from the camcorder Creating movie discs Uploading images to network services Playing back imported images For Windows the followi...

Page 19: ...B Terminal of your camcorder using VMC UAM2 USB Adaptor Cable sold separately Movies are copied with high definition image quality HD Recorder without a USB jack Connect a recorder to the Multi Micro USB Terminal of your camcorder using an AV cable sold separately Movies are copied with standard definition image quality Signal flow ...

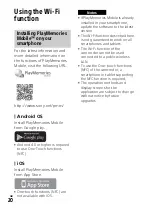
Page 20: ...le with iOS If PlayMemories Mobile is already installed in your smartphone update the software to the latest version The Wi Fi function described here is not guaranteed to work on all smartphones and tablets The Wi Fi function of the camcorder cannot be used connected to a public wireless LAN To use the One touch functions NFC of the camcorder a smartphone or tablet supporting the NFC function is ...

Page 21: ...g MP4 movies and photos to your smartphone 1 On the smartphone select Settings then select More to check that NFC is enabled 2 On the camcorder play back an image to be sent to the smartphone You can transfer MP4 movies and photos only 3 Touch the camcorder to the smartphone Notes 1 Press the View Images button then select Edit Copy Send to Smartphone Select on This Device image type 2 Select the ...

Page 22: ...word displayed on the camcorder first time only Confirm that the SSID displayed on the camcorder is selected Return to Home and start up PlayMemories Mobile iPhone iPad Using your smartphone as a wireless remote commander 1 On your camcorder select Camera Mic Shooting Assist Ctrl with Smartphone 2 On your smartphone perform in the same way as in step 3 in Connection without using NFC page 21 When ...

Page 23: ...ontact the person who set up the access point If the wireless access point has a WPS button On your camcorder select Setup Connection WPS Push Press the WPS button on the access point you want to register If you know the SSID and the password of your wireless access point On your camcorder select Setup Connection Access point settings Select the access point you want to register enter the password...

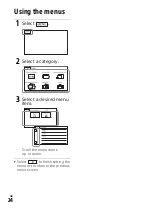
Page 24: ...Customizing your camcorder Using the menus Select to finish setting the menu or to return to the previous menu screen 1 Select 2 Select a category 3 Select a desired menu item Scroll the menu items up or down ...

Page 25: ...recordings cannot be provided even if recording or playback is not possible due to a malfunction of the camcorder recording media etc The camcorder is not dustproofed dripproofed or waterproofed Do not let your camcorder get wet for example from rain or sea water If your camcorder gets wet it may malfunction Sometimes this malfunction cannot be repaired Do not aim the camcorder at the sun or stron...

Page 26: ...n after about 1 minute and turn the camcorder on Initialize your camcorder All settings including the clock setting are reset Contact your Sony dealer or local authorized Sony service facility Specifications System Signal format NTSC color EIA standards HDR CX330 PJ340 PAL color CCIR standards HDR CX330E PJ330E PJ340E PJ350E HD TV Movie recording format AVCHD AVCHD format Ver 2 0 compatible Video ...

Page 27: ...Input Output connectors HDMI OUT jack HDMI micro connector PROJECTOR IN jack HDR PJ330E PJ340 PJ340E PJ350E HDMI micro connector USB jack Type A Built in USB Multi Micro USB Terminal Supports Micro USB compatible devices USB connection is only for output HDR CX330E PJ330E PJ340E PJ350E LCD monitor Picture 6 7 cm 2 7 type aspect ratio 16 9 Total number of pixels 230 400 960 240 Projector HDR PJ330E...

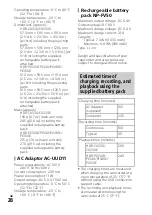
Page 28: ...1 Power requirements AC 100 V 240 V 50 Hz 60 Hz Current consumption 200 mA Power consumption 11 W Output voltage DC 5 0 V 1 500 mA Operating temperature 0 C to 50 C 32 F to 122 F Storage temperature 20 C to 60 C 4 F to 140 F Rechargeable battery pack NP FV50 Maximum output voltage DC 8 4 V Output voltage DC 6 8 V Maximum charge voltage DC 8 4 V Maximum charge current 2 1 A Capacity Typical 7 0 Wh ...

Page 29: ...rademarks of Microsoft Corporation in the United States and or other countries Mac and Mac OS are registered trademarks of Apple Inc in the United States and other countries Intel Intel Core and Pentium are trademarks of Intel Corporation in the U S and or other countries microSDXC logo is a trademark of SD 3C LLC Android Google Play are trademarks of Google Inc iOS is a registered trademark or tr...

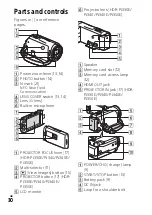
Page 30: ... lever 17 HDR PJ330E PJ340 PJ340E PJ350E Multi selector 11 View Images button 15 PROJECTOR button 17 HDR PJ330E PJ340 PJ340E PJ350E LCD monitor Projector lens HDR PJ330E PJ340 PJ340E PJ350E Speaker Memory card slot 12 Memory card access lamp 12 HDMI OUT jack PROJECTOR IN jack 17 HDR PJ330E PJ340 PJ340E PJ350E POWER CHG charge lamp 9 START STOP button 13 Battery pack 9 DC IN jack Loop for a shoulde...

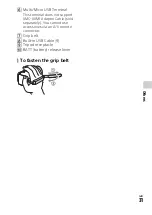
Page 31: ...erminal This terminal does not support VMC AVM1 Adaptor Cable sold separately You cannot use accessories via an A V remote connector Grip belt Built in USB Cable 9 Tripod receptacle BATT battery release lever To fasten the grip belt ...

Page 32: ... 2014 Sony Corporation Printed in China Additional information on this product and answers to frequently asked questions can be found at our Customer Support Website http www sony net GB ...

Reviews: