background image

Table of C

on

ten

ts

Enjo

y U
seful F

unc
tions

Inde
x

GB

When the camcorder is connected to other 

devices through a USB connection and the 

power of the camcorder is turned on, do not 

close the LCD panel. The image data that has 

been recorded may be lost.

If you cannot record/play back images, 

perform [Format]

If you repeat recording/deleting images for 

a long time, fragmentation of data occurs on 

the recording media. Images cannot be saved 

or recorded. In such a case, save your images 

on some type of external media first, and 

then perform [Format] by touching  


(MENU) 

 [Setup] 

 [  (Media Settings)] 

 [Format] 

 the desired medium (HDR-

CX160E/CX180E) 


.

Notes on optional accessories

We recommend using genuine Sony accessories.

Genuine Sony accessories may not be available 

in some countries/regions.

About this manual, illustrations and 

on-screen displays

The example images used in this manual for 

illustration purposes are captured using a 

digital still camera, and therefore may appear 

different from images and screen indicators that 

actually appear on your camcorder. And, the 

illustrations of your camcorder and its screen 

indication are exaggerated or simplified for 

understandability. 

In this manual, the internal memory (HDR-

CX160E/CX180E) and the memory card are 

called “recording media.”

In this manual, the DVD disc recorded with 

high definition image quality (HD) is called 

AVCHD recording disc.

Design and specifications of your camcorder 

and accessories are subject to change without 

notice.


Confirm the model name of your 

camcorder

The model name is shown in this manual when 

there is a difference in specification between 

models. Confirm the model name on the 

bottom of your camcorder. 

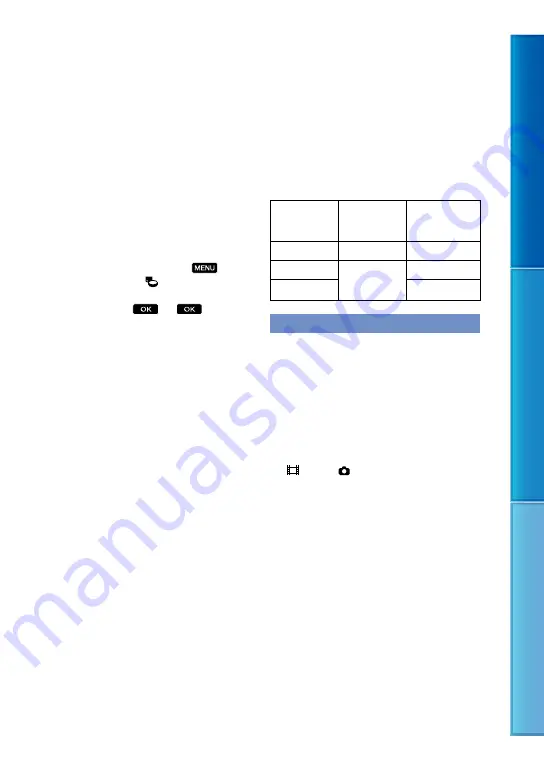
The main differences in specification of this 

series are as follows.

Recording 

media

Capacity 

of internal 

recording media

HDR-CX130E Memory card

HDR-CX160E Internal 


memory card

16 GB

HDR-CX180E

32 GB

Notes on use

Do not do any of the following. Otherwise, the 

recording media may be damaged, recorded 

images may be impossible to play back or may 

be lost, or other malfunctions could occur.

ejecting the memory card when the access 

lamp (p. 22) is lit or flashing

removing the battery pack or AC Adaptor 

from the camcorder, or applying mechanical 

shock or vibration to the camcorder when the 

 (Movie)/  (Photo) lamps (p. 24) or the 

access lamp (p. 22) are lit or flashing

When using a shoulder belt (sold separately), do 

not crash the camcorder against an object.

Summary of Contents for Handycam HDR-CX130E

Page 1: ...Table of Contents Enjoy Useful Functions Index GB Click Handycam Handbook HDR CX130E CX160E CX180E 2011 Sony Corporation 4 271 479 11 1 ...

Page 2: ...ng your camcorder connected to a computer will be also found in the Operating Guide and the PMB Help that is the Help of the supplied PMB Picture Motion Browser software Searching for information quickly Click an item on the right edge of each page and you will jump to the page for that item You can search for an item by keyword using Adobe Reader Refer to the Help of Adobe Reader for tips on how ...

Page 3: ...oofed See About handling of your camcorder p 98 Menu items LCD panel and lens A menu item that is grayed out is not available under the current recording or playback conditions The LCD screen is manufactured using extremely high precision technology so over 99 99 of the pixels are operational for effective use However there may be some tiny black points and or bright points white red blue or green...

Page 4: ...ty HD with DVD players recorders as they are not compatible with the AVCHD format If you insert a disc recorded with the AVCHD format high definition image quality HD into a DVD player recorder you may not be able to eject the disc Save all your recorded image data To prevent your image data from being lost save all your recorded images on external media periodically To save images on your compute...

Page 5: ...tion are exaggerated or simplified for understandability In this manual the internal memory HDR CX160E CX180E and the memory card are called recording media In this manual the DVD disc recorded with high definition image quality HD is called AVCHD recording disc Design and specifications of your camcorder and accessories are subject to change without notice Confirm the model name of your camcorder...

Page 6: ...me Recording Capturing images beautifully without cumbersome setting Intelligent Auto 34 Focus on the child on the left side of the screen Tracking the subject 36 Spot Focus 68 Checking your golf swing Golf Shot 66 Smth Slw REC 65 Enjoy useful functions 6 GB ...

Page 7: ... Recording mode 35 Changing the recording media Media setting 20 Capturing fireworks or a sunset in all its splendor Fireworks 69 Sunrise Sunset 69 Capturing photos during movie recording Dual Rec 37 Smile Shutter 37 7 GB Recording in a dimly lit room Low Lux 69 ...

Page 8: ... Playing back a digest of your movies Highlight Playback 38 Fun simple playback edit Using Editing on the camcorder Capturing a photo from a movie 45 Deleting unnecessary scene Dividing 44 Deleting 41 8 GB ...

Page 9: ... GB Computer 49 Easy ways to store good memories Saving External media 54 Recorder 61 Easy uploading Uploading with a PC when you are out PMB Portable DVD writer 57 60 9 GB ...

Page 10: ...ording Playback Recording 23 Recording movies 24 Shooting photos 26 Playback on the camcorder 27 Operating the camcorder while playing a movie 29 Viewing photos 30 Playing images on a TV 31 List of connection 31 Using BRAVIA Sync 33 Advanced operations Useful functions for recording movies and photos 34 Zooming 34 Recording better images automatically Intelligent Auto 34 Selecting high definition ...

Page 11: ...r creating a disc computer 46 Creating a disc with one touch Disc Burn 48 Importing movies and photos to a computer 49 Saving images on a disc 50 Saving images with an external device Selecting a method for saving images with an external device 52 The devices on which the created disc can be played back 53 Saving images on an external media device 54 Saving desired movies and photos 56 Playing bac...

Page 12: ...ity or size 74 Playback Function Items for playback 76 Edit Copy Items for editing 76 Setup Other setup items 77 Additional information Troubleshooting 84 Self diagnosis display Warning indicators 90 Using your camcorder abroad 94 Maintenance and precautions 96 About the AVCHD format 96 About the memory card 96 About the InfoLITHIUM battery pack 97 About x v Color 98 About handling of your camcord...

Page 13: ...rder by closing the LCD screen 2 Attach the battery pack by sliding it in the direction of the arrow until it clicks 3 Connect the AC Adaptor and the power cord mains lead to your camcorder and the wall outlet wall socket The CHG charge lamp lights up and charging starts The CHG charge lamp turns off when the battery pack is fully charged Battery pack CHG charge lamp DC IN jack To the wall outlet ...

Page 14: ...er will continue to use up its charge Do not leave the camcorder connected to a computer in this manner Charging with a personally assembled computer with a converted computer or through a USB hub are not guaranteed The camcorder may not function correctly depending on the USB device which is used with the computer Tips You can charge the battery by connecting the Built in USB Cable to a wall outl...

Page 15: ...B Connection support cable Tips When your camcorder is on you can check the approximate amount of remaining battery power with the remaining battery indicator at the upper right on the LCD screen To remove the battery pack Close the LCD screen Slide the BATT battery release lever and remove the battery pack To use a wall outlet wall socket as a power source Make the same connections as Step 1 Char...

Page 16: ... battery pack from your camcorder and put it in a cool place We do not recommend using an NP FV30 which only allows short recording and playback times with your camcorder In the default setting the power turns off automatically if you leave your camcorder without any operation for about 5 minutes to save battery power A Shut Off p 81 Notes on the AC Adaptor Use the nearby wall outlet wall socket w...

Page 17: ...er is opened To turn on your camcorder when the LCD screen is open press POWER 2 Select the desired language then touch Next 3 Select the desired geographical area with then touch Next To set the date and time again touch MENU Setup Clock Settings Date Time Setting Date Time When an item is not on the screen touch until the item appears Touch the button on the LCD screen MODE lamp POWER button ...

Page 18: ...appears only when you set the clock for the first time The clock starts Notes The date and time does not appear during recording but they are automatically recorded on the recording media and can be displayed during playback To display the date and time touch MENU Setup Playback Settings Data Code Date Time You can turn off the operation beeps by touching MENU Setup General Settings Beep Off If th...

Page 19: ...e camcorder is turned off Tips You can turn off the camcorder also by pressing POWER When Power On By LCD p 81 is set to Off turn off your camcorder by pressing POWER Changing the language setting You can change the on screen displays to show messages in a specified language Touch MENU Setup General Settings Language Setting a desired language ...

Page 20: ...media You can perform recording playback and editing operations on the selected medium Selecting recording media HDR CX160E CX180E Touch MENU Setup Media Settings Media Select The Media Select screen appears Touch the desired recording medium then touch Both movies and photos are recorded on the selected medium To check the recording media settings In either movie recording mode or photo recording...

Page 21: ... this camcorder Do not attach a label or the like on memory card or memory card adaptor Doing so may cause a malfunction Memory Stick PRO Duo media of up to 32 GB and SD cards of up to 64 GB have been verified to operate with your camcorder Notes A MultiMediaCard cannot be used with this camcorder Movies recorded on SDXC memory cards cannot be imported to or played back on computers or AV devices ...

Page 22: ...d to create a new Image Database File It may be possible that there is not enough free space is displayed format the memory card p 77 Confirm the direction of the memory card If you forcibly insert the memory card in the wrong direction the memory card memory card slot or image data may be damaged Do not open the cover during recording When inserting or ejecting the memory card be careful so that ...

Page 23: ...ed on the following media Movies are recorded with high definition image quality HD HDR CX130E Memory card HDR CX160E CX180E Internal recording media Tips To change the recording media see page 20 HDR CX160E CX180E 1 Fasten the grip belt 2 Open the LCD screen of your camcorder Your camcorder is turned on and the lens cover is opened ...

Page 24: ...top recording press START STOP again To display items on the LCD screen again Touch anywhere on the screen except the buttons on the LCD screen so that you can use items You can change the settings using the Display Setting menu p 74 MODE button Movie When recording a movie Photo When recording a photo STBY REC START STOP button about 4 sec after ...

Page 25: ... battery or AC Adaptor Access lamp p 22 is lit or flashing The media icon in the upper right of the LCD screen is flashing Tips You can record photos during movie recording by pressing PHOTO fully Dual Rec p 37 SteadyShot is set to Active in the default setting You can specify the priority face by touching it p 36 You can capture photos from recorded movies p 45 You can check the recordable time e...

Page 26: ...ngs Data Code a desired setting Shooting photos When disappears the photo is recorded Press MODE to turn on the Photo lamp The LCD screen display switches for photo recording mode and the screen aspect ratio becomes 4 3 Press PHOTO lightly to adjust the focus then press it fully Tips To change the image size touch MENU Image Quality Size Image Size a desired setting You cannot record photos while ...

Page 27: ...mory card HDR CX160E CX180E Internal recording media Tips To change the recording media see page 20 HDR CX160E CX180E The camcorder displays recorded images as an event automatically based on the date and time 1 Open the LCD screen of your camcorder Your camcorder is turned on and the lens cover is opened 2 Press View Images The Event View screen appears after some seconds 3 Touch to select the de...

Page 28: ...ne bar from one and a half years to three months which changes the number of the events that can be displayed on the time line bar 4 Touch an image you want to view Touch to select the image type to be displayed in the index from MOVIE movies only PHOTO photos only or MOVIE PHOTO movies and photos mixed To go back to the Event View screen Displays the previous next page Touching and holding the bu...

Page 29: ...hose functions easily When playback from the selected image reaches the last image the screen returns to the INDEX screen Touch during pause to play back movies slowly As you repeat touching during playback movies are played as fast as about 5 times about 10 times about 30 times about 60 times The recording date time and shooting conditions are recorded automatically during recording This informat...

Page 30: ...unctions shown in the figure below while you are viewing photos The figure below will be displayed when you select PHOTO by touching the Switch Image Type button on the Event Index screen Tips To repeat Slideshow touch Slideshow Set To start stop slide show Next Previous Delete Context ...

Page 31: ...s of the TV 2 Connect the camcorder to a TV Use the supplied AC Adaptor as the power source p 15 3 Play a movie or a photo on the camcorder p 27 List of connection Connecting to a high definition TV When the recording quality is high definition image quality HD the movies are played back in high definition image quality HD When the recoding quality is standard image quality STD the movies are play...

Page 32: ...n one end for the camcorder and a plug suitable for connecting your TV on the other end Copyright protected images are not output from the HDMI OUT jack of your camcorder Some TVs may not function correctly e g no sound or image with this connection Do not connect the camcorder HDMI OUT jack to an external device HDMI OUT jack as malfunction may result To set the aspect ratio according to the conn...

Page 33: ...able to output images the order of priority of the TV input jacks is as follows HDMI component S VIDEO video HDMI High Definition Multimedia Interface is an interface to send both video audio signals The HDMI OUT jack outputs high quality images and digital audio Using BRAVIA Sync You can operate your camcorder with the remote commander of your TV by connecting your camcorder to a BRAVIA Sync comp...

Page 34: ... about 31 1 2 in for telephoto You can magnify images up to 30 times using optical zooming unless SteadyShot is set to Active Tips You can set Digital Zoom if you want to zoom to a greater level Recording better images automatically Intelligent Auto When you turn the camcorder toward the subject the camcorder records using the optimum combination of the three detection modes Face detection Scene d...

Page 35: ...ce Touch MENU Image Quality Size Setting Touch HD Quality to record high definition image quality HD images or touch STD Quality to record standard definition image quality STD images Touch Recording image quality is changed Tips You can record play or edit movies in the selected image quality only To record play or edit movies in another image quality change this setting Selecting the recording m...

Page 36: ... AVCHD 1440 1080 50i format You can select the following high definition image quality HD recording mode 50p Quality AVC HD 28M PS Highest Quality AVC HD 24M FX High Quality AVC HD 17M FH Standard AVC HD 9M HQ the default setting Long Time AVC HD 5M LP The recording mode of the standard image quality STD is limited to the following value Standard STD 9M HQ M such as in 24M means Mbps Using the Tra...

Page 37: ...de are set to 50i Highest Quality or 50p 50p Quality you cannot use the Smile Shutter function while recording movies Smiles may not be detected depending on recording conditions subject conditions and the setting of your camcorder Tips You can select the subject that has priority for face detection and smile detection with Face Detection p 72 When you specify the priority subject by touching the ...

Page 38: ...isual effects If you like the Highlight Playback you have just seen you can save it as a scenario and play it back repeatedly Furthermore you can share the Highlight Playback scenes or scenarios easily using other media by converting the data format of the Highlight Playback scenes or scenarios which allows you to upload the data to the Web or create DVDs Tips Touching the button on the playback s...

Page 39: ... event to be used as the playback range then touch If no range is set the camcorder plays images in the date range of the event selected on the Event View as the playback range Theme You can select a theme for Highlight Playback The music category is selected automatically according to the theme Music You can select and add music Audio mix The original sound is played back with the music Touch to ...

Page 40: ...a saved scenario Touch MENU Playback Function Scenario select the desired scenario and then touch To erase a saved scenario Touch Scenario Erase on the screen after the scenario playback you want to erase has finished or touch while playing the scenario you want to erase then select Erase Converting and sharing Highlight Playback scenes or Highlight scenarios You can convert the data format of Hig...

Page 41: ...images once they are deleted Save important movies and photos in advance Do not remove the battery pack or the AC Adaptor from your camcorder while deleting the images It may damage the recording media Do not eject the memory card while deleting images from the memory card You cannot delete protected movies and photos Undo the protection of the movies and photos to delete them before you try to de...

Page 42: ...ouch and hold the desired thumbnail so that you can confirm the image Touch to return to the previous screen Touch Protecting recorded movies and photos Protect Protect movies and photos to avoid deleting them by mistake will be displayed on the protected images Touch MENU Edit Copy Protect To select and protect movies touch Multiple Images MOVIE PHOTO MOVIE PHOTO When Setting is set to STD Qualit...

Page 43: ... operation Notes When you record an image on the memory card for the first time create the image database file by touching MENU Setup Media Settings Repair Img DB F Memory Card Connect your camcorder to the wall outlet wall socket using the supplied AC Adaptor to prevent your camcorder from running out of power during dubbing Tips The original copy of the image will not be deleted after the copy o...

Page 44: ...the point where you want to divide the movie into scenes The movie pauses Touch to adjust the dividing point with more precision Touch Notes You cannot restore movies once they are divided You cannot divide protected movie Undo the protection of the movie to divide it before you try to divide it p 43 Do not remove the battery pack or the AC Adaptor from your camcorder while dividing the movie It m...

Page 45: ... image quality of the movie If the movie was recorded with one of the following image quality levels the image size will be set as shown below High definition image quality HD 2 1 M 16 9 Wide aspect ratio 16 9 with standard definition image quality STD 0 2 M 16 9 4 3 aspect ratio with standard definition image quality 0 3 M 4 3 The recording medium where you want to save photos should have enough ...

Page 46: ...sc with high definition image quality HD p 51 Blu ray disc playback devices a Sony Blu ray disc player PlayStation 3 etc To save images on a AVCHD recording disc with high definition image quality HD Creating a disc with one touch Disc Burn p 48 AVCHD format playback devices a Sony Blu ray disc player PlayStation 3 etc Importing movies and photos to a computer p 49 Creating a AVCHD recording disc ...

Page 47: ...s of following type with PMB For Blu ray disc see page 51 Disc type Features DVD R DVD R DVD R DL Unrewritable DVD RW DVD RW Rewritable Notes Always maintain your PlayStation 3 to use the latest version of the PlayStation 3 system software The PlayStation 3 may not be available in some countries regions ...

Page 48: ...D movies import movies to a computer first p 49 and then create a standard definition image quality STD disc p 35 Install PMB beforehand however do not start PMB Connect your camcorder to the wall outlet wall socket using the supplied AC Adaptor for this operation p 15 With Disc Burn function on your camcorder you can save movies and photos recorded on recording medium selected with the Media Sele...

Page 49: ...he camcorder screen 2 Touch USB Connect on the camcorder screen Prior to the connection select the recording medium with image data to import to the computer using the Media Select menu HDR CX160E CX180E If the USB Select screen does not appear touch MENU Setup Connection USB Connect The window for import appears on the computer screen If you want to change the location where imported media files ...

Page 50: ...c Create DVD Video Format Discs STD You can save movies with standard definition image quality STD on a DVD disc You can select high definition image quality HD movies as sources However saving such movies will take longer than the actual length of the movies because the image quality must be converted from high definition HD to standard definition STD when saving the movie on the disc To add movi...

Page 51: ...ck Create Blu ray Disc HD in step 4 of Saving images on a disc p 50 Other procedures are the same as that for creating an AVCHD disc Your computer must support the creation of Blu ray discs BD R unrewritable and BD RE rewritable media are available for creating Blu ray discs You cannot add contents to either type of disc after creating the disc Copying a disc You can copy a recorded disc to anothe...

Page 52: ...ition image quality HD or with standard definition image quality STD Built in USB Cable 60 Hard disk recorder etc Saving images on a DVD disc with standard definition image quality STD A V connecting cable supplied 61 Movies that are recorded with standard definition image quality STD Use the A V connecting cable to connect the camcorder to an external device in which images are saved Notes The AV...

Page 53: ...k DVD disc with high definition image quality HD AVCHD format playback devices such as a Sony Blu ray disc player or a PlayStation 3 DVD disc with standard definition image quality STD Ordinary DVD playback devices such as a DVD player Notes Always maintain your PlayStation 3 to use the latest version of the PlayStation 3 system software The PlayStation 3 may not be available in some countries reg...

Page 54: ...connected via a USB hub media devices with built in USB hub card reader Notes You may not be able to use external media devices with a code function The FAT file system is available for your camcorder If the storage medium of the external device was formatted for the NTFS file system etc format the external media device using the camcorder before use The format screen appears when an external medi...

Page 55: ...e The images saved in the external media device are displayed on the LCD screen Images saved on the connected external media device appear on the LCD screen When an external media device is connected the USB icon will appear on the Event View screen etc You can make menu settings of the external media device such as deleting images Touch MENU Edit Copy on Event View To disconnect the external medi...

Page 56: ...h to return to the previous screen If you select All In Event select the event to copy with You cannot select multiple events Touch on the camcorder screen Playing back images in the external media device on the camcorder Connect the camcorder to the external media device and touch Play without copying Event View of the external media device is displayed Select the image you want to view and play ...

Page 57: ...writer DVDirect Express sold separately Refer also to the instruction manual supplied with the DVD writer Notes Connect your camcorder to the wall outlet wall socket using the supplied AC Adaptor for this operation p 15 DVDirect Express is referred to as DVD writer in this section Discs that can be used 12 cm DVD R 12 cm DVD R The device does not support two layered discs 1 Connect the AC Adaptor ...

Page 58: ...dividual discs according to the image quality If the files you want to copy do not fit onto one disc replace the disc in the DVD writer with an unused one and repeat the operation 5 After the operation is completed touch the tray opens remove the disc touch on the camcorder screen 6 Touch then disconnect the USB cable Tips If the total memory size of movies to be burnt by the DISC BURN operation e...

Page 59: ... memory card from the camcorder Play the created disc to make sure copying was performed correctly before deleting the movies on your camcorder If Failed or DISC BURN failed appears on the screen insert another disc into the DVD writer and perform the DISC BURN operation again Tips Disc creation time to copy movies to the limit of the disc is about 20 to 60 minutes It may take more time depending ...

Page 60: ...he USB cable to connect your camcorder to a disc creation device which is compatible with high definition image quality HD movies such as a Sony DVD writer Refer also to the instruction manuals supplied with the device to be connected Notes Connect your camcorder to the wall outlet wall socket using the supplied AC Adaptor for this operation p 15 Sony DVD writer may not be available in some countr...

Page 61: ... a standard definition image quality STD disc with a recorder etc You can copy images played back on your camcorder on a disc or video cassette by connecting your camcorder to a disc recorder a Sony DVD writer etc other than DVDirect Express with the A V connecting cable Connect the device in either way of or Refer also to the instruction manuals supplied with the devices to be connected Notes Con...

Page 62: ...arately Connect your camcorder to the input jacks of the recording device 3 Start playback on your camcorder and record it on the recording device Refer to the instruction manuals supplied with your recording device for details 4 When dubbing is finished stop the recording device and then your camcorder Notes Since copying is performed via analog data transfer the image quality may deteriorate You...

Page 63: ...etting up image quality or size p 74 Playback Function Items for playback p 76 Edit Copy Items for editing p 76 Setup Other setup items p 77 Operating menus Follow the procedures explained below to set the menu items The Camera Mic and Setup menus have sub categories Touch the sub category icon and the screen changes to other sub category menus Grayed out menu items or settings are not available N...

Page 64: ...tter 72 Smile Sensitivity 73 Microphone Blt in Zoom Mic 73 Wind Noise Reduct 73 Micref Level 73 Shooting Assist Guide Frame 73 Display Setting 74 Image Quality Size REC Mode 35 Frame Rate 74 Setting 35 Wide Mode 75 x v Color 75 Image Size 75 Playback Function Event View 27 Highlight Movie 38 Scenario 40 Edit Copy Delete 41 Protect 42 Copy 43 Direct Copy 56 Setup Media Settings Media Select 20 Medi...

Page 65: ...You can record movies Photo You can shoot photos Smth Slw REC Smooth slow rec Fast moving subjects and actions which cannot be captured under the ordinary shooting conditions can be shot in smooth moving slow motion for about 3 seconds Press START STOP on the Smth Slw REC screen An about 3 second movie is recorded as a 12 second slow motion movie Recording disappears when recording is finished To ...

Page 66: ...amcorder automatically sets the impact point at 0 5 second before the START STOP button has been pressed and records a movie in the time period between 1 5 seconds before the impact point to 0 5 second after the impact point The size of photos becomes 1 920 1 080 You cannot record sound Image quality is not as good as that of normal recording The REC Mode will be set to Standard automatically You ...

Page 67: ...as you will shoot the subject Touch Notes Set White Balance to Auto or adjust the color in One Push under white or cool white fluorescent lamps When you select One Push keep framing white objects While the camcorder is recording a movie is grayed out and One Push cannot be set If you set White Balance Scene Selection is set to Auto Tips If you have changed the battery pack while Auto was selected ...

Page 68: ...st the focus To adjust the focus automatically touch Auto Notes Focus is automatically set to Manual Exposure You can fix the brightness of a picture manually Adjust the brightness when the subject is too bright or too dark Touch to adjust the brightness To adjust the exposure automatically touch Auto Focus You can adjust the focus manually You can select this function also when you want to focus ...

Page 69: ...ction is used Scene Selection You can record images effectively in various situations Auto Records images in average image quality without the Scene Selection function Twilight Maintains the darkening atmosphere of the distant surroundings in twilight scenes Sunrise Sunset Reproduces the atmosphere of scenes such as sunsets or sunrises Fireworks Takes spectacular shots of fireworks Landscape Shoot...

Page 70: ...t View or other screens Self Timer Press PHOTO to start the count down A photo is recorded after about 10 seconds Off Cancels the self timer On Starts the self timer recording To cancel the recording touch Reset Tele Macro This is useful to shoot small subjects such as flowers or insects You can blur out backgrounds and the subject stands out clearer Off Cancels Tele Macro Tele Macro is also cance...

Page 71: ... to Off when using a tripod sold separately then the image becomes natural On The SteadyShot function is used Off The SteadyShot function is not used Digital Zoom You can select the maximum zoom level Note that the image quality decreases when you use the digital zoom Off Up to 42 zoom is performed 350 Up to 350 zoom is performed digitally Note You can magnify images up to 30 times using optical z...

Page 72: ...g conditions subject conditions and the setting of your camcorder Face Detection may not function properly depending on recording conditions Set Face Detection to Off in this case Tips For better face detection performance shoot the subject s under the following conditions Shoot in a sufficiently bright place The subject s does not wear glasses a hat or mask The subject s faces directly towards th...

Page 73: ...duction Notes If you turn the Wind Noise Reduct function to On the Blt in Zoom Mic function turns off automatically Micref Level Microphone reference level You can select the microphone level for recording sound Normal Records various ambient sounds converting them into the appropriate level Low Records ambient sound faithfully Select Low when you want to record an exciting and powerful sound in a...

Page 74: ...are marked with REC Mode See page 35 Frame Rate You can select the frame rate to be used to record high definition image quality HD movies Using 50i is recommended for standard recording Set Frame Rate first before setting REC Mode p 35 50i For ordinary recording this frame rate is recommended 50p You can record movies with a volume of data twice that of 50i with this setting and this will allow y...

Page 75: ...e instruction manuals of the TV Off Records in ordinary color range On Records in x v Color Notes Set x v Color to On when the recorded movie will be played back on an x v Color compliant TV If the movie recorded with this function On is played back on a non x v Color compliant TV the color may not be reproduced correctly x v Color cannot be set to On When the image quality is set to the standard ...

Page 76: ...playback See Using menus p 63 on the operation Event View See page 27 Highlight Movie See page 38 Scenario See page 40 Edit Copy Items for editing See Using menus p 63 on the operation Delete See page 41 Protect See page 42 Copy HDR CX160E CX180E See page 43 Direct Copy See page 56 ...

Page 77: ... avoid the loss of important images you should save them before formatting the recording media Protected movies and photos will also be deleted While Executing is displayed do not close the LCD screen operate the buttons on the camcorder disconnect the AC Adaptor or eject the memory card from your camcorder The access lamp is lit or flashing while formatting memory card To prevent data on the inte...

Page 78: ...card is replaced with another one the file number is assigned in sequence Reset Assigns file numbers in sequence following the largest file number existing on the recording medium When the memory card is replaced with another one the file number is assigned for each memory card Data Code During playback your camcorder displays the information Date Time Camera Data recorded automatically at the tim...

Page 79: ...mage quality HD movies is 16 9 Component Select Component when connecting your camcorder to a TV with the component input jack 576i Select this when connecting your camcorder to a TV with the component input jack 1080i 576i Select this when connecting your camcorder to a TV that has the component input jack and is capable of displaying the 1080i signal 1080p 576i Select this when connecting your c...

Page 80: ... connecting the camcorder to a computer or other USB device Auto The camcorder automatically selects the USB transfer mode depending on the connected device Mass Storage This is a USB transfer mode compatible to many types of USB devices MTP This is a USB transfer mode compatible with certain types of computers Notes When you connect the camcorder to other devices using the MTP mode movies that ha...

Page 81: ...This adjustment does not affect the recorded images in any way A Shut Off Auto shut off You can set your camcorder to turn off automatically when you do not operate your camcorder for more than about 5 minutes On The camcorder turns off automatically Off The camcorder does not turn off automatically Notes When you connect your camcorder to a wall outlet wall socket the camcorder does not turn off ...

Page 82: ...irst one displayed on the Event Index screen The movie is saved on the internal recording media The movie is recorded with high definition image quality HD Tips When you set this item to On and touch the demonstration starts playing If you make one of the following operations the demonstration will be suspended It appears again if no operation is performed for about 10 minutes Pressing START STOP ...

Page 83: ...amcorder in the area where you are living Destination Select this item when you want to use the camcorder with the area setting set to another place Tips If you visit a certain place often and want to use the camcorder with the area setting set to that place it is useful if you set the place to Destination ...

Page 84: ... p 84 Batteries power sources p 85 LCD screen p 86 Memory card p 86 Recording p 86 Playback p 88 Playing back images stored on memory card on other devices p 88 Editing movies photos on your camcorder p 89 Playback on the TV p 89 Copying Connecting to other devices p 89 Connecting to a computer p 90 Overall operations The power does not turn on Attach a charged battery pack to the camcorder p 13 T...

Page 85: ... AC Adaptor In the default setting when about 5 minutes have elapsed while you do not operate your camcorder the camcorder is automatically turned off A Shut Off Change the setting of A Shut Off p 81 or turn on the power again Charge the battery pack p 13 The CHG charge lamp does not light while the battery pack is being charged Close the LCD screen p 13 Attach the battery pack to the camcorder co...

Page 86: ... a computer format it again on your camcorder p 77 Images stored on the memory card cannot be deleted The maximum number of images that you can delete on the index screen at one time is 100 You cannot delete the protected images The data file name is not indicated correctly or flashes The file is damaged The file format is not supported by your camcorder p 97 Recording Refer also to Memory card p ...

Page 87: ...d and the point that the recording movie is started or stopped actually On your camcorder there may be a slight time difference between the point where you press START STOP and the actual point that recording movie starts stops This is not a malfunction The horizontal to vertical ratio of the movie 16 9 wide 4 3 cannot be changed The horizontal to vertical ratio of high definition image quality HD...

Page 88: ...t the top right corner of the screen flashes or before the access lamp is turned off after recording This may damage your image data and is displayed is indicated on a thumbnail The image data base file may be damaged Check the data base file by touching MENU Setup Media Settings Repair Img DB F the recording medium HDR CX160E CX180E If it still appears delete the image with p 41 No sound or only ...

Page 89: ...reen of your camcorder can display recording images across the entire screen full pixel display However this may cause slight trimming of the top bottom right and left edges of images when played back on a TV which is not compatible with full pixel display It is recommended you record images using the outer frame of Guide Frame p 73 as a guide The image appears distorted on the 4 3 TV This happens...

Page 90: ...check the following If the problem persists even after you have tried to fix a couple of times contact your Sony dealer or local authorized Sony service facility In this case when you contact them give them all the numbers of the error code beginning with C or E C or E Self diagnosis display C 04 The battery pack is not an InfoLITHIUM battery pack V series Use an InfoLITHIUM battery pack V series ...

Page 91: ...ricted on another device Warning indicator pertaining to camera shake warning The camcorder is unsteady so camera shake easily occurs Hold the camcorder steady with both hands and record the image However note that the camera shake warning indicator does not disappear Warning indicator pertaining to photo recording The recording media is full Photos cannot be recorded during processing Wait for a ...

Page 92: ...nition image quality STD movies or photos Inconsistencies found in image database file Do you want to repair the image database file The Image Database File is damaged Do you want to repair the Image Database File Inconsistencies found in image database file Cannot record or play HD movies Do you want to repair the image database file You cannot record or play back movies because no movie manageme...

Page 93: ...puter This memory card may not be able to record or play movies Use a memory card recommended for your camcorder p 21 This memory card may not be able to record or play images correctly Use a memory card recommended for your camcorder p 21 Do not eject the memory card during writing Data may be damaged Reinsert the memory card and follow the instructions on the LCD screen Other Maximum number of i...

Page 94: ...D movies To view standard definition image quality STD movies you need a PAL system based TV with AUDIO VIDEO input jacks An A V connecting cable must be connected On TV color systems Your camcorder is a PAL system based camcorder If you want to view the playback image on a TV it must be a PAL system based TV with an AUDIO VIDEO input jack System Used in PAL Australia Austria Belgium China Czech R...

Page 95: ...o Istanbul 03 00 Moscow Nairobi 03 30 Tehran 04 00 Abu Dhabi Baku 04 30 Kabul 05 00 Karachi Islamabad 05 30 Calcutta New Delhi 06 00 Almaty Dhaka 06 30 Yangon 07 00 Bangkok Jakarta 08 00 Hong Kong Singapore Beijing 09 00 Seoul Tokyo 09 30 Adelaide Darwin Time zone differences Area setting 10 00 Melbourne Sydney 11 00 Solomon Is 12 00 Fiji Wellington Eniwetok Kwajalein 11 00 Samoa 10 00 Hawaii 09 0...

Page 96: ...ned cannot be played on your camcorder About the memory card A memory card formatted by a computer Windows OS Mac OS does not have guaranteed compatibility with your camcorder Data read write speed may vary depending on the combination of the memory card and memory card compliant product you use Damaged or lost data may occur in the following cases the data will not be compensated for If you eject...

Page 97: ... supports parallel data transfer However the transfer speed may differ depending on the type of media you use This product cannot record or play data that uses MagicGate technology MagicGate is a copyright protection technology that records and transfers the contents in an encrypted format About the InfoLITHIUM battery pack Your camcorder operates only with an InfoLITHIUM V series battery packs In...

Page 98: ...ully charged state or when the battery pack is frequently used Use the remaining battery time indication as a rough guide only The mark that indicates low battery flashes even if there are still 20 minutes of battery time remaining depending on the operating conditions or ambient temperature About storage of the battery pack If the battery pack is not used for a long time fully charge the battery ...

Page 99: ...ttery electrolytic liquid has leaked Consult your local authorized Sony service facility Wash off any liquid that may have contacted your skin If any liquid gets in your eyes wash with plenty of water and consult a doctor When not using your camcorder for a long time To keep your camcorder in optimum state for a long time turn it on and let it run by recording and playing back images about once a ...

Page 100: ...cticide and sunscreen Handling the camcorder with above substances on your hands Leaving the casing in contact with rubber or vinyl objects for a long period of time About care and storage of the lens Wipe the surface of the lens clean with a soft cloth in the following instances When there are fingerprints on the lens surface In hot or humid locations When the lens is exposed to salty air such as...

Page 101: ...uo MagicGate MagicGate Memory Stick and MagicGate Memory Stick Duo are trademarks or registered trademarks of Sony Corporation InfoLITHIUM is a trademark of Sony Corporation x v Colour is a trademark of Sony Corporation BIONZ is a trademark of Sony Corporation BRAVIA is a trademark of Sony Corporation DVDirect is a trademark of Sony Corporation Blu ray Disc and the logo are trademarks Dolby and th...

Page 102: ... software are provided in your camcorder We provide this software based on license agreements with their owners of copyright Based on requests by the owners of copyright of these software applications we have an obligation to inform you of the following Please read the following sections Read license3 pdf in the License folder on the CD ROM You will find licenses in English of C Library zlib and l...

Page 103: ...scene detection camera shake detection 34 Center Indicator Meaning STBY REC Recording status 24 Slide show set Warning 90 Playback mode 29 Right Indicator Meaning 50i Recording image quality HD STD frame rate 50p 50i and recording mode PS FX FH HQ LP 35 60min Remaining battery Recording playback editing media 20 0 00 00 Counter hour minute second 00Min Estimated recording remaining time Photo size...

Page 104: ...101 0005 Data file name 30 Protected image 42 Indicators and their positions are approximate and may differ from what you actually see Some indicators may not appear depending on your camcorder model Parts and controls Figures in are reference pages Lens G lens Built in microphone LCD screen Touch panel 17 38 If you rotate the LCD panel 180 degrees you can close the LCD panel with the LCD screen f...

Page 105: ...ack 31 USB jack 54 57 Power zoom lever 34 PHOTO button 26 CHG charge lamp 13 Battery pack 13 START STOP button 24 DC IN jack 13 A V Remote Connector 31 Grip belt 23 Built in USB Cable 14 Memory card access lamp 22 While the lamp is lit or flashing the camcorder is reading or writing data Tripod receptacle Attach a tripod sold separately to the tripod receptacle using a tripod screw sold separately...

Page 106: ...8 Disc recorder 61 Display Setting 74 Divide 44 Dual Rec 37 DVDirect Express 57 DVD writer 57 60 E Edit Copy 76 Empty 77 Event Index 27 Exposure 68 External media 54 F Face Detection 72 Fader 70 FH 35 File Number 78 Fireworks 69 Focus 68 Format 77 Frame Rate 74 Fully charged 13 FX 35 G Golf Shot 66 Guide Frame 73 H HD STD Set 35 HDMI Resolution 79 Highlight Playback 38 Highlight Setting 39 HQ 35 I...

Page 107: ...d time 17 Setup 77 Shooting Mode 65 Smile Sensitivity 73 Smile Shutter 37 Smth Slw REC 65 Snow 69 Spot Focus 68 Spotlight 69 Spot Meter 68 Spot Meter Fcs 67 SteadyShot Movie 71 SteadyShot Photo 71 SummerTime 82 Sunrise Sunset 69 Supplied items 3 T Tele Macro 70 Telephoto 34 Thumbnail 42 Tripod 105 Troubleshooting 84 Turning the power on 17 TV 31 TV color systems 94 TV Type 79 Twilight 69 U USB cab...

Page 108: ...Additional information on this product and answers to frequently asked questions can be found at our Customer Support Website http www sony net ...

Reviews: