background image

116

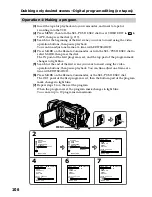
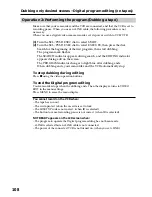
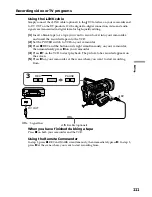
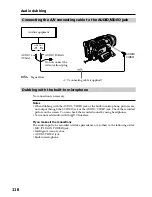
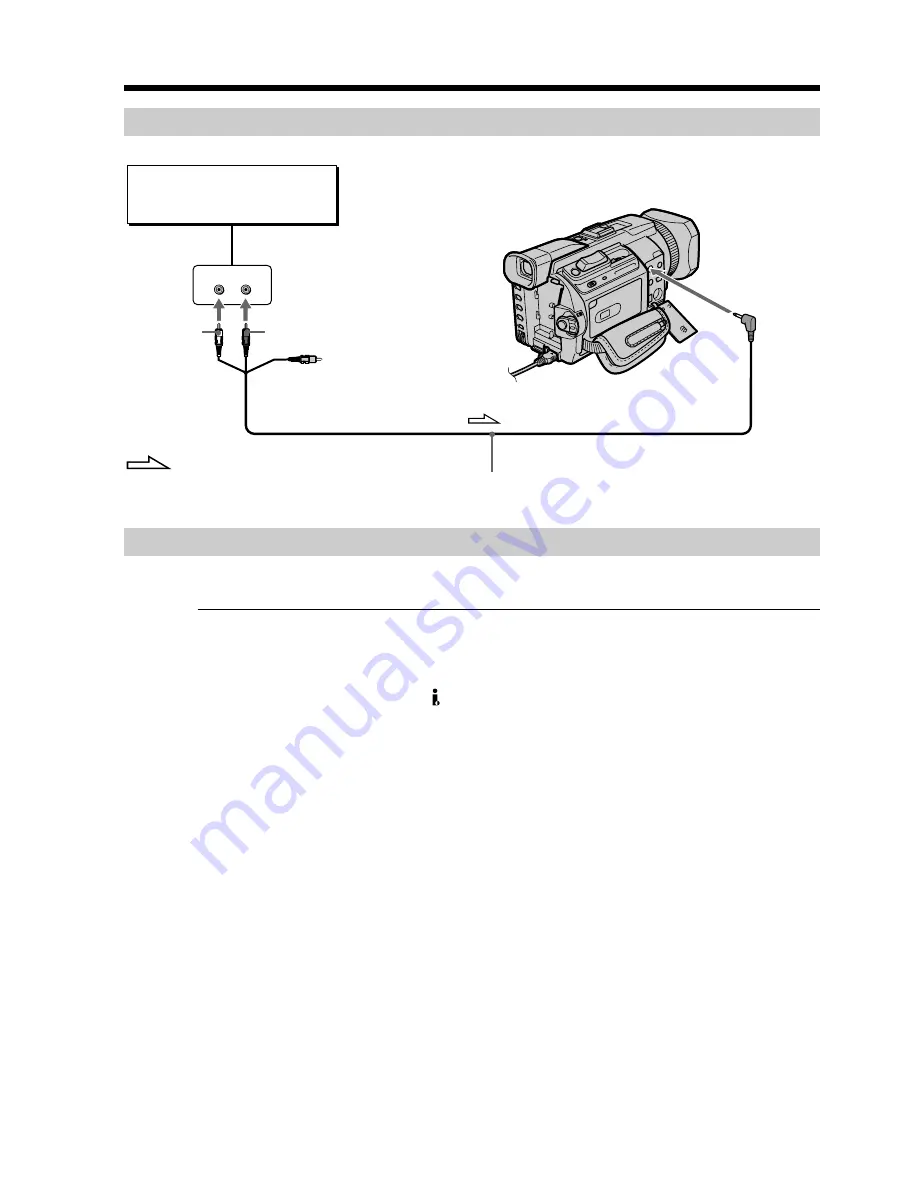
Connecting the A/V connecting cable to the AUDIO/VIDEO jack

Dubbing with the built-in microphone

No connection is necessary.

Notes

•When dubbing with the AUDIO/VIDEO jack or the built-in microphone, pictures are

not output through the S VIDEO jack or the AUDIO/VIDEO jack. Check the recorded
picture on the screen. You can check the recorded sound by using headphones.

•You cannot add audio with the   DV Interface.

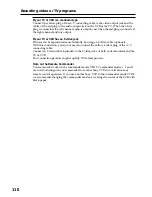
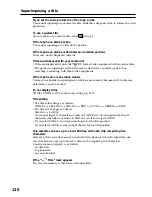
If you make all the connections

The audio input to be recorded will take precedence over others in the following order:
•MIC (PLUG IN POWER) jack
•Intelligent accessory shoe
•AUDIO/VIDEO jack
•Built-in microphone

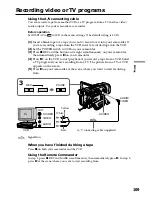
Audio dubbing

LINE OUT

L

R

AUDIO/
VIDEO

Audio equipment

Do not connect the
video (yellow) plug.

: Signal flow

AUDIO L
(White)

AUDIO R (Red)

A/V connecting cable (supplied)

Summary of Contents for Handycam DCR-TRV950

Page 1: ...selector to 70 or 100 while the POWER switch is set to CAMERA or MEMORY NETWORK DCR TRV950 only Setting 70 100 OFF To erase the zebra pattern Set the ZEBRA selector to OFF When the ZEBRA selector is set to 100 The portion of the picture where zebra pattern appears is an area of high brightness and overexposure Shooting with the zebra pattern Meaning The zebra pattern appears in the portion of the ...

Page 2: ...BAR again the color bar disappears When you adjust color on the screen Connect your camcorder to the TV p 45 and adjust image color on the TV screen While the color bar is displayed The following functions do not work However the settings before the color bar is displayed are retained BACK LIGHT SPOT LIGHT Picture effect Digital effect PROGRAM AE Shutter speed adjustment White balance adjustment E...

Page 3: ...e functions manually Select this position c to maintain the settings Using the PROGRAM AE You can select the PROGRAM AE Auto Exposure to suit your specific shooting requirements Soft portrait This mode brings out the subject while creating a soft background for subjects such as people or flowers Sports lesson This mode minimizes camera shake on fast moving subjects such as in tennis or golf Beach ...

Page 4: ...950 only p 67 2 Press PROGRAM AE 3 Turn the SEL PUSH EXEC dial to select the desired mode then press the dial The indicator changes as follows y y y y To cancel the PROGRAM AE Set the AUTO LOCK selector to the AUTO LOCK or press PROGRAM AE The PROGRAM AE indicator disappears Shooting with manual adjustment 3 2 PROGRAM AE 1 AUTO LOCK HOLD ...

Page 5: ...K DCR TRV950 only Sports lesson does not work The indicator flashes The PROGRAM AE does not work When you are recording images on a Memory Stick using the MEMORY MIX The indicator flashes While WHT BAL is set to automatic adjustment The white balance is adjusted even if the PROGRAM AE is selected You can adjust the following functions while using the PROGRAM AE Backlight Spot light Exposure Flexib...

Page 6: ... 1 180 y 1 250 y 1 350 y 1 500 The shutter speed increases when a smaller number is selected The size of the picture displayed on the screen also increases Conversely the shutter speed is slower when a larger number is selected The picture displayed on the screen will thus decrease in size To return to automatic shutter speed mode Set the AUTO LOCK selector to AUTO LOCK or press SHUTTER SPEED The ...

Page 7: ...lights up or dims the screen or the color change may occur depending on the shutter speed When the POWER switch is set to MEMORY NETWORK DCR TRV950 only Shutter speeds available in the MEMORY NETWORK DCR TRV950 only mode are different from those in the CAMERA mode Even if you set the shutter speed faster than 1 500 or slower than 1 60 while the POWER switch is set to CAMERA the shutter speed setti...

Page 8: ...ress WHT BAL 3 Turn the SEL PUSH EXEC dial to select the appropriate white balance mode under the following conditions As you turn the dial the display changes as follows One push white balance y Outdoor y n Indoor Indicator One push white balance Outdoor n Indoor WHT BAL 3 1 AUTO LOCK HOLD 2 Shooting conditions Adjusting the white balance according to the light source Follow the procedure describ...

Page 9: ...ure is being taken in a studio lit by TV lighting We recommend that you record in the n indoor mode When you record under fluorescent lamp Use the automatic white balance mode or the one push white balance mode Your camcorder may not adjust the white balance correctly if you use the n indoor mode Shooting when lighting conditions have changed Readjust the white balance while the camcorder is in st...

Page 10: ...e the POWER switch is set to CAMERA or MEMORY NETWORK DCR TRV950 only p 67 2 Press EXPOSURE The exposure indicator appears 3 Turn the SEL PUSH EXEC dial to adjust the brightness To return to automatic exposure Set the AUTO LOCK selector to AUTO LOCK or press EXPOSURE The exposure indicator disappears When you adjust the exposure manually the following functions do not work Backlight Spot light Shu...

Page 11: ...e the POWER switch is set to CAMERA or MEMORY NETWORK DCR TRV950 only p 67 2 Press FN to display PAGE1 3 Press SPOT METER The SPOT METER screen appears 4 Press the desired area in the frame on the LCD screen The SPOT METER indicator flashes on the LCD screen The exposure of the point you selected is adjusted 5 Press OK to return to PAGE1 To return to FN Press EXIT To return to automatic exposure S...

Page 12: ...he 9 indicator appears 2 Turn the focus ring to sharpen focus To return to the autofocus Set FOCUS to AUTO To record distant subjects When you set FOCUS to INFINITY the focus changes to a setting appropriate for an object in the far distance and the indicator appears When you release FOCUS your camcorder returns to the manual focus Use this mode when your camcorder focuses on near objects even tho...

Page 13: ...is too close to focus on Focal distance information is displayed for about three seconds on the screen in the following cases When switching the focus adjustment mode from autofocus to manual When turning the focus ring Focal distance information This information aids focusing if it is not easy to focus on the subject for example when recording in the dark Use this information as a rough guide to ...

Page 14: ...red area in the frame on the LCD screen The SPOT FOCUS indicator flashes on the LCD screen The spot focus of the point you selected is adjusted 5 Press OK to return to PAGE1 To return to FN Press EXIT To return to the autofocus Set FOCUS to AUTO When Using PROGRAM AE Spot focus do not work Focal distance information It is not displayed on the screen Using the spot focus Spot Focus 2 3 5 FN SPOT FO...

Page 15: ...he SEL PUSH EXEC dial to adjust the recording level a Recording level meter b Decreases the recording level c Increases the recording level To clear the recording level adjustment display Press AUDIO LEVEL To return to automatic recording sound level Set MIC LEVEL to AUTO in the menu setting MENU END TAPE SET REC MODE AUD I O MODE REMA I N M I C LEVEL RETURN MANUAL MENU END 2 3 30 20 12 0 dB MENU ...

Page 16: ...ng level indicator appears at the lower right on the screen The sound input through the AUDIO VIDEO jack or the DV Interface You cannot adjust the recording level When MIC LEVEL is set to AUTO You cannot adjust the recording level however the recording level adjustment display is displayed Adjusting recording level manually Sound recording level ...

Page 17: ...SH EXEC dial to select the desired recording time then press the dial The time 0 5SEC y 1SEC y 1 5SEC y 2SEC 5 Turn the SEL PUSH EXEC dial to select RETURN then press the dial 3 Turn the SEL PUSH EXEC dial to select ON then press the dial 10 min 10 min 1 s 1 s 9 min 59 s 9 min 59 s a b c 3 CAMERA SET D ZOOM PHOTO REC 16 9WIDE STEADYSHOT FRAME REC INT REC RETURN ON MENU END MENU END MENU END MENU E...

Page 18: ...menu settings Set the POWER switch to other than CAMERA To perform normal recording during the interval recording Press START STOP The interval indicator flashes During the waiting time you can perform normal recording only once To stop normal recording press START STOP again Step4 is displayed on the screen On recording time There may be a discrepancy in the recording time of up to six frames fro...

Page 19: ...es a recording for about six frames and returns to recording standby 4 Move the subject and repeat step 3 To cancel the frame recording Perform either of the following Set FRAME REC to OFF in the menu settings Set the POWER switch to other than CAMERA Note The remaining tape time is not indicated correctly if you use this function continuously When using the frame recording The last recorded frame...

Page 20: ...ou cannot process externally input scenes using picture effect You cannot record images on a tape on your camcorder when you have processed the image using the picture effect However you can record images on a Memory Stick p 144 156 or on a VCR using your camcorder as a player Pictures processed by picture effect Pictures processed by picture effect are not output through the DV Interface When you...

Page 21: ...er to page 60 for details 5 Press OK to return to PAGE2 To return to FN Press EXIT To cancel the digital effect Press OFF to return to PAGE2 Notes You cannot process externally input scenes using digital effect You cannot record images on a tape on your camcorder when you have processed the image using digital effect However you can record images on a Memory Stick p 144 156 or on a VCR using your ...

Page 22: ...the PB ZOOM screen The area you pressed moves to the center of the screen and the playback image is enlarged approximately at twice the size If you press the other area again the area moves to the center of the screen 4 Adjust the zoom ratio by the power zoom lever You can enlarge the image from approximately 1 1 times up to five times its size W Decreases the zoom ratio T Increases the zoom ratio...

Page 23: ...camcorder when you have processed the picture using the tape PB ZOOM The PB ZOOM is automatically canceled when you activate the following Set the POWER switch to OFF CHG Stop playback Press MENU Insert a Memory Stick Pictures in the PB ZOOM Pictures in the PB ZOOM are not output through the DV Interface and the USB jack In the PB ZOOM If you press DISPLAY TOUCH PANEL button the frame on the PB ZO...

Page 24: ...to rewind the tape to the tape counter s zero point The tape stops automatically when the tape counter reaches approximately zero The ZERO SET MEMORY indicator disappears and the time code appears 5 Press N Playback starts from the counter s zero point Notes When you press ZERO SET MEMORY before rewinding the tape the zero set memory will be canceled There may be a discrepancy of several seconds f...

Page 25: ...ote Commander to select the title for playback Your camcorder automatically starts playback of the scene having the title that you selected a Actual point you are trying to search for b Present point on the tape To stop searching Press x If you use a cassette without cassette memory You cannot superimpose or search a title If a tape has a blank portion between recorded portions The title search ma...

Page 26: ...efault setting is ON 1 Set the POWER switch to VCR 2 Press SEARCH MODE on the Remote Commander repeatedly until the DATE SEARCH indicator appears The indicator changes as follows TITLE SEARCH t DATE SEARCH t PHOTO SEARCH no indicator T PHOTO SCAN 3 Press or on the Remote Commander to select the date for playback Your camcorder automatically starts playback at the beginning of the selected date a A...

Page 27: ...memory below Searching for the date without using cassette memory 1 Set the POWER switch to VCR 2 Press MENU then select CM SEARCH in to OFF with the SEL PUSH EXEC dial p 213 3 Press SEARCH MODE on the Remote Commander repeatedly until the DATE SEARCH indicator appears The indicator changes as follows DATE SEARCH t PHOTO SEARCH t PHOTO SCAN t no indicator 4 Press on the Remote Commander to search ...

Page 28: ...Press SEARCH MODE on the Remote Commander repeatedly until the PHOTO SEARCH indicator appears The indicator changes as follows TITLE SEARCH t DATE SEARCH t PHOTO SEARCH no indicator T PHOTO SCAN 3 Press or on the Remote Commander to select the date for playback Your camcorder automatically starts playback of the photo having the date that you selected a Actual point you are trying to search for b ...

Page 29: ...hen press the dial p 213 3 Press SEARCH MODE on the Remote Commander repeatedly until the PHOTO SEARCH indicator appears The indicator changes as follows DATE SEARCH t PHOTO SEARCH t PHOTO SCAN t no indicator 4 Press or on the Remote Commander to select the photo for playback Each time you press or your camcorder searches for the previous or next photo Your camcorder automatically starts playback ...

Page 30: ...menu settings 3 Press or on the Remote Commander Each photo is played back for about five seconds automatically To stop scanning Press x If a tape has a blank portion between recorded portions PHOTO SEARCH PHOTO SCAN may not work correctly The available number of photos that can be searched using the cassette memory The available number is up to 12 photos However you can search 13 photos or more u...

Page 31: ...r DISPLAY DATA CODE SEARCH MODE 1 Insert a blank tape or a tape you want to record over into the VCR and insert the recorded tape into your camcorder 2 Prepare the VCR for recording then set the input selector to LINE Connect the A V connecting cable to the AUDIO VIDEO jack Refer to the operating instructions of the VCR 3 Set the POWER switch to VCR on your camcorder 4 Play back the recorded tape ...

Page 32: ... the TV When the white plug is connected the left channel audio is output and when the red plug is connected the right channel audio is output If your VCR has an S video jack Pictures can be reproduced more faithfully by using an S video cable optional With this connection you do not need to connect the yellow video plug of the A V connecting cable Connect an S video cable optional to the S video ...

Page 33: ...e VCR for recording then set the input selector to LINE Refer to the operating instructions of the VCR 3 Set the POWER switch to VCR on your camcorder 4 Play back the recorded tape on your camcorder 5 Start recording on the VCR Refer to the operating instructions of the VCR When you have finished dubbing a tape Press x on both your camcorder and the VCR You can connect one VCR only using the i LIN...

Page 34: ...g on tapes recorded on other equipment Operation 1 Making a program p 106 Operation 2 Performing the program dubbing a tape p 108 Note When editing digital video on tapes the operation signals cannot be sent with the LANC Step 1 Connecting the VCR You can connect both an A V connecting cable and an i LINK cable When you use the A V connecting cable connect the devices as illustrated on page 95 Whe...

Page 35: ... Setting the VCR to operate with the A V connecting cable To edit using the VCR send the control signal by infrared rays to the remote sensor on the VCR When you connect using the A V connecting cable follow the procedure below steps 1 to 4 to send the control signal correctly 1 Set the IR SETUP code 1 Set the POWER switch to VCR on your camcorder 2 Turn the power of the connected VCR on then set ...

Page 36: ...lectric 8 32 77 94 101 Goldstar LG 47 GO VIDEO 71 Hitachi 8 42 78 HQ 40 Instant Replay 77 78 JC Penny 8 21 33 35 36 42 77 JVC 12 13 14 21 33 35 Kenwood 21 33 35 47 LXI Sears 36 37 42 44 45 47 49 80 Magnavox 17 77 78 83 Marantz 21 33 35 Marta 47 Memorex 37 77 Minolta 8 42 Brand IR SETUP code Mitsubishi MGA 22 23 24 28 29 Multitech 23 32 80 NEC 21 33 35 Olympic 77 78 Optimus 22 Orion 60 Panasonic 16...

Page 37: ...to cancel recording pause is z Select PB if the button to cancel recording pause is N 3 Setting your camcorder and the VCR to face each other Locate the infrared rays emitter of your camcorder and face it towards the remote sensor of the VCR Set the devices about 30 cm 12 in apart and remove any obstacles between the devices Dubbing only desired scenes Digital program editing on tapes VIDEO EDIT E...

Page 38: ...en the VCR does not operate correctly After checking the code in About IR SETUP codes set the IR SETUP or the PAUSEMODE again Place your camcorder at least 30 cm 12 in away from the VCR Refer to the operating instructions of your VCR Dubbing only desired scenes Digital program editing on tapes 2 3 VIDEO EDIT EDIT SET CONTROL ADJ TEST CUT IN CUT OUT IR SETUP PAUSEMODE IR TEST RETURN ENGAGE REC PAUS...

Page 39: ...he dial When you connect using an i LINK cable You cannot dub the titles display indicators Dubbing only desired scenes Digital program editing on tapes 3 5 4 6 OTHERS DATA CODE BEEP COMMANDER DISPLAY VIDEO EDIT RETURN RETURN TAPE MEMORY VIDEO EDIT EDIT SET CONTROL ADJ TEST CUT IN CUT OUT IR SETUP PAUSEMODE IR TEST RETURN IR i LINK 0 08 55 06 MENU END VIDEO EDIT MARK UNDO ERASE ALL START EDIT SET ...

Page 40: ...usting the synchronization The EXECUTING indicator flashes on the screen When finished the indicator changes to COMPLETE 4 Rewind the tape in the VCR then start slow playback Take a note of the first number value of each IN and the closing number value of each OUT 5 Calculate the average of all the first number values of each IN and the average of all the last number values of each OUT 6 Turn the ...

Page 41: ...TEST CUT IN CUT OUT IR SETUP PAUSEMODE IR TEST RETURN 0 0 08 55 06 MENU END VIDEO EDIT EDIT SET CONTROL ADJ TEST CUT IN CUT OUT IR SETUP PAUSEMODE IR TEST RETURN 0 0 08 55 06 MENU END Notes When you complete step 3 the image used to adjust the synchronization is recorded for about 50 seconds If you start recording from the very beginning of the tape the first few seconds of the tape may not record...

Page 42: ...s then pause playback You can fine adjust one frame at a time with EDITSEARCH 6 Press MARK on the Remote Commander or the SEL PUSH EXEC dial The OUT point of the first program is set then the bottom part of the program mark changes to light blue 7 Repeat steps 3 to 6 then set the program When the program is set the program mark changes to light blue You can set up to 20 programs in maximum MENU 4 ...

Page 43: ...asing all programs 1 Turn the SEL PUSH EXEC dial to select ERASE ALL 2 Turn the SEL PUSH EXEC dial to select EXECUTE then press the dial All the program marks flash then the settings are canceled To cancel erasing all programs Select RETURN with the SEL PUSH EXEC dial in step 2 To cancel a program you have set Press MENU The program is stored in memory until the tape is ejected Note You cannot ope...

Page 44: ...er dubbing ends When dubbing ends your camcorder and the VCR automatically stop To stop dubbing during editing Press x using the video operation buttons To end the Digital program editing Your camcorder stops when the dubbing ends Then the display returns to VIDEO EDIT in the menu settings Press MENU to erase the menu display You cannot record on the VCR when The tape has run out The write protect...

Page 45: ...y on your camcorder then immediately press X on your camcorder 4 Press N on the VCR to start playback if you record a tape from a VCR Select a TV program if you are recording from a TV The picture from a TV or VCR appears on the screen 5 Press X on your camcorder at the scene where you want to start recording from When you have finished dubbing a tape Press x on both your camcorder and the VCR Usi...

Page 46: ...nal With this connection you do not need to connect the yellow video plug of the A V connecting cable Connect an S video cable optional to the S video jacks of both your camcorder and the TV or VCR This connection produces higher quality DV format pictures Note on the Remote Commander Your camcorder works in the commander mode VTR 2 Commander modes 1 2 and 3 are used to distinguish your camcorder ...

Page 47: ...der 3 Press z REC and the button on its right simultaneously on your camcorder then immediately press X on your camcorder 4 Press N on the VCR to start playback The picture to be recorded appears on the screen 5 Press X on your camcorder at the scene where you want to start recording from When you have finished dubbing a tape Press x on both your camcorder and the VCR Using the Remote Commander In...

Page 48: ... Before recording Make sure that the DV IN indicator appears on the LCD screen or in the viewfinder The DV IN indicator may appear on both equipment Note on the Remote Commander Your camcorder works in the commander mode VTR 2 Commander modes 1 2 and 3 are used to distinguish your camcorder from other Sony VCRs to avoid erroneous remote control operation If you use another Sony VCR in the commande...

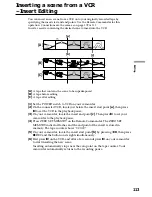
Page 49: ...the VCR to the playback pause 3 On your camcorder locate the insert end point c Then press X to set your camcorder to the playback pause 4 Press ZERO SET MEMORY on the Remote Commander The ZERO SET MEMORY indicator flashes and the end point of the insert is stored in memory The tape counter shows 0 00 00 5 On your camcorder locate the insert start point b by pressing m then press z REC and the but...

Page 50: ...r When the inserted picture is played back Pictures and sound may be distorted at the end of the inserted portion This is not a malfunction Pictures and sound at the start point and the end point may be distorted in the LP mode To insert a scene without setting the insert end point Skip steps 3 and 4 Press x when you want to stop inserting If you press FN The ZERO SET MEMORY indicator is not displ...

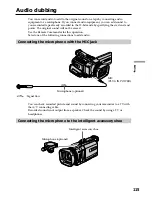
Page 51: ...e the Remote Commander for this operation Select one of the following connections to add audio Connecting the microphone with the MIC jack You can check recorded picture and sound by connecting your camcorder to a TV with the A V connecting cable Recorded sound is not output from a speaker Check the sound by using a TV or headphones Connecting the microphone to the intelligent accessory shoe Micro...

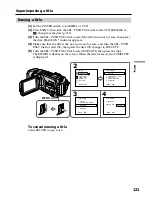
Page 52: ...rded picture on the screen You can check the recorded sound by using headphones You cannot add audio with the DV Interface If you make all the connections The audio input to be recorded will take precedence over others in the following order MIC PLUG IN POWER jack Intelligent accessory shoe AUDIO VIDEO jack Built in microphone Audio dubbing LINE OUT L R AUDIO VIDEO Audio equipment Do not connect t...

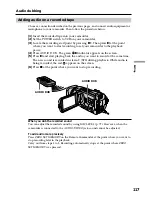
Page 53: ...s X and start playing back the audio you want to record at the same time The new sound is recorded in stereo 2 ST2 during playback While audio is being recorded the red appears on the screen 6 Press x at the point where you want to stop recording When you dub the recorded sound You can adjust the recorded sound by using MIC LEVEL p 79 However when the camcorder is connected to the AUDIO VIDEO jack...

Page 54: ...ecorded on a tape already recorded in the 16 bit mode 32 kHz 44 1 kHz or 48 kHz New audio cannot be recorded on a tape already recorded in the LP mode You cannot add audio on the blank portion of the tape If an i LINK cable optional is connected to your camcorder You cannot add audio to a recorded tape We recommend that you add audio on a tape recorded with your camcorder If you add audio on a tap...

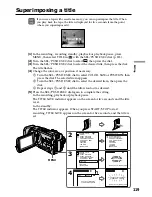
Page 55: ...al 3 Repeat steps 1 and 2 until the title is laid out as desired 5 Press the SEL PUSH EXEC dial again to complete the setting In the recording playback or playback pause The TITLE SAVE indicator appears on the screen for five seconds and the title is set In the standby The TITLE indicator appears When you press START STOP to start recording TITLE SAVE appears on the screen for five seconds and the...

Page 56: ...memory becomes full In this case delete data you do not need To not display titles Set TITLE DSPL to OFF in the menu settings p 213 Title setting The title color changes as follows WHITE y YELLOW y VIOLET y RED y CYAN y GREEN y BLUE The title size changes as follows SMALL y LARGE You cannot input 13 characters or more in LARGE size If you input more than 12 characters the title size returns to SMA...

Page 57: ...l OK changes to EXECUTE 5 Turn the SEL PUSH EXEC dial to select EXECUTE then press the dial The ERASING flashes on the screen When the title is erased the COMPLETE is displayed To cancel erasing a title Select RETURN in step 4 or 5 Superimposing a title MENU 2 3 4 CM SET TITLE TITLEERASE TITLE DSPL CM SEARCH TAPE TITLE ERASE ALL RETURN MENU END TITLE ERASE 1 HELLO 2 CONGRATULATIONS 3 HAPPY NEW YEA...

Page 58: ...EC dial to select the column of the desired character then press the dial 6 Turn the SEL PUSH EXEC dial to select the desired character then press the dial 7 Repeat steps 5 and 6 until you have selected all characters and completed the title 8 To finish making your own titles turn the SEL PUSH EXEC dial to select SET then press the dial Making your own titles 3 4 5 7 1 2 3 4 TITLE SET CUSTOM1 SET ...

Page 59: ...enter characters in the standby while a cassette is set in your camcorder The power automatically goes off The characters you have entered remain stored in memory Set the POWER switch to OFF CHG once and then to CAMERA again then proceed from step 1 We recommend setting the POWER switch to VCR or removing the cassette so that your camcorder does not automatically turn off while you are entering ti...

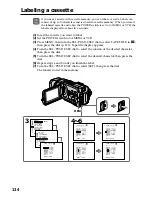
Page 60: ... Tape title display appears 4 Turn the SEL PUSH EXEC dial to select the column of the desired character then press the dial 5 Turn the SEL PUSH EXEC dial to select the desired character then press the dial 6 Repeat steps 4 and 5 until you finish the label 7 Turn the SEL PUSH EXEC dial to select SET then press the dial The label is stored in the memory Labeling a cassette 3 4 6 MENU END TAPE TITLE ...

Page 61: ...ory is full The indicates the number of characters you can select for the label To delete the title Select P The last character is erased To enter a space Select Z then select the blank part Erasing all the data in cassette memory You can erase all the data in cassette memory at once 1 Set the POWER switch to CAMERA or VCR 2 Press MENU then turn the SEL PUSH EXEC dial to select ERASE ALL in then p...

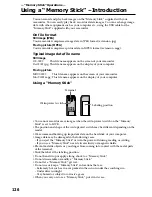
Page 62: ... write protect switch on the Memory Stick is set to LOCK The position and shape of the write protect switch may be different depending on the model We recommend backing up important data on the hard disk of your computer Image data may be damaged in the following cases If you eject the Memory Stick or turn the power off during reading or writing If you use a Memory Stick near static electricity or...

Page 63: ...on Technology Industries Association You cannot play back on your camcorder still images recorded on other equipment DCR TRV890E TRV900 TRV900E or DSC D700 D770 that does not conform with this universal standard These models are not sold in some areas If you cannot use the Memory Stick that is used with other equipment format it with this camcorder p 212 However formatting erases all information o...

Page 64: ... lamp is lit or flashing Do not shake or knock your camcorder because your camcorder is reading the data from the Memory Stick or recording the data on the Memory Stick Do not turn the power off eject the Memory Stick Otherwise image data may become damaged If MEMORYSTICK ERROR is displayed Reinsert the Memory Stick a few times The Memory Stick may be damaged if the indicator is still displayed If...

Reviews: