background image

10

First Time Operation - Basic Presetting

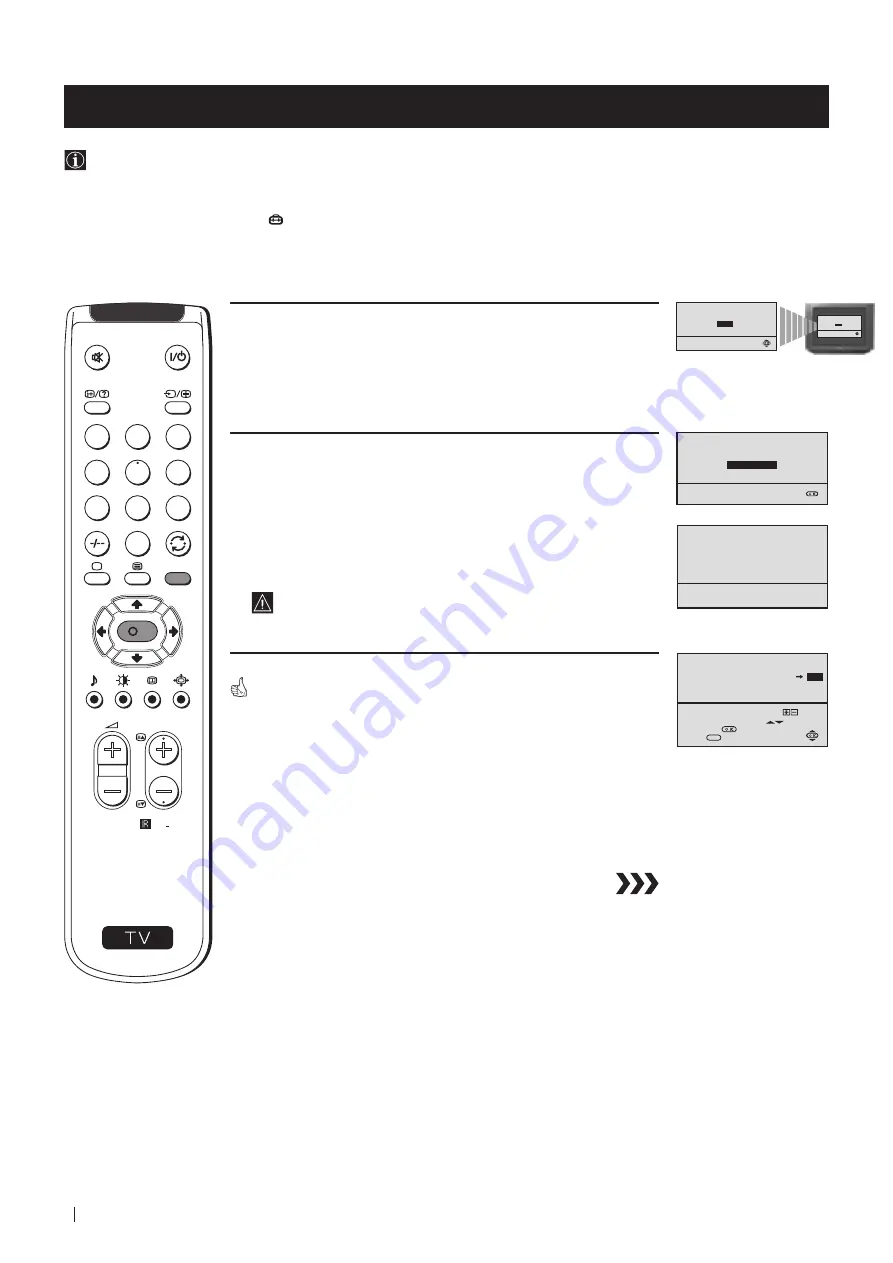
Automatically Tuning the TV using the Remote Control

You need to tune the TV to receive channels (TV Broadcast). By following the instructions below, this TV automatically
searches and stores all available channels for you.
After having selected the language, a new menu appears automatically on the TV screen asking you to automatically tune
the TV. However, if you need to change or repeat the tuning afterwards (e.g. when you move house), select the menu
AUTO PROGRAMME in the 

 (SET UP) menu and proceed in the same way as described below in step 1 or, please refer

to the section "Automatically Tuning the TV using the TV buttons" of this instruction manual.

1

Press the 

OK

 button on the remote control to select 

YES

.

A new menu appears automatically on the screen asking you to
check that the antenna is connected.

2

Confirm that the antenna is connected and then press the 

OK

button.

The automatic tuning starts and the message "Searching..." flashes
on the screen.

  This procedure could take some minutes.

When the automatic tuning is finished, the Programme Sorting menu
appears on the TV screen.

Notes:

• To stop the automatic tuning, press the 

MENU

 button.

• If you stop the automatic tuning by pressing the 

MENU

   button, the Programme Sorting menu does not appear
   automatically on the TV screen.


First Time Operation - Basic Presetting

Do you want to start

automatic tuning?

YES

NO

Do you want to start

automatic tuning?

YES

NO

Please confirm that

antenna is connected

CONFIRM

AUTO PROGRAMME

PROGRAMME:
SYSTEM:
CHANNEL:

Searching...

01
I
C 21

01

Select Channel:
Select new position:
Confirm:
Exit:

PROGRAMME SORTING

PROGR

PROGRAMME:
CONFIRM

MENU

03

S

RM 887

PROGR

MENU

1

4

7

2

5

8

0

3

6

9

K

Summary of Contents for FD Trinitron KV-29FX20U

Page 1: ...R 1999 by Sony Corporation Printed in Spain KV 29FX20U 4 204 787 61 1 FD Trinitron Colour Television Instruction Manual GB ...

Page 2: ...and an appropriate plug fitted in accordance with the following instructions The wires in this mains lead are coloured in accordance with the following code Blue Neutral Brown Live As the colours of the wires in the mains lead of this apparatus may not correspond with the coloured markings identifying the terminals in your plug proceed as follows The wire which is coloured blue must be connected t...

Page 3: ... the basic functions Use Advanced Operation if you wish to know more about the additional features of the TV set Symbols used in the manual Informs you of possible hazards Important information Information on a feature 1 2 Sequence of instructions Shaded buttons on the remote control show the buttons you have to press to follow the sequence of instructions Informs you of the result of the instruct...

Page 4: ...he TV For Safe Operation Do not operate the TV set on anything other than a 220 240V AC 50Hz supply Do not operate the TV if any liquid or solid objects fall in through the ventilation slots Have it checked immediately For environmental and safety reasons it is recommended that the TV set is not left in standby mode when not in use Switch off at the mains Do not disconnect the TV by pulling on the...

Page 5: ...ing Selecting Language 9 Automatically Tuning the TV using the Remote Control 10 Changing the Programme Order of the TV channels 11 Advanced Operation Advanced Presetting Automatically Tuning the TV using the TV buttons 12 Manually Tuning the TV 13 Fine Tuning Channels 14 Adjusting the Picture Rotation 15 Skipping Programme positions 16 Advanced TV Operation Adjusting the Picture 17 Adjusting the ...

Page 6: ...iew Programme Up or Down buttons Selects TV channels On Off Switch Standby indicator Press the flap on the front of the TV to reveal the front control panel press on the mark S Video Input jack Headphone jack Phono Video Input jack Selecting Input source Volume control buttons Auto Tune button Audio Inputs jacks S RM 887 PROGR MENU 1 4 7 2 5 8 0 3 6 9 K ...

Page 7: ...Press to view programmes in 16 9 mode Press again to return to 4 3 mode This button only works in Teletext mode Function associated to this button does not work with this TV Selecting channels Press to select the next or previous channel Muting the Sound Press to mute TV sound Press again to restore the sound Displaying On Screen Information Press to display all on screen indications Press again t...

Page 8: ...ys remember to dispose of used batteries in an environmental friendly way Connecting the Aerial Connect the TV plug to the mains socket 220 240V AC 50Hz Switching on the TV Inserting Batteries into the Remote Control Push in the On Off switch on the front of the TV Connect a conventional aerial to the socket marked on the rear of the TV ...

Page 9: ...nguage menu displays automatically on the TV screen 2 Press the or button on the remote control to select the language then press the OK button to confirm your selection The Auto Tuning menu appears on the TV screen in the selected language First Time Operation Basic Presetting LANGUAGE Select language ENGLISH DEUTSCH FRANÇAIS ESPAÑOL NEDERLANDS PORTUGUÊS SUOMI SVENSKA NORSK DANSK LANGUAGE Select ...

Page 10: ... A new menu appears automatically on the screen asking you to check that the antenna is connected 2 Confirm that the antenna is connected and then press the OK button The automatic tuning starts and the message Searching flashes on the screen This procedure could take some minutes When the automatic tuning is finished the Programme Sorting menu appears on the TV screen Notes To stop the automatic ...

Page 11: ...resetting Changing the Programme Order of the TV channels After all available channels TV Broadcast are captioned and stored a new menu appears automatically on the screen to change the order in which the channels appear on the screen However if you wish to rearrange the order of the channels afterwards select the menu PROGRAMME SORTING in the SET UP menu and proceed in the same way as described i...

Page 12: ...until a menu appears automatically on the screen asking you to check that antenna is connected 3 Confirm that the antenna is connected and then press the OK button The automatic tuning starts and the message Searching flashes on the screen This procedure could take some minutes When the automatic tuning procedure is complete the menu disappears from the TV screen and your TV is now ready for use N...

Page 13: ...nel If you do not wish to store this channel press the or button to continue searching for the desired channel 7 If this is the desired channel you wish to store press the OK button and then with the cursor highlighting CONFIRM press the OK button again 8 Repeat steps 4 to 7 if you wish to store more channels 9 Press the MENU button to exit and return to the normal TV screen Your TV is now ready f...

Page 14: ... 15 then press the OK button 6 With the cursor highlighting CONFIRM press the OK button to store 7 Press the MENU button to exit and return to the normal TV screen 8 Repeat steps 1 to 7 to fine tune other channels Your TV is now ready for use PICTURE CONTROL CONTRAST BRIGHTNESS COLOUR SHARPNESS HUE RESET MODE PERSONAL PICTURE CONTROL CONTRAST BRIGHTNESS COLOUR SHARPNESS HUE RESET MODE PERSONAL 0 S...

Page 15: ...the or button to adjust the picture rotation adjusting range is 5 to 5 then press the OK button 5 Press the MENU button to exit and return to the normal TV screen Your TV is now ready for use PICTURE CONTROL CONTRAST BRIGHTNESS COLOUR SHARPNESS HUE RESET MODE PERSONAL PICTURE CONTROL CONTRAST BRIGHTNESS COLOUR SHARPNESS HUE RESET MODE PERSONAL 0 SET UP PICTURE ROTATION LANGUAGE ENGLISH AUTO PROGRA...

Page 16: ...g CONFIRM press the OK button 8 Repeat steps 4 to 7 to skip other unused programme positions 9 Press the MENU button to exit and return to the normal TV screen When changing channels TV Broadcasts with the PROGR buttons the skipped programme positions do not appear You can however still select them using the number buttons PICTURE CONTROL CONTRAST BRIGHTNESS COLOUR SHARPNESS HUE RESET MODE PERSONA...

Page 17: ...e factory preset levels Can be only altered if PERSONAL MODE is selected Only avalaible for NTSC colour signal e g US video tapes Advanced Operation Advanced TV Operation Adjusting the Picture Although the picture is adjusted at the factory you can modify it to suit your own taste Changing Picture Mode Quickly 1 Press the button on the remote control to directly access the PICTURE MODE 2 Press the...

Page 18: ...ble A for channel 1 B for channel 2 DSP Digital sound Processor ON OFF RESET Resets sound to the factory preset levels Can be only altered if PERSONAL MODE is selected Advanced Operation Advanced TV Operation Adjusting the Sound Although the sound is adjusted at the factory you can modify it to suit your own taste Changing Sound Mode Quickly 1 Press the button on the remote control to access direc...

Page 19: ...0 min 4 00 hours 5 Press the OK button 6 Press the MENU button to exit and return to the normal TV screen One minute before the TV switches into standby mode the time remaining is displayed on the TV screen automatically Notes When watching the TV press the button to display the time remaining To return to normal operation from standby mode press the button Advanced Operation Advanced TV Operation...

Page 20: ...to view 2 Press the button on the remote control to switch on the teletext 3 Input three digits for the page number using the numbered buttons on the remote control if you have made a mistake type in any three digits and then re enter the correct page number 4 Press the button to switch off teletext Using other Teletext functions TO PRESS THE BUTTON Access the next or preceding page for next page ...

Page 21: ...al through the phono socket C and Audio input signal through D q S video input signal through the socket B and Audio input signal through D 3 Switch on the connected equipment 4 To return to normal TV picture press the button on the remote control Note To avoid picture distortion do not connect equipment to the B and E connectors at the same time Additional Information Connecting a VCR Plug in VCR...

Page 22: ...link are Tuning information such as the channel overview are downloaded from the TV set to the VCR Direct TV recording While watching TV you need to press just one button on the VCR to record this programme TV in standby mode Press the Play z button on your VCR to switch the TV automatically on If you have connected a decoder to a VCR which supports Smartlink feature select the menu MANUAL PROGRAM...

Page 23: ...AL PROGRAMME PICTURE CONTROL CONTRAST BRIGHTNESS COLOUR SHARPNESS HUE RESET MODE PERSONAL STEREO ON SOUND CONTROL TREBLE BASS BALANCE DUAL SOUND DSP RESET MODE PERSONAL 0 SET UP PICTURE ROTATION LANGUAGE ENGLISH AUTO PROGRAMME PROGRAMME SORTING MANUAL PROGRAMME 0 SET UP PICTURE ROTATION LANGUAGE ENGLISH AUTO PROGRAMME PROGRAMME SORTING MANUAL PROGRAMME 0 SET UP PICTURE ROTATION LANGUAGE ENGLISH AU...

Page 24: ...hing a Press the button repeatedly on the remote control until RGB video source the RGB symbol is displayed on the screen Good picture no sound Press the button on the remote control If is displayed on the screen press the button on the remote control No colour on colour programmes Using the MENU system select the Picture Adjustment display Adjust the colour balance From the Picture Adjustment dis...

Page 25: ... CENELEC standard including audio video input S video input monitor audio video output Audio outputs phono jacks Front Terminals 2 video input phono jack 2 audio inputs phono jacks s S video input 4 pin DIN Headphones jack minijack stereo Sound output 2x7 W 1x15 W RMS Power consumption 150 W Standby Power consumption 0 5 W Dimensions w x h x d Approx 746 x 569 x 516 mm Weight Approx 47 5 kg Access...

Page 26: ...y Heath 31 27 24 21 39 Sudbury 51 44 41 47 Tacolneston 62 55 59 65 52 Midlands West Ridge Hill 22 28 25 32 Sutton Coldfield 46 40 43 50 The Wrekin 26 33 23 29 Midlands East Waltham 58 64 61 54 Northern Ireland Brougher Mountain 22 28 25 32 Divis 31 27 24 21 Limavady 55 62 59 65 North Belmont 22 28 25 32 56 Emley Moor 44 51 47 41 37 North West Winter Hill 55 62 59 65 48 North East Bilsdale West Moo...

Page 27: ...27 Ecological Paper Totally Chlorine Free ...

Reviews: