83
M
e
nus
SETU
P
M
e
nus
SETU
P
M
e
nus
SETU
P
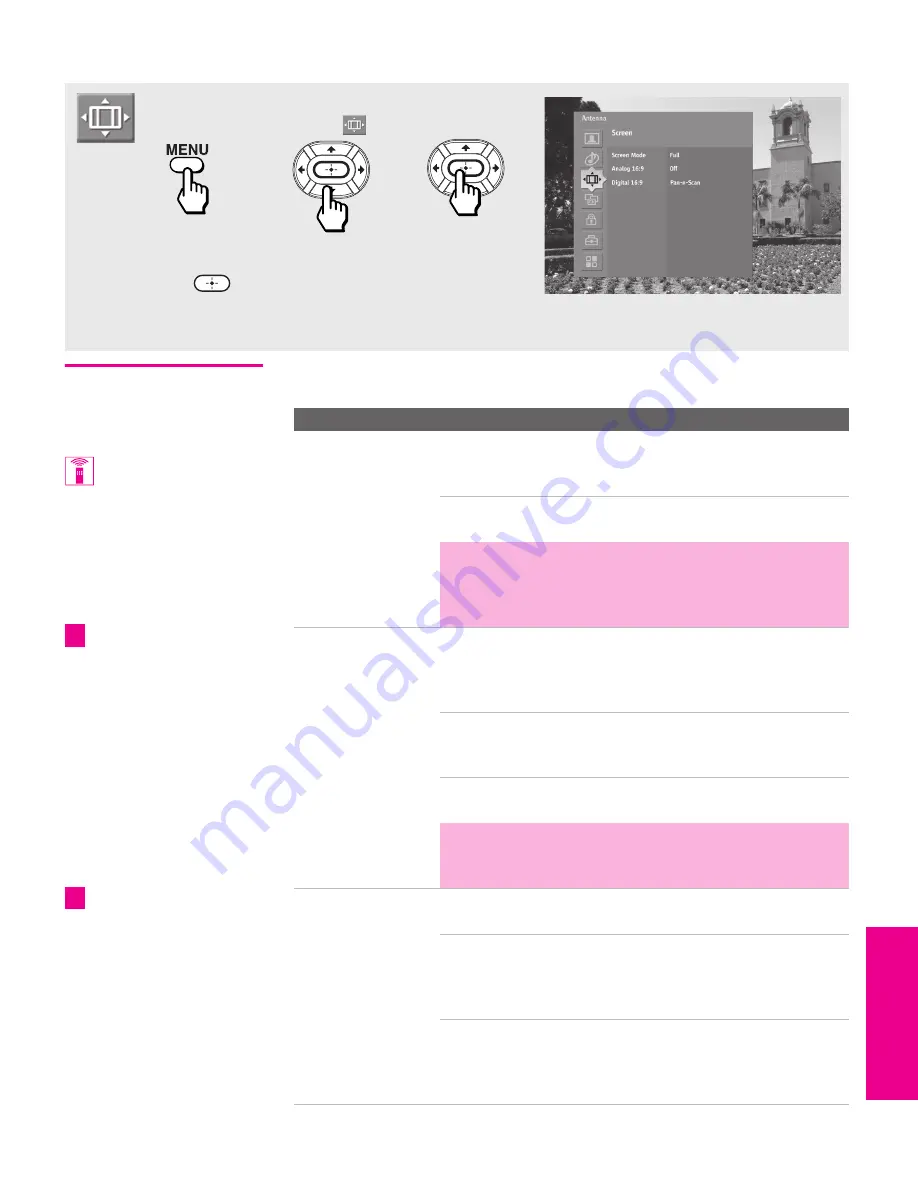
Using the Screen Menu (32/36 models only)
Selecting Screen
Mode Options
The Screen Menu includes the following options:
To access the Screen Menu, follow these steps:
To change settings, press
V
v B b
.
Press
to confirm the selection.
To exit the Menu, press
MENU
.
1.
Display Menu
2.
Highlight
3.
Press to select
Option
Description
Screen Mode
Enables you to change the picture size for both
standard-definition (480i/480p) and high-definition
(720p/1080i) sources.
Select from:
Full
,
Normal
,
Horizontal Expand
,
Vertical Expand
.
For details, see page 57.
✍
In some cases, wide-screen programs will be shown in
aspect ratios that require the display of bars at the
top and bottom of your 16:9 screen. For more details,
see page 101.
Analog 16:9
Provides enhanced picture resolution for widescreen
(anamorphic) sources, such as selected DVD titles. This
option is available only when the TV is set to
VIDEO 1-7.
On
To activate manually. Returns to
Auto
when
you switch to another video input or
change channels.
Auto
To activate automatically when a 16:9
signal is received.
✍
If the Auto setting does not automatically detect the
16:9 signal from your DVD player, select On to
manually turn on the 16:9 Enhanced feature.
Digital 16:9
Allows you to determine the formatting for digital 16:9
pictures.
Pan-n-Scan
The picture is clipped to fit the 4:3 screen.
This setting is temporary and will be reset
when you change channels or video
inputs, or turn off your TV.
Letterbox
The picture is made smaller so that the left
and right edges fit the 4:3 screen. No
clipping results, but bars appear at the top
and bottom of the picture.
You can also change the
Screen Mode using the
SCREEN MODE
button on the
remote control.
To use
Analog 16:9
with
widescreen DVDs, set your DVD
player to 16:9 aspect ratio.
(Aspect ratio is the ratio of width
to height of the screen. 16:9 is
also referred to as widescreen
format.)
z
Digital 16:9
is available only
for digital broadcast sources
(antenna or cable).
z
XS.book Page 83 Monday, February 7, 2005 8:41 AM
Summary of Contents for FD Trinitron KD-30XS955
Page 9: ......
Page 15: ...14 SETUP SETUP SETUP SETUP Setup SETUP Rear Panel 3 4 1 2 5 6 7 8 9 q qa ...
Page 45: ......
Page 95: ......


