background image

33

Re
co
rd

in

g

Recording

Recording

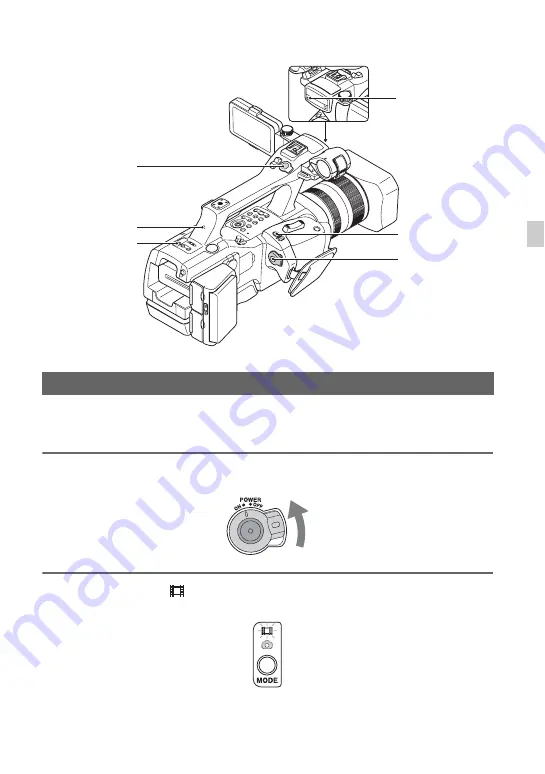
Your camcorder records movies on a memory card and/or a flash memory unit. The factory 
setting of recording movies is high definition image quality (HD). Do the following steps to 
record movies.

1

Slide the POWER switch to ON while pressing the green button.

2

Make sure that the 

(Movie) lamp is lit.

Recording movies

POWER switch, 
START/STOP 
button

START/STOP

button

Rear recording

lamp

MODE button

PHOTO button

Front recording

lamp

Continued 

,

Summary of Contents for EA50EH

Page 1: ...tal HD Video Camera Recorder Operating Guide E mount NEX EA50UH EA50EH EA50H EA50UK EA50EK EA50K Table of Contents Getting Started Recording Playback Editing Using the Menu Connecting with another device Troubleshooting Additional Information ...

Page 2: ... over 99 99 of the pixels are operational for effective use However there may be some tiny black points and or bright points white red blue or green in color that appear constantly on the LCD screen These points are normal results of the manufacturing process and do not affect the recording in any way On sunlight Do not record the sun or leave the camcorder under the sun for a long time The intern...

Page 3: ... image signals the following phenomena may occur The subjects passing by the frame rapidly might appear crooked depending on the recording conditions This phenomenon may be notable in displays having high motion resolution Horizontal lines appear on the LCD screen during recording under fluorescent lights sodium lamps or mercury lamps The phenomena can be reduced by adjusting the shutter speed p 4...

Page 4: ...rs depending on the lens used you will find the relevant information in Notes or Tips The value you can set in REC FORMAT etc depends on the 60i 50i SEL setting In this manual the values for both 60i and 50i settings are described Memory cards and a flash memory unit are both referred to as recording media in this manual The images of the LCD screen used in this manual for illustration purposes ar...

Page 5: ... J FOCUS HOLD PUSH AUTO button 40 K SHUTTER SPEED button 47 L WHT BAL button 49 M one push button 49 N MENU button 28 80 O ASSIGN 1 2 3 4 5 6 button 61 P AUTO MANUAL switch 45 Q SEL PUSH EXEC dial 28 80 R DISPLAY button 68 IRIS button WHT BAL button ASSIGN 2 HISTOGRAM button and ASSIGN 5 MARKER button have raised tactile dots for your convenience in locating the buttons MENU button has a raised ta...

Page 6: ... E AUDIO LEVEL CH1 dial 51 F INPUT 2 switch 51 G CH2 INT MIC INPUT 1 INPUT 2 switch 51 H CH2 AUTO MAN switch 51 I AUDIO LEVEL CH2 dial 51 J Hook for shoulder strap K i headphones jack For connecting stereo mini jack headphones L Speaker M Access lamp N Memory card slot 31 Identifying parts and controls Continued ...

Page 7: ...ont recording lamp 102 The recording lamp flashes if the remaining capacity of recording media or battery is low L IRIS PUSH AUTO button M Lens mount 22 N Image sensor O Lens contacts Do not touch or dirty the lens contacts P Lens lock pin Q Lens release button 23 To attach a shoulder strap Attach a shoulder strap sold separately to the hooks for a shoulder strap Continued ...

Page 8: ... receptacles 26 F Rear recording lamp 102 The recording lamp flashes if the remaining capacity of recording media or battery is low G BATT RELEASE button 20 H POWER switch START STOP button 27 I LCD TILT HOLD dial 29 J Built in microphone K Microphone holder L Hook for cable stopper shoulder strap M Tripod receptacles For 1 4 20UNC screws For attaching a tripod with a screw shorter than 5 5 mm sol...

Page 9: ...32 J Flash memory unit jack K Playback control buttons STOP PAUSE PREV PLAY NEXT SCAN SLOW 63 L TC U BIT button Switches between time code and user bit to display on the LCD screen M DATA CODE button 68 N VISUAL INDEX button 63 O RESET button If you press the RESET button all settings including the clock setting except the picture profile settings return to the default P MENU button 28 80 Q V v B ...

Page 10: ...scale I Focal length index J Lens contacts Do not touch or dirty the lens contacts For NEX EA50UH EA50EH EA50H users For details of the high magnification power zoom lens E PZ 18 200mm F3 5 6 3 OSS refer to the accompanying instruction manuals Lens E 18 200mm F3 5 6 3 OSS NEX EA50UK EA50EK EA50K only Identifying parts and controls Continued ...

Page 11: ...r video device may also operate In that case select a commander mode other than DVD2 for your video device or cover the sensor of your video device with black paper To change the battery of the Wireless Remote Commander 1 While pressing on the tab inset your fingernail into the slit to pull out the battery case 2 Place a new battery with the side facing up 3 Insert the battery case back into the W...

Page 12: ...g time Recording playback media Upper left Upper right Bottom Center 00 00 00 00 Time code hour minute second frame Movie still image capture display 9999 Number of recordable still images Playback folder of memory card Indicator Meaning GPS triangulating status 59 Face detection ON ISO800 ISO PEAKING 94 ZEBRA 94 STEADYSHOT 88 9 Manual focus 39 Picture profile 53 F3 5 Iris 45 9dB Gain 46 100 180 S...

Page 13: ...ositions Data code during recording The recording date time and condition are recorded automatically on the recording media They are not displayed while recording However you can check them by pressing the DATA CODE button p 68 Red Eye Reduction 89 Indicator Meaning ...

Page 14: ...29 Step 7 Preparing the recording media 31 Recording 33 Recording movies 33 Recording still images 35 Recording using the shoulder mount 36 Adjusting the zoom by the zoom ring 37 Adjusting the zoom with the zoom lever 38 Adjusting the focus 39 Using automatic focus fixed focus temporarily Push auto focus Focus hold 40 Using the expanded focus Expanded focus 40 Focusing by touching the LCD screen S...

Page 15: ... Reviewing the most recently recorded scene Last Scene Review 61 Assigning the functions to the ASSIGN buttons 61 Playback 63 Playing back movies 63 Playing back still images 66 Changing checking the settings in your camcorder 68 Changing the screen display 68 Displaying recording data Data code 68 Checking the settings in your camcorder Status check 69 Connecting a monitor or a TV 70 Protecting r...

Page 16: ...other basic settings AREA SET GPS SETTING BEEP etc Saving images on an external media device 104 Creating a standard definition image quality SD disc with a recorder etc 106 Troubleshooting 107 Warning indicators and messages 115 Recording time of movies and the number of recordable photos 117 Using your camcorder abroad 119 File folder structure on the memory card and the flash memory unit 120 Ma...

Page 17: ...17 Table of Contents Specifications 128 Index 133 ...

Page 18: ...d 2 p 19 Rechargeable battery pack NP F770 1 p 19 123 Wireless Remote Commander RMT 845 1 p 11 A button type lithium battery is already installed A V connecting cable 1 p 70 106 USB cable 1 p 104 USB Adaptor Cable 1 p 104 Large LCD viewfinder 1 p 30 Large eyecup 1 p 30 Flash memory unit jack cover 1 p 32 Attached to camcorder as shipped from factory Lens hood 1 p 24 Front lens cap 1 rear lens cap ...

Page 19: ...50K only NEX EA50UH EA50EH EA50H only Step 2 Charging the battery pack You can charge the InfoLITHIUM battery pack L series with the supplied Charger b Notes You can use a large capacity battery pack NP F770 supplied or NP F970 sold separately with your camcorder You cannot use NP F570 1 Set the mode switch to CHARGE 2 Connect the power cord mains lead to the AC Adaptor Charger and the wall outlet...

Page 20: ...ton and slide the battery pack in the direction of the arrow To store the battery pack If the battery pack is not in use for a while run down the battery and store it p 124 Charging time Approximate time minute required when you charge a fully discharged battery pack b Notes The supplied battery pack is NP F770 You cannot use the NP F570 battery pack with your camcorder On the battery pack Before ...

Page 21: ...e connecting cord DK 415 against the back of your camcorder in the battery slot and slide it in the direction of the arrow On the AC Adaptor Charger Use the nearby wall outlet wall socket when using the AC Adaptor Charger Disconnect the AC Adaptor Charger from the wall outlet wall socket immediately if any malfunction occurs while using your camcorder Do not use the AC Adaptor Charger placed in a ...

Page 22: ...from the camcorder body and the rear lens cap from the lens 2 Mount the lens by aligning the mounting indexes white on the lens and the camcorder body While pushing the lens lightly toward the camcorder body turn the lens clockwise The lens is mounted when it clicks into the locked position b Notes When attaching a lens do not press the lens release button Attach the lens to the camcorder squarely...

Page 23: ...dust coating to prevent dust from adhering to the image sensor However attach or remove the lens quickly somewhere away from dusty locations Do not leave the camcorder body with the lens and body cap removed If dust or debris adheres on the glass surface of the mount Turn off the camcorder and detach the lens Clean the glass surface of the mount and the surrounding area using a blower sold separat...

Page 24: ...ached to the lens backwards Using a mount adaptor sold separately you can attach an A mount lens sold separately to your camcorder For details refer to the operating instructions supplied with the mount adaptor The available functions differ depending on the mount adaptor type LA EA1 Mount adaptor Functions Autofocus Available in photo mode with SAM SSM lens only AF system Contrast AF AF MF Select...

Page 25: ... authorized Sony service facility on compatible lenses The sound of the lens and the camcorder in operation may be recorded during movie recording You can avoid this by recording without the microphone or by setting the CH1 AUTO MAN switch or CH2 AUTO MAN switch to MAN and the AUDIO LEVEL dial to 0 p 51 It may take a long time or may be difficult for the camcorder to focus depending on the lens us...

Page 26: ...ccessory shoe Mount the accessory shoe on the accessory shoe mount as illustrated 1 Lift the edge of the accessory shoe plate and pull it in the direction opposite to that of the arrow on the accessory shoe plate and remove it from the accessory shoe 2 Place the accessory shoe as its protrusions matches recesses of the accessory shoe mount then fix it to the mount with four screws 3 Insert the acc...

Page 27: ... mount Step 5 Turning on the camcorder and setting the date and time Slide the POWER switch to ON while pressing the green button When you use your camcorder for the first time the CLOCK SET screen appears To turn off the power Slide the POWER switch to OFF b Notes If warning messages appear on the LCD screen follow the instructions Turning on the camcorder Press and hold the green button Continue...

Page 28: ...t any year up to the year 2037 Midnight is indicated as 12 00 AM and noon as 12 00 PM z Tips The date and time are automatically recorded on the selected recording media and can be displayed during playback DATA CODE button p 68 Once the clock is set the clock time is automatically adjusted with AUTO CLOCK ADJ p 101 and AUTO AREA ADJ p 101 set to ON The clock may not be adjusted to the correct tim...

Page 29: ...XEC dial p 102 Setting 60i 50i SEL Step 6 Adjusting the LCD screen The LCD screen can be rotated in the range as illustrated below allowing a person other than the camera operator to see the image To set and hold the LCD screen angle Turn the LCD TILT HOLD dial and set Turn the LCD TILT HOLD dial in the opposite direction to loosen when you change the angle Using the LCD screen 180 degrees 90 degr...

Page 30: ...wfinder clearly under bright circumstances use the supplied large eyecup To attach the large eyecup stretch it slightly and align it with the groove in the large LCD viewfinder You can attach the large eyecup facing either the right or left side z Tips If you are farsighted and have a trouble seeing images in the viewfinder you can attach a 52 mm close up lens sold separately to the viewfinder len...

Page 31: ...tem used for Memory Stick XC HG Duo media and SDXC memory cards Confirm in advance that the connecting equipment is supporting the exFAT file system If you connect equipment not supporting the exFAT file system and the format screen appears do not perform the format All the data recorded will be lost Open the cover and insert the memory card with the notched edge in the direction as illustrated un...

Page 32: ...ry unit Turn off the power then while sliding the RELEASE lever remove the flash memory unit in the direction of the arrow shown in step 1 When you do not use a flash memory unit Leave the flash memory unit jack cover attached z Tips Your camcorder does not have the relay recording function If the memory card is fully recorded during recording the camcorder stops recording automatically You can re...

Page 33: ...cording movies is high definition image quality HD Do the following steps to record movies 1 Slide the POWER switch to ON while pressing the green button 2 Make sure that the Movie lamp is lit Recording movies POWER switch START STOP button START STOP button Rear recording lamp MODE button PHOTO button Front recording lamp Continued ...

Page 34: ...remove the battery pack or the AC Adaptor Charger before turning off the power the settings may return to the default settings z Tips When recording in high definition image quality HD the aspect ratio is fixed to 16 9 When recording in standard definition image quality SD you can switch the aspect ratio to 4 3 WIDE REC p 90 You can change the screen display during recording p 68 Indicators displa...

Page 35: ...cess error occurred while the camcorder was accessing the recording media 1 Press the MODE button to turn on the Photo lamp 2 Press the PHOTO button lightly to adjust the focus then press it fully Focus indicator when autofocusing The focus indicator shows the focusing status by lighting flashing z lit Focus locked z flashing The camcorder cannot focus on the subject automatically Either recompose...

Page 36: ...ng and reduce camera shake by using the shoulder mount b Notes When pulling out the shoulder mount hold the shoulder mount itself Do not pull out the shoulder mount while holding the shoulder mount lock lever Recording using the shoulder mount Recording Continued ...

Page 37: ...d within the optical range of the lens For details refer to the operating instructions supplied with the lens b Notes Do not grab or apply a strong force to the lens cylinder that rolls out when zooming The lens may be damaged You may need to set a switch on the lens to MANUAL depending on the lens you are using Adjusting the zoom by the zoom ring Zoom ring Continued ...

Page 38: ...ens is required Digital zoom Due to digital processing the image quality will deteriorate b Notes Do not remove your finger from the zoom lever suddenly The noise of the zoom lever may be recorded z Tips The digital zoom and the optical zoom can be used together When ZOOM LEVER p 87 is set to a setting other than DIGITAL ZOOM digital zoom magnification will be retained Adjusting the zoom with the ...

Page 39: ...witch B at the AUTO position 1 During recording or standby set the FOCUS switch B to MAN 9 appears 2 Rotate the focusing ring A and adjust the focus 9 changes to when the focus cannot be adjusted any farther 9 changes to when the focus cannot be adjusted any closer To restore automatic adjustment Set the FOCUS switch B to AUTO 9 disappears and the automatic focus adjustment is restored z Tips The ...

Page 40: ... to press the FOCUS HOLD PUSH AUTO button Keep the button pressed to shoot If you release the button the setting returns to auto focusing b Notes If the lens has the same function button as your camcorder the function on the lens works the same as your camcorder For example when focus hold is active on your camcorder the button on the lens functions as focus hold The selected area on the LCD scree...

Page 41: ... function to an ASSIGN button p 61 To cancel the spot focus Press the MENU button E The camcorder detects the face and focuses on it The default setting is OFF You can use this function when the FOCUS switch B is set to AUTO 1 Press the MENU button E 2 Select CAMERA SET t FACE DETECTION t ON or OFF with the SEL PUSH EXEC dial D When the faces are detected frames appear on the LCD screen 3 Move the...

Page 42: ...transition between positions For example you can gradually shift the focus from foreground to background To prevent camera shake or transition lag between positions a tripod is recommended 1 Assign FOCUS TRANSITION to an ASSIGN button p 61 Focus transition is assigned to the ASSIGN 4 5 6 buttons at the same time The screen changes in the order STORE t CHECK t EXEC t cancel with each press of the A...

Page 43: ...s not possible to return the focus to that position from FOCUS A or FOCUS B If you press any of the following buttons or perform any of the following operations during focus transition focus transition is cancelled MENU button VISUAL INDEX button EXPANDED FOCUS button Any of the ASSIGN button assigned LAST SCENE REVIEW VISUAL INDEX SPOT FOCUS or EXPANDED FOCUS Remove the lens Zoom the optical lens...

Page 44: ... 1080 Effective scanning lines 24 Frame rate p Scanning system FX Recording mode Frame rate when selecting 60i The frame rate displayed on the LCD screen differs from the actual frame rate b Notes The recording mode is fixed to FX or FH with the progressive scanning system Movies recorded with the recording mode set to PS or FX on REC FORMAT can be saved on an external media device only p 104 z Ti...

Page 45: ...ired image size with the SEL PUSH EXEC dial Setting value B 3 2 16 0M 3 2 8 4M 3 2 4 0M 16 9 13 6M 16 9 7 1M 16 9 3 4M Selecting high definition image quality HD or standard definition image quality SD Selecting the image size for still images Adjusting the brightness You can adjust the brightness by controlling the amount of light etc using iris gain ISO sensitivity or shutter speed b Notes When ...

Page 46: ...ally using the iris ring B However IRIS PUSH AUTO button C is available in the following situations When using an A mount lens with the LA EA2 When manually focusing z Tips The range of focus an important effect of the aperture is called the depth of field The depth of field gets shallower as the aperture is opened and deeper as the aperture is closed Use the aperture creatively to obtain the desi...

Page 47: ... subject look still or emphasize the movement of a subject by adjusting the shutter speed 1 Set the AUTO MANUAL switch G to MANUAL 2 Press the SHUTTER SPEED button E to highlight the shutter speed value 3 Change the shutter speed displayed on the LCD screen by turning the SEL PUSH EXEC dial H The following shutter speed adjustment ranges are available Movie mode When selecting 60i 1 4 1 10000 1 3 ...

Page 48: ...d automatically Press the SHUTTER SPEED button E twice The shutter speed value disappears or appears next to the shutter speed value Setting value when switching 60i 50i SEL The shutter speed of the same level before changing the 60i 50i SEL setting is applied See the following table for the shutter speeds on each level Shutter speed for still images is not affected Level 60i 60p 30p 24p 50i 50p 2...

Page 49: ...tting the A B value Select A or B for recording with the white balance setting stored in memory A or B See page 50 on how to store the adjusted value When using a commercially available ND filter this adjustment is recommended x To use the PRESET value of white balance Select CAMERA SET t WB PRESET t a desired setting Adjusting the white balance Setting value Example of recording conditions outdoo...

Page 50: ... paper full screen in the same lighting condition as the one in which the subject is 5 Press the one push button B The adjusted value is stored in A or B The stored color temperature appears for about 3 seconds b Notes When a white balance adjustment value has not been obtained successfully A or B turns to slow flashing Adjust the subject appropriately and set the shutter speed to auto or around 1...

Page 51: ...J The sound will be recorded in stereo when using the internal microphone Set the CH1 INT MIC INPUT1 and CH2 INT MIC INPUT1 INPUT2 switches to INT MIC z Tips If the recording sound is small set INT MIC SENS p 93 to HIGH To reduce the wind roar set INT MIC WIND p 93 to ON The sound will be recorded in monaural 1 Attach the supplied microphone p 26 and connect it to the INPUT 1 jack A 2 Set the CH1 ...

Page 52: ...be appropriate for the supplied microphone ECM XM1 NEX EA50UH EA50EH EA50H only You can set an input level between 60 dBu 12dB and 30 dBu 18dB by 6dB The default setting is 48 dBu 0dB 3 Select the channel you want to record Using the CH1 CH2 switches select the source to be recorded on each channel When the CH1 switch is set to INT MIC When the CH1 switch is set to INPUT 1 Recording sound from an ...

Page 53: ...el to AUTO You can select the channel by setting the switch to CH1 or CH2 to output from the headphone See HEADPHONE OUT on the sound at STEREO MIX p 92 Adjusting the volume Setting the headphone sound Useful functions You can customize the picture quality by adjusting picture profile items such as GAMMA and DETAIL You can make adjustments for the time of day weather conditions or just personal pr...

Page 54: ... 3 Select SETTING with the SEL PUSH EXEC dial B then press the dial 4 Select an item to be adjusted with the SEL PUSH EXEC dial B then press the dial 5 Adjust the picture quality with the SEL PUSH EXEC dial B then press the dial 6 Repeat steps 4 and 5 to adjust other items 7 Select RETURN with the SEL PUSH EXEC dial B then press the dial 8 Select OK with the SEL PUSH EXEC dial B then press the dia...

Page 55: ...rve for movies STILL Standard gamma curve for still images CINEMATONE1 Gamma curve 1 for producing tone of film camera images CINEMATONE2 Gamma curve 2 for producing tone of film camera images ITU709 Gamma curve that corresponds to ITU 709 Gain in low intensity area 4 5 Item Description and settings RANGE Selects a correcting range HIGH MIDDLE LOW LEVEL Sets the correcting level 7 maximum black co...

Page 56: ...W MANUAL SET Sets the knee point and slope manually POINT Sets the knee point 75 to 105 SLOPE Sets the knee slope 5 gentle to 5 steep KNEE is set to off when you set to 5 Item Description and settings TYPE Selects a type of colors STANDARD Suitable colors when GAMMA is set to STANDARD STILL Suitable colors when GAMMA is set to STILL CINEMATONE1 Film camera image like colors good with GAMMA set to ...

Page 57: ...and settings 8 black and white 7 light to 7 dark Item Description and settings 7 greenish to 7 reddish Item Description and settings R 7 light red to 7 deep red G 7 light green to 7 deep green B 7 light blue to 7 deep blue C 7 light cyan to 7 deep cyan M 7 light magenta to 7 deep magenta Y 7 light yellow to 7 deep yellow Item Description and settings FILTER TYPE Selects a color filter type for the...

Page 58: ...ed V H BALANCE Sets the vertical V and horizontal H balance of DETAIL 2 off to the vertical V side to 2 off to the horizontal H side B W BALANCE Selects the balance of the lower DETAIL B and the upper DETAIL W TYPE1 off to the lower DETAIL B side to TYPE5 off to the upper DETAIL W side LIMIT Sets the limit level of DETAIL 0 Low limit level likely to be limited to 7 High limit level not likely to b...

Page 59: ...that you want to reset with the SEL PUSH EXEC dial B then press the dial 3 Select SETTING t RESET t YES t RETURN t OK with the SEL PUSH EXEC dial B 1 Press the MENU button during standby 2 Select OTHERS t GPS SETTING t ON default setting with the SEL PUSH EXEC dial appears and your camcorder starts trying to triangulate When your camcorder triangulates successfully it will record the location info...

Page 60: ...selecting 60i 00 00 00 00 23 59 59 29 When setting 24p you can set the last 2 time code digits of the frames in multiples of 4 between 0 and 23 When selecting 50i 00 00 00 00 23 59 59 24 4 Set other digits by repeating step 3 5 Select OK with the SEL PUSH EXEC dial then press the dial To reset the time code You can reset the time code 00 00 00 00 Select RESET in step 2 of Presetting the time code ...

Page 61: ...ast Scene Review Assigning the functions to the ASSIGN buttons Some functions can be assigned to the ASSIGN buttons for use You can assign a single function to any one of the ASSIGN 1 to 6 buttons See Menu items p 82 on the function of each item Default function of each ASSIGN button ASSIGN 1 PEAKING p 94 ASSIGN 2 HISTOGRAM p 94 ASSIGN 3 FACE DETECTION p 41 ASSIGN 4 ZEBRA p 94 ASSIGN 5 MARKER p 95...

Page 62: ... select YES and jump to step 5 4 Select the function that you want to assign with the SEL PUSH EXEC dial A then press the dial 5 Select OK with the SEL PUSH EXEC dial A then press the dial z Tips FOCUS TRANSITION is assigned to the ASSIGN 4 5 6 buttons p 42 If you cancel the assignment of FOCUS TRANSITION the setting goes back to the previous setting To cancel FOCUS TRANSITION select FOCUS TRANSIT...

Page 63: ... button The VISUAL INDEX screen appears after a few seconds You can turn on or off the date and time display on the thumbnails by pressing the DISPLAY button Playing back movies VOLUME buttons VISUAL INDEX button POWER switch START STOP button Thumbnail movie Previous Recording media Playback mode Next Current movie data p 64 Continued ...

Page 64: ...reen ADate and time of recording started BResolution CFrame rate DRecording mode EDuration FTime code of recording started Time code will not be displayed correctly when you play back recording media with no time code or recording media with time code that your camcorder does not support GGPS data Appears on the movie that was recorded with GPS SETTING set to ON default setting on the OTHERS menu ...

Page 65: ... view many movies at the same time on the VISUAL INDEX screen are called thumbnails You can operate playback using the PREV PLAY NEXT STOP PAUSE SCAN SLOW buttons on the camcorder To adjust the volume Adjust the volume with the VOLUME buttons To return to the recording mode Press the VISUAL INDEX button On playing back movies Movies recorded using this camcorder may not be played back normally on ...

Page 66: ... still image you want to view The first touch of the thumbnail will show the information on the still image at the lower part of the LCD screen ADate and time of recording BResolution CImage size DGPS data Appears on a still image that was created from a movie recorded with GPS SETTING set to ON default setting on the OTHERS menu Playing back still images Playback mode Playback Continued ...

Page 67: ...ected still image To enlarge Touch playback zoom when playing back a still image You can adjust the zoom with or with the zoom lever When you touch the enlarged image the touched point will be displayed at the center of the screen Previous Next ...

Page 68: ... recording on the screen during playback Press the DATA CODE button A during playback or pause The screen changes in the order date and time display t camera data display t GPS triangulation data t no display with each press of the button A White balance The following icons will appear during the playback of still images or movies recorded with MANU WB TEMP When a still image is played back 6500K ...

Page 69: ...splayed You can check the settings of the following items Audio setup p 92 Output signal setup p 91 Functions assigned to the ASSIGN buttons p 61 Camera setup p 85 Recording media information You can check the estimated used and free spaces Battery Info You can check the remaining capacity of the attached battery 1 Press the STATUS CHECK button D 2 Turn the SEL PUSH EXEC dial C until a desired dis...

Page 70: ...output from the HDMI OUT and COMPONENT OUT jacks simultaneously In the case of the A V connecting cable connection signals are output from the VIDEO OUT jack Component video cable sold separately Monitor TV A V connecting cable supplied HDMI cable sold separately To HDMI input jack To audio video input jacks To component input jacks Signal flow ...

Page 71: ...ce signals by the pull down system to be output HD SD HDMI COMPONENT setting Output resolution HDMI OUT COMPONENT OUT VIDEO OUT HD 1080p 480i 1080p 1080p No output 720p 480i 720p 720p No output 1080i 480i 1080i 1080i No output 480p 480p 480p No output 480i 480i 480i No output SD 1080p 480i 480i 480i No output 720p 480i 480i 480i No output 1080i 480i 480i 480i No output 480p 480p 480p No output 480...

Page 72: ...refore if HDMI COMPONENT is set to 720p 480i 60i or 720p 576i 50i or either 480p 60i or 576p 50i the screen of the connected device becomes blank If you display the edit screen while outputting signals to a monitor or TV the menu may not be displayed correctly This camcorder is not compatible with BRAVIA sync Connecting a monitor or a TV Continued ...

Page 73: ...ed 2 Select EDIT t PROTECT with the SEL PUSH EXEC dial 3 Touch the movies or still images to be protected is displayed on the selected images Press and hold the image down to preview the image Touch to return to the previous screen You can select up to 100 images at one time 4 Touch t t To undo the protection of movies and still images Touch the movie or still image marked with in step 3 disappear...

Page 74: ... recording media that contains the movies from your camcorder during the operation It may damage the recording media A slight difference may occur from the point where you touch X and the actual dividing point as your camcorder selects the dividing point based in about half second increments z Tips Only simple editing is available on this camcorder Use commercially available editing software for m...

Page 75: ... you try to delete them p 73 Save important movies and still images in advance z Tips To delete all data recorded on the recording media and recover all the recordable space of the media format the media p 78 1 Press the MENU button when the VISUAL INDEX screen is displayed 2 Select EDIT t DELETE with the SEL PUSH EXEC dial 3 Touch the movies or still images to be deleted is displayed on the selec...

Page 76: ...sing the supplied AC Adaptor Charger to prevent your camcorder from running out of power during the operation z Tips The original movies and still images will not be deleted after copying 1 Press the MENU button when the VISUAL INDEX screen is displayed 2 Select EDIT t COPY with the SEL PUSH EXEC dial 3 Select the recording media to copy from and to 4 Select Multiple Images 5 Select the image type...

Page 77: ...ng on the image quality of the movie 2 1M with high definition image quality HD 0 2M in 16 9 wide with standard definition image quality SD VGA 0 3M in 4 3 with standard definition image quality SD The recording media where you want to save still images should have enough free space The recording date and time of captured still images is the same as the recording date and time of the movies If the...

Page 78: ...edia from being recovered Unintelligible data can be written on recording media Thus it may become more difficult to recover any original data It is impossible to delete all data completely even if you format the recording media Therefore when you dispose of or transfer the recording media it is recommended that you perform the Empty operation b Notes If you perform this operation all stored data ...

Page 79: ...on the recording media and repairs if any inconsistencies found b Notes Connect your camcorder to the wall outlet wall socket using the supplied AC Adaptor Charger to prevent your camcorder from running out of power during the operation 1 Press the MENU button 2 Select OTHERS t REPAIR IMAGE DB FILE with the SEL PUSH EXEC dial 3 Select the recording media you want to check the database file 4 Touch...

Page 80: ...2 Turn the SEL PUSH EXEC dial until the icon of the desired menu is highlighted then press the dial to select the menu CAMERA SET p 85 REC OUT SET p 90 AUDIO SET p 92 DISPLAY SET p 94 TC UB SET p 98 OTHERS p 99 EDIT p 85 3 Turn the SEL PUSH EXEC dial until the desired menu item is highlighted then press the dial to select the item SEL PUSH EXEC dial MENU button MENU button V v B b EXEC buttons ...

Page 81: ...utton to hide the menu screen To return to the previous screen select RETURN b Notes The available menu items vary depending on the context of your camcorder during recording or playback Items and setting values not available due to other settings are grayed out z Tips You can operate using the V v B b EXEC button without using the SEL PUSH EXEC dial ...

Page 82: ...EL 7 7 B0 WB TEMP SET 2300K 15000K B6500K AE SHIFT ON OFF BOFF ON LEVEL 2 0EV 2 0EV B0EV ZOOM SET DIGITAL ZOOM BON OFF ZOOM LEVER BDIGITAL ZOOM POWER ZOOM OFF ZOOM SPEED TYPE BVARIABLE FIXED ZOOM SPEED 1 32 B16 STEADYSHOT BSTANDARD ACTIVE OFF STEADYSHOT BON OFF FOCUS TRANSITION TRANSITION TIME 3 5sec 90 0sec B4 0sec START TIMER BOFF 5sec 20sec REC LINK BOFF FOCUS A FOCUS B SPOT FOCUS FACE DETECTIO...

Page 83: ...080 50i HQ 1080 50i LP 720 50p FX 720 50p FH SIMULTANEOUS REC BON OFF WIDE REC BON OFF MEDIA SELECT BMEMORY CARD FMU IMAGE SIZE B3 2 16 0M 3 2 8 4M 3 2 4 0M 16 9 13 6M 16 9 7 1M 16 9 3 4M ZOOM LEVER BSERIES RESET VIDEO OUT HDMI COMPONENT 60i 1080p 480i 720p 480i B1080i 480i 480p 480i 50i 1080p 576i 720p 576i B1080i 576i 576p 576i DOWN CONVERT TYPE BSQUEEZE LETTER BOX 16 9 EDGE CROP WIDE CONVERT BS...

Page 84: ...ENTER BON OFF ASPECT BOFF 4 3 13 9 14 9 15 9 1 66 1 1 85 1 2 35 1 SAFETY ZONE BOFF 80 90 GUIDEFRAME BOFF ON EXPANDED FOCUS MAG 4 0 8 0 B 4 0 8 0 CAMERA DATA DISPLAY OFF BON AUDIO LEVEL DISPLAY BON OFF ZOOM DISPLAY BBAR NUMBER FOCUS DISPLAY BMETER FEET SHUTTER DISPLAY BSECOND DEGREE LCD BRIGHT BNORMAL BRIGHT DISPLAY OUTPUT BLCD PANEL ALL OUTPUT TC UB SET p 98 TC PRESET BPRESET RESET UB PRESET BPRES...

Page 85: ...to adjust your camcorder to the recording conditions GAIN SET STEADYSHOT etc The default settings are marked with B See page 80 for details on selecting menu items You can change the gain display between dB and ISO sensitivity during movie mode B GAIN Adjusts in dB ISO Adjusts in ISO sensitivity recommended exposure index b Notes This setting is fixed to ISO in photo mode Gain and ISO sensitivity ...

Page 86: ...n photo mode or when GAIN ISO SEL is set to ISO The value can be set separately from the one set in GAIN SET You can select the upper limit for the Auto Gain Control AGC BOFF 27dB 0dB 3dB increments b Notes This function is not effective while you adjust the gain manually z Tips The setting is available when GAIN ISO SEL is set to GAIN in movie mode The value can be set separately from the one set...

Page 87: ...ssign ON OFF to an ASSIGN button p 61 x DIGITAL ZOOM B ON z Tips The face detection function will not be effective while using the digital zoom OFF x ZOOM LEVER You can select zooming by the zoom lever on the camcorder or the Wireless Remote Commander It is not possible to assign different operations for them B DIGITAL ZOOM POWER ZOOM OFF z Tips To set to POWER ZOOM a power zoom lens compatible wi...

Page 88: ... B 4 0sec 4 5sec 15 0sec 0 5sec increments 20 0sec 30 0sec 45 0sec 60 0sec 90 0sec x START TIMER You can set the time to start the transition after the ASSIGN 5 or ASSIGN 6 button is pressed B OFF 5sec 10sec 20sec x REC LINK You can link the time you start recording with the time focus shifts B OFF FOCUS A FOCUS B b Notes FOCUS TRANSITION function is effective only on the EXEC screen See page 41 S...

Page 89: ...mount adaptor sold separately and an A mount lens you can register a specific focal setting for that lens x ON OFF B OFF Deactivates AF micro adjustment ON Activates AF micro adjustment x AMOUNT You can set the adjustment value of the attached lens Set a higher value to focus farther from the camcorder or set a lower value to focus closer to the camcorder 20 B0 20 x CLEAR ALL You can clear the val...

Page 90: ...0dB 60i 18dB 50i Set ON OFF to ON too z Tips You can assign ON OFF to an ASSIGN button p 61 If you record color bars with TONE set to OFF the camcorder records sound from the microphone COLOR BAR REC OUT SET menu Recording settings input and output settings REC SET VIDEO OUT etc The default settings are marked with B See page 80 for details on selecting menu items x SET See page 45 x REC FORMAT Se...

Page 91: ...ing its right and left edges x WIDE CONVERT You can select a down convert type when you down covert video signal Use this function for outputting SD movies recorded with WIDE REC set to ON B SQUEEZE Outputs a horizontally compressed image while maintaining its original height LETTER BOX 16 9 Outputs a vertically compressed image while maintaining its original aspect ratio EDGE CROP Outputs the cen...

Page 92: ...age quality HD recording B LINEAR PCM Records in Linear PCM system DOLBY DIGITAL Records in Dolby Digital system b Notes Audio format is fixed to DOLBY DIGITAL with the standard definition image quality SD recording You can set the clipping noise reduction function for CH1 CH2 B OFF Disables the function ON Enables the function b Notes This function is available only when you set the AUTO MAN CH1 ...

Page 93: ... 6dB B0dB 6dB 12dB b Notes The setting is not effective when you set the INPUT 1 switch to LINE x INPUT1 WIND B OFF Disables wind noise reduction ON Enables wind noise reduction appears on the status check screen b Notes The setting is not effective when you set the INPUT 1 switch to LINE x INPUT2 TRIM x INPUT2 WIND You can set INPUT 2 in the same way as INPUT 1 z Tips 48 dBu is set as 0dB in your...

Page 94: ...T with the SEL PUSH EXEC dial HISTOGRAM Histogram You can display a zebra pattern as a guide for adjusting brightness x ON OFF B OFF Does not display the zebra pattern ON and the brightness level The zebra pattern is not recorded with the image x LEVEL You can select the brightness level B70 to 100 or 100 z Tips The zebra pattern is a stripe pattern that appears in areas of brightness equal to or ...

Page 95: ...hat regular home TVs can display x GUIDEFRAME B OFF Does not display the guide frame ON Displays the guide frame You can check the horizontal and vertical aspect of a subject b Notes Only the time code is output to an external device via external output jacks when MARKER is set to ON even if DISPLAY OUTPUT is set to ALL OUTPUT You cannot display markers during EXPANDED FOCUS You can display marker...

Page 96: ...mber 0 through 99 that indicates the optical zoom position B METER Displays the focal length in meters FEET Displays the focal length in feet B SECOND Displays the shutter display in seconds DEGREE Displays the shutter display in degrees The shutter speed equal to the period that your camcorder reads image data from the image sensor is defined as 360 degrees The degree is calculated based on this ...

Page 97: ...splayed as an integral multiple of 360 degrees 360 2 etc You can adjust the brightness of the LCD screen Changes in the LCD brightness are not affect the brightness of recording images B NORMAL BRIGHT You can select where to output the display information such as time code B LCD PANEL Outputs the information to the LCD screen ALL OUTPUT Outputs information to the HDMI OUT COMPONENT OUT and VIDEO O...

Page 98: ...e Time code without this correction is called non drop frame Press the MENU button t select TC UB SET with the SEL PUSH EXEC dial TC PRESET UB PRESET TC FORMAT You can select how the time code advances B REC RUN Advances the time code only during recording Select this setting to record the time code sequentially from the last time code of the previous recording FREE RUN Advances the time code rega...

Page 99: ...all cameras via the memory card b Notes A camera profile of a different 60i 50i SEL setting is not compatible The file may not be shown properly if the file name is changed on the computer or the power turned off during generation Formatting the memory card also deletes saved camera profiles z Tips Items that can be saved include setting values for menus picture profiles buttons etc You can save t...

Page 100: ... Select YES on the confirmation screen See page 61 See page 27 You can adjust a time difference without stopping the clock When you use your camcorder abroad you can adjust the clock to the local time You can change this setting without stopping the clock Set to ON to move the time forward 1 hour B OFF Does not set the summertime ON Sets the summertime You can select the language to be used on the...

Page 101: ...he power is on Once the clock is adjusted it will not be adjusted until the next time you turn the camcorder on again The clock may not be adjusted to the correct time automatically using the GPS system depending on the country region selected for your camcorder In this case set AUTO CLOCK ADJ to OFF The camcorder can compensate for time differences automatically by acquiring location information ...

Page 102: ...ps You can assign this function to an ASSIGN button p 61 B ON Turns on the rear camera recording lamp OFF Turns off the rear camera recording lamp z Tips You can assign this function to an ASSIGN button p 61 B ON Enables the supplied Wireless Remote Commander p 11 OFF Disables the supplied Wireless Remote Commander to prevent misoperation by the remote control of another device Select the setting ...

Page 103: ...r perform MEDIA FORMAT Performing the MEDIA FORMAT also deletes protected movies See page 78 See page 79 Select this item when USB CONNECT does not appear on the LCD screen by connecting the camcorder to another device with the USB cable Displays the total hours of operation in 10 hour increments Displays the current version of your camcorder and lens Be sure to check for firmware updates b Notes ...

Page 104: ...tes You may not be able to use external media devices with a code function The FAT file system is available for your camcorder If the storage medium of the external device was formatted for the NTFS file system etc format the external media device using the camcorder before use The format screen appears when an external media device is connected to your camcorder Make sure that important data has ...

Page 105: ...ot save scenes exceeding the following number The number of scenes may be smaller depending on the camcorder setting and the type of images recorded High definition image quality HD movies Max 3 999 Standard definition image quality SD movies Max 9 999 Still images Max 40 000 When the camcorder is connected to the external media device the images saved in the external media device are displayed on...

Page 106: ...back on your camcorder and record it on the recording device For details refer to the instruction manuals supplied with the device to be connected 5 When copy is finished stop the recording device and then your camcorder b Notes Since copying is performed via analog data transfer the image quality may deteriorate You cannot copy images to recorders connected with an HDMI cable When you do not want...

Page 107: ...amcorder may get warmer while you use it This is not a malfunction The remaining battery indicator does not indicate the correct figure Ambient temperature is too high or too low or the battery pack has not been charged enough This is not a malfunction Fully charge the battery again If the problem persists the battery may be worn out Replace it with a new one p 19 123 The indicated figure may not ...

Page 108: ...sources such as sunlight or overhead lighting away from the remote sensor otherwise the Wireless Remote Commander may not function properly Insert a fresh battery in the compartment with its terminals matching those of the compartment p 11 Another video device malfunctions when you use the supplied Wireless Remote Commander Select a commander mode other than DVD2 for your video device Cover the se...

Page 109: ... recording media p 78 Total number of movie scenes exceeds the recordable capacity of your camcorder p 118 Delete unnecessary images p 75 The temperature of your camcorder is extremely high Turn off your camcorder and leave it for a while in a cool place The temperature of your camcorder is extremely low Turn off your camcorder and leave it for a while in a warm place Something wrong happened to o...

Page 110: ...pect ratio 16 9 wide 4 3 cannot be changed The aspect ratio of high definition image quality HD movies is 16 9 wide Automatic focus does not function Set the FOCUS switch to AUTO to enable the automatic focus function p 39 Adjust the focus manually if the automatic focus does not work properly p 39 Use an E mount lens p 22 Menu items are grayed out or do not work You cannot select grayed out displ...

Page 111: ... appear crooked depending on the recording conditions Horizontal stripes appear on the image This occurs when recording pictures under a fluorescent lamp sodium lamp or mercury lamp This is not a malfunction This can be improved by changing the shutter speed p 47 Black bands appear when you record a TV screen or computer screen This can be improved by adjusting the shutter speed p 47 Fine patterns...

Page 112: ...ta file name is displayed incorrectly or flashing The file is damaged The file format is not supported on your camcorder p 120 Only the file name is displayed if the folder structure does not conform to the universal standard No sound or only a low sound is heard Turn up the volume p 65 Photos cannot be played back Photos may not be playable if the folder file name is changed or images are edited ...

Page 113: ...onnecting the HDMI cable or turn on your camcorder again The image appears distorted on the 4 3 TV This happens when viewing a movie recorded in the 16 9 wide mode on a 4 3 TV Select REC OUT SET t VIDEO OUT t DOWN CONVERT TYPE t the appropriate down conversion type p 91 Black zone appears at top and bottom of a 4 3 TV screen This happens when viewing a movie recorded in the 16 9 wide mode on a 4 3...

Page 114: ...t location If your camcorder receives the radio signal reflected by surrounding buildings or weak radio signals the margin of error can be as wide as several hundred meters at a maximum The computer does not recognize the camcorder Disconnect the cable from the computer then connect it again securely Disconnect the cable from your computer and camcorder Reboot your computer and connect your comput...

Page 115: ...ery remaining figure Warning indicator pertaining to battery pack temperature The battery pack is too hot Replace the battery pack or remove the battery pack and put it in a cool place Warning indicator pertaining to memory cards Slow flashing Free spaces for recording images are running out For the type of memory cards you can use with your camcorder see page 31 No memory card is inserted p 31 Fa...

Page 116: ...ertaining to the external media device The image database file may be damaged p 79 The external media device is damaged Warning indicator pertaining to formatting of the external media device The external media device is damaged Format the external media device correctly If the message still appears reconnect the external media device then format it Note that if you format the external media devic...

Page 117: ...er from 10 C to 30 C 50 F to 86 F The recording and playback time will be shorter depending on the conditions under which you use your camcorder NEX EA50UH EA50EH EA50H only Playing time unit minute High definition image quality HD x When AUDIO FORMAT is set to LINEAR PCM unit minute x When AUDIO FORMAT is set to DOLBY DIGITAL unit minute Estimated time of recording and playback with each battery ...

Page 118: ...corder The actual number of recordable photos is displayed on the LCD screen during recording p 12 The number of recordable photos of memory card may vary depending on the recording conditions z Tips Bit rate movie audio etc number of pixels and aspect ratio of each recording mode of movies are as follows High definition image quality HD PS max 28 Mbps 1 920 1 080 16 9 FX max 24 Mbps 1 920 1 080 1...

Page 119: ... Bahama Islands Bolivia Canada Central America Chile Colombia Ecuador Guyana Jamaica Japan Korea Mexico Peru Surinam Taiwan the Philippines the U S A Venezuela etc Countries regions that require 50i on 60i 50i SEL Argentina Australia Austria Belgium Brazil Bulgaria China Czech Republic Denmark Finland France Germany Guiana Holland Hong Kong Hungary Iran Iraq Italy Kuwait Malaysia Monaco New Zealan...

Page 120: ...f a file exceeds 2 GB the file becomes divided The file numbers go up automatically When the capacity of a file number exceeds 9999 another folder is created to record new movie files The folder name goes up 100PNV01 t 101PNV01 D Still image files JPEG files The extension of the files is JPG The file numbers go up automatically When the capacity of a file number exceeds 9999 another folder is crea...

Page 121: ...ate US space satellites This system allows you to pinpoint your exact location on the earth The GPS satellites are located in 6 orbits 20 000 km above the earth The GPS system consists of 24 or more GPS satellites A GPS receiver receives radio signals from the satellites and calculates the current location of the receiver based on the orbital information almanac data and travel time of the signals...

Page 122: ...liant product you use Damaged or lost image data will not be compensated for and may occur in the following cases If you eject the memory card turn the power off on your camcorder or remove the battery pack for replacement while your camcorder is reading or writing image files on the memory card while the access lamp is lit or flashing If you use the memory card near magnets or magnetic fields It ...

Page 123: ...n InfoLITHIUM battery pack An InfoLITHIUM battery pack is a lithium ion battery pack that has functions for communicating information related to operating conditions between your camcorder and a supplied AC Adaptor Charger The InfoLITHIUM battery pack displays the remaining battery time in according to the operating situations of your camcorder To charge the battery pack Be sure to charge the batt...

Page 124: ...time to replace it with a new one Each battery s life is governed by storage operating and environmental conditions About charging the battery pack Use the Charger supplied to charge the designated batteries only If you charge other types of batteries those batteries may leak heat up burst or give an electric shock resulting in burns or injury Remove the charged battery from the Charger The CHARGE...

Page 125: ...witch set to OFF when you are not using your camcorder Do not wrap your camcorder with a towel for example and operate it Doing so might cause heat to build up inside When disconnecting the power cord mains lead pull it by the plug and not the lead Do not damage the power cord mains lead such as by placing anything heavy on it Keep metal contacts clean Keep the Wireless Remote Commander and button...

Page 126: ...w It is recommended that you connect your camcorder to the wall outlet wall socket using the supplied AC Adaptor Charger during the operation 1 Press the MENU button t select OTHERS t CALIBRATION with the SEL PUSH EXEC dial 2 Touch displayed on the LCD screen with the corner of memory card or the like 3 times b Notes If you did not press the right spot try the calibration again Do not use a sharp ...

Page 127: ...attery is not charged the camcorder operation will not be affected as long as you are not recording the date x Procedures Connect your camcorder to a wall outlet wall socket using the supplied AC Adaptor Charger and leave it with the POWER switch set to OFF for more than 24 hours Removing dust from inside the viewfinder Remove dust inside the eye piece and viewfinder with a blower Note on disposal...

Page 128: ...0 pixels Effective movie 16 9 Approx 13 600 000 pixels Effective photo 16 9 Approx 13 600 000 pixels Effective photo 3 2 Approx 16 100 000 pixels Lens E mount lens 11 Optical Filter diameter 67 mm 2 3 4 in F3 5 6 3 Focal length f 18 mm 200 mm 23 32 in 7 7 8 in When converted to a 35 mm still camera For movies 29 mm 322 mm 1 3 16 in 12 3 4 in 16 9 27 mm 300 mm 1 1 8 in 11 7 8 in 4 3 Color temperatu...

Page 129: ... C 4 F to 140 F Dimensions approx Camcorder body only including the projecting parts 142 5 mm 203 mm 285 5 mm 5 5 8 in 8 in 11 1 4 in w h d When recording including the projecting parts 142 5 mm 203 mm 429 5 mm 5 5 8 in 8 in 17 in w h d With the accessories lens lens hood large LCD viewfinder large eyecup attached Mass approx Camcorder body only 1 720 g 3 lb 12 7 oz When recording NEX EA50UH EA50E...

Page 130: ...50K only Lens E mount lens When converted to a 35 mm still camera 29 mm 322 mm 1 3 16 in 12 3 4 in 16 9 27 mm 300 mm 1 1 8 in 11 7 8 in 4 3 F value F3 5 F6 3 SteadyShot Optical shift biaxial linear drive and hall effect sensor Minimum focus 0 30 m W 0 50 m T 11 7 8 in 19 3 4 in Maximum magnification 0 35 Minimum f stop f 22 f 40 Filter diameter 67 mm 2 3 4 in Dimensions approx max diameter height ...

Page 131: ...rk of SD 3C LLC MultiMedia Card is a trademark of MultiMediaCard Association All other product names mentioned herein may be the trademarks or registered trademarks of their respective companies Furthermore and are not mentioned in each case in this manual Notes on the License ANY USE OF THIS PRODUCT OTHER THAN CONSUMER PERSONAL USE IN ANY MANNER THAT COMPLIES WITH THE MPEG 2 STANDARD FOR ENCODING...

Page 132: ...modify and redistribute source code for these software programs under the conditions of the supplied GPL LGPL Source code is provided on the web Use the following URL to download it When downloading the source code select NEX EA50 as the model for your camcorder http www sony net Products Linux We would prefer you do not contact us about the contents of source code Please read the files in the LIC...

Page 133: ...media device 104 Recorder 106 TV 70 COPY 76 D Data code 68 Date and time 13 28 DATE REC 102 DELETE 75 DETAIL 58 DISPLAY OUTPUT 97 DISPLAY SET menu 94 DIVIDE 74 DOWN CONVERT TYPE 91 E Expanded focus 40 EXPANDED FOCUS MAG 95 F FACE DETECTION 41 FILE NUMBER 90 Flash memory unit 32 FLASH SET 88 Focus 39 FOCUS DISPLAY 96 Focus hold 40 FOCUS TRANSITION 88 Focus transition 42 FREE RUN 98 G Gain 46 GAIN S...

Page 134: ...C SET 90 Recording 33 Recording format 44 Recording image quality 45 Recording time 117 REC OUT SET menu 90 REMOTE CONTROL 102 REPAIR IMAGE DB FILE 79 RESET button 9 S SAFETY ZONE 95 Screen indicators 12 SD WIDE CONVERT 91 SD WIDE REC 90 Self diagnosis display 115 Shoulder strap 7 SHUTTER DISPLAY 96 Shutter speed 47 Simultaneous recording 34 Specifications 128 SPOT FOCUS 41 START TIMER 88 Status c...

Page 135: ...135 Additional Information Wireless Remote Commander 11 X XLR AGC LINK 93 XLR SET 93 Z ZEBRA 94 110 ZOOM DISPLAY 96 ZOOM SET 87 Zooming 38 ...

Page 136: ...http www sony net Printed in Japan 2012 Sony Corporation Printed on 70 or more recycled paper using VOC Volatile Organic Compound free vegetable oil based ink ...

Reviews: