background image

24

Optional Components

Hooking up the optional
A/V components

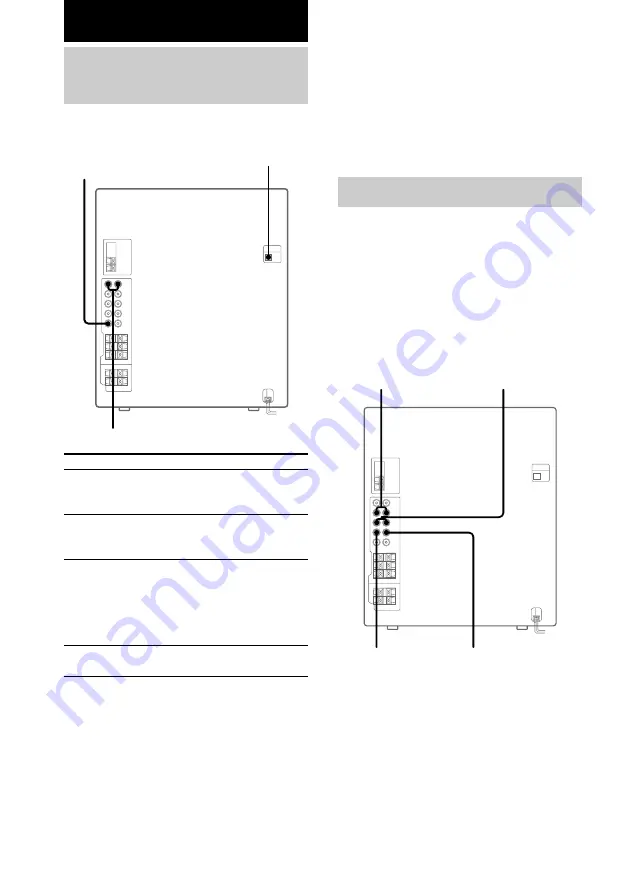
You can connect your MD deck or VCR to this
system.

To the digital input jack of the MD deck

Notes

• If you cannot select “MD” when you press MD

(VIDEO), press 

?/1

 while holding down MD

(VIDEO) when the system is on. “VIDEO” will be
switched to “MD”. To return to “VIDEO”, do the
same procedure.

• Make sure to match the color of the plugs and the

connectors.

• When you connect a VIDEO CD deck, set to “MD”.

Connecting a DVD player

When your DVD player has
5.1 channel analog outputs

To listen to the sound from the connected DVD
player, press DVD 5.1CH.
The indicator on the button lights.

When you listen to a stereo sound track from
the DVD player, press DVD 5.1CH to turn off
the indicator.

To the front output of
the DVD player

To the rear output of
the DVD player

To the woofer output
of the DVD player

To the center output of
the DVD player

To sub woofer

To the audio output of the MD deck or VCR

To

Do this

Make a digital
recording from
CD to MD

Connect an optional optical cable.

Listen to the
connected
MD deck

Press MD (VIDEO).

Listen to the
connected VCR

While holding down MD
(VIDEO), press 

?/1

. This

switches the “MD” function to
“VIDEO”. Once you enable the
“VIDEO” function, just press MD
(VIDEO).

Connect a sub
woofer speaker.

Connect an optional sub woofer.

Summary of Contents for DX60AV

Page 1: ...ny Corporation Operating Instructions Owner s Record The model and serial numbers are located on the rear panel of the unit Record the serial number in the space provided below Refer to them whenever you call upon your Sony dealer regarding this product Model No Serial No ...

Page 2: ...frequency energy and if not installed and used in accordance with the instructions may cause harmful interference to radio communications However there is no guarantee that interference will not occur in a particular installation If this equipment does cause harmful interference to radio or television reception which can be determined by turning the equipment off and on the user is encouraged to t...

Page 3: ...Recording to a tape CD Synchro Recording Recording Manually Program Edit 17 Timer recording radio programs 18 Sound Adjustment Adjusting the sound 19 Selecting the sound effect 19 Enjoying Dolby Pro Logic Surround sound 20 Selecting the surround effect 21 Adjusting the graphic equalizer and storing 21 Other Features Enhancing video game sound Game Sync 22 Changing the spectrum analyzer display 22 ...

Page 4: ... wl 24 25 EDIT 8 18 EFFECT ON OFF 4 20 ENTER qa 9 10 12 15 18 19 21 23 29 GAME ef 25 GAME EQ 2 19 20 GROOVE 5 19 MD VIDEO qh 24 MOVIE EQ 0 19 20 MUSIC EQ 7 19 20 P FILE qs 21 PHONES jack ql PLAY MODE 8 11 12 PRO LOGIC 3 20 PTY DIRECTION 8 15 18 REC PAUSE START wf 17 REPEAT 8 11 SPECTRUM 8 22 STEREO MONO 8 14 TAPE A B qg 16 17 TUNER MEMORY 8 13 TUNER BAND qf 13 14 17 VIDEO jack ed 25 VOLUME control...

Page 5: ...24 25 EFFECT ON OFF qf 20 ENTER qj 9 10 12 15 18 19 21 23 29 GAME wa 25 MD VIDEO qa 24 P FILE qh 21 PRESET EQ qk 19 PRESET wd 14 PRESET wd 14 PROLOGIC ON OFF 8 20 REAR CENTER LEVEL 6 8 SLEEP 1 22 TAPE A B qs 16 17 TEST TONE qd 8 9 TUNER BAND ql 13 14 17 TUNING wd 13 TUNING wd 13 VOL 9 BUTTON DESCRIPTIONS 1 power 4 v V b B qg M fast forward wd go back wd go forward wd X pause wd nN play wd m rewind...

Page 6: ... only the stripped portion Red Solid 3 Black Stripe 2 Connect the rear surround speakers Connect the speaker cords to the REAR SPEAKER jacks as shown below R L Getting Started Hooking up the system Perform the following procedure 1 to 5 to hook up your system using the supplied cords and accessories 4 2 3 1 5 Insert only the stripped portion Red Solid 3 Black Stripe Center surround speaker Front s...

Page 7: ... from slipping Notes Keep the speaker cords away from the antennas to prevent noise Do not place the surround speakers on top of a TV This may cause distortion of the colors in the TV screen Be sure to connect both left and right surround speakers Otherwise the sound will not be heard continued 3 Connect the center surround speaker Connect the speaker cords to the CENTER SPEAKER jacks as shown bel...

Page 8: ...de then adjust the volume of each speaker using the test tone provided by the system 1 Press PRO LOGIC or PRO LOGIC ON OFF on the remote PRO LOGIC ON appears 2 Press TEST TONE on the remote Each speaker emits the test tone cyclically in the following order LEFT front t CENTER t RIGHT front t REAR R right t REAR L left 3 From your listening position press REAR CENTER LEVEL on the remote to adjust t...

Page 9: ...m 1 Make sure that all discs are removed from the unit 2 Hold down CD and then press 1 until STANDBY appears When you release the buttons LOCK appears 3 Unplug the power cord Inserting two R6 size AA batteries into the remote E e e E Tip With normal use the batteries should last for about six months When the remote no longer operates the system replace both batteries with new ones Note If you do n...

Page 10: ...lights up even in the Power Saving Mode The timer functions in the Power Saving Mode Note You cannot set the time in the Power Saving Mode To cancel the Power Saving Mode Press DISPLAY once to show the demonstration or twice to show the clock display CD Loading a CD 1 Press Z OPEN CLOSE The disc tray opens 2 Place a CD with the label side up on the disc tray When you play a CD single 8 cm CD place...

Page 11: ... DISC 1 3 or DISC SKIP EX CHANGE or D SKIP on the remote To Do this Switch to CD function from another source Press DISC 1 3 Automatic Source Selection However if a CD is used in a program play does not start even if you press CD 1 3 Remove a CD Press Z OPEN CLOSE Exchange other CDs while playing Press DISC SKIP EX CHANGE Play repeatedly Repeat Play Press REPEAT during play until REPEAT or REPEAT ...

Page 12: ...ent track or the entire CD Press DISPLAY or DSP on the remote repeatedly During normal play Elapsed playing time of the current track t Remaining time of the current track t Remaining time of current CD 1DISC mode or display ALL DISCS mode t Clock display for eight seconds t Effect status In stop mode During Program Play mode when there is a program The last track number of the program and the tot...

Page 13: ...RY A preset number appears in the display The stations are stored from preset number 1 Preset number 4 Press ENTER COMPLETE appears The station is stored 5 Repeat steps 1 to 4 to store other stations To tune in a station with a weak signal Press or or TUNING or on the remote repeatedly in step 2 to tune in the station manually To set another station to an existing preset number Start over from ste...

Page 14: ...dle Eastern models The AM tuning interval is factory set to 9 kHz 10 kHz in some areas To change the AM tuning interval tune in any AM station first then turn off the system While holding down ENTER turn the system back on When you change the interval all the AM preset stations are erased To reset the interval repeat the same procedure Tip The preset stations are retained for half a day even if yo...

Page 15: ...e may not appear in the display Locating a station by program type PTY You can locate a station you want by selecting a program type The system tunes in the type of programs currently being broadcast from the RDS stations stored in the tuner s preset memory The types of programs include NEWS AFFAIRS current news INFO SPORT EDUCATE education programs DRAMA CULTURE SCIENCE VARIED interviews games an...

Page 16: ...mes then stops Deck A front side t Deck A reverse side t Deck B front side t Deck B reverse side To Do this Stop play Press x Pause Press X Press again to resume play Fast forward or rewind Press m or M Remove the cassette Press Z Searching for the beginning of the current or the next track AMS To go forward Press during playback when N lights in the display TAPE A or TAPE B 1 appears Press during...

Page 17: ...r tape or tune in the station you want to record 5 Press DIRECTION repeatedly to select g to record on one side Select j or RELAY to record on both sides 6 Press REC PAUSE START To stop recording Press x Tips If you want to record from the reverse side press TAPE A B to select deck B after step 1 Press hH or nN on the remote to start playback of the reverse side then press x to start recording The...

Page 18: ...hour indication flashes in the display Recording a CD by specifying track order Program Edit When programing make sure the playing times for each side do not exceed the length of one side of the tape 1 Load a CD and load a recordable tape into deck B 2 Press CD 3 Press PLAY MODE repeatedly until PROGRAM appears in the display 4 Press one of DISC 1 3 to select a CD To program all the tracks on a CD...

Page 19: ...em until the Sleep Timer turns it off Sound Adjustment Adjusting the sound You can reinforce the bass and create a more powerful sound The GROOVE setting is ideal for music sources and the V GROOVE setting is ideal for video sources movies VCDs Press GROOVE Each time you press the button the display changes cyclically as follows GROOVE ON t V GROOVE ON t GROOVE OFF The volume switches to power mod...

Page 20: ...O LOGIC button lights up To cancel the Dolby Pro Logic Surround sound Press PRO LOGIC or PRO LOGIC ON OFF on the remote again to turn off the PRO LOGIC button Notes You cannot use both Dolby Pro Logic Surround sound and the DSP surround effects see page 21 or 5 1 channel surround sound see page 24 at the same time When recording the sound be sure to turn off Dolby Pro Logic Surround sound Selectin...

Page 21: ...qualizer setting 4 Press ENTER COMPLETE appears This setting is automatically stored as the personal file you selected in step 3 To Press Call up a personal file P FILE repeatedly to select the desired personal file number Cancel a personal file EFFECT ON OFF repeatedly until EFFECT OFF appears in the display Selecting the surround effect Press DSP on the remote repeatedly to select the surround e...

Page 22: ...follows PATTERN 1 t PATTERN 2 t PATTERN 3 t PATTERN OFF No display Falling asleep to music Sleep Timer You can set the system to turn off after a certain time so that you can fall asleep to music Press SLEEP on the remote Each time you press the button the minute display the turn off time changes cyclically as follows AUTO t 90 t 80 t 70 t t 10 t OFF The system turns off when the current CD or tap...

Page 23: ... 6 Repeat step 5 to set the time to stop playing 7 Press v or V repeatedly until the music source you want appears The indication changes as follows t TUNER y CD PLAY T t TAPE PLAY T 8 Press ENTER The type of timer DAILY 1 or DAILY 2 followed by the start time stop time and the music source appear then the original display appears 9 Press 1 to turn off the system To Do this Check the setting Press...

Page 24: ...from the connected DVD player press DVD 5 1CH The indicator on the button lights When you listen to a stereo sound track from the DVD player press DVD 5 1CH to turn off the indicator To the front output of the DVD player To the rear output of the DVD player To the woofer output of the DVD player To the center output of the DVD player To sub woofer To the audio output of the MD deck or VCR To Do th...

Page 25: ...O LOGIC while listening to 5 1 channel surround sound the 5 1 channel surround sound turns to 2 channel surround sound If there is no sound when you connect a DVD player which has 5 1 channel analog outputs connect the audio output jacks of your DVD player to the MD VIDEO IN jacks then change the function to MD by pressing MD VIDEO If you cannot select MD see page 24 Connecting a video game machin...

Page 26: ...mains if it is not to be used for an extended period of time To disconnect the cord mains lead pull it out by the plug Never pull the cord itself Should any solid object or liquid fall into the component unplug the system and have it checked by qualified personnel before operating it any further The AC power cord must be changed only at a qualified service shop On placement Place the system in a l...

Page 27: ...n the lens inside the CD player Should this occur the system will not operate properly Remove the CD and leave the system turned on for about an hour until the moisture evaporates When you move the system take out any discs If you have any questions or problems concerning your stereo system please consult your nearest Sony dealer Notes on CDs Before playing clean the CD with a cleaning cloth Wipe ...

Page 28: ...too close to the stereo system Move the stereo system away from the TV or VCR The sound from the connected source is distorted If VIDEO appears in the display when you press MD VIDEO switch the display to MD see Hooking up the optional A V components on page 24 0 00 or 12 00 AM flashes in the display A power interruption occurred Set the clock and timer settings again The timer does not function S...

Page 29: ...e dirty see Cleaning the tape heads on page 27 The record playback heads are magnetized see Demagnetizing the tape heads on page 27 The tape does not erase completely The record playback heads are magnetized see Demagnetizing the tape heads on page 27 There is excessive wow or flutter or the sound drops out The capstans or pinch rollers are dirty see Cleaning the tape heads on page 27 Noise increa...

Page 30: ...n from 120 10 000 Hz rates 60 watts per channel minimum RMS power with no more than 10 total harmonic distortion from 250 milliwatts to rated output Amplifier section North American model MHC RG70AV Front speaker Continuous RMS power output reference 60 60 watts 6 ohms at 1 kHz 10 THD Total harmonic distortion less than 0 07 6 ohms at 1 kHz 30 watts Center speaker Continuous RMS power output refer...

Page 31: ...tts 6 ohms at 1 kHz DIN Continuous RMS power output reference 40 40 watts 6 ohms at 1 kHz 10 THD Inputs MD VIDEO IN phono jacks voltage 250 450 mV impedance 47 kilohms DVD INPUT FRONT IN phono jacks voltage 450 mV impedance 47 kilohms REAR IN phono jacks voltage 450 mV impedance 47 kilohms CENTER IN phono jacks voltage 450 mV impedance 47 kilohms WOOFER IN phono jacks voltage 450 mV impedance 47 k...

Page 32: ...r SS CT70AV SS CT60AV Speaker system Full range bass reflex type magnetically shielded type Speaker units Full range 8 cm cone type Nominal impedance 6 ohms Dimensions w h d Approx 220 105 200 mm Mass Approx 1 2 kg net per speaker Rear surround speaker SS RS70AV SS RS60AV Speaker system Full range bass reflex type Speaker units Full range 8 cm cone type Nominal impedance 6 ohms Dimensions w h d Ap...

Reviews: