background image

17

H

o

o

kups

Note

When connecting to a progressive TV, it is recommended that you use only pattern 

D

. If you connect to your 

TV using both 

D

 and 

E

, a special control signal transmitted via the SCART cable may cause the signal to 

be switched to the SCART jack.

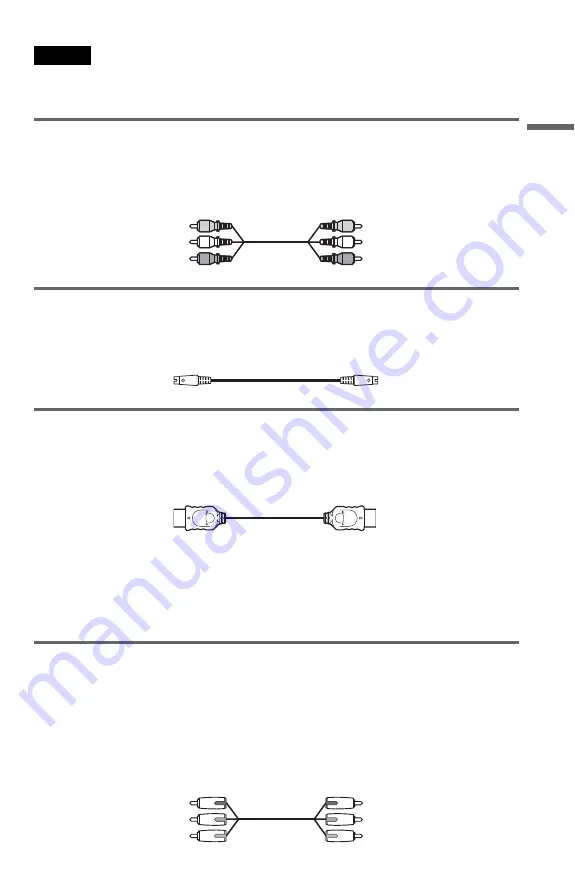
A

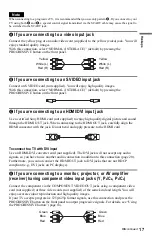
 If you are connecting to a video input jack

Connect the yellow plug of an audio/video cord (supplied) to the yellow (video) jack. You will 
enjoy standard quality images.
With this connection, select “NORMAL (INTERLACE)” (default) by pressing the 
PROGRESSIVE button on the front panel.

B

 If you are connecting to an S VIDEO input jack

Connect an S VIDEO cord (not supplied). You will enjoy high quality images.
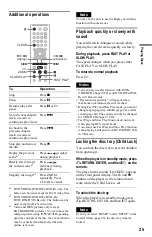
With this connection, select “NORMAL (INTERLACE)” (default) by pressing the 
PROGRESSIVE button on the front panel.

C

 If you are connecting to an HDMI/DVI input jack

Use a certified Sony HDMI cord (not supplied) to enjoy high quality digital picture and sound 
through the HDMI OUT jack. When connecting to the HDMI OUT jack, carefully align the 
HDMI connector with the jack. Do not bend and apply pressure to the HDMI cord.

To connect to a TV with DVI input

Use an HDMI-DVI converter cord (not supplied). The DVI jack will not accept any audio 
signals, so you have to use another audio connection in addition to this connection (page 20). 
Furthermore, you cannot connect the HDMI OUT jack to DVI jacks that are not HDCP 
compliant (e.g., DVI jacks on PC displays).

D

 If you are connecting to a monitor, projector, or AV amplifier 

(receiver) having component video input jacks (Y, P

B

/C

B

, P

R

/C

R

)

Connect the component via the COMPONENT VIDEO OUT jacks using a component video 
cord (not supplied) or three video cords (not supplied) of the same kind and length. You will 
enjoy accurate colour reproduction and high quality images.
If your TV accepts progressive 525p/625p format signals, use this connection and press the 
PROGRESSIVE button on the front panel to output progressive signals. For details, see “Using 
the PROGRESSIVE button” (page 18).

Yellow

White (L)

Red (R)

Yellow

White (L)

Red (R)

Green

Blue

Red

Green

Blue

Red

,

continued

Summary of Contents for DVP-NS76H

Page 1: ...2 666 956 12 1 Operating Instructions 2006 Sony Corporation DVP NS76H CD DVD Player ...

Page 2: ...o the applicable collection point for the recycling of electrical and electronic equipment By ensuring this product is disposed of correctly you will help prevent potential negative consequences for the environment and human health which could otherwise be caused by inappropriate waste handling of this product The recycling of materials will help to conserve natural resources For more detailed inf...

Page 3: ...his case remove the disc and leave the player turned on for about half an hour until the moisture evaporates When you move the player take out any discs If you don t the disc may be damaged On adjusting volume Do not turn up the volume while listening to a section with very low level inputs or no audio signals If you do the speakers may be damaged when a peak level section is played On cleaning Cl...

Page 4: ...INAL or PLAY LIST on a DVD RW DVD R 27 Playing VIDEO CDs With PBC Functions PBC Playback 28 Various Play Mode Functions Programme Play Shuffle Play Repeat Play A B Repeat Play 29 Searching for a Scene 33 Searching for a Particular Point on a Disc Search Scan Slow motion Play Freeze Frame 33 Searching for a Title Chapter Track Scene etc 34 Searching by Scene PICTURE NAVIGATION 36 Viewing Informatio...

Page 5: ...ONTROL PARENTAL CONTROL 60 Controlling Your TV with the Supplied Remote 63 Settings and Adjustments 64 Using the Setup Display 64 Setting the Display or Sound Track Language LANGUAGE SETUP 65 Settings for the Display SCREEN SETUP 66 Custom Settings CUSTOM SETUP 68 Settings for the Sound AUDIO SETUP 69 Additional Information 72 Troubleshooting 72 Self diagnosis Function When letters numbers appear ...

Page 6: ...ncluding Super VCDs or CD Rs CD RWs in video CD format or Super VCD format Functions available for music CDs or CD Rs CD RWs in music CD format Functions available for DATA CDs CD ROMs CD Rs CD RWs containing MP3 1 audio tracks JPEG image files and DivX 2 3 video files Functions available for DATA DVDs DVD ROMs DVD RWs DVD Rs DVD RWs DVD Rs containing MP3 1 audio tracks JPEG image files and DivX 2...

Page 7: ... ROMs recorded in PHOTO CD format Data part of CD Extras DVD Audio discs HD layer on Super Audio CDs DATA DVDs that do not contain MP3 audio tracks JPEG image files or DivX video files Also the player cannot play the following discs A DVD VIDEO with a different region code A disc that has a non standard shape e g card heart A disc with paper or stickers on it A disc that has the adhesive of cellop...

Page 8: ... aware that among those discs there are some that do not conform to the CD standard and may not be playable by this product Note on DualDiscs A DualDisc is a two sided disc product which mates DVD recorded material on one side with digital audio material on the other side However since the audio material side does not conform to the Compact Disc CD standard playback on this product is not guarante...

Page 9: ... up when the player outputs progressive signals J Remote sensor 15 This player is based on version 1 1 of High Definition Multimedia Interface Specifications This DVD player incorporates High Definition Multimedia Interface HDMI technology HDMI the HDMI logo and High Definition Multimedia Interface are trademarks or registered trademarks of HDMI Licensing LLC Rear panel A HDMI OUT high definition ...

Page 10: ...playing DATA DVDs the DVD indicator is displayed When playing VIDEO CDs without PBC the VCD indicator is displayed Current title chapter or playing time 37 Disc type Current audio signal 41 Lights up when you can change the angle 44 Lights up during Repeat Play 31 Playing status Disc type Current scene or playing time 37 Playing status Lights up during A B Repeat Play 32 Playing time 37 Disc type ...

Page 11: ...K ZOOM button 25 54 L SLOW PLAY FAST PLAY buttons 25 M audio button 40 N subtitle button 44 O 1 on standby button 24 P 2 volume buttons 63 The button has a tactile dot Q t TV video button 63 R PICTURE NAVI picture navigation button 36 54 S TIME TEXT button 37 T MENU button 27 U ENTER button 22 V DISPLAY button 12 W H play button 24 The H button has a tactile dot X x stop button 25 Y X pause button...

Page 12: ...ber for VIDEO CDs MP3 audio track number or JPEG image file number for DATA CDs DATA DVDs DivX video file number for DATA CDs DATA DVDs 3 Displays Super VCD as SVCD 4 Displays the date for JPEG files To turn off the display Press DISPLAY repeatedly Control Menu display 1 m Control Menu display 2 appears for certain discs only m Control Menu display off OFF OFF SET ON PLAY 1 8 3 4 1 2 2 7 T 1 3 2 5...

Page 13: ...T page 32 Specifies the parts you want to play repeatedly CUSTOM PICTURE MODE page 45 Adjusts the video signal from the player You can select the picture quality that best suits the program you are watching SHARPNESS page 47 Exaggerates the outline of the image to produce a sharper picture BNR page 48 Adjusts the picture quality by reducing the block noise or mosaic like patterns that appear on yo...

Page 14: ... the JPEG image file to be played ALBUM page 34 Selects the album that contain DivX video file to be played FILE page 34 Selects the DivX video file to be played DATE page 54 Displays the date the picture was taken by a digital camera INTERVAL page 56 Specifies the duration for which the slides are displayed on the screen EFFECT page 56 Selects the effects to be used for changing slides during a s...

Page 15: ...1 R6 size AA batteries 2 Step 2 Inserting Batteries Into the Remote You can control the player using the supplied remote Insert two R6 size AA batteries by matching the 3 and ends on the batteries to the markings inside the compartment When using the remote point it at the remote sensor on the player Notes Do not leave the remote in an extremely hot or humid place Do not drop any foreign object in...

Page 16: ...ped with HDMI input COAXIAL DIGITAL OUT OPTICAL LINE RGB TV HDMI OUT VIDEO LINE OUT S VIDEO OUT PR CR Y PB CB COMPONENT VIDEO OUT AUDIO R L A VIDEO AUDIO INPUT L R D PR CR PB CB Y COMPONENT VIDEO IN B INPUT S VIDEO E C IN INPUT Audio video cord supplied Component video cord not supplied yellow TV projector or AV amplifier receiver to S VIDEO OUT TV projector or AV amplifier receiver green S VIDEO ...

Page 17: ...I OUT jack When connecting to the HDMI OUT jack carefully align the HDMI connector with the jack Do not bend and apply pressure to the HDMI cord To connect to a TV with DVI input Use an HDMI DVI converter cord not supplied The DVI jack will not accept any audio signals so you have to use another audio connection in addition to this connection page 20 Furthermore you cannot connect the HDMI OUT jac...

Page 18: ... signals via the VCR you may not receive a clear image on the TV screen If your TV has only one audio video input jack connect the player to this jack If you set LINE in SCREEN SETUP to RGB page 67 the player outputs no component video signals Using the PROGRESSIVE button By using the PROGRESSIVE button on the front panel you can select the signal format in which the player outputs video signals P...

Page 19: ...NENT VIDEO OUT jacks LINE OUT VIDEO or S VIDEO OUT You cannot select this setting while the HDMI indicator is lit About DVD software types and the conversion method DVD software can be divided into two types film based software and video based software Video based software is derived from TV such as dramas and sit coms and displays images at 25 frames 50 fields 30 frames 60 fields per second Film ...

Page 20: ...R L COAXIAL DIGITAL OUT OPTICAL HDMI OUT VIDEO LINE OUT AUDIO R L COAXIAL DIGITAL OUT OPTICAL HDMI OUT HDMI cord not supplied red TV projector or AV amplifier receiver Audio video cord supplied Signal flow Optical digital cord not supplied Remove jack cap before connecting to DIGITAL OUT COAXIAL or OPTICAL HDMI OUT to LINE OUT L R AUDIO Rear L CD DVD player white yellow yellow white red Speakers F...

Page 21: ...u have completed the connection be sure to set DOLBY DIGITAL to DOLBY DIGITAL and DTS to ON in Quick Setup page 22 If your AV amplifier receiver has an MPEG audio decoder function set MPEG to MPEG in Audio Setup page 71 Otherwise no sound or a loud noise will come from your speakers When you connect an amplifier receiver that conforms to the 96 kHz sampling frequency set 48kHz 96kHz PCM in AUDIO S...

Page 22: ...is message does not appear select QUICK quick under SETUP setup in the Control Menu to run Quick Setup page 65 4 Press ENTER without inserting a disc The Setup Display for selecting the language used in the on screen display appears 5 Press X x to select a language The player displays the menu and subtitles in the selected language 6 Press ENTER The Setup Display for selecting the aspect ratio of ...

Page 23: ...pe of Dolby Digital signal you wish to send to your amplifier receiver If your AV amplifier receiver has a Dolby Digital decoder select DOLBY DIGITAL Otherwise select D PCM 11Press ENTER DTS is selected 12Press X x to select whether or not you wish to send a DTS signal to your amplifier receiver If your AV amplifier receiver has a DTS decoder select ON Otherwise select OFF 13Press ENTER When DIGIT...

Page 24: ...ee page 28 To turn off the player Press 1 The player enters standby mode z Hint You can have the player turn off automatically whenever you leave it in stop mode for more than 30 minutes To turn this function on or off set AUTO POWER OFF in CUSTOM SETUP to ON or OFF page 68 Notes on playing DTS sound tracks on a DVD VIDEO DTS audio signals are output only through the DIGITAL OUT COAXIAL or OPTICAL...

Page 25: ...d page 40 The sound can only be changed for VIDEO CDs Super VCDs Fast Play and Slow Play functions do not work when playing DTS sound tracks You cannot use Fast Play and Slow Play function when playing a still picture on DVD RW DVD R in VR mode Locking the disc tray Child Lock You can lock the disc tray to prevent children from opening it When the player is in standby mode press O RETURN ENTER and...

Page 26: ...ss H Notes MULTI DISC RESUME in CUSTOM SETUP must be set to ON default for this function to work page 68 The point where you stopped playing is cleared when you change the play mode you change the settings on the Setup Display For DVD RWs DVD Rs in VR mode CDs DATA CDs and DATA DVDs the player remembers the resume playback point for the current disc The resume point is cleared when you opened the ...

Page 27: ...lay appears Press the number buttons to select the item you want 3 Press ENTER Selecting ORIGINAL or PLAY LIST on a DVD RW DVD R Some DVD RWs DVD Rs in VR Video Recording mode have two types of titles for playback originally recorded titles ORIGINAL and titles that can be created on recordable DVD players for editing PLAY LIST You can select the type of title to be played 1 Press DISPLAY when the ...

Page 28: ... supplied with the disc as the operating procedure may differ depending on the VIDEO CD To return to the menu Press O RETURN z Hint To play without using PBC press or the number buttons while the player is stopped to select a track then press H or ENTER Play without PBC appears on the TV screen and the player starts continuous play You cannot play still pictures such as a menu To return to PBC pla...

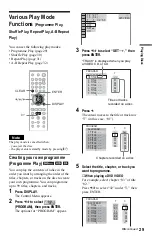
Page 29: ... press ENTER The options for PROGRAM appear 3 Press X x to select SET t then press ENTER 4 Press c The cursor moves to the title or track row T in this case 01 5 Select the title chapter or track you want to programme When playing a DVD VIDEO For example select chapter 03 of title 02 Press X x to select 02 under T then press ENTER CLEAR ENTER DISPLAY OFF OFF SET ON PLAY 1 8 3 4 1 2 2 7 T 1 3 2 5 5...

Page 30: ...To cancel all of the titles chapters or tracks in the programmed order 1 Follow steps 1 to 3 of Creating your own programme Programme Play 2 Press X and select ALL CLEAR 3 Press ENTER z Hint You can perform Repeat Play or Shuffle Play of programmed titles chapters or tracks During Programme Play follow the steps of Repeat Play page 31 or Shuffle Play page 30 Notes When you programme tracks on a Su...

Page 31: ...e titles TITLE repeats the current title on a disc CHAPTER repeats the current chapter When playing a DVD VR mode disc DISC repeats all the titles of the selected type TITLE repeats the current title on a disc CHAPTER repeats the current chapter When playing a VIDEO CD or CD DISC repeats all of the tracks TRACK repeats the current track When playing a DATA CD DATA DVD DISC repeats all of the album...

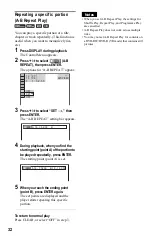
Page 32: ...oint A of the portion to be played repeatedly press ENTER The starting point point A is set 5 When you reach the ending point point B press ENTER again The set points are displayed and the player starts repeating this specific portion To return to normal play Press CLEAR or select OFF in step 3 Notes When you set A B Repeat Play the settings for Shuffle Play Repeat Play and Programme Play are canc...

Page 33: ...d or to search forward or backwards and release the button when you find the point you want to return to normal playback Search Locating a point quickly by playing a disc in fast forward or fast reverse Scan Press m or M while playing a disc When you find the point you want press H to return to normal speed Each time you press m or M during scan the scan speed changes With each press the indicatio...

Page 34: ...nly To return to normal playback press H Notes You cannot search for a still picture on a DVD RW DVD R in VR mode For DATA CDs DATA DVDs this function works only for DivX video files Searching for a Title Chapter Track Scene etc You can search a DVD by title or chapter and you can search a VIDEO CD CD DATA CD DATA DVD by track index file or scene As titles and tracks are assigned unique numbers on...

Page 35: ... the time code DVD VIDEO DVD VR mode only 1 In step 2 select TIME TEXT T playing time of the current title is selected 2 Press ENTER T changes to T 3 Input the time code using the number buttons then press ENTER For example to find the scene at 2 hours 10 minutes and 20 seconds after the beginning just enter 2 10 20 z Hints When the Control Menu display is turned off you can search for a chapter D...

Page 36: ... Press ENTER The first scene of each chapter title or track appears as follows 4 Press C X x c to select a chapter title or track and press ENTER Playback starts from the selected scene To return to normal play during setting Press O RETURN or DISPLAY z Hint If there are more than 9 chapters titles or tracks V is displayed at the bottom right of the screen To display the additional chapters titles...

Page 37: ...title T Remaining time of the current title C Playing time of the current chapter C Remaining time of the current chapter When playing a VIDEO CD or Super VCD with PBC functions minutes seconds Playing time of the current scene When playing a VIDEO CD without PBC functions or CD T minutes seconds Playing time of the current track T Remaining time of the current track D Playing time of the current ...

Page 38: ... current audio track on your TV screen Appears when playing an MP3 audio track on a DATA CD DATA DVD playing a DivX video file that contains MP3 audio on a DATA CD DATA DVD Checking the information on the front panel display You can view the time information and text displayed on the TV screen also on the front panel display The information on the front panel display changes as follows when you ch...

Page 39: ...of disc being played the disc text or track name may not be displayed The player can only display the first level of the disc text such as the disc name or title Playing time of MP3 audio tracks and DivX video files may not be displayed correctly If you play a disc containing JPEG image files only NO AUDIO DATA appears when MODE MP3 JPEG is set to AUTO JPEG appears when MODE MP3 JPEG is set to IMA...

Page 40: ... two or more times the DVD VIDEO is recorded in multiple audio formats When playing a DVD VR mode disc The types of sound tracks recorded on a disc are displayed The default setting is underlined Example 1 MAIN main sound 1 SUB sub sound 1 MAIN SUB main and sub sound When playing a VIDEO CD CD DATA CD MP3 audio or DATA DVD MP3 audio The default setting is underlined STEREO the standard stereo soun...

Page 41: ...hen playing a DivX video file on a DATA CD or a DATA DVD Example MP3 audio About audio signals Audio signals recorded in a disc contain the sound elements channels shown below Each channel is output from a separate speaker Front L Front R Centre Rear L Rear R Rear Monaural This signal can be either the Dolby Surround Sound processed signals or the Dolby Digital sound s monaural rear audio signals ...

Page 42: ...lowing section TVS DYNAMIC THEATER TVS DYNAMIC TVS WIDE TVS NIGHT TVS STANDARD To cancel the setting Select OFF in step 2 TVS DYNAMIC THEATER Creates one set of LARGE virtual rear speakers and virtual subwoofer from the sound of the front speakers L R without using actual rear speakers and subwoofer shown below This mode is effective when the distance between the front L and R speakers is short su...

Page 43: ...d to the TVS NIGHT function in the same way When the playing signal does not contain a signal for the rear speakers you cannot hear the TVS effect When you select one of the TVS modes the player does not output the sound of centre speaker Make sure that your listening position is between and at an equal distance from your speakers and that the speakers are located in similar surroundings If you us...

Page 44: ...nge the angles even if multi angles are recorded on the DVD VIDEO Displaying the Subtitles If subtitles are recorded on the discs you can change the subtitles or turn them on and off whenever you want while playing the disc 1 Press subtitle during playback The following display appears 2 Press subtitle repeatedly to select a setting When playing a DVD VIDEO Select the language Depending on the DVD...

Page 45: ...en you press FAST PLAY or SLOW PLAY button Adjusting the Playback Picture CUSTOM PICTURE MODE You can adjust the video signal of the DVD VIDEO CD DATA CD DATA DVD in JPEG format or DATA CD DATA DVD containing DivX video files from the player to obtain the picture quality you want Choose the setting that best suits the programme you are watching When you select MEMORY you can make further adjustmen...

Page 46: ...ms in MEMORY You can adjust each element of the picture individually PICTURE changes the contrast BRIGHTNESS changes the overall brightness COLOR makes the colours deeper or lighter HUE changes the colour balance 1 In step 3 of Adjusting the Playback Picture select MEMORY and press ENTER The PICTURE adjustment bar appears 2 Press C c to adjust the picture contrast To go to the next or previous pic...

Page 47: ...PNESS appear 3 Press X x to select a level 1 enhances the outline 2 enhances the outline more than 1 4 Press ENTER The selected setting takes effect To cancel the SHARPNESS setting Select OFF in step 3 Note This setting is not effective if you connect the player via the LINE OUT VIDEO S VIDEO OUT or LINE RGB TV jack and select PROGRESSIVE AUTO or PROGRESSIVE VIDEO by using the PROGRESSIVE button o...

Page 48: ... off the Control Menu Press DISPLAY repeatedly until the Control Menu is turned off Notes If the outlines of the images on your screen should become blurred set BNR to OFF Depending on the disc or the scene being played there may be no BNR effect or it may be hard to discern Adjusting the MNR The MNR function adjusts the picture quality by reducing the faint noise appearing around the outlines of ...

Page 49: ...c or the scene being played there may be no MNR effect or it may be hard to discern Adjusting the Delay Between the Picture and Sound AV SYNC When the sound does not match the pictures on the screen you can adjust the delay between the picture and sound 1 Press DISPLAY twice during playback The Control Menu appears 2 Press X x to select AV SYNC then press ENTER The following display appears 3 Pres...

Page 50: ...ctive if you use the DIGITAL OUT OPTICAL or COAXIAL jack and set DOLBY DIGITAL MPEG or DTS in AUDIO SETUP to DOLBY DIGITAL MPEG or ON respectively page 70 This function is not effective if you connect a Dolby Digital or DTS compliant device via the HDMI OUT jack and set DOLBY DIGITAL MPEG or DTS in AUDIO SETUP to DOLBY DIGITAL MPEG or ON respectively page 70 For DATA CDs DATA DVDs this function wo...

Page 51: ...ay some DATA CDs DATA DVDs created in the Packet Write format MP3 audio track or JPEG image file that the player can play The player can play the following tracks and files MP3 audio tracks with the extension MP3 JPEG image files with the extension JPEG or JPG JPEG image files that conform to the DCF image file format Design rule for Camera File system Image standards for digital cameras regulated...

Page 52: ...ding on the software you use to create the DATA CD DATA DVD the playback order may differ from the above illustration The playback order above may not be applicable if there are more than 200 albums and 300 tracks files in each album The player can recognize up to 200 albums the player will count just albums including albums that do not contain MP3 audio tracks and JPEG image files The player will...

Page 53: ...ress ENTER The list of tracks in the album appears 2 Press X x to select a track and press ENTER Playback starts from the selected track To stop playback Press x To go to the next or previous page Press c or C To return to the previous display Press O RETURN To go to the next or previous MP3 audio track Press or during playback You can select the first track of the next album by pressing during pl...

Page 54: ...ckwise by 90 degrees To return to normal view press CLEAR Note that the view also returns to normal if you press C c to go to the next or previous image Example when X is pressed once To magnify a JPEG image ZOOM Press ZOOM while viewing the image You can enlarge the image up to four times the original size and scroll using C X x c To return to normal view press CLEAR When pressed once x2 The imag...

Page 55: ...appears 2 Press X x to select MODE MP3 JPEG and press ENTER The options for MODE MP3 JPEG appear 3 Press X x to select AUTO default and press ENTER AUTO plays both the JPEG image files and MP3 audio tracks in the same album as a slide show AUDIO MP3 plays only MP3 audio tracks continuously IMAGE JPEG plays only JPEG image files continuously 4 Press MENU The list of albums on the DATA CD DATA DVD a...

Page 56: ...stop mode The Control Menu appears 2 Press X x to select INTERVAL then press ENTER The options for INTERVAL appear 3 Press X x to select a setting The default setting is underlined NORMAL sets the duration to between 6 to 9 seconds FAST sets a duration shorter than NORMAL SLOW 1 sets a duration longer than NORMAL SLOW 2 sets a duration longer than SLOW 1 4 Press ENTER Note Some JPEG files especial...

Page 57: ...s or DATA DVDs See About playback order of albums tracks and files page 51 Note that the playback order may not be applicable depending on the software used for creating the DivX video file or if there are more than 200 albums and 600 DivX video files in each album Note The player may not be able to play some DATA CDs DATA DVDs created in the Packet Write format DivX video files that the player ca...

Page 58: ...this player does not conform to WMA Windows Media Audio format Because of the compression technology used for DivX video files it may take some time after you press H play for the picture to appear Depending on the DivX video file the sound may not match the pictures on the screen Selecting an album 1 Press MENU A list of albums on the disc appears Only albums that contain DivX video files are lis...

Page 59: ...lbum by pressing or You can also select the first file of the next album by pressing during playback of the last file of the current album Note that you cannot return to the previous album by using To return to the previous album select it from the album list z Hint If the number of viewing times is preset you can play the DivX video files as many times as the preset number The following occurrenc...

Page 60: ...ode The Control Menu appears 3 Press X x to select PARENTAL CONTROL then press ENTER The options for PARENTAL CONTROL appear 4 Press X x to select ON t then press ENTER If you have not entered a password The display for registering a new password appears Enter a 4 digit password using the number buttons then press ENTER The display for confirming the password appears When you have already register...

Page 61: ...L then press ENTER The options for PARENTAL CONTROL appear 3 Press X x to select PLAYER t then press ENTER If you have not entered a password The display for registering a new password appears Enter a 4 digit password using the number buttons then press ENTER The display for confirming the password appears When you have already registered a password The display for entering the password appears 4 ...

Page 62: ... disc in the player and press H When the display for entering your password appears enter your new password Notes When you play discs which do not have the Parental Control function playback cannot be limited on this player Depending on the disc you may be asked to change the parental control level while playing the disc In this case enter your password then change the level If the Resume Play mod...

Page 63: ...turer s code see the table below 2 Release TV 1 Code numbers of controllable TVs If more than one code number is listed try entering them one at a time until you find the one that works with your TV Notes When you replace the batteries of the remote the code number you have set may be reset to the default setting Set the appropriate code number again Depending on the connected unit you may not be ...

Page 64: ... select CUSTOM then press ENTER The Setup Display appears 4 Press X x to select the setup item from the displayed list LANGUAGE SETUP SCREEN SETUP CUSTOM SETUP or AUDIO SETUP Then press ENTER The Setup item is selected Example SCREEN SETUP 5 Press X x to select an item then press ENTER The options for the selected item appear Example TV TYPE ENTER DISPLAY STOP QUICK CUSTOM RESET DVD VIDEO QUICK LA...

Page 65: ...the Setup Display page 64 OSD On Screen Display Switches the display language on the screen MENU DVD VIDEO only You can select the desired language for the disc s menu AUDIO DVD VIDEO only Switches the language of the sound track When you select ORIGINAL the language given priority in the disc is selected SUBTITLE DVD VIDEO only Switches the language of the subtitle recorded on the DVD VIDEO When ...

Page 66: ...he HDMI indicator on the front panel lights up images from the S VIDEO OUT and LINE OUT VIDEO jacks are enlarged vertically Except when 720 480 576p is selected YCBCR RGB HDMI Selects the type of HDMI signal output from HDMI OUT jack Notes If the playback picture becomes distorted set YCBCR to RGB If the HDMI OUT jack is connected to equipment with a DVI jack RGB signals will be automatically outp...

Page 67: ...cally switches to VIDEO when you turn on any connected HDMI equipment 4 3 OUTPUT This setting is effective only when you set TV TYPE in SCREEN SETUP to 16 9 Adjust this to watch 4 3 aspect ratio progressive signals If you can change the aspect ratio on your progressive format 525p 625p compatible TV change the setting on your TV not the player This setting is effective only when PROGRESSIVE AUTO o...

Page 68: ...this order MULTI DISC RESUME DVD VIDEO VIDEO CD only Switches the Multi disc Resume setting on or off Resume playback can be stored in memory for up to 6 different DVD VIDEOs VIDEO CDs page 26 Note If you run Quick Setup Multi disc Resume settings stored in memory may return to the default settings ON The player enters standby mode when left in stop mode for more than 30 minutes OFF Switches this ...

Page 69: ...g jacks LINE OUT L R AUDIO jacks LINE RGB TV jack AUDIO DRC Dynamic Range Control DVD VIDEO DVD VR mode only Makes the sound clear when the volume is turned down when playing a DVD that conforms to AUDIO DRC This function affects the output from the following jacks LINE OUT L R AUDIO jacks LINE RGB TV jack DIGITAL OUT OPTICAL or COAXIAL HDMI OUT jack only when DOLBY DIGITAL is set to D PCM page 70...

Page 70: ...IAL jack and set DOLBY DIGITAL MPEG or DTS to DOLBY DIGITAL MPEG or ON respectively The AV SYNC function page 49 is not effective if you connect a Dolby Digital or DTS compliant device via the HDMI OUT jack and set DOLBY DIGITAL MPEG or DTS to DOLBY DIGITAL MPEG or ON respectively DOLBY DIGITAL DVD VIDEO DVD VR mode only Selects the type of Dolby Digital signal Note If the HDMI OUT jack is connect...

Page 71: ...pment not compatible with 96 kHz 24 bit signals 48 kHz 16 bit PCM will be automatically output even when you select 96kHz 24bit PCM Select this when the player is connected to an audio component without a built in MPEG decoder If you play multi channel MPEG audio sound tracks only the Front L and Front R signals will be output from your two front speakers MPEG Select this when the player is connec...

Page 72: ...ay be affected when you set the player to progressive format In this case select NORMAL INTERLACE using the PROGRESSIVE button on the front panel so that the PROGRESSIVE indicator turns off and the player is set to normal interlace format If you set LINE to RGB in SCREEN SETUP page 66 the player outputs no component video signals The player is connected to an input device that is not HDCP complian...

Page 73: ...s The sound volume may improve if you set AUDIO DRC in AUDIO SETUP to TV MODE page 69 Set AUDIO ATT in AUDIO SETUP to OFF page 69 Operation The remote does not function The batteries in the remote are weak There are obstacles between the remote and the player The distance between the remote and the player is too far The remote is not pointed at the remote sensor on the player The disc does not pla...

Page 74: ...k stops automatically While playing discs with an auto pause signal the player stops playback at the auto pause signal Some functions such as Stop Search Fast Play and Slow Play Slow motion Play Repeat Play Shuffle Play or Programme Play cannot be performed Depending on the disc you may not be able to do some of the operations above Refer to the operating manual that comes with the disc The langua...

Page 75: ... does not conform to a DivX Certified profile Self diagnosis Function When letters numbers appear in the display When the self diagnosis function is activated to prevent the player from malfunctioning a five character service number e g C 13 50 with a combination of a letter and four digits appears on the screen and the front panel display In this case check the following table First three charact...

Page 76: ...deterioration is realized because all channel data processing is digital DVD VIDEO page 6 A disc that contains up to 8 hours of moving pictures even though its diameter is the same as a CD The data capacity of a single layer and single sided DVD is 4 7 GB Giga Byte which is 7 times that of a CD The data capacity of a double layer and single sided DVD is 8 5 GB a single layer and double sided DVD i...

Page 77: ...PEG 1 conforms to up to 2 channel stereo MPEG 2 used on DVDs conforms to up to 7 1 channel surround Normal Interlace format page 19 Normal Interlace format shows every other line of an image as a single field and is the standard method for displaying images on television The even number field shows the even numbered lines of an image and the odd numbered field shows the odd numbered lines of an im...

Page 78: ... Phono jack 2 Vrms 10 kilohms DIGITAL OUT OPTICAL Optical output jack 18 dBm wave length 660 nm DIGITAL OUT COAXIAL Phono jack 0 5 Vp p 75 ohms HDMI OUT Type A 19 pin LINE OUT VIDEO Phono jack 1 0 Vp p 75 ohms S VIDEO OUT 4 pin mini DIN Y 1 0 Vp p C 0 3 Vp p PAL 0 286 Vp p NTSC 75 ohms COMPONENT VIDEO OUT Y PB CB PR CR Phono jack Y 1 0 Vp p PB CB PR CR 0 7 Vp p 75 ohms General Power requirements 2...

Page 79: ...ian Lettish 1345 Malagasy 1347 Maori 1349 Macedonian 1350 Malayalam 1352 Mongolian 1353 Moldavian 1356 Marathi 1357 Malay 1358 Maltese 1363 Burmese 1365 Nauru 1369 Nepali 1376 Dutch 1379 Norwegian 1393 Occitan 1403 Afan Oromo 1408 Oriya 1417 Punjabi 1428 Polish 1435 Pashto Pushto 1436 Portuguese 1463 Quechua 1481 Rhaeto Romance 1482 Kirundi 1483 Romanian 1489 Russian 1491 Kinyarwanda 1495 Sanskrit...

Page 80: ...splay 10 H Handling discs 2 HDMI AUDIO HDMI 69 HDMI 77 HDMI RESOLUTION 66 Hooking up 15 I INDEX 35 Interlace format 77 INTERVAL 56 J JPEG 51 L LANGUAGE SETUP 65 LINE 67 Locating a specific point by watching the TV screen 33 M MEMORY 46 MENU 65 MNR 48 MODE MP3 JPEG 55 MP3 6 51 MPEG 40 71 77 MULTI DISC RESUME 26 68 N NORMAL INTERLACE 18 Normal Interlace format 77 O On screen display Control Menu Dis...

Page 81: ...81 Additional Information U Usable discs 7 V Video based software 77 VIDEO CD 6 24 Z ZOOM 25 54 ...

Page 82: ......

Page 83: ......
Page 84: ...Sony Corporation Printed in Malaysia Printed on 100 recycled paper using VOC Volatile Organic Compound free vegetable oil based ink ...

Reviews: