


1-4
16
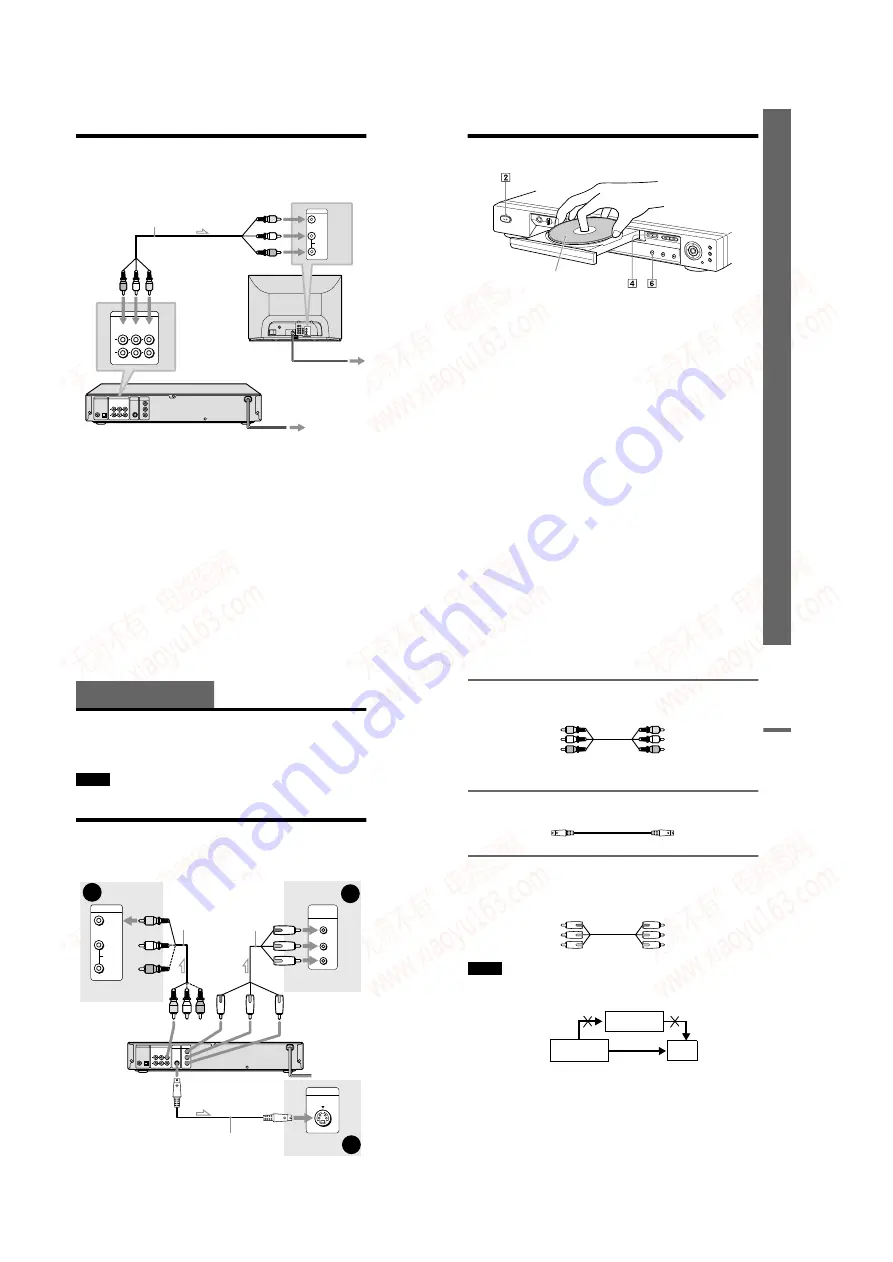
Step 3: TV Hookups
Connect the supplied audio/video cord and the power cord (mains lead) in the order (
1
~
3
)
shown below. Be sure to connect the power cord (mains lead) last.
When connecting to a standard 4:3 screen
TV
Depending on the disc, the image may not fit
your TV screen.
If you want to change the aspect ratio, please
refer to page 66.
To change the colour system
The colour system of the player is set to
NTSC or PAL. If the on-screen display of the
player does not appear on the TV, change the
colour system of the player (PAL or NTSC)
so that a picture appears on your TV. To
change the colour system, hold
[
/
1
down for
a few seconds while pressing
X
on the player.
z
Hints
• To check the current setting of the player’s colour
system, press
[
/
1
on the player or remote. The
power indicator lights up in green. When “ NTSC”
appears on the front panel display, the colour
system of the player is set to NTSC. When
“ NTSC” does not appear, the colour system is set
to PAL.
• When connecting to a monaural TV, use a stereo-
mono conversion cord (not supplied). Connect the
LINE OUT (VIDEO) 1/2 jacks on the player to
the TV’s video input jack, and connect the LINE
OUT L/R (AUDIO) 1/2 jacks to the TV’s audio
input jack.
PCM/DTS/MPEG
DOLBY DIGITAL
COAXIAL
OPTICAL
R
1
2
L
AUDIO
VIDEO
DIGITAL OUT
LINE OUT
S VIDEO
OUT
COMPONENT
VIDEO OUT
Y
CB
CR
VIDEO
AUDIO
INPUT
L
R
(yellow)
(white)
(red)
R
1
2
L
AUDIO
VIDEO
LINE OUT
to LINE OUT
(VIDEO)1 or 2
to audio input
1
Audio/video
cord (supplied)
2
Power source
to video input
to LINE OUT
L/R (AUDIO)1
or 2
CD/DVD Player
TV
3
Power source
l
: Signal flow
17
Si
m
p
le
St
art
G
u
id
e
Step 4: Playing a Disc
A
Turn on the TV.
B
Press
[
/
1
on the player.
C
Switch the input selector on your
TV so that the signal from the
player appears on the TV screen.
D
Press
A
on the player to open the
disc tray.
E
Place the disc on the tray with the
playback side facing down.
F
Press
H
.
The disc tray closes and the player begins
playing the disc.
After Step 6
Depending on the disc, a menu may be
displayed on the TV screen. If so, select the
item you want from the menu and play the
DVD (page 32) or VIDEO CD disc (page 32).
To stop playing
Press
x
.
To remove the disc
Press
A
.
To turn off the player
Press
[
/
1
. The player enters standby mode
and the power indicator lights up in red.
With the playback side facing down
18
Hookups
Hooking Up the Player
Follow Steps 1 to 4 to hook up and adjust the settings of the player.
Before you start, disconnect the power cords (mains leads), check that you have all of the
supplied accessories, and insert the batteries into the remote (page 15).
Notes
• Plug cords securely to prevent unwanted noise.
• Refer to the instructions supplied with the components to be connected.
Step 1: Connecting the Video Cords
Connect this player to your TV monitor, projector, or AV amplifier (receiver) using a video cord.
Select one of the patterns
, according to the input jack on your TV monitor,
projector, or AV amplifier (receiver).
PCM/DTS/MPEG
DOLBY DIGITAL
COAXIAL
OPTICAL
R
1
2
L
AUDIO
VIDEO
DIGITAL OUT
LINE OUT
S VIDEO
OUT
COMPONENT
VIDEO OUT
Y
CB
CR
B
C
INPUT
S VIDEO
C
R
C
B
Y
COMPONENT
VIDEO IN
l
: Signal flow
Component
video cord
(not supplied)
(yellow)
TV, projector or AV
amplifier (receiver)
CD/DVD player
TV, projector or AV
amplifier (receiver)
(green)
S VIDEO cord
(not supplied)
TV, projector or AV
amplifier (receiver)
(red)
(blue)
(green)
(blue)
(red)
to LINE OUT (VIDEO)1 or 2
to COMPONENT
VIDEO OUT
to S VIDEO OUT
19
H
ook
up
s
A
If you are connecting to a video input jack
Connect the yellow plug of the audio/video cord (supplied) to the yellow (video) jacks. You will
enjoy standard quality images.
Use the red and white plugs to connect to the audio input jacks (page 21). (Do this if you are
connecting to a TV only.)
B
If you are connecting to an S VIDEO input jack
Connect an S VIDEO cord (not supplied). You will enjoy high quality images.
C
If you are connecting to a monitor, projector, or AV amplifier (receiver)
having component video input jacks (Y, C
B
, C
R
)
Connect the component via the COMPONENT VIDEO OUT jacks using a component video
cord (not supplied) or three video cords (not supplied) of the same kind and length. You will
enjoy accurate colour reproduction and high quality images.
Notes
• You can switch the player’s colour system to match the colour system of the connected TV (page 16).
• Do not connect the player to a VCR. If you pass the player signals via the VCR, you may not receive a clear
image on the TV screen. If your TV only has one audio/video input jack, connect the player to this jack.
Yellow (Video)
White (L)
Red (R)
Yellow (Video)
White (L)
Red (R)
Green
Blue
Red
Green
Blue
Red
VCR
CD/DVD player
TV
Connect
directly
www. xiaoyu163. com
QQ 376315150
9
9
2
8
9
4
2
9
8
TEL 13942296513
9
9
2
8
9
4
2
9
8
0
5
1
5
1
3
6
7
3
Q
Q
TEL 13942296513 QQ 376315150 892498299
TEL 13942296513 QQ 376315150 892498299