background image

47

U

si

ng
 t

he
 sh
oo
ti

ng
 f

un
ct

ions

• You can set the camera to keep the exposure value after releasing the AEL (AE lock) button or to 

temporarily perform spot metering with [AEL button] in the 

 Custom menu (page 107).

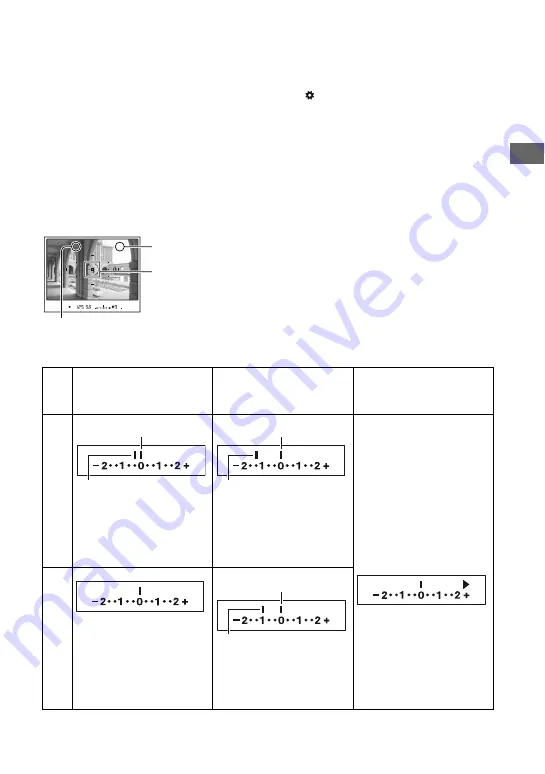
About the EV scale when the AEL (AE lock) button is pressed

While you press the AEL (AE lock) button, an exposure value determined by the camera is 
locked as the standard value (0). At the same time, an exposure value within the spot metering 
circle appears as the second standard index.

• If the exposure is beyond the range of the EV scale, 

bB

 appears at the end of the EV scale. The 

bB

 starts 

flashing if the difference becomes any greater.

Example: When the composition is determined in the scene below and the AEL (AE lock) 
button is pressed

The indicator displays are as follows when the AEL (AE lock) button is pressed.

AEL (AE lock) button is 
pressed

Recompose on 

1

 while 

holding the AEL (AE lock) 
button down

Recompose on 

2

 while 

holding the AEL (AE lock) 
button down

Turn the camera on 

2

 and 

the light level of 

2

 is 

displayed. The arrow 
indicates 

2

 will white out.

The locked exposure is 
equal to the light level 
within the spot metering 
circle.

2

 Bright area

Spot metering circle

1

 Slightly darker area

Mu

lti s

eg

m

en
t/

Ce
nt

er

 we

ig

ht

ed
 me

te

ri

n

g

The locked exposure

The light level within the 
spot metering circle is 
0.3 EV less than the locked 
exposure (varies according to 
the recomposition of the 
shot).

The locked exposure

The light level of 

1

 is 

1.3 EV less than the locked 
exposure (varies according 
to the recomposition of the 
shot).

Sp
ot

 me

te

ri

ng

The light level of 

1

 is 

1.0 EV less than the locked 
exposure (varies according 
to the recomposition of the 
shot).

The locked exposure

Summary of Contents for DSLR-A700K - alpha; Digital Single Lens Reflex Camera

Page 1: ...ng functions Using the menu Using your computer Printing images Troubleshooting Others Index Digital Single Lens Reflex Camera User s Guide Troubleshooting Read This First separate volume Explains the set up and basic operations for shooting playback with your camera ...

Page 2: ...rt the user to the presence of uninsulated dangerous voltage within the product s enclosure that may be of sufficient magnitude to constitute a risk of electric shock to persons This symbol is intended to alert the user to the presence of important operating and maintenance servicing instructions in the literature accompanying the appliance ...

Page 3: ...hock Never spill liquid of any kind on the set Attachments Do not use attachments not recommended by the manufacturer as they may cause hazards Cleaning Unplug the set from the wall outlet before cleaning or polishing it Do not use liquid cleaners or aerosol cleaners Use a cloth lightly dampened with water for cleaning the exterior of the set Water and Moisture Do not use power line operated sets ...

Page 4: ... that are specified in the operating instructions Improper adjustment of other controls may result in damage and will often require extensive work by a qualified technician to restore the set to normal operation When the set exhibits a distinct change in performance this indicates a need for service Servicing Do not attempt to service the set yourself as opening or removing covers may expose you t...

Page 5: ...ply with the limits for a Class B digital device pursuant to Part 15 of the FCC Rules These limits are designed to provide reasonable protection against harmful interference in a residential installation This equipment generates uses and can radiate radio frequency energy and if not installed and used in accordance with the instructions may cause harmful interference to radio communications Howeve...

Page 6: ...ces for the environment and human health which could otherwise be caused by inappropriate waste handling of this product The recycling of materials will help to conserve natural resources For more detailed information about recycling of this product please contact your local Civic Office your household waste disposal service or the shop where you purchased the product Applicable Accessories Remote...

Page 7: ...he camera is working correctly This camera is designed to be dust and moisture resistant but not to be waterproof and splash proof When using the camera in the rain be careful not to get the camera and lens wet Clean the camera after use if the camera becomes dirty With water sand dust salt etc left on the camera the camera may cause a malfunction Read also Precautions page 168 Do not look at the ...

Page 8: ...he picture angle of this camera is narrower than that of a 35 mm format film camera You can find the approximate equivalent of the focal length of a 35 mm format film camera and shoot with the same picture angle by increasing the focal length of your lens by half For example by using a 50 mm lens you can get the approximate equivalent of a 75 mm lens of a 35 mm format film camera On image data com...

Page 9: ...am auto P 36 Shooting with aperture priority mode A 37 Shooting with shutter speed priority mode S 39 Shooting with manual exposure mode M 41 Exposure 45 Adjusting the exposure 45 Locking the exposure AE lock 46 Selecting the metering mode 48 Focus 49 Setting the AF area 49 Selecting the focus mode 52 Switching the AF MF easily 53 Using AF illuminator 54 Drive mode 55 Shooting continuously 56 Usin...

Page 10: ...your own settings 79 Using the C Custom button 81 Viewing images 83 Switching the playback screen 83 Switching to the index screen 84 Displaying the histogram 85 Enlarging images 86 Rotating an image 88 Viewing images on a TV screen 89 Operating with the Remote Commander 91 Menu list 92 Recording menu 1 94 Image size Aspect ratio Quality D RangeOptimizer Creative Style Custom button Exposure step ...

Page 11: ...1 105 Eye Start AF EyeStart trigr AF MF button AF MF control AF drive speed AF area disp FocusHoldButton Custom menu 2 107 AEL button Ctrl dial setup Dial exp comp Ctrl dial lock Button ops Release w oCard Release w oLens Custom menu 3 110 Red eye reduc Exp comp set Bracket order Auto review Auto off w VF Rec info disp Img orientation Custom menu 4 113 Custom reset ...

Page 12: ...Slide show Interval Setup menu 1 120 LCD brightness Info disp time Power save Video output HDMI output Language Date Time setup Setup menu 2 123 Memory card File number Folder name Select folder New folder USB connection MassStrg card Setup menu 3 125 Menu start Delete confirm Audio signals Cleaning mode Reset default ...

Page 13: ...icture Motion Browser 137 Using the Image Data Converter SR 139 Using the Image Data Lightbox SR 140 Using the Remote Camera Control 142 How to print images 145 Printing images directly using a PictBridge compliant printer 146 Troubleshooting 149 Warning messages 158 On the memory card not supplied 161 On the InfoLITHIUM battery pack 163 On the battery charger 164 Optional accessories 165 Precauti...

Page 14: ...l 30 107 F Remote sensor 60 G Grip sensor 105 H AF illuminator 54 102 Self timer lamp 57 I Depth of field preview button 39 J Lens contacts K Mirror L Lens mount M Lens release button t step 2 in Read This First N Focus mode lever 52 101 O WB White Balance button 61 P Built in flash t step 5 in Read This First Q DRIVE button 55 R Mode dial 34 S HDMI terminal 90 121 148 T VIDEO OUT USB terminal 89 ...

Page 15: ...8 L Accessory shoe 166 M Diopter adjustment dial t step 5 in Read This First N Metering mode lever 48 O For shooting AEL AE lock button 43 46 SLOW SYNC button 77 For viewing Index button 84 P Image sensor position mark 50 Q For shooting AF MF Auto focus manual focus button 53 For viewing Enlarge button 86 R Rear control dial 30 107 S Access lamp t step 3 in Read This First T Super SteadyShot switc...

Page 16: ...step 1 in Read This First E Battery cover t step 1 in Read This First Remote Commander With the exception of the 2 SEC and SHUTTER buttons the buttons only work when the camera is connected to a TV pages 60 91 148 A 2 SEC shutter release in 2 seconds button B SHUTTER button C Histogram button 85 D DISP Display button 83 E Index button 84 F Rotate button 88 G Playback button 83 H MENU button 32 I P...

Page 17: ...n the lithium battery becomes weak the operating distance of the Remote Commander may shorten or the Remote Commander may not function properly In this case replace the battery with a Sony CR2025 lithium battery Use of another battery may present a risk of fire or explosion Attaching the shoulder strap This camera has two hooks to attach the shoulder strap Attach the end of the strap without the r...

Page 18: ...lder ring hold the tip of the strap with your finger and slide the holder ring rather than the tip of the strap into position to secure the strap If the holder ring comes off the strap put it back on the strap from the notched side Notched side ...

Page 19: ...tion Flash compensation 75 Flashing The flash is being charged Lit The flash has been charged t step 5 in Read This First WL Wireless flash 73 High speed sync 167 Manual focus 53 z Focus t step 5 in Read This First 125 Shutter speed 39 5 6 Aperture 37 EV scale 42 47 58 AE lock 46 9 Shots remaining counter 56 Camera shake warning t step 5 in Read This First Super SteadyShot scale t step 5 in Read T...

Page 20: ...re compensation 45 Metered Manual 42 Flash compensation 75 EV scale 42 47 58 ISO AUTO ISO sensitivity 64 Display Indication Drive mode 55 Focus mode 52 AF area 49 Metering 48 D range optimizer 66 Creative Style 67 1 1 1 1 1 Contrast Saturation Sharpness Brightness Zone Matching 68 AWB 1 5500K M1 White balance Auto Preset Color temperature Color filter Custom 61 Display Indication 90 Battery remain...

Page 21: ... the multi selector MENU button Returns with MENU Delete button Enlarge button C button Fn button button Front or rear control dial Front control dial Rear control dial Display Indication Memory card 123 100 0003 Folder file number 133 Protect 115 DPOF3 DPOF set 116 Image quality 96 Image size 94 Battery remaining t step 1 in Read This First 1 30 Shutter speed 39 F4 0 Aperture 37 ISO 400 ISO sensi...

Page 22: ... image 85 Display Indication Histogram 85 P A S M Mode dial 34 1 125 Shutter speed 39 F3 5 Aperture 37 ISO100 ISO sensitivity 64 0 3 EV scale 45 0 3 Flash compensation 75 Metering mode 48 35mm Focal length 8 Creative Style 67 AWB 1 5500K M1 White balance Auto Preset Color temperature Color filter Custom 61 D range optimizer 66 2007 1 1 10 37PM Date of recording 3 7 File number total number of imag...

Page 23: ... camera position Horizontal position Vertical position The instructions in this operating instructions are based on the detailed display in the horizontal position The upper left illustration You can choose to keep the display from rotating in the vertical position with Rec info disp in the Custom menu page 112 You can adjust the brightness of the LCD monitor by pressing the DISP Display button a ...

Page 24: ... 38 81 167 338 669 1344 Extra fine 11 20 43 89 180 358 720 cRAW JPEG 6 11 24 51 103 204 410 RAW JPEG 4 8 18 38 77 153 309 cRAW 9 17 35 73 148 293 590 RAW 6 11 24 50 100 199 401 Capacity Size 128MB 256MB 512MB 1GB 2GB 4GB 8GB Standard 36 65 136 280 565 1120 2250 Fine 24 44 94 193 390 773 1553 Extra fine 13 24 51 105 212 420 844 cRAW JPEG 6 12 25 53 107 212 427 RAW JPEG 5 9 19 39 80 158 318 cRAW 9 1...

Page 25: ...713 1433 cRAW JPEG 7 13 29 59 120 237 477 RAW JPEG 5 9 21 43 86 172 345 Capacity Size 128MB 256MB 512MB 1GB 2GB 4GB 8GB Standard 74 132 276 566 1142 2262 4543 Fine 56 101 212 435 877 1737 3489 Extra fine 33 59 125 256 517 1024 2057 cRAW JPEG 8 14 30 62 126 251 504 RAW JPEG 5 10 21 44 90 179 359 Capacity Size 128MB 256MB 512MB 1GB 2GB 4GB 8GB Standard 81 145 305 625 1262 2497 5016 Fine 62 112 236 4...

Page 26: ... JPEG 10 20 40 78 156 313 cRAW 19 38 76 149 299 598 RAW 13 26 52 101 203 406 Capacity Size 256MB 512MB 1GB 2GB 4GB 8GB Standard 73 147 291 570 1142 2281 Fine 50 101 201 393 788 1574 Extra fine 27 55 109 214 428 856 cRAW JPEG 13 27 55 108 217 433 RAW JPEG 10 20 41 80 161 323 cRAW 19 38 76 149 299 598 RAW 13 26 52 101 203 406 Capacity Size 256MB 512MB 1GB 2GB 4GB 8GB Standard 100 202 400 783 1567 31...

Page 27: ...6 93 185 363 727 1452 cRAW JPEG 15 31 61 121 242 484 RAW JPEG 11 22 44 87 175 350 Capacity Size 256MB 512MB 1GB 2GB 4GB 8GB Standard 148 298 589 1152 2307 4605 Fine 113 228 452 885 1772 3537 Extra fine 66 134 266 522 1044 2086 cRAW JPEG 16 33 65 128 256 511 RAW JPEG 11 23 46 91 182 364 Capacity Size 256MB 512MB 1GB 2GB 4GB 8GB Standard 163 329 650 1273 2547 5085 Fine 126 254 503 985 1972 3937 Extr...

Page 28: ...ce every 30 seconds The flash strobes once every two times The power turns on and off once every ten times The measurement method is based on the CIPA standard CIPA Camera Imaging Products Association The number of shooting images does not change regardless of image size The battery capacity decreases as the number of uses increases and also over time page 163 The number of images that can be reco...

Page 29: ...lector to v V b B moves the cursor in the corresponding direction Pressing the center of the multi selector enters the selected item On the single screen Select a previous or next image by moving the multi selector to b B On the index screen Select the desired image by moving the multi selector to v V b B Multi selector MENU button Playback button The directions in which the multi selector is move...

Page 30: ...ng information screen the Exclusive disp screen that switches the display to each exclusive screen is available In this operating instructions examples use the Quick Navi screen for explanations 1 Press the Fn Function button so that the Quick Navi screen appears How to use the Fn Function button How to operate on the Quick Navi screen Quick Navi screen Exclusive disp screen Rear control dial Fn F...

Page 31: ...asks can be accomplished only on the Exclusive disp screen 1 Follow steps 1 and 2 on the procedure of How to operate on the Quick Navi screen 2 Press the center of the multi selector so that the Exclusive disp screen appears 3 Set up with the multi selector For details on how to set up each item see the corresponding page You can also substitute the front and rear control dials for the multi selec...

Page 32: ...i screen are Exposure page 45 AF area page 49 Drive mode page 55 White Balance page 61 ISO page 64 D Range Optimizer page 66 Creative Style page 67 Flash mode page 73 Flash compensation page 75 Image size page 94 Image quality page 96 Unavailable on the enlarged display screen page 23 Operate from the Recording menu How to use the menu Gray items are not available MENU button Multi selector Menu n...

Page 33: ... also turned off if you press the shutter button halfway down When setting the menu you can substitute the front or rear control dial for the multi selector Rotating the front control dial moves the cursor to v V and rotating the rear control dial moves it to b B During operation if you press the MENU button the setup is canceled When you display a menu you can display the previously selected menu...

Page 34: ...posure adjusted automatically both the shutter speed and the aperture value The other settings can be adjusted and your setting values can be saved page 36 A Aperture priority mode Allows you to shoot after adjusting the aperture value manually page 37 S Shutter speed priority mode Allows you to shoot after adjusting the shutter speed manually page 39 M Manual exposure mode Allows you to shoot aft...

Page 35: ... The shutter speed becomes slower when the subject is dark If appears in the viewfinder be careful about camera shake or use a tripod The Super SteadyShot function is also effective Shoots close subjects such as flowers insects You can achieve clear and sharp focus When shooting with the built in flash within the range of 1 m 39 3 8 inches shadows may appear on the lower part of the image Do not u...

Page 36: ...the subject does not move to prevent the image from blurring Night view Shoots night scenes at a distance without losing the dark atmosphere of the surroundings Do not use the flash Push the flash back down The picture may not be taken properly when shooting a wholly dark night scene Shooting with program auto P z The difference between auto adjustment mode and program auto mode In both auto adjus...

Page 37: ...ing the shutter button When the shutter speed and the aperture value disappear seconds later the adjusted values also disappear When the flash is pulled up you cannot select the program shift When the program shift is turned on pulling up the flash cancels the program shift You can adjust the aperture manually If you open the aperture a smaller F number the in focus range becomes narrower Only the...

Page 38: ...re a larger F number the flash light does not reach a distant subject Opening the aperture a smaller F number is recommended If you close the aperture a larger F number the amount of light passing through the lens is decreased and the shutter speed becomes slower Using a tripod is recommended z Shooting techniques The depth of field is the in focus range Opening the aperture makes the depth of fie...

Page 39: ...shooting allowing you to check the approximate sharpness of the subject image before the actual shooting Press the depth of field preview button after the subject is in focus While the button is held down the aperture is narrowed to match the aperture value displayed in the viewfinder The image in the viewfinder will be darker When the focus is not fixed and the depth of field preview button is pr...

Page 40: ...djusting again is recommended When the flash is pulled up the flash fires regardless of the amount of ambient light page 73 When using the flash if you close the aperture a larger F number by making the shutter speed slower the flash light does not reach a distant subject When the shutter speed is one second or more the noise reduction Long exp NR will be done after shooting page 103 The Camera sh...

Page 41: ...al BULB Bulb shooting is indicated next to 30 page 43 In the manual exposure mode even when ISO sensitivity page 64 is set to AUTO it is fixed to ISO 200 You can exchange their functions of the front and rear control dials with Ctrl dial setup in the Custom menu page 107 When the flash is pulled up the flash fires regardless of the amount of ambient light page 73 The Camera shake warning indicator...

Page 42: ...second standard index The following illustrations show a case where the set exposure specified by the photographer is 1 0 EV more than the locked standard exposure determined by the meter When the composition is changed in the viewfinder the exposure within the spot metering circle is 0 7 EV more than the set exposure thereby making it 1 7 EV more than the standard exposure determined by the meter...

Page 43: ...old the AEL AE lock button and turn the front control dial to select the desired shutter speed and aperture value combination BULB long exposure shooting As long as the shutter button is pressed the shutter remains open You can shoot trails of light such as fireworks Attach a tripod to the camera when using the bulb shooting function Front control dial Mode dial AEL AE lock button Front control di...

Page 44: ...n cancel this function with Long exp NR in the Recording menu page 103 The Super SteadyShot function is automatically turned off The higher the ISO sensitivity or the longer the exposure time the more outstanding the noise on the monitor To reduce camera shake connecting the Remote Commander is recommended pages 60 166 To attach the eyepiece cover When the shutter is released without the use of th...

Page 45: ...rall screen 1 Press the Exposure button to display the Exposure comp screen 2 Adjust the exposure with b B on the multi selector You can substitute the Fn Function button for the Exposure button page 30 The exposure is compensated by 1 3 of a step between 3 0 EV You can set this exposure step to 1 2 EV increments with Exposure step in the Recording menu page 98 Adjusting the exposure Toward Bright...

Page 46: ...ter a shot you can continue to shoot with the same exposure value The setting is canceled when the button is released When the flash is fired in a mode other than shutter speed priority mode or manual mode the slow sync shooting is performed page 77 z Shooting techniques When shooting a whitish overall image such as a backlit subject or a snowy scene the camera judges that the subject is too brigh...

Page 47: ...sed The indicator displays are as follows when the AEL AE lock button is pressed AEL AE lock button is pressed Recompose on 1 while holding the AEL AE lock button down Recompose on 2 while holding the AEL AE lock button down Turn the camera on 2 and the light level of 2 is displayed The arrow indicates 2 will white out The locked exposure is equal to the light level within the spot metering circle...

Page 48: ...ot metering circle in the center of the frame This is suitable for shooting a subject with strong contrast or measuring the light of a specific area of the screen If the area to be measured is not in the center of the screen use AE lock to take the picture page 46 Selecting the metering mode z Multi segment metering The screen of this camera is equipped with 39 honeycomb sharped metering elements ...

Page 49: ... Quick Navi screen page 30 2 Select the AF area item with the multi selector 3 Select the desired mode with front or rear control dial After selecting the AF area in step 2 if you press the center of the multi selector the screen switches to the Exclusive disp screen On this screen select the desired mode with v V on the multi selector then press the center You can also select the AF area from the...

Page 50: ... A subject that is very bright or glittering such as the sun the body of an automobile or the surface of water To measure the exact distance to the subject Spot The camera uses the spot AF area exclusively Local Choose a local AF area from the 11 areas Select a local AF area that you want to activate the focus with the multi selector Press the center of the multi selector to use the spot AF area i...

Page 51: ...press the shutter button halfway down 2 Keep the shutter button halfway down and put the subject back in the original position to re compose the shot 3 Press the shutter button fully down to take the picture If anything but the subject is in the AF area When Wide is selected the default setting an undesired subject that is located in another area may be in focus In such cases pressing the center o...

Page 52: ...onless the focus is locked and if the subject is in motion the camera continues to focus This mode is used in various situations You can substitute DMF Direct Manual Focus for AF A with AF A setup in the Recording menu page 101 C Continuous AF In this mode the camera continues to focus while the shutter button is pressed and held halfway down This mode is used when the subject is in motion If the ...

Page 53: ...an be switched not only with the focus mode lever located on the front of the camera but also with the AF MF button located on the rear You can switch between auto focus and manual focus without relaxing your position AF MF control In auto focus mode By pressing the AF MF button the focus mode is switched temporarily to the manual focus Press and hold the AF MF button and adjust the focus by rotat...

Page 54: ...ately 1 to 7 m 3 3 to 23 feet AF illuminator does not operate when the focus mode is set to Continuous AF or the subject is moving The or indicator lights in the viewfinder The AF illuminator may not operate with focal lengths of 300 mm or longer When an external flash is attached the AF illuminator of the external flash is used You can deactivate the AF illuminator with AF illuminator in the Reco...

Page 55: ... desired setting with b B on the multi selector 3 Press the center of the multi selector to turn off the screen The default setting You can substitute the Fn Function button for the DRIVE button page 30 Single shot adv Also used for canceling other drive modes Continuous adv page 56 Self timer page 57 Bracket Cont page 57 Bracket Single page 58 WB bracket page 59 DRO adv bracket page 59 Remote Com...

Page 56: ...ntinuously this number decreases After the images have been recorded on the memory card the number returns to the original number depending on the camera memory buffer When the built in flash is fired images are shot after the flash has been charged When the focus mode is set to Continuous AF or Automatic AF the focus is set separately on each image When set to Single shot AF the focus is fixed on...

Page 57: ...ou press the shutter button without looking into the viewfinder use the eyepiece cover attached on the shoulder strap to prevent unnecessary lighting from seeping through the viewfinder and affecting the exposure page 44 An accurate exposure setting is required for some shooting In such cases a photographer continuously shoots some images with the exposure shifted aside from the correct exposure i...

Page 58: ...r Automatic AF with an still subject When the flash is not used ambient bracket shooting is performed and the shutter speed and aperture are changed to accommodate bracket shooting When the flash is used flash bracket shooting is performed and the flash light is changed In ambient bracket shooting the shutter speed and aperture change in program auto mode the shutter speed changes in aperture prio...

Page 59: ...ge with paler colors and side an image with reddish colors Shifts the white balance by 10 mired when taking a picture Shifts the white balance by 20 mired when taking a picture Mired a unit to indicate the color conversion quality in color temperature filters Only the image recorded last is displayed in auto review page 111 DRO advanced bracket shooting takes three pictures while separately optimi...

Page 60: ...ot with the Remote Commander After shooting the focus remains locked Any operation on the camera will release the focus lock In BULB shooting page 43 the camera starts exposure right away when you press the SHUTTER button and the camera starts exposure two seconds later when you press the 2 SEC button By pressing the SHUTTER or 2 SEC button again the exposure will be done right away The other butt...

Page 61: ...ple The color of an image affected by light sources The color tones are adjusted automatically in the auto white balance mode However you can adjust color tones manually with the white balance mode 1 Press the WB White Balance button to display the White balance mode screen Adjusting the white balance Weather lighting Daylight Cloudy Fluorescent Incandescent Characteristics of light White standard...

Page 62: ...lor Compensation filter for photography When setting the color temperature measured by the color meter test shooting is recommended before the actual photo is taken AWB Auto WB Adjusts the white balance automatically Daylight Adjusts for outdoors sunlit subjects 3 to 3 Shade Adjusts for shady conditions on a clear day 3 to 3 Cloudy Adjusts for a cloudy sky 3 to 3 Tungsten Adjusts for incandescent ...

Page 63: ...5 3 Press the center of the multi selector after the setting is completed In a scene where the ambient light consists of multiple types of light source use of custom white balance is recommended in order to accurately reproduce the whiteness Up to three settings are registered 1 Select a custom white balance item with v V on the multi selector 2 Switch the item with b B To register a setting 1 Sel...

Page 64: ...ash light taken into account Take pictures with the flash in later shootings The message Custom WB error indicates that the value is beyond the expected range When the flash is used on a subject in close proximity or a subject with a bright color is in the frame If you register this value the indicator turns yellow on the recording information display on the LCD monitor You can shoot at this point...

Page 65: ...automatically adjusted between ISO 200 and ISO 800 You can change the maximum and minimum values with ISO Auto max and ISO Auto min in the Recording menu page 100 If the mode dial is set to M it is fixed at ISO 200 The built in flash range the range within which the correct exposure is provided depends on the aperture value and ISO sensitivity Refer to the following table to determine the shooting...

Page 66: ... in Advanced Level adjust the level with b B You can also switch the screen to the Exclusive disp screen from the Recording menu page 97 Standard is effective when the screen is wholly dark such as with a backlit subject and Advanced is effective when the difference between the bright and dark portions on the screen is extremely large Using the D Range Optimizer Off Does not correct brightness or ...

Page 67: ...orarily deactivated This camera is pre programmed with image styles optimal for various scenes and purposes You can take a picture with an appropriate color balance and tone The camera is equipped with four unswitchable styles Standard Vivid Neutral and Adobe RGB and three styleboxes to which you can assign image styles of your choosing Portrait Landscape and B W are assigned to the styleboxes as ...

Page 68: ...n and beautiful colors Vivid The saturation and contrast are heightened for capturing striking images of colorful scenes and subjects such as flowers spring greenery blue sky or ocean views Neutral The saturation and sharpness are lowered for capturing images in a quiet tone This is also suitable for capturing image material to be modified with a computer Adobe RGB For capturing images in Adobe RG...

Page 69: ...olor in a soft tone ideally suited to capturing portraits Landscape The saturation contrast and sharpness are heightened for capturing vivid and crisp scenery Distant landscapes also stand out more Sunset For capturing the beautiful red of the setting sun Night view The contrast is attenuated for capturing a nightscape that is more faithful to the real view Autumn leaves For capturing autumn scene...

Page 70: ...B and make adjustments with v V 6 Press the center of the multi selector after the setting is completed Of the seven image styles explained in Basic operation the last three styles are Styleboxes 1 3 which can be switched Example When you have assigned Standard to one stylebox and Landscape to two styleboxes Advanced operation Unswitchable Standard Saturation contrast and sharpness can be adjusted...

Page 71: ... the switchable style boxes can adjust the Zone Matching You can keep the image from becoming overexposed or underexposed This function is also available for a RAW file When Zone Matching is not set to 0 the contrast cannot be adjusted Refer to the following table to determine the flash range 1 This keeps the image from becoming underexposed with shooting a high keyed subject Use in low key predom...

Page 72: ...re recorded with Adobe RGB on non Adobe RGB compliant devices or on the LCD monitor on the rear of the camera images are displayed with low saturation To edit or print images recorded with Adobe RGB use applications or printers that support color management and DCF2 0 option color space Using some applications and printers that do not support color management may result in or print images that do ...

Page 73: ...lti selector 3 Select the desired mode with the front or rear control dial The flash indicator is displayed only when the flash is pulled up After selecting the flash item in step 2 if you press the center of the multi selector the screen switches to the Exclusive disp screen On this screen select the desired mode with v V on the multi selector then press the center You can also select the flash m...

Page 74: ... on page 73 If the built in flash is used while the wireless flash mode is still active inaccurate flash exposures will result You can select the wireless setting on the camera and the external flash separately See page 73 to set the camera To set the external flash refer to the operating instructions supplied with it Rear sync Ordinarily the flash is fired right after the shutter has been release...

Page 75: ...ting should be performed in a dark environment such as indoors etc We recommend that you place the camera and the external flash in the gray area within radius 5 m 16 4 ft as illustrated below For more information about flash range also refer to the operating instructions supplied with your flash Do not place the external flash directly behind the subject When shooting with the flash you can adjus...

Page 76: ...ble due to the limited amount of flash light if the subject is at or around the maximum range for the flash If the subject is very close the negative effect may not be visible z Exposure compensation and flash compensation Exposure compensation changes the shutter speed aperture and ISO sensitivity when AUTO is selected to perform the compensation If the flash is used the amount of flash light is ...

Page 77: ...shutter speed priority mode or manual mode slow sync shooting is not available using the AEL AE lock button You can set the camera to keep the slow sync mode after the SLOW SYNC button is released with AEL button in the Custom menu page 107 You can use a flash equipped with a flash sync cord Open the cover of the flash sync terminal and plug the cord in Select the manual exposure mode and set the ...

Page 78: ...he flash will always be full emission Flash compensation page 75 cannot be used You can perform bracket shooting while holding down the AEL AE lock button the aperture is adjusted page 46 Using auto white balance is not recommended Use custom white balance to gain more precise white balance You can use a flash equipped with a flash sync terminal of the opposite polarity ...

Page 79: ...menus with exclusive buttons and levers You cannot register only some of the items 2 Press the MENU button to display the menu screen 3 Select Recording menu t 4 t Memory with the multi selector page 32 4 Press the center of the multi selector to display the Select register screen The memory information set in step 1 the current setting on the camera will be displayed 5 Select the number you want ...

Page 80: ...tor and press the center After you have recalled a setting the actual setting will not correspond to the positions of the dials and levers on the camera Refer to the information displayed on the LCD monitor when you take pictures You can change the settings after you have recalled a saved setting A new setting can be registered by following the steps in To register a setting Recording mode1 34 Dri...

Page 81: ...m button with the multi selector page 32 3 Press the center of the multi selector 4 Select the item to be assigned with v V and press the center The default setting Using the C Custom button AF lock Functions as the AF lock button page 105 AF MF control Functions as the AF MF button page 53 D O F preview Functions as the Depth of field preview button page 39 ISO Functions as the ISO button page 64...

Page 82: ...he DRIVE button page 55 AF area Displays the AF area setup screen page 49 Image size Displays the image size setup screen page 94 Quality Displays the image quality setup screen page 96 Creative Style Displays the Creative Style setup screen page 67 D RangeOptimizer Displays the D Range Optimizer setup screen page 66 Flash mode Displays the flash mode screen page 73 Memory Displays the register se...

Page 83: ...h time you press the DISP Display button the screen changes as follows The DISP Display button switches the recording data display on and off in other playback modes such as on an enlarged screen Switching the playback screen Playback button Select an image with b B Multi selector DISP Display button With recording data With recording data Without recording data Latest recording history up to five...

Page 84: ...en quickly To select the folder 1 Select the folder bar with b B on the multi selector then press the center Switching to the index screen DISP Display button Index button Delete button Multi selector Select an image with v V b B 9 image index Index button Index button or the center of the multi selector 25 image index 4 image index Folder bar The currently selected folder The total number of fold...

Page 85: ...d with Delete confirm in the Setup menu page 125 When you want to delete selected images see page 114 Once you have deleted an image you cannot restore it Protected images cannot be deleted Pressing the Histogram button displays the histogram and recording data of the displayed image Pressing it again turns the screen to a previous screen Displaying the histogram Histogram button When the image ha...

Page 86: ...is an example Both ends of the histogram consist only of data of 100 black or white Checking the histogram allows you to know the status of the image beforehand To be exact a color image is expressed with RGB Thus the white is equal to R255 G255 B255 and the black is equal to R0 G0 B0 Enlarging images Dark Light Number of pixels Use the exposure compensation on the positive side This compensation ...

Page 87: ...he center of the multi selector the screen changes between the enlarged screen and the whole screen You can select an image with the front control dial 4 Press the Enlarge or Playback button so that enlarged playback is canceled and the screen returns to the screen that was displayed before enlarging The scaling range is as follows Image size Scaling range L Approx 1 1 13 M Approx 1 1 10 S Approx ...

Page 88: ... of the multi selector to rotate the image to your desired orientation 3 Press the Playback or Rotate button to return to the normal screen Once you rotate the image the image is played back in the rotated position even if you turn off the power When you copy rotated images to a computer Picture Motion Browser contained on the CD ROM supplied can display the rotated images correctly However the im...

Page 89: ...Images shot with the camera appear on the TV screen Select the desired image with b B on the multi selector When using your camera abroad it may be necessary to switch the video signal output to match that of your TV system page 121 The LCD monitor on the rear of the camera does not turned on The quality of images displayed on a TV connected with a video cable is lower for different systems compar...

Page 90: ... connector of the device with the HDMI terminal on the camera This may cause a malfunction You can change the type of output signal with HDMI output in the Setup menu page 121 On PhotoTV HD This camera is compatible with the PhotoTV HD standard By connecting Sony s PhotoTV HD compatible devices using an HDMI cable whole new world of photos can be enjoyed in breathtaking Full HD quality PhotoTV HD ...

Page 91: ...der Most of the buttons on the Remote Commander have the same functions as the buttons on the camera The other buttons are used when the camera is in recording mode or is connected to a PictBridge printer pages 60 148 Slide show The Slide show button on the Remote Commander easily starts stops a slide show page 119 During a slide show the following operations are available from the Remote Commande...

Page 92: ...io Flash compens ISO Auto max ISO Auto min 3 4 AF A setup AF area Priority setup AF illuminator AF w shutter Long exp NR High ISO NR Memory Rec mode reset 1 2 Eye Start AF EyeStart trigr AF MF button AF MF control AF drive speed AF area disp FocusHoldButton AEL button Ctrl dial setup Dial exp comp Ctrl dial lock Button ops Release w oCard Release w oLens 3 4 Red eye reduc Exp comp set Bracket orde...

Page 93: ... Protect DPOF setup Date imprint Index print PlaybackDisplay Slide show Interval 1 2 3 LCD brightness Info disp time Power save Video output HDMI output Language Date Time setup Memory card File number Folder name Select folder New folder USB connection MassStrg card Menu start Delete confirm Audio signals Cleaning mode Reset default ...

Page 94: ...ed or displayed on a computer screen 1 Image size L 2 Image size S Aspect ratio 3 2 Aspect ratio 16 9 When you select a RAW file with Quality the image size of the RAW file corresponds to L This size is not displayed on the LCD monitor You can also use the Fn Function button for operations page 30 Image size Pixel Many pixels Fine image quality and large file size Few pixels Rough image quality bu...

Page 95: ... table when selecting the image size This is a size larger than A3 size You can print images with a margin around the A3 size image Aspect ratio 3 2 A normal ratio 16 9 An HDTV ratio 16 9 is recommended when viewing on an HDTV Image size Usage guidelines No of images Printing L Larger Smaller For storing important images or printing A3 A3 size or fine A4 size images Less More Fine Rough M For prin...

Page 96: ...erted to a common format such as JPEG or TIFF and its white balance color saturation contrast etc can be readjusted Quality RAW File format RAW raw data A RAW file is the raw material to be processed on the computer for professional purposes The file can be opened with the Image Data Converter SR provided on the CD ROM supplied page 139 c of cRAW means compressed The image size is fixed to the max...

Page 97: ...review screen If the data is correctly recorded accurate colors can be reproduced on a computer You cannot verify the effects of D Range Optimizer other than those of Standard if you play back and enlarge an image recorded in RAW or cRAW format You can analyze the recorded scene and make automatic adjustments to optimize the image quality You can select image styles most suitable for the recorded ...

Page 98: ...increment for shutter speed aperture and exposure Custom button AF lock For details see page 81 AF MF control D O F preview ISO White balance Exposure comp Flash compens Drive mode AF area Image size Quality Creative Style D RangeOptimizer Flash mode Memory Exposure step 0 5 EV Changes in 1 2 EV steps 0 3 EV Changes in 1 3 EV steps ...

Page 99: ...with an exposure factor such as an ND filter is used A close up lens is used ADI flash is only available in combination with the lens that is provided with a distance encoder To determine the lens is equipped with a distance encoder refer to the operating instructions supplied with the lens Flash mode Autoflash For details see page 73 Fill flash Rear sync Wireless Flash control ADI flash A pre fla...

Page 100: ... is set to AUTO You can select the lower limit of an ISO AUTO value when the mode dial is set to P A or S and ISO is set to AUTO Power ratio 1 1 Guide number approx 12 1 2 Guide number approx 8 4 1 4 Guide number approx 6 1 8 Guide number approx 4 2 1 16 Guide number approx 3 Flash compens ISO Auto max 1600 Automatically adjusts ISO with the selected value set to the upper limit 800 400 ISO Auto m...

Page 101: ...wn to lock the focus 4 Turn the focusing ring to fine tune the focus while pressing the shutter button halfway down 5 Press the shutter button fully down Once you release your finger from the shutter button the focus lock operation starts again from the beginning when you press the shutter button halfway down You can select the AF area AF A setup AF A Assigns the Automatic AF function DMF Assigns ...

Page 102: ... can be released even when the focus is not confirmed This is useful when shooting continuously at the same focus position Setting AF MF button to AF lock or assigning AF lock to the C Custom button can also adjust the focus Priority setup AF The shutter cannot be released when the focus is not confirmed Release The shutter can be released even when the focus is not confirmed Select this setting i...

Page 103: ...igh is selected the speed of continuous shooting becomes approx 3 5 images sec Long exp NR On When a long exposure of one second or longer takes place the noise reduction process is performed for the duration that the shutter was open While the noise reduction is being performed the message Processing appears on the LCD monitor You cannot take the next picture until the process is over Off This mo...

Page 104: ...ter of the multi selector The message Reset recording mode appears on the LCD monitor 2 Select OK with v on the multi selector then press the center of the multi selector The main functions of the recording mode are reset The items to be reset are the functions operated with the exclusive buttons and all the items in the Recording menu For details on the items to be reset see Reset default page 17...

Page 105: ...on switches between AF auto focus and MF manual focus in the default setting page 53 This button can be used as the AF Lock button Eye Start AF On Automatically adjusts the focus This mode uses up the battery charge faster than Off Off Does not adjust the focus EyeStart trigr w GripSensor The focus is automatically confirmed when you hold the grip and look into the viewfinder w o GripSensor The fo...

Page 106: ...ontrol Hold AF and MF are switched only while the button is held down Toggle Press and release the button to switch AF and MF Press and release the button again to go back to the previous setting AF drive speed Fast Confirms the focus quickly Slow Confirms the focus slowly Use this setting when a subject is a little hard to focus on such as in macro shooting AF area disp 0 6 sec The local AF area ...

Page 107: ...le are the only switchable alternatives page 77 The hold and toggle settings affect the manual shift page 43 in the manual mode When the mode dial is set to P or M adjusting the shutter speed is performed with the front control dial and adjusting the aperture is performed with the rear control dial at the default setting You can reverse this assignment When the mode dial is set to A or S this assi...

Page 108: ...ontrol dial PA shift PA shift Exposure A Front control dial Aperture Exposure Aperture Rear control dial Aperture Aperture Exposure S Front control dial Shutter speed Exposure Shutter speed Rear control dial Shutter speed Shutter speed Exposure M Front control dial Shutter speed Shutter speed Shutter speed Rear control dial Aperture Aperture Aperture Mode Off Front dial Rear dial P Front control d...

Page 109: ...u can set the shutter lock to keep the shutter from releasing when no lens is mounted on the camera When attaching the camera to an astronomical telescope for example select Enable so the shutter can be released Ctrl dial lock On The front and rear control dial function only when the shutter speed and the aperture are displayed Off The front and rear control dial function at all times Button ops E...

Page 110: ...ight other than the flash With the flash compensation you can limit the compensation to flash light range by fixing the exposure of ambient light range that the flash light does not reach page 75 Values that change amount of flash light Values that do not change shutter speed aperture ISO Red eye reduc On Reduces the red eye phenomenon Off Does not use red eye reduction Exp comp set Ambient flash ...

Page 111: ...rtical position even if you shot the image in a vertical position page 112 The eyepiece sensors located right below the viewfinder determine whether the photographer is looking into the viewfinder or not The LCD monitor can be set to turn off automatically when you are looking into the viewfinder Regardless of the setting in this menu the recording information display automatically turns off after...

Page 112: ...d The image may not be displayed in a vertical position depending on the software employed To rotate the displayed image manually see page 88 Rec info disp Auto rotate The display rotates automatically to a vertical position when the camera is in a vertical position Horizontal The display does not rotate when the camera is in a vertical position Img orientation Record The image orientation is reco...

Page 113: ...stom menu are all reset to the default settings 1 Select Custom reset then press the center of the multi selector The message Reset custom functions appears on the LCD monitor 2 Select OK with v on the multi selector then press the center The setting in the Custom menu are reset Custom reset ...

Page 114: ...pears on the selected image To cancel a selection press the center again 3 To delete other images repeat step 2 To cancel press Playback 4 Press MENU The message Delete images appears 5 Select Delete with v on the multi selector then press the center of the multi selector The selected images are deleted and the screen returns to the playback screen To delete all images 1 Select All images in Delet...

Page 115: ...sertion slot using an adaptor To format it directly insert into the Memory Stick Duo insertion slot Protects images against accidental erasure Follow the procedure below To protect selected images 1 Select Marked images in Protect 2 Select the image you want to protect with b B on the multi selector then press the center of the multi selector A mark appears on the selected image To cancel a select...

Page 116: ...You cannot mark RAW data files You can specify any number up to 9 To specify DPOF on selected images 1 Select Marked images in DPOF setup 2 Select the image you want to mark with b B on the multi selector then select the number of sheets with the rear control dial A DPOF mark appears on the selected image and the number of sheets is selected To cancel a selection rotate the rear control dial to re...

Page 117: ...lect Cancel all in DPOF setup The message Cancel all appears 2 Select OK with v on the multi selector then press the center of the multi selector The DPOF is unspecified on all the images and the screen returning to the playback screen You can impose the date onto images when printing images The position of the date inside or outside the image character size etc depends on your printer Normally on...

Page 118: ... When you play back the image on a TV or a computer it will be displayed in the portrait position even if Manual rotate is selected If Not record is selected with Img orientation in the Custom menu the image will not be displayed in the portrait position page 112 PlaybackDisplay Auto rotate Displays the image in the portrait position if required Manual rotate Displays all images in the landscape p...

Page 119: ...ide show press the center of the multi selector Pressing again starts the slide show again To end in the middle of the slide show press the MENU button You can view the previous next image with b B during a slide show You can choose the interval between the images in the slide show mode Slide show Interval 30 sec The image switches every 30 seconds 10 sec The image switches every 10 seconds 5 sec ...

Page 120: ...utton halfway down or perform some other operation If you do not operate the camera for given period of time the camera turns to power saving mode and almost completely shuts down Power Save t step 4 in Read This First You can set the time to turn the camera to the power save mode Pressing the shutter button halfway down returns the camera to the recording mode LCD brightness Info disp time 1 min ...

Page 121: ...signal from this camera is determined automatically When displaying images recorded with a camera other signals may make the image clearer depending on the subject You can make the following changes The above settings do not apply if the TV does not support the selected signal in which case the camera outputs the signal supported by the TV Select the language to be used to display the menu items w...

Page 122: ...2 Sets the date and time Select Date Time setup then press the center of the multi selector Set the date and time again on the Date Time setup screen For the procedure on setting the date and time see step 4 in Read This First Date Time setup ...

Page 123: ...Folder number B Y the last digit MM DD Memory card Memory Stick Uses the Memory Stick Duo for recording or playback CompactFlash Uses the CF card Microdrive for recording or playback File number Series Assigns numbers to files in sequence even if the recording folder or the memory card is changed or all of the images are deleted Reset Starts from 0001 each time the folder is changed or each time a...

Page 124: ...e Mass Storage connection is used and a Memory Stick Duo and a CF card Microdrive are both inserted in the camera both can be displayed depending on the PC used Select folder New folder USB connection Mass Storage Used for copying images to the computer The camera is recognized as a USB mass storage device PTP Prints the images with a PictBridge compliant printer or copies images to PTP Picture Tr...

Page 125: ...ercially available blower and clean the image sensor following the steps below You can easily clean the image sensor using only the blower and the anti dust function Cleaning can be performed only when the battery level is three remaining battery icons or more Low battery power during cleaning can cause damage to the shutter The cleaning should be completed quickly 1 Confirm that the battery is fu...

Page 126: ...age sensor 6 Attach the lens and set the POWER switch to OFF The camera starts beeping if the battery pack becomes low during cleaning Stop the cleaning immediately and set the POWER switch to OFF z To keep dust from entering the camera Choose a location with little dust to change the lens and complete the operation quickly Do not leave the camera without a lens or the body cap When attaching the ...

Page 127: ...amera and the computer and connecting the camera and your computer Copying images to your computer page 130 Viewing images on your computer Installing the application software and utilizing images page 135 The following software is installed Picture Motion Browser Image Data Converter SR Image Data Lightbox SR Remote Camera Control ...

Page 128: ...anteed for all the recommended computer environments mentioned above If you connect two or more USB devices to a single computer at the same time some devices including your camera may not operate depending on the types of USB devices you are using Operations are not guaranteed when using a USB hub or an extension cable Connecting your camera using a USB interface that is compatible with Hi Speed ...

Page 129: ...o 132 to copy images Check that USB connection in the Setup menu is set to Mass Storage page 124 1 Insert a memory card with recorded images into the camera 2 Insert the sufficiently charged battery pack in the camera or connect the camera to a wall outlet wall socket with the AC Adaptor charger not supplied When you copy images to your computer using insufficient battery pack copying may fail or ...

Page 130: ...indows 2000 page 131 2 Double click DCIM In that case you can also import images using Picture Motion Browser 3 Double click the folder where the image files you want to copy are stored Then right click an image file to display the menu and click Copy On the storage destination of the image files see page 133 4 Double click the My Documents For Windows Vista Documents folder Then right click on th...

Page 131: ... My Computer t Removable Disk 2 Follow the step 2 and later in Copying images to a computer Windows XP Vista 1 Double click the newly recognized icon t DCIM t the folder where the images you want to copy are stored 2 Drag and drop the image files to the hard disk icon The image files are copied to the hard disk x Windows This section describes the procedure for viewing copied images in the My Docu...

Page 132: ...ng the memory card Turning off the camera x Windows 1 Double click on the tasktray 2 Click USB Mass Storage Device t Stop 3 Confirm the device on the confirmation window then click OK 4 Click OK The device is disconnected Step 4 is unnecessary for Windows XP Vista x Macintosh Drag and drop the drive icon or the icon of the memory card to the Trash icon The camera is disconnected from the computer ...

Page 133: ...m page 123 You cannot record play back any images to the MISC folder Image files are named as follows ssss file number stands for any number within the range from 0001 to 9999 The numerical portions of the name of a RAW data file and its corresponding JPEG image file are the same JPEG files DSC0ssss JPG JPEG files Adobe RGB _DSCssss JPG RAW data file other than Adobe RGB DSC0ssss ARW RAW data file...

Page 134: ...than that of your camera playback on your camera is not guaranteed When there is no folder first create a folder with your camera page 124 and then copy the image file 1 Right click the image file then click Rename Change the file name to DSC0ssss Enter a number from 0001 to 9999 for ssss If the overwrite confirmation message appears enter a different number An extension may be displayed depending...

Page 135: ...nded environment for using Image Data Converter SR Ver 2 Image Data Lightbox SR Remote Camera Control OS pre installed Microsoft Windows 2000 Professional SP4 Windows XP SP2 Windows Vista Remote Camera Control is only for Windows XP SP2 Windows Vista CPU Memory MMX Pentium III 1 GHz or faster is recommended RAM 512 MB or more RAM 1 GB or more is recommended Virtual memory 700 MB or more Display 10...

Page 136: ... and then click Next 5 Follow the instructions on the screen to complete the installation When the restarting confirmation message appears restart the computer following the instructions on the screen 6 Remove the CD ROM after the installation is complete The following software is installed Sony Picture Utility Picture Motion Browser Sony Image Data Suite Image Data Converter SR Image Data Lightbo...

Page 137: ...on Browser Guide from the Start menu click Start t All Programs in Windows 2000 Programs t Sony Picture Utility t Help t Picture Motion Browser Guide Starting the Picture Motion Browser Double click the Picture Motion Browser icon on the desktop Or from the Start menu Click Start t All Programs in Windows 2000 Programs t Sony Picture Utility t Picture Motion Browser The confirmation message of the...

Page 138: ...he operation refer to Picture Motion Browser Guide When importing is complete the Picture Motion Browser starts Thumbnails of the imported images are displayed The My Pictures folder is set as the default folder in Viewed folders You can view images arranged by shooting date on a calendar For details on the operation refer to Picture Motion Browser Guide Viewing images Example Month display screen...

Page 139: ...e Data Suite t Image Data Converter SR Ver 2 0 To exit Click the button on the upper right of the screen x Macintosh To start up Double click Image Data Converter SR Ver 2 in the Sony Image Data Suite folder from the Application folder To exit Click Quit Image Data Converter SR from the IDC SR menu You can adjust the white balance exposure and Creative Style of the image using the buttons on the t...

Page 140: ...t of the screen The dialogue used for saving a collection appears For details on a Collection see page 141 x Macintosh To start up Double click Image Data Lightbox SR in the Sony Image Data Suite folder from the Application folder To exit Click Quit Image Data Lightbox SR from the Image Data Lightbox SR menu When you start up the operation menu will be displayed Click Open an Image File or Open a ...

Page 141: ...ages the operation status of images in Image Data Lightbox SR You can save an operation status as it is such as for images selected from multiple folders based on their rating information You can resume the operation by opening a Collection file To resume an operation start up Image Data Lightbox SR click Open a Previous Collection File and select the desired collection file For details refer to t...

Page 142: ...Suite t Remote Camera Control To exit Click the button on the upper right of the screen x Macintosh To start up Double click Remote Camera Control in the Sony Image Data Suite folder from the Application folder To exit Click Quit Remote Camera Control from the Remote Camera Control menu 1 Press MENU to display the menu 2 Select Setup t 2 t USB connection with the multi selector page 32 3 Select Re...

Page 143: ...hen start the Remote Camera Control 3 Make settings on the control panel such as those for drive mode white balance etc 4 Adjust the focus and click the Shutter button The camera shoots a subject and the image is stored on the computer For details on the operation refer to the help of Remote Camera Control Operating the camera from a computer USB cable 2 To the USB terminal 1 To the USB terminal ...

Page 144: ...s 1 and 2 in Operating the camera from a computer 2 Set up the camera or the computer and take a picture with the camera The image is shot and is saved on the computer Saving images recorded with the camera on a computer ...

Page 145: ...ages with a Memory Stick Duo CF card Microdrive compliant printer For details see the operating instructions supplied with the printer Printing using a computer You can copy images to a computer using the supplied Picture Motion Browser software and print the images For details see the Picture Motion Browser Guide Printing at a shop You can take a memory card containing images shot with your camer...

Page 146: ... the power from turning off partway through printing 1 Press MENU to display the menu 2 Select Setup t 2 t USB connection with the multi selector page 32 3 Select PTP with v V then press the center of the multi selector The USB mode is set to PTP 4 Turn the camera off and insert the memory card that the images have been recorded 1 Connect the camera to the printer 2 Turn on your camera and the pri...

Page 147: ...ars press the center of the multi selector To cancel the print During printing pressing the center of the multi selector cancels the print Remove the USB cable or turn off the camera When you want to print again follow the procedure Stages 1 to 3 above Page 1 Print Prints the selected images For details see Stage 3 Printing Set print q ty You can specify the number of prints up to 20 The same numb...

Page 148: ...nect the camera to a TV page 90 2 Connect the camera to a printer page 146 3 Display the image you want to print 4 Press the PRINT button on the Remote Commander Depending on the menu setup of the camera setup for printing is fixed as follows The number of sheets 1 sheet Paper size Auto Layout Auto Date imprint Off When the camera is connected to a TV with the video cable supplied the PRINT button...

Page 149: ... in Read This First The battery pack is discharged page 163 Install a charged battery pack t step 1 in Read This First The battery remaining indicator is incorrect or sufficient battery remaining indicator is displayed but the power runs out too quickly This phenomenon occurs when you use the camera in an extremely hot or cold location page 163 The displayed battery remaining differs from the curr...

Page 150: ...en insert your memory card into the camera t step 3 in Read This First page 123 The shutter cannot be released with lit at the upper right corner on the LCD monitor This indication means the lens is not attached properly Attach the lens properly t step 2 in Read This First Recording takes a long time The noise reduction function is activated page 103 This is not a malfunction You are shooting in R...

Page 151: ...correct date and time page 122 t step 4 in Read This First The aperture value and or shutter speed flash when you press the shutter button halfway down Since the subject is too bright or too dark it is beyond the available range Adjust the setting again Excessive light appears in the image The picture was taken under a strong light source and excessive light has entered the lens Attach a lens hood...

Page 152: ...efer to Computers page 153 in conjunction with the following items Your camera cannot play back images The folder file name has been changed on your computer page 134 When an image file has been processed by a computer or when the image file was recorded using a model other than that of your camera playback on your camera is not guaranteed The camera is in USB mode Delete the USB connection page 1...

Page 153: ...es When you are copying images from the camera to your computer if you open the memory card cover the copy is canceled Do not open the memory card cover during copying Make the USB connection by properly connecting the camera with your computer page 129 Follow the designated copy procedure for your OS pages 130 131 When you shoot images with a memory card formatted by a computer you may not be abl...

Page 154: ...Stick PRO Duo is not supported connect the camera to the computer page 129 The computer recognizes the Memory Stick PRO Duo The supplied Remote Commander does not function To shoot set the drive mode to Remote Commander To play back connect the camera to a TV Insert a battery into the battery holder with the polarities correctly matching the marks Remove any obstructions between the Remote Command...

Page 155: ...not have a feature for superimposing dates on images However because the images shot with the camera include information on the recording date you can print images with the date superimposed if the printer or the software can recognize Exif information For compatibility with Exif information consult the manufacturer of the printer or the software When you print images at a shop images can be print...

Page 156: ...setting of the camera differs from that of the printer Change the setting of either the camera page 147 or the printer Cannot operate the camera after canceling printing Wait for a while as the printer is carrying out the cancellation It may take some time depending on the printer The lens gets fogged Moisture condensation has occurred Turn off the camera and leave it for about an hour before usin...

Page 157: ...lied is used disconnect the power cord If the camera is hot allow it to cool down before trying this corrective procedure The five bars of the Super SteadyShot scale flash The Super SteadyShot function does not work You can continue to shoot but the Super SteadyShot function will not work Turn the camera off and on If the Super SteadyShot scale continues to flash consult your Sony dealer or local ...

Page 158: ... Select OK then format the memory card You can use the memory card again however all previous data in the memory card is erased It may take a some time to complete the format If the message still appears change the memory card Card error An incompatible memory card is inserted or the format was failed Read only memory Your camera cannot record or delete images on this Memory Stick Duo Reinsert the...

Page 159: ...r off Cool the camera and wait until the camera is ready to shoot again Camera error System error Turn the power off remove the battery pack then re insert it If the message appears frequently consult your Sony dealer or local authorized Sony service facility Cover open Close the memory card cover to start shooting Check that the access lamp is not lit then open the cover when you replace the memo...

Page 160: ...160 Printer error Check the printer Check if the image you want to print is corrupted Printer busy Check the printer ...

Page 161: ... up important data Do not press down hard when you write down on the memo area Do not attach a label on the Memory Stick Duo itself When you carry or store the Memory Stick Duo put it in the case supplied with it Do not touch the terminal section of the Memory Stick Duo with your hand or a metal object Do not strike bend or drop the Memory Stick Duo Do not disassemble or modify the Memory Stick Du...

Page 162: ...ew label over the label When you carry or store the memory card put it in the case supplied with it Do not expose the memory card to water Do not press on the label strongly Do not touch the terminal section of the memory card with your hand or a metal object Notes on use of the Microdrive A Microdrive is a compact and lightweight hard disk drive that complies with CompactFlash Type II The Microdr...

Page 163: ... shots Do not expose the battery pack to water The battery pack is not water resistant Do not leave the battery pack in extremely hot places such as in a car or under direct sunlight On the remaining battery indicator The power may go off although the battery remaining indicator shows there is enough power to operate Use the battery pack up and charge the battery pack fully again so that the indic...

Page 164: ...e charged battery pack in the charger battery life may be decreased When the CHARGE lamp flashes this may indicate a battery error or that a battery pack other than the specified type have been inserted Check that the battery pack is the specified type If the battery pack is the specified type remove the battery pack replace it with new one or another one and check if the battery charger operates ...

Page 165: ... the cover and insert the plug of the AC Adaptor charger into the DC IN terminal When disconnecting the AC Adaptor charger from the camera turn the power off beforehand You cannot use any AC adaptor charger other than the AC VQ900AM VG C70AM Vertical Grip The Vertical Grip is equipped with a portrait shooting shutter button and a power switch as well as front and rear control dials and an AEL AE l...

Page 166: ...ulb exposure page 43 To attach the Remote Commander flip open the cover of the REMOTE terminal and insert the plug of the Remote Commander With the Remote Commander clip attached to the shoulder strap you can catch the cord to secure it HVL F56AM HVL F36AM Flash A powerful flash can cover a longer distance than the built in flash can enabling flash shooting that produces beautiful images Flash HVL...

Page 167: ...36AM flash allows you to take pictures using the flash with any shutter speed including a high speed It also enables you to take pictures with the flash in bright conditions with the iris open In high speed sync mode H or HSS appears in the viewfinder and on the LCD monitor High speed sync mode is not available when the two second self timer or Rear sync is selected FDA A1AM Angle Finder FDA M1AM ...

Page 168: ...n the image sensor it may appear on the photo image Turn the camera to the cleaning mode page 125 then clean it using a blower Do not use a spray blower to clean the inside of the camera Using this may cause a malfunction Do not use a cleaning solution containing organic solvents such as thinner or benzine Cleaning the camera surface Clean the camera surface with a soft cloth slightly moistened wi...

Page 169: ...ountries with separate collection systems This symbol on the battery or on the packaging indicates that the battery provided with this product shall not be treated as household waste By ensuring these batteries are disposed of correctly you will help prevent potentially negative consequences for the environment and human health which could otherwise be caused by inappropriate waste handling of the...

Page 170: ... 1 diopter 1m 1 Dioptor Adjustment 3 0 to 1 0 m 1 Auto Focus System System TTL phase detection system CCD line sensors Metering area 11 points Sensitivity Range 0 EV to 18 EV at ISO 100 equivalent Exposure Metering Cell 40 segment honeycomb pattern SPC Metering Range 0 EV to 20 EV 2 EV to 20 EV with Spot metering at ISO 100 with F1 4 lens Shutter Type Electronically controlled vertical traverse fo...

Page 171: ... Input rating 100 V 240 V AC 50 60 Hz Output rating 8 4 V DC 750 mA Operating temperature range 0 to 40 C 32 to 104 F Storage temperature range 20 to 60 C 4 to 140 F Maximum dimensions Approx 70 25 95 mm 2 7 8 1 3 3 4 inches W H D Mass Approx 90 g 3 2 oz Rechargeable battery pack NP FM500H Used battery Lithium ion battery Maximum voltage DC 8 4 V Nominal voltage DC 7 2 V Maximum charge current 2 0...

Page 172: ...ot a a a a 14 Adjusting the diopter a a a a 17 Recording display Detailed display a a a z 23 Exposure mode a a 34 Exposure compensation 0 z z z z 45 Metering mode Multi segment z z a a 48 Focus mode AF S AF A AF C MF AF A z z1 a a 52 Drive mode Single image advance z z2 z z 55 White balance AWB Auto white balance z z z z 61 Color temperature color filter 5500K Color filter 0 z z 62 Custom white ba...

Page 173: ...geOptimizer Standard z3 z3 z z 66 Creative Style Standard z z z 67 Custom button Creative Style a a z z 81 Exposure step 0 3 EV a a z z 98 Flash mode Autoflash z z z4 z5 73 Flash control ADI flash z z z z 99 Power ratio 1 1 a a z z 100 Flash compens 0 0 z z z z 75 ISO Auto max 800 z z 100 ISO Auto min 200 z z 100 AF A setup AF A z z z z 101 AF area Wide z z z z 49 Priority setup AF z z z z 102 AF ...

Page 174: ... a z 107 Dial exp comp Off a a a z 108 Ctrl dial lock Off a a a z 109 Button ops Exclusive disp a a a z 109 Release w oCard Enable a a a z 109 Release w oLens Disable a a a z 109 Red eye reduc Off a a a z 110 Exp comp set Ambient flash a a a z 110 Bracket order 0 t t a a a z 111 Auto review 2 sec a a a z 111 Auto off w VF On a a a z 111 Rec info disp Auto rotate a a a z 112 Img orientation Record ...

Page 175: ...I output HD 1080i prior a a a z 121 Date Time setup a a a a 122 Memory card CompactFlash a a a a 123 File number Series a a a z 123 Folder name Standard form a a a z 123 Select folder a a a a 124 USB connection Mass Storage a a a z 124 MassStrg card Selected card a a a z 124 Menu start Top a a a z 125 Delete confirm Cancel first a a a z 125 Audio signals On a a a z 125 ...

Page 176: ... First CD ROM 136 Center weighted 48 Charging battery pack t step 1 in Read This First Cleaning 168 Cleaning mode 125 Cloudy WB 62 Color 61 Color filter 62 Color temperature 62 Compression ratio 96 Computer 127 Copying images 130 Recommended environment 128 135 Software 135 Viewing image files stored on a computer with your camera 134 Connecting Computer 129 Printer 146 TV 89 Continuous AF 52 Cont...

Page 177: ...screen 84 Indicator 19 Info disp time 120 Install 136 Internal rechargeable battery 169 ISO 64 ISO Auto max 100 ISO Auto min 100 J JPEG 96 L Landscape Scene Selection 35 Language 121 t step 4 in Read This First LCD monitor 20 LCDbrightness 120 Local AF area 50 Locking exposure 46 Long exp NR 103 Long exposure shooting 43 Luminance limit warning 85 M Macro 35 Manual exposure 41 Manual flash 99 Manu...

Page 178: ...lt 126 Rotate 88 S Saturation 67 Scene Selection 35 Screen Changing the display 23 Indicator 19 Select folder 124 Self timer 57 Set the clock t step 4 in Read This First Setup menu 1 120 Setup menu 2 123 Setup menu 3 125 Shade WB 62 Sharpness 67 Shoulder strap 17 Shutter speed priority 39 Single bracket 58 Single shot AF 52 Slide show 119 Slow Sync 77 Software 136 Specifications 170 Sports action ...

Page 179: ...logo and High Definition Multimedia Interface are trademarks or registered trademarks of HDMI Licensing LLC Intel Intel Core MMX and Pentium are trademarks or registered trademarks of Intel Corporation CompactFlash is a trademark of SanDisk Corporation Microdrive is a registered trademark of Hitachi Global Storage Technologies in the United States and or other countries Adobe is a registered trade...

Reviews: