background image

40

ES

x

Etapa 1: Instalación de “PMB” (suministrado)

Puede instalar el software (suministrado) utilizando el procedimiento siguiente. Cuando 
instale “PMB”, también se instalará “Music Transfer”.

Inicie la sesión como Administrador.

1

Compruebe el entorno de su ordenador.

Entorno recomendado para utilizar “PMB” y “Music Transfer”

SO (preinstalado):

 Microsoft Windows XP

*1

 SP3/Windows Vista

*2

 SP1

CPU:


Intel Pentium III 800 MHz o más rápido (Para reproducir/editar las películas 

de alta definición: Intel Pentium 4 2,8 GHz o más rápido/Intel Pentium D 2,8 GHz 
o más rápido/Intel Core Duo 1,66 GHz o más rápido/Intel Core 2 Duo 1,20 GHz o 
más rápido)

Memoria:


512 MB o más (Para reproducir/editar las películas de alta definición: 

1 GB  o  más)

Disco Duro (Espacio requerido en disco para la instalación):


aproximadamente 500 MB

Pantalla:

 Resolución de pantalla: 1 024 × 768 puntos o más

Memoria de vídeo:

 32 MB o más (Recomendado: 64 MB o más)

*1

Las ediciones de 64 bits y Starter (Edition) no son compatibles.

*2

Starter (Edition) no es compatible.

2

Encienda su ordenador e inserte el CD-ROM (suministrado) 
en la unidad de CD-ROM.

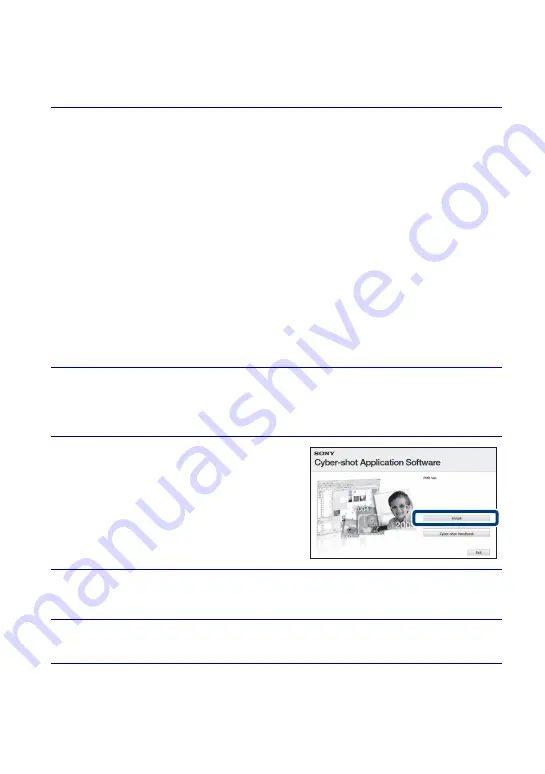
Aparecerá la pantalla del menú de instalación.

3

Haga clic en [Install].

Aparecerá la pantalla “Choose Setup 
Language” (Elegir idioma de instalación).

4

Siga las instrucciones de la pantalla para completar la 
instalación.

5

Extraiga el CD-ROM después de completarse la instalación.

Summary of Contents for DSC T90 - Cyber-shot Digital Camera

Page 1: ...S 4130942611DSCT90U2 01GB 010COV fm master Right 2009 Sony Corporation 4 130 942 61 1 DSC T90 4 130 942 61 1 Digital Still Camera Cámara fotografía digital DSC T90 Instruction Manual Manual de instrucciones GB PT ES ...

Page 2: ...ructions Polarization This set may be equipped with a polarized ac power cord plug a plug having one blade wider than the other This plug will fit into the power outlet only one way This is a safety feature If you are unable to insert the plug fully into the outlet try reversing the plug If the plug should still fail to fit contact your electrician to have a suitable outlet installed Do not defeat...

Page 3: ...ster or where it is exposed to direct sunlight Lightning For added protection for this set during a lightning storm or when it is left unattended and unused for long periods of time unplug it from the wall outlet and disconnect the antenna or cable system This will prevent damage to the set due to lightning and power line surges Damage Requiring Service Unplug the set from the wall outlet and refe...

Page 4: ...ice that can charge the battery pack Keep the battery pack out of the reach of small children Keep the battery pack dry Replace only with the same or equivalent type recommended by Sony Dispose of used battery packs promptly as described in the instructions Replace the battery with the specified type only Otherwise fire or injury may result Do not expose the batteries to excessive heat such as sun...

Page 5: ...rease the separation between the equipment and receiver Connect the equipment into an outlet on a circuit different from that to which the receiver is connected Consult the dealer or an experienced radio TV technician for help The supplied interface cable must be used with the equipment in order to comply with the limits for a digital device pursuant to Subpart B of Part 15 of FCC Rules Notice for...

Page 6: ...teries are disposed of correctly you will help prevent potentially negative consequences for the environment and human health which could otherwise be caused by inappropriate waste handling of the battery The recycling of the materials will help to conserve natural resources In case of products that for safety performance or data integrity reasons require a permanent connection with an incorporate...

Page 7: ...atically Smile Shutter 21 Detecting the shooting conditions automatically Scene Recognition 22 Shooting close ups Macro Close focus 24 Using the self timer 24 Selecting a flash mode 25 Changing the screen display 26 Focusing on a specific point of the frame 27 Focusing on the face of the subject Face Detection 27 Selecting the image size to match the usage 28 Using the Shooting mode that matches t...

Page 8: ...ting to other devices 39 Viewing images on a TV 39 Printing still images 39 Using the camera with a computer 41 Changing camera settings 45 Changing the operation sounds 45 Using the HOME screen 45 Using the MENU items 48 Using functions in Program Auto mode 50 Others 51 List of icons displayed on the screen 51 Learning more about the camera Cyber shot Handbook 53 Troubleshooting 54 Precautions 57...

Page 9: ...e recording media may become unusable or image data may be damaged Clean the flash surface before use The heat of flash emission may cause dirt on the flash surface to become discolored or to stick to the flash surface resulting in insufficient light emission Notes on the LCD screen The LCD screen is manufactured using extremely high precision technology so over 99 99 of the pixels are operational...

Page 10: ...videotapes and other materials may be copyrighted Unauthorized recording of such materials may be contrary to the provisions of the copyright laws No compensation for damaged content or recording failure Sony cannot compensate for failure to record or loss or damage of recorded content due to a malfunction of the camera or recording media etc ...

Page 11: ...OM 1 Cyber shot application software Cyber shot Handbook Cyber shot Step up Guide Instruction Manual this manual 1 xUsing the wrist strap The camera is supplied with a wrist strap Attach the strap and place your hand through the loop to prevent the camera from damage by being dropped xUsing the paint pen The paint pen is used when operating the touch panel It attaches to the wrist strap Do not car...

Page 12: ...utter lamp AF illuminator GLens HLens cover ILCD screen Touch panel J Playback button KHook for wrist strap Grip LSpeaker MBattery Memory Stick Duo media cover NTripod receptacle Use a tripod with a screw less than 5 5 mm 7 32 inch long Otherwise you cannot firmly secure the camera and damage to the camera may occur OBattery eject lever PAccess lamp Q Memory Stick Duo media slot RBattery insertion...

Page 13: ...y charger to the wall outlet wall socket If you continue charging the battery pack for about one more hour after the CHARGE lamp turns off the charge will last slightly longer full charge CHARGE lamp Lit Charging Off Charging finished normal charge 3When charging is finished disconnect the battery charger Battery pack CHARGE lamp For customers in the USA and Canada Plug CHARGE lamp Power cord main...

Page 14: ...isconnect the power cord mains lead from the wall outlet wall socket and remove the battery pack from the battery charger Designed for use with compatible Sony batteries and the battery charger xBattery life and number of images you can record view The measurement method is based on the CIPA standard CIPA Camera Imaging Products Association The battery life and the number of still images may vary ...

Page 15: ...the cover 2Insert the Memory Stick Duo media sold separately With the terminal side facing the lens insert the Memory Stick Duo media until it clicks into place 3Insert the battery pack Check the direction of the battery and insert it until the battery eject lever is locked 4Close the cover Closing the cover with the battery inserted incorrectly may damage the camera Battery eject lever ...

Page 16: ... Stick Duo media insert the Memory Stick Duo media in the camera touch and select Copy in Memory Tool of Manage Memory xTo remove the battery pack xChecking the remaining battery charge A remaining charge indicator appears on the upper left of the LCD screen It takes about one minute until the correct remaining charge indicator appears The remaining charge indicator may not be correct under certai...

Page 17: ...h the date xSetting the date and time again Touch t Settings t Clock Settings page 47 1Lower the lens cover The camera is turned on You can also turn on the camera by pressing the ON OFF Power button It may take time for the power to turn on and allow operation 2Touch the desired date display format then touch 3Touch each item then touch v V to set its numeric value Midnight is indicated as 12 00 ...

Page 18: ...oom W T lever to the T side to zoom Slide to the W side to return 3 Press the shutter button halfway down to focus is displayed to indicate that SteadyShot is working When the image is in focus a beep sounds and the z indicator lights The shortest shooting distance is approximately 8 cm 3 1 4 inches W 50 cm 19 3 4 inches T from the lens 4 Press the shutter button fully down The image is shot Lens ...

Page 19: ...era Close the lens cover You can also turn off the camera by pressing the ON OFF Power button 1Press the Playback button The last image shot is displayed When images on the Memory Stick Duo media recorded with other cameras cannot be played back on this camera view the images in Folder View page 35 xSelecting next previous image Touch Next Previous on the screen xDeleting an image Touch Delete the...

Page 20: ...reduces the minimum number of settings and enlarges the text size for better visibility xReturning to normal display Touch REC Mode t Intelligent Auto Adjustment t 1 Touch REC Mode t Easy Shooting t Action How to change Self Timer Self Timer t Select Self Timer Off or Self Timer 10sec Image Size t Select Large or Small in Image Size Flash t Select Auto or Off in Flash ...

Page 21: ... touch Smile again Smile Shutter ends If you press the shutter button during Smile Shutter the camera shoots the image then returns to Smile Shutter mode Face Detection frame Smile Detection Sensitivity indicator zHints for better capturing of smiles 1 Do not cover the eyes with the bangs 2 Try to orient the face in front of the camera and be as level as possible The detection rate is higher when ...

Page 22: ...or 2 Point the camera at the subject When the camera recognizes the scene Twilight Twilight Portrait Twilight using a tripod Backlight Backlight Portrait Landscape Macro or Portrait appears When the camera does not recognize the scene appears on the screen of the camera 3 Press the shutter button halfway down to focus and then press the shutter button fully down to shoot the image Scene Recognitio...

Page 23: ...cally shoots two images consecutively when it recognizes Portrait The camera will select display and record the image which the eyes are not blinked automatically First Image Second Image Shoot in Slow Synchro Shoots with sensitivity increased and shake reduced Shoot in Slow Synchro with the face which the flash strobes on as guide Shoots with sensitivity increased with the face as guide and shake...

Page 24: ...is mode Macro On The camera adjusts the focus with priority on close up subjects Set Macro On when shooting close subjects Close focus enabled Use this mode to shoot at even closer distances than Macro recording Locked to the W side Approximately 1 to 20 cm 13 32 to 7 7 8 inches Notes 1 Touch Self Timer t desired mode t Self Timer Off Not using the self timer Self Timer 10sec Shooting starts after...

Page 25: ...is in Intelligent Auto Adjustment mode You cannot use the flash during burst or bracket shooting 1 Touch Flash t desired mode t Flash Auto Flashes when there is insufficient light or backlight Flash On Flash always operates Slow Synchro Flash On Flash always operates The shutter speed is slow in a dark place to clearly shoot the background that is out of flash light Flash Off Flash does not operat...

Page 26: ...ns Simple Displays only buttons Image Only Hides buttons and icons Note zHistogram and brightness settings The following setting can be accessed by touching Histogram A histogram is a graph showing the brightness of an image The graph display indicates a bright image when skewed to the right side and a dark image when skewed to the left side Brightness This sets the backlight brightness Normal Bri...

Page 27: ...ng 1 Point the camera at the subject then touch the point of the frame you want to focus on You can change the focus point as many times as you wish before pressing the shutter button halfway down If you want the camera to choose a focus point automatically touch 1 Touch t Face Detection t desired mode t When touched Detects the face when an area with a face is touched on the screen Auto Selects t...

Page 28: ... Select the image size that matches the way you will view your images When you print images shot with 16 9 aspect ratio both edges may be cut off 1 t Image Size t desired size t Note Image size Usage guidelines LCD screen 4000 3000 For prints up to A3 size Images are displayed in 4 3 or 3 2 aspect ratio 3264 2448 For prints up to A3 size 2592 1944 For prints up to A4 size 2048 1536 For prints up t...

Page 29: ...s When an image shot with other cameras is played back on this camera the image may not appear in the actual image size Capacity Size Internal memory Memory Stick Duo media formatted with this camera Approx 11 MB 256 MB 512 MB 1 GB 2 GB 4 GB 8 GB 16 GB 12M 2 40 84 173 351 693 1401 2847 8M 2 56 118 242 493 972 1963 3991 5M 3 68 143 293 595 1174 2372 4821 3M 7 144 301 617 1253 2472 4991 10140 VGA 70...

Page 30: ...here for portraits of people flowers etc Landscape Shoots with the focus on a distant subject Twilight Portrait Shoots sharp images of people in a dark place without losing the nighttime atmosphere Twilight Shoots night scenes without losing the nighttime atmosphere Gourmet Shoots food arrangements in delicious color Beach Shoots seaside or lakeside scenes with the blueness of the water captured m...

Page 31: ...erage bit rate the smoother the playback image 1 Touch REC Mode t Movie Mode t 2 Press the shutter button fully down to start recording 3 Press the shutter button fully down again to stop recording Button Action Volume control B Playback x Stop M m Fast forward fast rewind Movie image size Average bit rate Usage guidelines 1280 720 Fine 9 Mbps Shoot highest quality movies for display on High Defin...

Page 32: ...s shooting time differs according to the shooting circumstances temperature etc The numbers in the table above are when Brightness of the screen display is set to Normal Movies with the size set to 1280 720 can only be recorded on a Memory Stick PRO Duo media Capacity Size Internal memory Memory Stick Duo media formatted with this camera Approx 11 MB 256 MB 512 MB 1 GB 2 GB 4 GB 8 GB 16 GB 1280 72...

Page 33: ...enlarge The image is enlarged at twice the size with the area you touched at the center When is set to Image Only touch the center of the screen then touch the area you want to enlarge 2 Adjust the zoom scale and position The zoom scale increases each time you touch the screen Adjusts the position Changes the zoom scale Turns on off Cancels playback zoom 1 Press the Playback button to display the ...

Page 34: ...l image then touch Slideshow 2 Touch Start The slideshow starts To end the slideshow touch the screen and then touch Exit zSelecting background music You can transfer a desired music file from your CDs or MP3 files to the camera to play back during slideshow To transfer music files install the Music Transfer software supplied to your computer page 42 then follow the steps below 1 Touch t Slideshow...

Page 35: ... Image Index If you touch you can set the number of images displayed in the index screen to 12 or 20 images 2 Touch to turn the pages To return to the single image screen touch the thumbnail image 1 Press the Playback button to display an image then touch Image Index t View Mode t desired mode Date View Displays images by the date Event View Analyzes the dates shots and frequency automatically org...

Page 36: ...n you cannot play back images recorded with other cameras view the images in Folder View Date List Displays a list of the images taken on the selected date Event List Displays a list of the images registered to the selected event Select Folder Touch OK to display a list of the images contained in the selected folder When set to Favorites You can display images registered to Favorites divided into ...

Page 37: ... All in Date Range All in Event or All in This Folder t t OK The images is displayed in Folder View when using the internal memory 1 Touch Delete t OK page 19 1 Touch Image Index t Delete 2 Select images for deletion 1 Touch to turn the pages then touch the images you want to delete The mark is attached to the selected images 2 Repeat step 1 3 Touch t OK You can switch between single image and ind...

Page 38: ...ick Duo media or the internal memory If a Memory Stick Duo media is inserted all data stored on the Memory Stick Duo media are deleted If no Memory Stick Duo media is inserted all data stored in the internal memory are deleted Formatting permanently deletes all data including protected images 1 Touch t Manage Memory t Memory Tool t t Format t 2 Touch OK Note ...

Page 39: ...he following procedure 1 Connect the camera to the TV with the cable for multi use terminal supplied Note 1 Connect the camera to the printer with the cable for multi use terminal supplied 2 Turn on the printer and press the Playback button After the connection is made the indicator appears To the multi connector To audio video input jacks Cable for multi use terminal zViewing images on a HD High ...

Page 40: ... Stick Duo media to the print shop How to copy Touch t Manage Memory t Memory Tool t t Copy t t OK For details consult your photo printing service shop zSuperimposing dates on images This camera does not include a function for superimposing a date on an image The reason for this is to prevent the date from being duplicated during printing Printing at a shop You can ask that images be printed with ...

Page 41: ... a CD ROM supplied There are more functions in addition to those listed below for enjoying your images For details see the PMB Guide page 43 PMB is not compatible with Macintosh computers Note Export to camera Exporting images to a Memory Stick Duo media and viewing them Import to computer Media service Uploading the image to the media service Print Printing images with date stamps CD DVD Creating...

Page 42: ...ter Intel Pentium D 2 8 GHz or faster Intel Core Duo 1 66 GHz or faster Intel Core 2 Duo 1 20 GHz or faster Memory 512 MB or more For playing editing the High Definition movies 1 GB or more Hard Disk Disk space required for installation approximately 500 MB Display Screen resolution 1 024 768 dots or more Video memory 32 MB or more Recommended 64 MB or more 1 64 bit editions and Starter Edition ar...

Page 43: ...ly and the USB AV DC IN Cable for multi use terminal sold separately is recommended 1 Insert a fully charged battery pack to the camera then press the Playback button 2 Connect the camera to your computer Connecting appears on the screen of the camera is displayed on the screen during the communication session Do not operate the computer while the indicator is displayed When the indicator changes ...

Page 44: ... install Music Transfer on your Macintosh computer Recommended computer environment The following environment is recommended for a computer connected to the camera Recommended environment for importing images OS pre installed Mac OS 9 1 9 2 Mac OS X v10 1 to v10 5 USB jack Provided as standard Recommended environment for using Music Transfer OS pre installed Mac OS X v10 3 to v10 5 Memory 64 MB or...

Page 45: ...ad categories for selection such as shooting viewing and printing images Only the items that are available for each mode are displayed on the screen x Shooting 1 Touch t Settings t Main Settings t t Beep t t desired mode t Shutter Turns on the shutter sound when you press the shutter button High Low Turns on the beep shutter sound when you operate the touch panel press the shutter button If you wa...

Page 46: ...n succession along with effects and music Music Tool Download Music Changes the slideshow music Format Music Deletes all slideshow music Item Description Print Prints still images Item Description Memory Tool Memory Stick Tool Format Formats a Memory Stick Duo media Create REC Folder Creates a new folder on a Memory Stick Duo media Change REC Folder Changes the folder used for recording images Del...

Page 47: ...nected TV terminal Video Out Sets the mode according to the video output system to be connected TV TYPE Set to the aspect ratio of a TV to be connected USB Connect Sets the mode used when connecting the camera to a computer or a printer Shooting Settings Shooting Settings 1 AF Illuminator Strobes the fill light when focusing in low light Grid Line Displays lines to easily set a subject in a horizo...

Page 48: ...V BRK 1 0EV EV Adjusts exposure manually 2 0EV to 2 0EV ISO Sets the ISO sensitivity ISO AUTO ISO80 to ISO3200 White Balance Adjusts color tones according to the surrounding light conditions Auto Daylight Cloudy Fluorescent Light 1 Fluorescent Light 2 Fluorescent Light 3 n Incandescent Flash Underwater White Balance Adjusts the colors when shooting underwater Auto Underwater 1 Underwater 2 Focus C...

Page 49: ...cription Date List Selects the playback date list Event List Selects the event group to be played back Select Folder Selects the folder for viewing images View Mode Switches the View Modes Date View Event View Favorites Folder View Filter by Faces Plays back images filtered to meet certain conditions Off All people Children Infants Smiles Slideshow Plays back images in succession along with effect...

Page 50: ...w Mode Adds a Print order mark to the image you want to print in a Memory Stick Duo media This Image Multiple Images Set All in Date Range Remove All in Date Range The displayed text differs according to each View Mode Print Prints images using a PictBridge compliant printer This Image Multiple Images All in Date Range The displayed text differs according to each View Mode Rotate Rotates a still i...

Page 51: ... on the bottom right of the screen page 26 When shooting still images The icons are limited in Easy Shooting mode When shooting movies When playing back A B Display Indication Battery remaining Low battery warning Scene Recognition Scene Recognition icon Smile Detection Sensitivity indicator Zoom scaling View Mode Filter by Faces PMB export Favorites Protect Print order DPOF mark Playback zoom Dis...

Page 52: ...on AF range finder frame Spot metering cross hair Self timer AF illuminator Housing Management file full Temperature increase warning VOL Volume Display Indication C 32 00 Self diagnosis display Histogram appears when histogram display is disabled Display Indication 35 37 32 N 139 44 31 E Latitude and Longitude display z AE AF lock NR slow shutter 125 Shutter speed F3 5 Aperture value ISO400 ISO n...

Page 53: ...r computer you can download it from web page http www adobe com xFor Windows users xFor Macintosh users 1 Turn on your computer and insert the CD ROM supplied into the CD ROM drive 2 Click Cyber shot Handbook Cyber shot Step up Guide which contains information on accessories for the camera is installed at the same time 3 Start Cyber shot Handbook from the shortcut on the desktop 1 Turn on your com...

Page 54: ...Insert a charged battery pack page 13 The battery pack is dead Replace it with a new one Use a recommended battery pack The power turns off suddenly Depending on the camera and battery temperature the power may turn off automatically to protect the camera In this case a message is displayed on the LCD screen before the power turns off If you do not operate the camera for about three minutes while ...

Page 55: ... The CHARGE lamp flashes while charging the battery Remove and reinsert the battery pack making sure it is installed correctly The temperature may be inappropriate for charging Try charging the battery pack again within the proper charging temperature range 10 C to 30 C 50 F to 86 F Cannot record images Check the free capacity of the internal memory or Memory Stick Duo media pages 29 32 If it is f...

Page 56: ...es containing images which were processed on a computer or images which were shot using other cameras The camera is in USB mode Delete the USB connection You may not be able to play back some images stored on the Memory Stick Duo media shot using other cameras Play such images in Folder View page 35 This is caused by copying images on your computer to the Memory Stick Duo media without using the P...

Page 57: ...ide Do not touch the camera with any of the above on your hand Do not leave the camera in contact with rubber or vinyl for a long time On operating temperatures Your camera is designed for use under the temperatures between 0 C and 40 C 32 F and 104 F Shooting in extremely cold or hot places that exceed this range is not recommended On moisture condensation If the camera is brought directly from a...

Page 58: ...AV out SD HD Component USB DC in Video output Audio output Monaural USB communication USB communication Hi Speed USB USB 2 0 compliant LCD screen LCD panel Wide 16 9 7 5 cm 3 0 type TFT drive Total number of dots 230 400 960 240 dots Power general Power Rechargeable battery pack NP BD1 3 6 V NP FD1 sold separately 3 6 V AC LS5K AC Adaptor sold separately 4 2 V Power consumption during shooting 1 0...

Page 59: ...demarks or trademarks of Microsoft Corporation in the United States and or other countries Macintosh and Mac OS are trademarks or registered trademarks of Apple Inc Intel MMX and Pentium are trademarks or registered trademarks of Intel Corporation Adobe and Reader are either trademarks or registered trademarks of Adobe Systems Incorporated in the United States and or other countries In addition sy...

Page 60: ...No la incinere ni la arroje al fuego No manipule baterías de iones de litio dañadas o con fugas Asegúrese de cargar la batería con un cargador de baterías original de Sony o con un dispositivo que pueda cargarla Mantenga la batería fuera del alcance de niños pequeños Mantenga la batería seca Sustitúyala únicamente por otra del mismo tipo o equivalente recomendada por Sony Deshágase de la baterías ...

Page 61: ...ismo interrumpen la transmisíon de datos fallo reinicie la aplicación o desconecte el cable de comunicación USB etc y vuelva a conectarlo Tratamiento de los equipos eléctricos y electrónicos al final de su vida útil aplicable en la Unión Europea y en países europeos con sistemas de recogida selectiva de residuos Este símbolo en el equipo o el embalaje indica que el presente producto no puede ser t...

Page 62: ...En el caso de productos que por razones de seguridad rendimiento o mantenimiento de datos sea necesaria una conexión permanente con la batería incorporada esta batería solo deberá ser reemplazada por personal técnico cualificado para ello Para asegurarse de que la batería será tratada correctamente entregue el producto al final de su vida útil en un punto de recogida para el reciclado de aparatos ...

Page 63: ...indicadores mínimos Toma fácil 18 Detección de sonrisas y toma automática Captador de sonrisas 19 Detección de las condiciones de la toma de imagen automáticamente Reconocimiento de escena 20 Toma de primeros planos Macro Enfoque de cerca 22 Utilización del autodisparador 23 Selección de un modo de flash 23 Cambio de la visualización en pantalla 24 Enfoque de un punto específico del cuadro 25 Enfo...

Page 64: ...n visualizada actualmente 35 Eliminación de múltiples imágenes 35 Eliminación de todas las imágenes Formatear 36 Conexión a otros dispositivos 37 Visionado de imágenes en un televisor 37 Impresión de imágenes fijas 37 Utilización de la cámara con un ordenador 39 Cambio de los ajustes de la cámara 43 Cambio de los sonidos de operación 43 Utilización de la pantalla HOME 43 Utilización de los element...

Page 65: ...ina 55 No agite ni golpee la cámara Podría ocasionar un mal funcionamiento y no poder grabar imágenes Además el soporte de grabación podría quedar inutilizable o dañarse los datos de imagen Limpie la superficie del flash antes de utilizarlo El calor de la emisión del flash podrá hacer que la suciedad en la superficie del flash se descolore o se adhiera en ella ocasionando una insuficiente emisión ...

Page 66: ... equipos puedan reproducir imágenes grabadas con la cámara Aviso sobre los derechos de autor Los programas de televisión películas cintas de vídeo y demás materiales pueden estar protegidos por copyright La grabación no autorizada de tales materiales puede ir en contra de los artículos de las leyes de copyright No hay compensación por daño del contenido o fallo de grabación Sony no compensará por ...

Page 67: ...a avanzada de Cyber shot Manual de instrucciones este manual 1 xUtilización de la correa de muñeca La Cámara se suministra con una correa para muñeca Coloque la correa y pase la mano a través del lazo para evitar que pueda caérsele la cámara y dañarse xUtilización del lápiz de pintar El lápiz de pintar se utiliza cuando se emplea el panel táctil Se coloca en la correa de muñeca No transporte la cá...

Page 68: ...LCD Panel táctil JBotón Reproducción KEnganche para la correa de muñeca Empuñadura LAltavoz MTapa de la batería Memory Stick Duo NRosca para trípode Utilice un trípode con un tornillo de menos de 5 5 mm de largo De lo contrario no podrá sujetar firmemente la cámara y es posible que la cámara se dañe OPalanca de expulsión de la batería PLámpara de acceso QRanura de Memory Stick Duo RRanura de inser...

Page 69: ...batería durante aproximadamente una hora más después de haberse apagado la lámpara CHARGE la carga durará un poco más carga completa Lámpara CHARGE Iluminada Cargando Apagada Ha finalizado la carga carga normal 3Cuando se haya completado la carga desconecte el cargador de batería Batería Lámpara CHARGE Para clientes en EE UU y Canadá Clavija Lámpara CHARGE Cable de alimentación Para clientes en pa...

Page 70: ...ría del cargador de batería Diseñada para ser utilizada con baterías y el cargador de batería de Sony compatibles xDuración de la batería y número de imágenes que se pueden grabar ver El método de medición está basado en el estándar CIPA CIPA Camera Imaging Products Association La duración de la batería y el número de imágenes fijas podrán variar dependiendo de los ajustes de la cámara Tiempo de c...

Page 71: ...orientado hacia el objetivo inserte el Memory Stick Duo hasta que produzca un chasquido al encajar en su sitio 3Inserte la batería Compruebe la dirección de la batería e insértela hasta que la palanca de expulsión de la batería quede bloqueada 4Cierre la tapa El cerrar la tapa con la batería insertada incorrectamente podrá dañar la cámara Palanca de expulsión de la batería ...

Page 72: ... memoria xPara extraer la batería xComprobación de la carga de batería restante En la parte superior izquierda de la pantalla LCD aparece un indicador de carga restante La aparición del indicador de carga restante correcto lleva aproximadamente un min minuto Es posible que el indicador de carga restante no sea correcto en ciertas circunstancias Si utiliza la batería NP FD1 se vende por separado ta...

Page 73: ...5 1Baje la tapa del objetivo La cámara se enciende También puede encender la cámara pulsando el botón ON OFF Alimentación Es posible que lleve algún tiempo en conectarse la alimentación y permitir realizar operaciones 2Toque el formato de visualización de fecha deseado después toque 3Toque cada elemento después toque v V para ajustar su valor numérico Medianoche se indica como 12 00 AM y mediodía ...

Page 74: ...slice hacia el lado W para volver 3Pulse el botón del disparador hasta la mitad para enfocar se visualiza para indicar que SteadyShot está funcionando Cuando la imagen está enfocada suena un pitido y se ilumina el indicador z La distancia de toma más corta es de aproximadamente 8 cm W 50 cm T desde el objetivo 4Pulse el botón del disparador a fondo Se toma la imagen Tapa del objetivo Palanca del z...

Page 75: ...cámara pulsando el botón ON OFF Alimentación 1Pulse el botón Reproducción Se visualiza la última imagen tomada Cuando imágenes del Memory Stick Duo grabadas con otras cámaras no puedan reproducirse en esta cámara vea las imágenes en Ver carpetas página 33 xSelección de la imagen siguiente anterior Toque Siguiente Anterior en la pantalla xEliminación de una imagen Toque Borrar después toque OK Botó...

Page 76: ...xto para mejorar la visibilidad xPara volver a la visualización normal Toque Modo Grabación t Ajuste automát inteligente t 1 Toque Modo Grabación t Toma fácil t Acción Cómo cambiar Autodisparador Autodisparador t Seleccione Autodisparador desac o Autodisparador 10 s segundo Tamaño imag t Seleccione Grande o Pequeño en Tamaño imag Flash t Seleccione Auto o Desactivar en Flash ...

Page 77: ...tón del disparador durante el Captador de sonrisas la cámara tomará la imagen después volverá al modo Captador de sonrisas Cuadro de Detección de cara Indicador de sensibilidad de detección de sonrisas zConsejos para capturar sonrisas mejor 1 No se cubra los ojos con flequillos 2 Intente orientar la cara enfrente de la cámara y estar lo más nivelado posible El porcentaje de detección será mayor cu...

Page 78: ...uando la cámara reconoce la escena aparece Crepúsculo Retrato crepúsculo Crepúsculo con trípode Contraluz Retrato a contraluz Paisaje Macro o Retrato Cuando la cámara no reconozca la escena aparecerá en la pantalla de la cámara 3 Pulse el botón del disparador hasta la mitad para enfocar y después pulse el botón del disparador a fondo para tomar la imagen Icono de Reconocimiento de escena ...

Page 79: ...ma automáticamente dos imágenes consecutivamente cuando reconoce Retrato La cámara seleccionará visualizará y grabará la imagen cuyos ojos no parpadean automáticamente Primera imagen Segunda imagen Tomada en Sinc lenta Toma aumentando la sensibilidad y reduciendo el movimiento Tomada en Sinc lenta con la cara que el flash destella como guía Toma aumentando la sensibilidad con la cara como guía y r...

Page 80: ... película o Captador de sonrisas 1 Toque Macro t modo deseado t Auto La cámara ajusta el enfoque automáticamente desde motivos distantes a primer plano Normalmente ponga la cámara en este modo Macro activado La cámara ajusta el enfoque con prioridad sobre motivos en primer plano Ajuste Macro activado cuando tome motivos cercanos Permitido enfocar de cerca Utilice este modo para tomar a distancias ...

Page 81: ...cluirse en la imagen Para cancelar toque Autodisparador 2 s segundo La toma se inicia tras un retardo de dos s segundo Esto es para evitar el desenfoque debido a la inestabilidad cuando se pulsa el botón del disparador 2 Pulse el botón del disparador La lámpara del autodisparador parpadea y suena un pitido hasta que se acciona el obturador 1 Toque Flash t modo deseado t Flash automático Destella c...

Page 82: ... e iconos Nota zAjustes de histograma y brillo Se puede acceder a los ajustes siguientes tocando Histograma Un histograma es un gráfico que muestra el brillo de una imagen El gráfico visualizado indicará una imagen brillante cuando se desvíe hacia el lado derecho y una imagen oscura cuando se desvíe hacia el lado izquierdo Brillo Esto establece el brillo de la luz de fondo Normal Brillo Cuando vea...

Page 83: ...el cuadro que quiere enfocar Puede cambiar el punto de enfoque cuantas veces lo desee antes de pulsar el botón del disparador hasta la mitad Si quiere que la cámara elija un punto de enfoque automáticamente toque 1 Toque t Detección de cara t modo deseado t Cuando se toca Detecta la cara cuando se toca un área de la pantalla donde hay una cara Auto Selecciona la cara que la cámara va a enfocar aut...

Page 84: ...mágenes Cuando imprima imágenes tomadas con relación de aspecto 16 9 es posible que ambos bordes sean recortados 1 t Tamaño imag t modo deseado t Nota Tamaño de imagen Guía de uso Pantalla LCD 4 000 3 000 Para copias hasta tamaño A3 Las imágenes se visualizan en relación de aspecto 4 3 ó 3 2 3 264 2 448 Para copias hasta tamaño A3 2 592 1 944 Para copias hasta tamaño A4 2 048 1 536 Para copias has...

Page 85: ...una imagen tomada con otras cámaras es posible que la imagen no aparezca en el tamaño de imagen real Capacidad Tamaño Memoria interna Memory Stick Duo formateado con esta cámara Aprox 11 MB 256 MB 512 MB 1 GB 2 GB 4 GB 8 GB 16 GB 12M 2 40 84 173 351 693 1 401 2 847 8M 2 56 118 242 493 972 1 963 3 991 5M 3 68 143 293 595 1 174 2 372 4 821 3M 7 144 301 617 1 253 2 472 4 991 10 140 VGA 70 1 383 2 897...

Page 86: ...c Paisaje Toma con el enfoque en un motivo distante Retrato crepúsculo Toma imágenes nítidas de gente en un lugar oscuro sin perder el ambiente nocturno Crepúsculo Toma escenas nocturnas sin perder el ambiente nocturno Gourmet Toma arreglos de comidas en deliciosos colores Playa Toma escenas de costas y riberas de lagos con el azul del agua capturado más vívidamente Nieve Toma escenas de nieve en ...

Page 87: ...ión 1 Toque Modo Grabación t Modo película t 2 Pulse el botón del disparador a fondo para iniciar la grabación 3 Pulse el botón del disparador a fondo otra vez para detener la grabación Botón Acción Control del volumen B Reproducción x Detener M m Avance rápido rebobinado rápido Tamaño de imagen de película Velocidad de bits promedio Guía de uso 1 280 720 Fina 9 Mbps Toma películas de calidad ópti...

Page 88: ...erdo con las circunstancias de la toma temperatura etc Los números de la tabla de arriba son válidos cuando Brillo de visualización en pantalla está ajustado a Normal Las películas con el tamaño ajustado a 1 280 720 solamente pueden ser grabadas en un Memory Stick PRO Duo Capacidad Tamaño Memoria interna Memory Stick Duo formateado con esta cámara Aprox 11 MB 256 MB 512 MB 1 GB 2 GB 4 GB 8 GB 16 G...

Page 89: ...doble del tamaño con el área que tocó en el centro Cuando está ajustado a Sólo imag toque el centro de la pantalla después toque el área que quiere ampliar 2 Ajuste la escala del zoom y la posición La escala del zoom aumenta cada vez que toca la pantalla Ajusta la posición Cambia la relación del zoom Activa desactiva Cancela el zoom de reproducción 1 Pulse el botón Reproducción para visualizar la ...

Page 90: ...ase de diapositivas Para finalizar el pase de diapositivas toque la pantalla y después toque Salir zSelección de la música de fondo Puede transferir un archivo de música deseado de sus CDs o archivos MP3 a la cámara para reproducirlo durante el pase de diapositivas Para transferir archivos de música instale el software Music Transfer suministrado en su ordenador página 40 después siga los pasos de...

Page 91: ...número de imágenes visualizadas en la pantalla de índice a 12 ó 20 imágenes 2 Toque para pasar las páginas Para volver a la pantalla de una sola imagen toque la imagen en miniatura 1 Pulse el botón Reproducción para visualizar una imagen después toque Índice de imágenes t Modo visualización t modo deseado Ver fecha Visualiza imágenes por la fecha Ver evento Analiza las fechas tomadas y la frecuenc...

Page 92: ...aras véalas en Ver carpetas Lista Fecha Visualiza una lista de las imágenes tomadas en la fecha seleccionada Lista de evento Visualiza una lista de las imágenes registradas en el evento seleccionado Seleccionar carpeta Toque OK para visualizar una lista de imágenes contenidas en la carpeta seleccionada Cuando está ajustado a Favoritos Puede visualizar imágenes registradas en Favoritos divididas en...

Page 93: ...a Carpeta t t OK Cuando se utiliza la memoria interna las imágenes se visualizan en Ver carpetas 1 Toque Borrar t OK página 17 1 Toque Índice de imágenes t Borrar 2 Seleccione imágenes para borrar 1 Toque para pasar las páginas después toque las imágenes que quiere eliminar Se pone la marca a las imágenes seleccionadas 2 Repita el paso 1 3 Toque t OK Puede cambiar entre una sola imagen y pantalla ...

Page 94: ... un Memory Stick Duo se eliminarán todos los datos almacenados en el Memory Stick Duo Si no hay insertado un Memory Stick Duo se eliminarán todos los datos almacenados en la memoria interna El formateo elimina permanentemente todos los datos incluidas las imágenes protegidas 1 Toque t Gestión de memoria t Herrta Memoria t t Formatear t 2 Toque OK Nota ...

Page 95: ...cte la cámara al televisor con el cable para terminal de usos múltiples suministrado Nota 1 Conecte la cámara a la impresora con el cable para terminal de usos múltiples suministrado 2 Encienda la impresora y pulse el botón Reproducción Después de hacer la conexión aparece el indicador Al conector múltiple A las tomas de entrada de audio vídeo Cable para terminal de usos múltiples zVisionado de im...

Page 96: ...emoria t Herrta Memoria t t Copiar t t OK Para más detalles consulte con el establecimiento de impresión de fotos zSuperposición de fechas en las imágenes Esta cámara no incluye una función para superponer una fecha en una imagen La razón de ello es para evitar que la fecha se duplique durante la impresión Impresión en un establecimiento Puede pedir que impriman las imágenes con la fecha superpues...

Page 97: ...o para disfrutar de las imágenes Para más detalles consulte la Guía de PMB página 41 PMB no es compatible con ordenadores Macintosh Nota Exportación a la cámara Exportación de imágenes a un Memory Stick Duo y visionado de las mismas Importación al ordenador Servicio multimedia Para colgar imágenes en el servicio multimedia Imprimir Impresión de imágenes con sellos de fecha CD DVD Creación de un di...

Page 98: ...s rápido Intel Core 2 Duo 1 20 GHz o más rápido Memoria 512 MB o más Para reproducir editar las películas de alta definición 1 GB o más Disco Duro Espacio requerido en disco para la instalación aproximadamente 500 MB Pantalla Resolución de pantalla 1 024 768 puntos o más Memoria de vídeo 32 MB o más Recomendado 64 MB o más 1 Las ediciones de 64 bits y Starter Edition no son compatibles 2 Starter E...

Page 99: ...s múltiples se vende por separado 1 Inserte una batería completamente cargada en la cámara después pulse el botón Reproducción 2 Conecte la cámara a su ordenador Aparecerá Conectando en la pantalla de la cámara Durante la sesión de comunicación se muestra en la pantalla No utilice el ordenador mientras esté visualizado el indicador Cuando el indicador cambia a puede comenzar a utilizar el ordenado...

Page 100: ...cintosh Entorno de ordenador recomendado Para un ordenador conectado a la cámara se recomienda el entorno siguiente Entorno recomendado para importar imágenes SO preinstalado Mac OS 9 1 9 2 Mac OS X v10 1 a v10 5 Toma USB Suministrada como estándar Entorno recomendado para utilizar Music Transfer SO preinstalado Mac OS X v10 3 a v10 5 Memoria 64 MB o más se recomiendan 128 MB o más Disco Duro Espa...

Page 101: ...presión de imágenes En la pantalla solamente se visualizan los elementos disponibles para cada modo x Toma de imagen 1 Toque t Ajustes t Ajustes principales t t Pitido t t modo deseado t Obturador Activa el sonido del obturador para cuando se pulsa el botón del disparador Alto Bajo Activa el sonido de pitido obturador para cuando se utiliza el panel táctil o se pulsa el botón del disparador Si qui...

Page 102: ...c música Cambia la música del pase de diapositivas Format músi Elimina toda la música del pase de diapositivas Elemento Descripción Imprimir Imprime imágenes fijas Elemento Descripción Herrta Memoria Her Memory Stick Formatear Formatea un Memory Stick Duo Crea CarpGrabación Crea una carpeta nueva en un Memory Stick Duo Camb Carp Grab Cambia la carpeta utilizada para grabar imágenes ElimCarpGrabaci...

Page 103: ...el modo de acuerdo con el sistema de salida de vídeo que se va a conectar TIPO TV Establece la relación de aspecto de un televisor que se va a conectar Conexión USB Establece el modo utilizado cuando se conecta la cámara a un ordenador o a una impresora Ajustes de toma Ajustes toma de imagen 1 Iluminador AF Destella la luz de relleno cuando se enfoca en poca luz Cuadrícula Visualiza líneas para aj...

Page 104: ...la exposición manualmente 2 0EV a 2 0EV ISO Selección de la sensibilidad ISO ISO AUTO ISO80 a ISO3200 Balance Blanco Ajusta los tonos de color en función de las condiciones de la luz ambiental Auto Luz diurna Nublado Luz fluorescente 1 Luz fluorescente 2 Luz fluorescente 3 n Incandescente Flash Balance Blanco submarino Ajusta los colores cuando se hacen tomas submarinas Auto Submarino 1 Submarino ...

Page 105: ...ha de reproducción Lista de evento Selecciona el grupo de evento que se va a reproducir Seleccionar carpeta Selecciona una carpeta para ver imágenes Modo visualización Cambia los modos de visualización Ver fecha Ver evento Favoritos Ver carpetas Filtro por caras Reproduce imágenes filtradas para reunir ciertas condiciones Desactivar Toda la gente Niños Bebés Sonrisas Diapositivas Reproduce imágene...

Page 106: ... a la imagen que quiere imprimir de un Memory Stick Duo Esta imagen Múltiples imágenes Ajusta todo de rango fecha Quita todo de rango fecha El texto visualizado varía de acuerdo con cada modo de visualización Imprimir Imprime imágenes utilizando una impresora compatible con PictBridge Esta imagen Múltiples imágenes Todas imágs de rango fecha El texto visualizado varía de acuerdo con cada modo de v...

Page 107: ...ados en modo Toma fácil Cuando se toman películas Cuando se reproduce A B Visualización Indicación Batería restante Aviso de poca batería Reconocimiento de escena Icono de Reconocimiento de escena Indicador de sensibilidad de detección de sonrisas Relación del zoom Modo de visualización Filtro por caras Exportación del PMB Favoritos Proteger Marca de orden de impresión DPOF Zoom de reproducción Vi...

Page 108: ...rchivo de gestión lleno Visualización Indicación Aviso de aumento de la temperatura VOL Volumen C 32 00 Visualización de autodiagnóstico Histograma aparece cuando la visualización del histograma está desactivada Visualización Indicación 35 37 32 N 139 44 31 E Visualización de latitud y longitud z Bloqueo AE AF Obturación lenta con reducción de ruido NR 125 Velocidad de obturación F3 5 Valor de abe...

Page 109: ...be com xPara usuarios de Windows xPara usuarios de Macintosh 1 Encienda su ordenador e inserte el CD ROM suministrado en la unidad de CD ROM 2 Haga clic en Cyber shot Handbook La Guía avanzada de Cyber shot que contiene información sobre accesorios para la cámara se instala al mismo tiempo 3 Inicie la Guía práctica de Cyber shot desde el acceso directo del escritorio 1 Encienda su ordenador e inse...

Page 110: ...la con una nueva Utilice una batería recomendada La alimentación se desconecta súbitamente Dependiendo de la temperatura de la cámara y de la batería es posible que la alimentación se desconecte automáticamente para proteger la cámara En este caso se visualizará un mensaje en la pantalla LCD antes de que se desconecte la alimentación Si no utiliza la cámara durante unos tres min minuto mientras es...

Page 111: ...egurándose de que está instalada correctamente Es posible que la temperatura no sea apropiada para cargar Intente cargar la batería otra vez dentro del rango de temperatura de carga apropiado 10 C to 30 C Resulta imposible grabar imágenes Compruebe la capacidad libre de la memoria interna o el Memory Stick Duo páginas 27 30 Si está llena realice uno de lo siguiente Borre imágenes no necesarias pág...

Page 112: ... en un ordenador o imágenes que hayan sido tomadas con otras cámaras La cámara está en el modo USB Elimine la conexión USB Es posible que no pueda reproducir algunas imágenes almacenadas en el Memory Stick Duo tomadas con otras cámaras Reproduzca tales imágenes en Ver carpetas página 33 Esto ocurre cuando se copian imágenes del ordenador al Memory Stick Duo sin utilizar el PMB Reproduzca tales imá...

Page 113: ...o insecticida No toque la cámara con nada de lo de arriba en su mano No deje la cámara en contacto con goma o vinilo durante largo tiempo Acerca de la temperatura de funcionamiento Su cámara está diseñada para ser utilizada a temperaturas de entre 0 C y 40 C No se recomienda tomar imágenes en lugares extremadamente fríos o calurosos que excedan esta gama Acerca de la condensación de humedad Si se ...

Page 114: ...D HD USB entrada de cc Salida de video Salida de audio Monofónica Conmunicación USB Conmunicación USB Hi Speed USB Cumple con USB 2 0 Pantalla LCD Panel LCD Panorámico 16 9 unidad TFT 7 5 cm tipo 3 0 Número total de puntos 230 400 960 240 puntos Alimentación general Alimentación Batería recargable NP BD1 3 6 V NP FD1 se vende por separado 3 6 V Adaptador de ca AC LS5K se vende por separado 4 2 V C...

Page 115: ... América y u otros países Macintosh y Mac OS son marcas comerciales o marcas comerciales registradas de Apple Inc Intel MMX y Pentium son marcas comerciales o marcas comerciales registradas de Intel Corporation Adobe y Reader son marcas comerciales o bien marcas comerciales registradas de Adobe Systems Incorporated en los Estados Unidos y u otros países Además los nombres de sistemas y productos u...

Page 116: ... utilizando tinta hecha con aceite vegetal exento de compuesto orgánico volátil COV Additional information on this product and answers to frequently asked questions can be found at our Customer Support Website En la página Web de atención al cliente puede encontrar información adicional sobre este producto y respuesta a las preguntas hechas con más frecuencia ...

Reviews: