background image


              11  


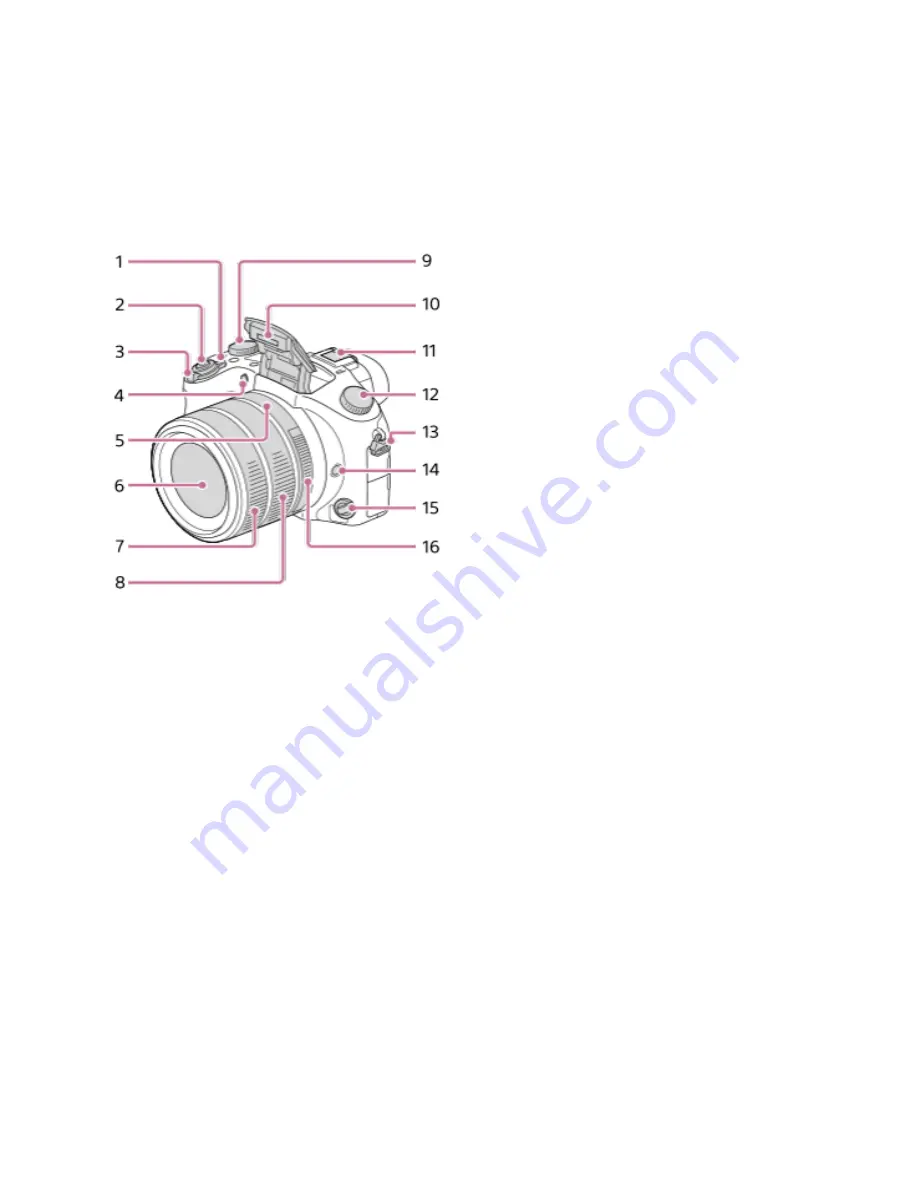
IDENTIFYING  PARTS  


1.  ON/OFF  (Power)  switch    

2.  Shutter  button    

3.  For  shooting:  W/T  (zoom)  lever  

For  viewing:  (Index)  

lever/Playback  zoom  lever    

4.  Self-­timer  lamp/AF  Illuminator    

5.  Aperture  index    

6.  Lens    

7.  Front  lens  ring    

8.  Rear  lens  ring    

9.  Exposure  compensation  dial    

10.  Flash    

11.  Multi  interface  shoe*    

12.  Mode  dial    

13.  Hook  for  shoulder  strap  

14.  Focus  hold  button    

15.  Focus  mode  dial    

16.  Aperture  ring


Summary of Contents for DSC RX10 M3

Page 1: ... SONY DSC RX10 M3 HIGH SPEED VIDEO MANUAL ...

Page 2: ...tifying Key Parts 3 Quick Start Instructions Getting Started 4 High Frame Rate Settings 5 SteadyShot Movie 6 Begin Filming 7 Movie Playback 8 Photo Capture 9 Customize Control Wheel 10 Identifying Parts 11 14 Glossary of Terms 15 17 Citations 18 ...

Page 3: ...s LED display and viewfinder Never point the camera towards the sun Always wear the camera strap around your neck when handling the camera Never overcharge the battery this may lead to deterioration in performance Battery is fully charged after approx 150 minutes ...

Page 4: ... 3 IDENTIFYING KEY PARTS The key parts needed to operate the camera are labeled below For more detailed part identification see Identifying Parts p 12 15 ...

Page 5: ...and the red mark on the lens head Align the red marks Reattach the lens hood turn clockwise until it clicks D Remove the lens cap and store it in a secure place e g camera case E Turn on the camera using the ON OFF Power switch F Set the Mode Dial to HFR High Frame Rate G Set Focus Mode Dial to MF Manual Focus H Set the Aperture Ring to f 8 recommended see Glossary of Terms ...

Page 6: ...s 480 fps recommended when filming most birds 960 fps recommended when filming hummingbirds c Priority Setting Quality Priority records 2 seconds recommended Shoot Time Priority records 4 seconds d REC Timing Start Trigger saves the 2 or 4 seconds of filming after the MOVIE button is pressed End Trigger saves the 2 or 4 seconds of filming captured before the MOVIE button is pressed recommended The...

Page 7: ...ize shaking that may occur during filming activate Steadyshot by pressing MENU and use the control wheel to go to Camera Settings folder B Go to folder No 8 and scroll down to SteadyShot Set to Standard See SteadyShot MOVIE in Glossary of Terms ...

Page 8: ...oom in out Note You will have to adjust the focus each time you change the zoom E Once you are ready to begin shooting press the center button of the control dial to enter Standby STBY mode STBY should appear in green on the LED display NOTE All settings are locked in STBY mode so be sure the zoom and focus settings are adjusted to their desired settings before entering this mode To exit STBY mode...

Page 9: ... 8 MOVIE PLAYBACK A Press the playback button to switch to playback mode B Use the control dial to select the desired movie and press to play the movie C Press the to return to MOVIE mode ...

Page 10: ...go to the Playback folder then to No 3 and select Photo Capture C The LED display illustrates the functions of the control wheel Play the movie and pause it at the desired scene D Once the scene has been located press the down button on the control wheel to save the scene as a still image E Exit the playback folder by selecting MENU ...

Page 11: ... Custom Settings folder then to folder No 5 B Scroll down to Custom Key Shoot C In this setting you may assign functions to the Left Button Right Button and Down Button of the control wheel It is recommend to assign functions that are utilized often e g Frame Rate ...

Page 12: ...or viewing Index lever Playback zoom lever 4 Self timer lamp AF Illuminator 5 Aperture index 6 Lens 7 Front lens ring 8 Rear lens ring 9 Exposure compensation dial 10 Flash 11 Multi interface shoe 12 Mode dial 13 Hook for shoulder strap 14 Focus hold button 15 Focus mode dial 16 Aperture ring ...

Page 13: ... 4 Diopter adjustment dial 5 MOVIE Movie button 6 Flash pop up button 7 Display panel illumination button 8 Display panel 9 C2 button Custom Button 2 10 C1 button Custom Button 1 11 Hook for shoulder strap 12 Memory card slot 13 Memory card cover 14 Access lamp ...

Page 14: ...ayback button 1 MENU button 2 Speaker 3 Microphone jack When an external microphone is connected this product switches from the internal microphone to the external microphone If the external microphone is a plug inpower type the power of the microphone is supplied by this product 4 Headphones jack 5 Multi Micro USB Terminal Supports Micro USB compatible device 6 HDMI micro jack 7 Charge lamp 8 Mon...

Page 15: ...N mark Touch the mark when you connect the camera to a smartphone equipped with the NFC function NFC Near Field Communication is an international standard of the short range wireless communication technology 4 Battery lock lever 5 Battery insertion slot 6 Connection plate cover Use this when using an AC PW20 AC Adaptor 7 Battery cover 8 Tripod socket hole ...

Page 16: ...more the light that passes through The larger the f stop the smaller the diaphragm the less the light that passes through For high speed videos it is recommended that the aperture value be set to F8 Diopter Adjustment Dial Adjusting the diopter level allows you to obtain the correct focus in the viewfinder 20 20 vision requires no adjustment thus set the diopter level to 0 by turning the dial as f...

Page 17: ...t is motionless C Continuous Shot AF The camera continues to focus while the shutter button is pressed and held halfway down Use this mode when the subject is in motion DMF Direct Manual Focus After focusing automatically make fine focus adjustment manually Direct Manual Focus MF Manual Focus Adjusts the focus manually ISO Sensitivity to light is expressed by the ISO number ranging between ISO 64 ...

Page 18: ...er 8 times slower 16 times slower SteadyShot MOVIE Stabilizes shaking which may occur during filming Intelligent Active Provides a more powerful steadyshot than Active Active Provides a powerful steadyshot effect Standard Reduces camera shake under stable movie shooting conditions Off Does not use feature Timing of Recording In the diagram below A represents the timing of when the MOVIE button is ...

Page 19: ...C RX10M3 User manual n d Retrieved July 27 2016 from https docs sony com release Help_459027211 pdf Understanding Maximum Aperture n d Retrieved July 29 2016 from http www nikonusa com en learn and explore article g3cu6o1r understanding maximum aperture html ...

Reviews: