background image

10 

GB

Before operation

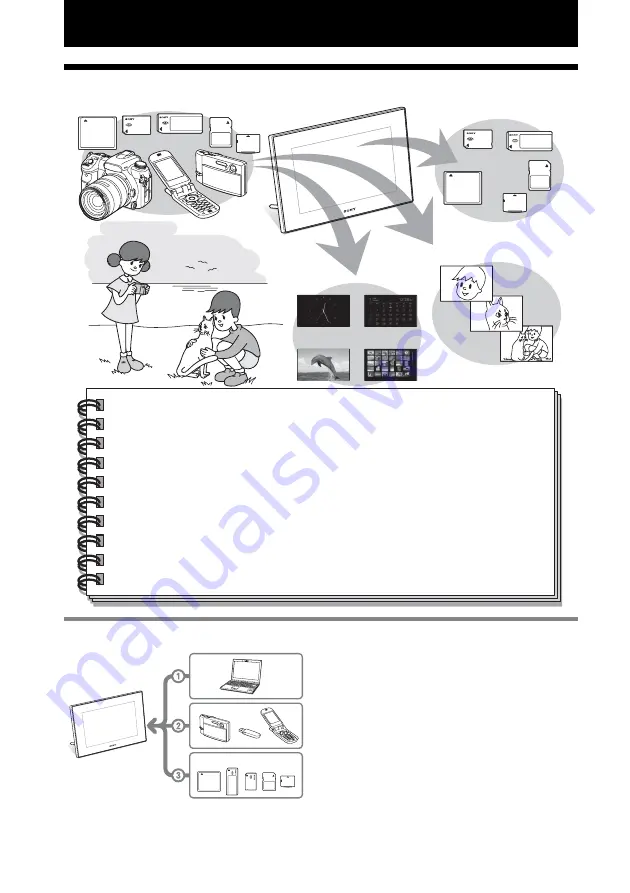
Enjoy your photo frame in various ways

Input to the photo frame

As shown on the left, the photo frame gives 
priority in order of computer, external device, 
and memory card if computer and memory 
cards are connected/inserted to the photo 
frame. If multiple memory cards are inserted, 
the images of the memory card you inserted 
first are displayed.

Easy display of images in a memory card or external device such as 
a digital camera

Various display functions

In addition to slideshows, you can enjoy various display modes easily including the 
single image, index, clock, and calendar modes. (

.

page 22)

Adding important images to an album (saving to the internal memory)

Images added to the album are saved in the internal memory. You can also export 
these images to a memory card or external device.

Summary of Contents for DPF-V900 - Digital Photo Frame

Page 1: ...nformation Operating Instructions Before operating this unit please read this manual thoroughly and retain it for future reference Owner s Record The model and serial numbers are located at the rear Record the serial number in the space provided below Refer to these numbers whenever you call upon your Sony dealer regarding this product Model No DPF V900 V700 Serial No ________________________ ...

Page 2: ...erate from battery power or other sources refer to the operating instructions Polarization This set may be equipped with a polarized ac power cord plug a plug having one blade wider than the other This plug will fit into the power outlet only one way This is a safety feature If you are unable to insert the plug fully into the outlet try reversing the plug If the plug should still fail to fit conta...

Page 3: ... from the wall outlet and disconnect the antenna or cable system This will prevent damage to the set due to lightning and power line surges Service Damage Requiring Service Unplug the set from the wall outlet and refer servicing to qualified service personnel under the following conditions When the power cord or plug is damaged or frayed If liquid has been spilled or objects have fallen into the s...

Page 4: ...ch can be determined by turning the equipment off and on the user is encouraged to try to correct the interference by one or more of the following measures Reorient or relocate the receiving antenna Increase the separation between the equipment and receiver Connect the equipment into an outlet on a circuit different from that to which the receiver is connected Consult the dealer or an experienced ...

Page 5: ...re that the battery will be treated properly hand over the product at end of life to the applicable collection point for the recycling of electrical and electronic equipment For all other batteries please view the section on how to remove the battery from the product safely Hand the battery over to the applicable collection point for the recycling of waste batteries For more detailed information a...

Page 6: ...in the United States and or other countries Macintosh and Mac OS are registered trademarks of Apple Inc in the United States and or other countries Intel and Pentium are the registered trademarks or trademarks of Intel Corporation CompactFlash is a trademark of SanDisk Corporation in the U S A or xD Picture Card is a trademark of FUJIFILM Corporation is a trademark of FotoNation Inc in the U S A i...

Page 7: ...terms and conditions please return this disk envelope unopened along with the rest of the package immediately to the dealer where you obtained it Sony Corporation reserves the right to make any modification to this manual or the information contained herein at any time without notice The software described herein may also be governed by the terms of a separate user license agreement Any design dat...

Page 8: ...and position 28 Enlarging an image 28 Rotating an image 28 Adding to the internal memory 29 Exporting an image 31 Deleting an image 32 Changing the various settings 33 Setting procedure 33 Items to set 34 Connecting to a high definition TV to view images 36 Connecting to a high definition TV 36 Using an external device Using a Bluetooth device 38 Transferring images from an external device 38 Conn...

Page 9: ...9 GB About the memory cards 48 Memory Stick 48 SD memory card 49 xD Picture Card 50 CompactFlash card 50 Notes on using a memory card 50 Specifications 51 Index 53 ...

Page 10: ... the images of the memory card you inserted first are displayed Easy display of images in a memory card or external device such as a digital camera Various display functions In addition to slideshows you can enjoy various display modes easily including the single image index clock and calendar modes page 22 Adding important images to an album saving to the internal memory Images added to the album...

Page 11: ...an also save images in the album to a computer as a backup Images can also be exchanged with a memory card USB memory etc and copied from a Bluetooth compatible device Enjoying images on a large TV screen If you connect the photo frame to a TV with an HDMI cable you can enjoy slideshows and single image display on a large screen ...

Page 12: ...mory on a large screen xVarious modes The displayed image can be switched automatically as though you are turning the pages of an album yourself You can select from various modes including just images clock and calendar view You can also change playback settings such as the display order xVarious display functions You can enjoy various view modes such as displaying an analog clock digital clock or...

Page 13: ...n some regions the warranty is not supplied Identifying the parts For details see the pages indicated in the parentheses The illustrations are of the DPF V900 The locations and names of buttons and connectors of the DPF V700 are identical to those of the DPF V900 although the LCD screen size is different Front A LCD screen B Remote sensor When using the supplied remote control point it at this sen...

Page 14: ... to view images on a high definition TV D DC IN 8 4 V jack page 17 Insert the plug of the supplied AC adaptor to this jack and connect the AC power cord to the AC adaptor and the wall outlet E Stand page 18 F VIEW MODE button G Access lamp page 20 H Memory Stick PRO Standard Duo slot page 20 I CompactFlash card Microdrive slot page 20 J 1 on standby button standby indicator K MENU button Displays ...

Page 15: ...C slideshow button D MENU button E BACK button F 1 on standby button G add to album button H zoom in zoom out buttons I index button This button switches from the image preview screen to index view screen J Direction B b v V buttons K enter button L rotation button page 28 ...

Page 16: ...ttery holder While pressing in the tab of the battery holder pull out the battery holder 2 Remove the old battery from the battery holder and then insert a new battery Insert the battery so that is facing upwards 3 Reinsert the battery holder into the remote control Notes When the lithium battery becomes weak the operating distance of the Remote conrol may shorten or the Remote control may not fun...

Page 17: ...n operation is performed differently with the remote control and buttons on photo frame it will be explained in a tip Connecting to the AC power source 1 Insert the plug of the AC adaptor into the DC IN 8 4 V jack on the rear of the photo frame 2 Connect the AC power cord to the AC adaptor and the wall outlet Notes A socket outlet should be as close as possible to unit and easily accessible Do not...

Page 18: ...e stand Set the photo frame with opening the stand as below Setting to portrait or landscape orientation You can set the photo frame to portrait or landscape orientation by rotating it without moving the stand When the photo frame is placed in the portrait orientation the image is also automatically rotated to its proper orientation Notes Close the stand when you carry the photo frame Check whethe...

Page 19: ...e needs to be adjusted in order to display an accurate time in the clock and calendar view modes When you power on the first time after purchase demo mode will automatically start During demo mode you cannot set up clock Please insert memory card with valid picture data which will disable demo mode After disabling demo mode you can start clock setting 1 Press MENU on the remote control The menu sc...

Page 20: ...ng images This section describes inserting a memory card and general operations for displaying images in a slideshow Insert a memory card firmly into the corresponding slot with its label side facing toward you when taking your position on the rear side of the photo frame For details on the memory cards you can use with this photo frame see pages 48 to 50 Insert a memory card firmly into the corre...

Page 21: ...splayed specify it in the Select device menu page 28 The photo frame displays the images of the memory card in the following priorities If a device is connected to the USB A connector of the photo frame the images in the connected device always take priority and are displayed To display the images in the memory card first disconnect the device from the USB A connector or change the setting in the ...

Page 22: ...nal memory demonstration mode starts automatically Demonstration mode ends if a memory card is inserted The display mode stays unchanged once you turn the photo frame off and on again Displaying images Slideshow display page 23 You can press the buttons on the remote control to switch the display Index image display page 25 Single image display page 24 Clock display page 25 Tips ...

Page 23: ...ou can set the interval on the single view and calendar view mode in the Slideshow Settings menu page 34 On the single view mode you can also set the effect and order in this menu Single view mode Images are displayed in a single screen one after another with the effect selected in the Slideshow Settings menu Multiple image mode Displays multiple images at same time Clock view mode Displays images...

Page 24: ...ion mode with Display Mode in the Various settings menu page 34 Not all images are able to be Fit to screen Entire image mode Displays an entire image in the screen You can switch the images to display by pressing B b Fit to screen mode Displays an image over the whole screen You can switch the images to display by pressing B b Image information mode Displays image information such as the image nu...

Page 25: ... VIEW MODE to switch the modes of the index image display Small thumbnail mode Displays a list of small thumbnails 5 rows 6 columns You can select an image by pressing B b v V Large thumbnail mode Displays a list of large thumbnails 3 rows 4 columns You can select an image by pressing B b v V Notes In the index image display images will not be automatically rotated when the photo frame is set to t...

Page 26: ...e and time on digital clock Calendar mode Displays a calendar for the current month You can press v V to display a calendar for the previous or next month You can also set the first day of the week for the calendar in the Date time settings menu Tip There are black and white background types for each of analogue clock digital clock and calendar mode ...

Page 27: ...t and the corrected image appears on the right 4 Press v V to select Save and then press The corrected image is saved as a new image To return to the original image image before correction Select Cancel and then press Tips The original image is the same as it was before correction The corrected image is saved in the same device as the image before correction To perform this operation from the phot...

Page 28: ...want to display and then press ENTER Adjusting the image size and position 1 To enlarge an image press zoom in on the remote control To reduce an enlarged image press zoom out Each press of the button enlarges the image further You can enlarge an image to maximum 5 times the original scale You can move an enlarged image up down left and right Notes Enlarging an image may reduce the quality dependi...

Page 29: ... photo frame press MENU press the direction buttons to select the item and then press ENTER Adding to the internal memory You can use the photo frame as the digital album with saving important images in the internal memory Tip In Image file size of the menu you can preset whether to optimize the size of images or save images as is without compressing them when you save them to the internal memory ...

Page 30: ...e currently displayed as index view If you select This image or All images go to step 4 to complete adding the image to the internal memory You cannot select This image on the slideshow display 3 If you selected Selected images choose the image you want to add 1Press B b v V to select the image to add to the album and then press Check mark will be placed on each selected image Repeat this operatio...

Page 31: ...ow display 4 If you selected Selected images specify the image to export 1Press B b v V to select the image you want to export and then press Check mark will be placed on each selected image Repeat this operation to export multiple images at the same time To cancel the selection select images to cancel and then press to delete check mark 2Press MENU The screen for selecting the device to which to ...

Page 32: ... 5 to confirm the operation 4 If you selected Selected images specify the image to delete 1Press B b v V to select the image to delete and then press Check mark will be placed on each selected image Repeat this operation to delete multiple images at the same time To cancel the selection select images to cancel and then press to delete check mark 2Press MENU The delete confirmation screen is displa...

Page 33: ...nge and then press This enables you to set each of the items page 34 Note When the photo frame is for instance displaying a slideshow some items are unavailable for changing the settings They are displayed in gray and cannot be selected 5 Press v V to select a setting value and then press Each time you press v V v V from the photo frame the setting value changes In the case of a numerical value pr...

Page 34: ... Uses the above five effects randomly Order Shoot Date Displays images in the order of shooting date Note When the number of images exceeds 1 500 the images cannot be displayed by date The images are listed in the order of their file names Random Displays images randomly Screen Settings LCD backlight Allows you to set the brightness of the backlight of the LCD screen to a level from 1 to 10 Bright...

Page 35: ...ol functions such as switching the TV s input automatically to its video mode so that the images are displayed and operating the photo frame with the TV s remote control Sony logo ON OFF You can set whether the photo frame s Sony logo lights or not Date time settings Sets the date time first day of a week etc page 19 Language setting Sets the display language on the LCD screen Japanese English Fre...

Page 36: ...g Use an HDMI cable with the HDMI logo 3 Connect the HDMI OUT connector A type connector of the photo frame and the HDMI input connector of the TV 4 Press 1 on standby on the photo frame to turn on the power 5 Change the input of the TV If the connected TV is compatible with HDMI control the TV turns on automatically when you turn on the photo frame Also the input of the TV is changed automaticall...

Page 37: ...e display and the slideshow display Note With the TV remote control you cannot do the following operation Changing the VIEW MODE Setting the MENU function Zooming in Zooming out On control for HDMI When the Control for HDMI is set to ON you can use the following operations Turning off the photo frame power together with the television After the photo frame is connected to the TV you can switch the...

Page 38: ...images Notes Compatibility with all external devices is not guaranteed If an external device is connected to the USB A connector on the photo frame the photo frame cannot read the images in card media Disconnect an external device if you need 1 Connect the photo frame to the AC power source page 17 2 Set the digital camera or external device to mass storage connection mode The setting and operatio...

Page 39: ... must satisfy the following recommended system requirements x Windows Recommended OS Microsoft Windows Vista Windows XP Service Pack 2 or Windows 2000 Professional Service Pack 4 pre installed at the time of shipment from the factory Port USB port x Macintosh Recommended OS Mac OS X 10 4 or later pre installed at the time of shipment from the factory Port USB port Notes If multiple USB devices are...

Page 40: ...ess 1 on standby on the photo frame to turn on the power 4 Exchange images with the internal memory of the photo frame by performing operations from the computer Note When images of the computer are saved to the internal memory of the photo frame the image files are saved without being compressed As a result fewer images may be able to be saved to the internal memory of the photo frame Connecting ...

Page 41: ...rotected image To delete a protected file cancel the protection on your digital camera Media is protected Remove protection then try again The memory card is write protected Slide the write protect switch to the enable position page 49 The Memory Stick is full The CompactFlash card is full The SD Memory Card is full The xD Picture Card is full The External Device is full No more data can be saved ...

Page 42: ... image file is not supported by the photo frame Cannot open the image No more USB hubs can be connected Connect the device directly to the photo frame or use a device without a built in USB hub Incompatible USB device Check device s USB settings Connect the device with support for mass storage If USB setting of your device is incorrect set the mass storage mode in USB setting Error message Meaning...

Page 43: ...properly c Insert the power plug properly Symptom Check item Cause Solutions No images are displayed on the screen Is a memory card inserted or an external device connected properly c Insert a memory card or connect an external device properly pages 20 38 Does the memory card contain images saved with a digital camera or other device Are images stored on the external device c Insert a memory card ...

Page 44: ...ft is displayed again the image cannot be displayed because the image file is not supported by the photo frame Does the mark displayed below appear in the index view c If the mark shown on the left is displayed the image file is supported by the photo frame but the thumbnail data or image itself cannot be opened Select the mark and press If the mark shown on the left is displayed again the image c...

Page 45: ...se Solutions Cannot save an image Is the memory card write protected c Cancel write protection and try saving again Is the write protect switch of the memory card in the LOCK position c Slide the write protect switch to the enable position page 49 Is the memory card full c Replace the memory card with one with sufficient free space Or delete any unnecessary images page 32 Is the internal memory fu...

Page 46: ...om the error turn the power of the photo frame off and then back on Images are not displayed on the TV screen or LCD screen The input of the TV is set to the external input c Even if the input of the TV is not set to the photo frame images may sometimes not be displayed on the TV screen or LCD screen if an HDMI cable is connected c Change the input of the TV to the photo frame or disconnect the HD...

Page 47: ...the AC adaptor Be sure to use the AC adaptor supplied with the photo frame Do not use other AC adaptors as this may cause a malfunction Do not use the supplied AC adaptor for other devices Do not use an electrical transformer travel converter as this may cause overheating or a malfunction In case the cord of the AC adaptor is damaged do not use it any longer as this may be dangerous On moisture co...

Page 48: ... with both standard size and Duo size media Without a Memory Stick Duo adaptor you can use both a standard size Memory Stick and the compact size Memory Stick Duo 3 When using a Memory Stick Micro with the photo frame always insert it into an M2 adaptor 4 M2 is an abbreviation for Memory Stick Micro In this section M2 is used to describe Memory Stick Micro 5 Data reading recording that requires Ma...

Page 49: ...ry Stick all the data including protected image files will be erased To avoid erasing important data by accident make sure to check the contents of the Memory Stick before formatting You cannot record edit or delete data if you slide the write protect switch to LOCK Do not attach any other material than the supplied label on the labelling position When you attach the supplied label be sure to atta...

Page 50: ... adaptor you use for how to install the card and adaptor When using the CompactFlash card adaptor the write protected card may not work properly When using a card make sure to check the correct insertion direction of the card and the correct insertion slot When inserting the memory card it will only insert the portion of the way so do not try to force it as this could damage the memory card and or...

Page 51: ...t Compatible image file formats JPEG DCF 2 0 compatible Exif 2 21 compatible JFIF 1 TIFF Exif 2 21 compatible BMP 1 4 8 16 24 32 bit Windows format RAW preview only 2 SRF SR2 ARW 2 0 or lower version Some image file formats are not compatible Maximum number of pixels that can be displayed 8 000 H 6 000 V pixels File system FAT12 16 32 sector size of 2 048 bytes or smaller Image file name DCF forma...

Page 52: ...he label of AC adaptor for more details Design and specifications are subject to change without notice 1 Baseline JPEG with 4 4 4 4 2 2 or 4 2 0 format 2 RAW files are displayed as thumbnail preview 3 The capacity is calculated as 1 MB is equivalent to 1 000 000 bytes The actual capacity is reduced as files for management and applications are included Approx 400 MB can be used for your actual oper...

Page 53: ...5 Inserting a memory card 20 L Language setting 35 M Mass storage compatible devices 38 Memory cards 48 CompactFlash card 50 Memory Stick 48 Notes on use 50 SD memory card 49 xD Picture Card 50 P Placing in portrait or landscape orientation 18 Playback device 28 Precautions 47 R Remote control 16 Replacing the battery of the remote control 16 Reset 35 Rotating an image 28 S Screen Settings 34 Sett...

Page 54: ......

Page 55: ......

Page 56: ...Sony Corporation Printed in China Printed using VOC Volatile Organic Compound free vegetable oil based ink ...

Reviews: