background image

24 

GB

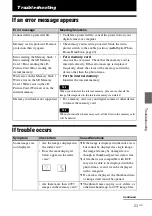
Some images are 
not displayed.

• Did you rename the file with 

a computer or other device?

c

If you named or renamed the file on your 
computer and the file name includes 
characters other than alphanumeric 
characters, the image may not be able to 
be displayed on the photo frame.

• Is there a folder with more 

than 5 levels in its hierarchy 
on the memory card?

c

The photo frame cannot display images 
saved in a folder that is more than 5 levels 
deep.

Cannot save an 
image.

• Did you save images from a 

computer to the internal 
memory without making a 
folder in the internal 
memory?

c

If you do not make a folder, you can only 
save up to 512 images. In addition, the 
number of images may be reduced 
depending on the file name length or 
character type. When you save images in 
the internal memory from a computer, be 
sure to make a folder in the internal 
memory and save the images in this 
folder.

Cannot delete an 
image.

• Is the memory card write-

protected? Or is the write-
protect switch locked?

c

Use the device you are using to cancel 
write-protection and try deleting again.

c

Slide the write-protect switch to the 
enable position.

• Is this image protected?

c

Check the image information from the 
single view mode. (

.

page 17)

c

An image with a 

 mark is set to “Read 

Only”. You cannot delete it on the photo 
frame.

Nothing happens 
even if you operate 
the photo frame.

c

Turn off and then on the power. 
(

.

page 12)

Nothing happens 
even if you operate 
the remote control.

• Is the battery inserted in the 

remote control properly?

c

Replace the battery. (

.

Digital Photo 

Frame Handbook, page 9)

c

Insert a battery in the proper orientation. 
(

.

Digital Photo Frame Handbook, 

page 9)

c

Point the top end of the remote control 
towards the remote sensor on the photo 
frame.

c

Remove any obstruction between the 
remote control and the remote sensor.

• Is there a protective sheet 

inserted?

c

Remove the protective sheet. 
(

.

page 10)

Symptom

Check item

Cause/Solutions
Summary of Contents for DPF-A73/E73

Page 1: ..._GB 01GB DPFA73 E73 UC CED_IM 010COV fm Master Right DPF A73 E73 4 174 749 11 2 Operating Instructions Before operating this unit please read this manual thoroughly and retain it for future reference Owner s Record The model and serial numbers are located at the rear Record the serial number in the space provided below Refer to these numbers whenever you call upon your Sony dealer regarding this p...

Page 2: ...a Increase the separation between the equipment and receiver Connect the equipment into an outlet on a circuit different from that to which the receiver is connected Consult the dealer or an experienced radio TV technician for help If you have any questions about this product you may call Sony Customer Information Services Center 1 800 222 SONY 7669 The number below is for the FCC related matters ...

Page 3: ...ead By ensuring these batteries are disposed of correctly you will help prevent potentially negative consequences for the environment and human health which could otherwise be caused by inappropriate waste handling of the battery The recycling of the materials will help to conserve natural resources In case of products that for safety performance or data integrity reasons require a permanent conne...

Page 4: ...ht holders for the materials to be duplicated use of those materials beyond this limit may infringe the provisions of the copyright law and be subject to the copyright holders claim for damages When using photo images with this digital photo frame pay special attention not to infringe the provisions of the copyright law Any unauthorized use or modification of other s portrait may also infringe the...

Page 5: ...oto frame on 12 Operations in an initial state 13 Setting the current time 14 Let s view an image Inserting a memory card 15 Changing the display 16 About the information displayed on the LCD screen 17 Try using various functions Various functions 18 Specifying the playback device 19 Adjusting image size and orientation Zoom in Zoom out Rotate 19 Changing the settings of the auto power on off func...

Page 6: ...n error message appears 23 If trouble occurs 23 Additional information Precautions 25 Installation 25 Cleaning 25 Restrictions on duplication 25 Disposing of the photo frame 25 Specifications 26 On trademarks and copyrights 27 ...

Page 7: ...e 12 Exchangeable panels DPF E73 only Operating Instructions this manual 1 CD ROM Digital Photo Frame Handbook 1 Warranty 1 In some regions the warranty is not supplied The supplied CD ROM contains the Digital Photo Frame Handbook that explains operations and setups of the digital photo frame in detail To view the handbook insert the CD ROM into the computer and double click the Handbook icon To d...

Page 8: ... Remote sensor Sony logo DPF A73 only page 10 VIEW MODE button page 16 1 on standby button Standby indicator MENU button Direction B b v V buttons ENTER button BACK button Access lamp Memory card slot page 15 Holes for hanging unit on the wall Space for storing the stand ...

Page 9: ...ons 1 on standby button SINGLE button INDEX button Zoom in button Direction B b v V buttons ENTER button Zoom out button IMPORT button DELETE button About descriptions in this manual The operations described in this manual are based on remote control operation When an operation is performed differently for example with the remote control and the buttons on the photo frame it will be explained in a...

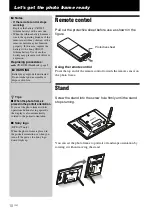
Page 10: ...battery becomes weak the operating distance of the remote control may shorten or the remote control may not function properly In this case replace the battery with a Sony CR2025 lithium battery Use of another battery may present a risk of fire or explosion Replacing procedures CD ROM Handbook page 9 z Tips x When the photo frame is placed in the portrait orientation If you set the photo frame with...

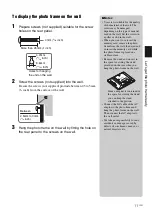
Page 11: ...e wall The screws may be damaged depending on the type of material used in the wall Set the screws in a pillar or stud in the wall When you want to re insert the memory card remove the photo frame from the wall then eject and re insert the memory card while the photo frame is placed on a stable surface Remove the stand and store it in the space for storing the stand provided on the rear when you h...

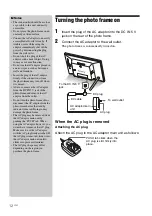
Page 12: ...e wall outlet Do not short the plug of the AC adaptor with a metal object Doing so may cause a malfunction Do not use the AC adaptor placed in a narrow space such as between a wall and furniture Insert the plug of the AC adaptor firmly if the connection is loose the photo frame may turn off when it is moved After use remove the AC adaptor from the DC IN 5 V jack of the photo frame and remove the A...

Page 13: ...s illustrated and remove it from the wall outlet Do not use a tool Be careful not to touch the metal terminals at the rear of the AC plug Check to see if there is no trouble with the AC adaptor main unit and AC plug and then slide the AC plug into the AC adaptor main unit until it clicks into place If there is any problem with the AC adaptor main unit or AC plug consult with your Sony service faci...

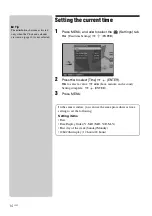
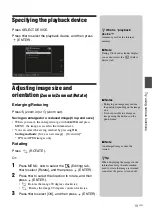
Page 14: ...inute and second Setting complete ENTER 3 Press MENU In the same window you can use the same procedures as time setting to set the following Setting items Date Date Display Order Y M D M D Y D M Y First day of the week Sunday Monday 12hr 24hr display 12 hours 24 hours P Tip The B b buttons become activated only when the Clock and calendar view mode page 16 is not selected ...

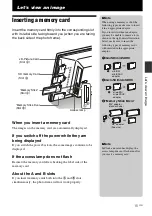
Page 15: ...u insert memory cards both into the A and B slots simultaneously the photo frame will not work properly Access lamp xD Picture Card Slot A SD memory Card Slot A Memory Stick Slot A Memory Stick Duo Slot B PNote When using a memory card of the following types make sure to insert it in an appropriate adaptor If you insert it without an adaptor you may be unable to remove it As shown in the right mos...

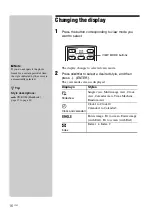
Page 16: ...show Single view Multi image view Clock view Calendar view Time Machine Random view Clock and calendarr Clock1 to Clock10 Calendar1 to Calendar3 Entire image Fit to screen Entire image with Exif Fit to screen with Exif Index Index 1 to Index 2 VIEW MODE buttons PNote If you do not operate the photo frame for a certain period of time the style indicated by the cursor is automatically selected z Tip...

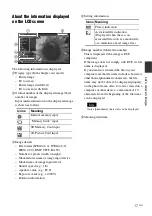
Page 17: ... 4Setting information 5Image number folder file number This is displayed if the image is DCF compliant If the image does not comply with DCF its file name is displayed If you named or renamed the file on your computer and the file name includes characters other than alphanumeric characters the file name may not be able to be displayed properly on the photo frame Also for a file created on a comput...

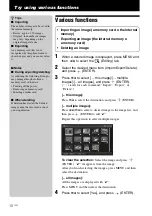
Page 18: ...lear the selection Select the image and press ENTER disappears from the image After you finish selecting the images press MENU and then select the destination all images All the images are displayed with Press MENU and then select the destination 4 Press v V to select Yes and press ENTER z Tips x Importing The number of images to be saved in the internal memory Resize approx 250 images Original th...

Page 19: ...ENU B b to select the Editing tab v V to select Rotate and then press ENTER 2 Press v V to select the direction to rotate and then press ENTER Rotates the image 90 degrees clockwise Rotates the image 90 degrees counterclockwise 3 Press v V to select OK and then press ENTER z What is playback device A memory card or the internal memory P Note During Clock and calendar display you cannot select the ...

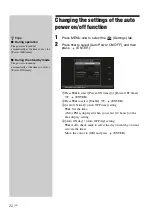
Page 20: ...time Auto OFF time setting v V Set the time AM or PM is displayed when you select 12 hours on the time display setting 4 Auto ON day Auto OFF day setting v V Add a check mark to select the day on which you want activate the timer Move the cursor to OK and press ENTER z Tips x During operation The power is turned off automatically at the time you set for Power OFF timer x During the standby mode Th...

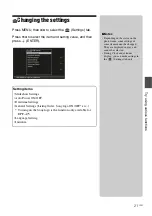
Page 21: ...o Power ON OFF Date time Settings General Settings Listing Order Sony logo ON OFF etc Turning on the Sony logo is the function only available for DPF A73 Language Setting Initialize PNotes Depending on the status on the photo frame some settings of some items cannot be changed They are displayed in gray and cannot be selected During Clock and calendar display you can make settings in the Settings ...

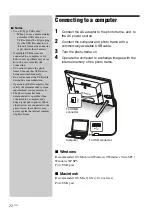
Page 22: ...rcially available USB cable use a USB cable with a B type plug for the USB B connector of this unit frame side connector type shorter than 3 meters If multiple USB devices are connected to a computer or if a hub is used a problem may occur In such a case simplify the connection You cannot operate the photo frame from another USB device being used simultaneously Do not disconnect the USB cable duri...

Page 23: ...image files imported to the internal memory are deleted Write error on the Memory Stick Write error on the SD Memory Card Write error on the xD Picture Card Write error on the internal memory Memory card format not supported For a memory card use your digital camera or other device to format the memory card Note When you initialize the memory card all the files on the memory card will be deleted S...

Page 24: ...d save the images in this folder Cannot delete an image Is the memory card write protected Or is the write protect switch locked c Use the device you are using to cancel write protection and try deleting again c Slide the write protect switch to the enable position Is this image protected c Check the image information from the single view mode page 17 c An image with a mark is set to Read Only You...

Page 25: ...side the unit In such cases the photo frame will probably not work properly and may even develop a fault if you persist in using it If moisture condensation occurs unplug the AC adaptor of the photo frame and do not use the photo frame for at least one hour On transport When you transport the photo frame remove the memory card AC adaptor and connected cables from the photo frame and put the photo ...

Page 26: ...of pixels that can be displayed 8 000 H 6 000 V dots 3 File system FAT12 16 32 sector size of 2 048 bytes or smaller Image file name DCF format 128 characters within 5th hierarchy Maximum number of files that can be handled 4 999 files for a memory card Internal memory capacity 4 128 MB Approx 250 images 5 can be saved Power requirements DC IN jack DC 5V Power consumption Operating temperature 5 C...

Page 27: ...value may vary depending on the shooting condition On trademarks and copyrights Cyber shot Memory Stick Memory Stick Duo MagicGate Memory Stick Memory Stick PRO Memory Stick PRO Duo Memory Stick PRO HG Duo Memory Stick Micro Memory Stick ROM MagicGate and are trademarks or registered trademarks of Sony Corporation Microsoft Windows and Windows Vista are registered trademarks of Microsoft Corporati...

Page 28: ...Sony Corporation Printed in China Printed using VOC Volatile Organic Compound free vegetable oil based ink ...

Reviews: