


5-46
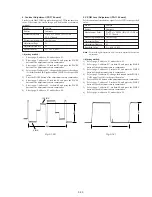
5. PLL Adjustment (VC-217 board)
(Except AEP/UK model)
Set the VCO center level of the video input circuit (IC1200).
Mode
VTR stop
Signal
Color bar (Video terminal of AUDIO/
VIDEO jack input)
Measurement Point
Display data of page: 3, address: 04
Measuring Instrument
Adjustment remote commander
Adjustment Page
C
Adjustment Address
AA
Specified Value
08 or 09 (Note 1), 08 to 0A (Note 2)
Note 1:
When the data of page: C, address: AA is “00” to “FE”.
Note 2:
When the data of page: C, address: AA is “FF”.
Adjusting method:
1)
Select page: 0, address: 01, and set data: 01.
2)
Select page: 3, address: 0C, set data: 80, and press the PAUSE
button of the adjustment remote commander.
3)
Select page: C, address: AA, and set data: 00, and press the
PAUSE button.
4)
Select page: 3, address: 04, and check. If the data is “08” or
“09”, proceed to step 7).
5)
Select page: C, address: AA, add “10”(hexadecimal) to the data
and press the PAUSE button.
Note 3:
If the data of page: C, address: AA is “F0”, change the data to
“FF” and press the PAUSE button.
6)
Select page: 3, address: 04, and check the data satisfies the
specified value. If not repeat steps 5) to 6).
7)
Select page: 3, address: 0C, set data: 00, and press the PAUSE
button of the adjustment remote commander.
8)
Select page: 0, address: 01, and set data: 00.
Summary of Contents for Digital Handycam DCR-TRV10
Page 10: ...1 2 ...
Page 11: ...1 3 ...
Page 12: ...1 4 ...
Page 13: ...1 5 ...
Page 14: ...1 6 ...
Page 15: ...1 7 ...
Page 16: ...1 8 ...
Page 17: ...1 9 ...
Page 18: ...1 10 ...
Page 19: ...1 11 ...
Page 20: ...1 12 ...
Page 21: ...1 13 ...
Page 22: ...1 14 ...
Page 23: ...1 15 ...
Page 24: ...1 16 ...
Page 25: ...1 17 ...
Page 26: ...1 18 ...
Page 27: ...1 19 ...
Page 28: ...1 20 ...
Page 29: ...1 21 ...
Page 30: ...1 22 ...
Page 31: ...1 23 ...
Page 32: ...1 24 ...
Page 33: ...1 25 ...
Page 34: ...1 26 ...
Page 35: ...1 27 ...
Page 36: ...1 28 ...
Page 37: ...1 29 ...
Page 38: ...1 30 ...
Page 39: ...1 31 ...
Page 40: ...1 32 ...
Page 41: ...1 33 ...
Page 42: ...1 34 ...
Page 43: ...1 35 ...
Page 44: ...1 36 ...
Page 45: ...1 37E ...
Page 57: ...DCR TRV8 TRV8E TRV10 TRV10E 3 5 3 6 3 7 3 8 3 2 OVERALL BLOCK DIAGRAM TRV10 TRV10E ...
Page 58: ...DCR TRV8 TRV8E TRV10 TRV10E 3 3 POWER BLOCK DIAGRAM 3 9 3 10 3 11 3 12E ...
Page 180: ... 264 OPTICAL AXIS FRAME Take a copy of OPTICAL AXIS FRAME with a clear sheet for use ...


