42
5
6,7
MENU
P EFFECT
HiFi SOUND
TBC
DNR
AUDIO MIX
PB MODE
A/V DV OUT
[MENU] : END
VCR SET
WORLD TIME
BEEP
COMMANDER
D I SPL AY
V I DEO ED I T
ED I T SET
RETURN
[MENU] : END
OTHERS
ED I T SET
CONTROL
ADJ TEST
CUT - I N
CUT -OUT
I R SETUP
PAUSEMODE
I R TEST
RETURN
[MENU] : END
I R
OTHERS
ED I T SET
CONTROL
ADJ TEST
CUT - I N
CUT -OUT
I R SETUP
PAUSEMODE
I R TEST
RETURN
[MENU] : END
I R
OTHERS
ED I T SET
CONTROL
ADJ TEST
CUT - I N
CUT -OUT
I R SETUP
PAUSEMODE
I R TEST
RETURN
[MENU] : END
I R
i . L I NK
OTHERS
ED I T SET
CONTROL
ADJ TEST
CUT - I N
CUT -OUT
I R SETUP
PAUSEMODE
I R TEST
RETURN
[MENU] : END
i . L I NK
OTHERS
3
ED I T SET
CONTROL
ADJ TEST
CUT - I N
CUT -OUT
I R SETUP
PAUSEMODE
I R TEST
RETURN
[MENU] : END
I R
i . L I NK
OTHERS
0 HR
Dubbing only desired scenes – Digital program editing
Step 2: Setting the other (recording) VCR for operation
- Using the i.LINK cable (DV connecting cable)
When you connect using the i.LINK cable (DV connecting cable) (not supplied), follow
the procedures below.
(
1
)
Set the POWER switch to ON on your (playback) VCR .
(
2
)
Turn the power of the other (recording) VCR on, then set the input selector to
DV input.
When you connect a digital video camera recorder, set its POWER switch to
VCR/VTR.
(
3
)
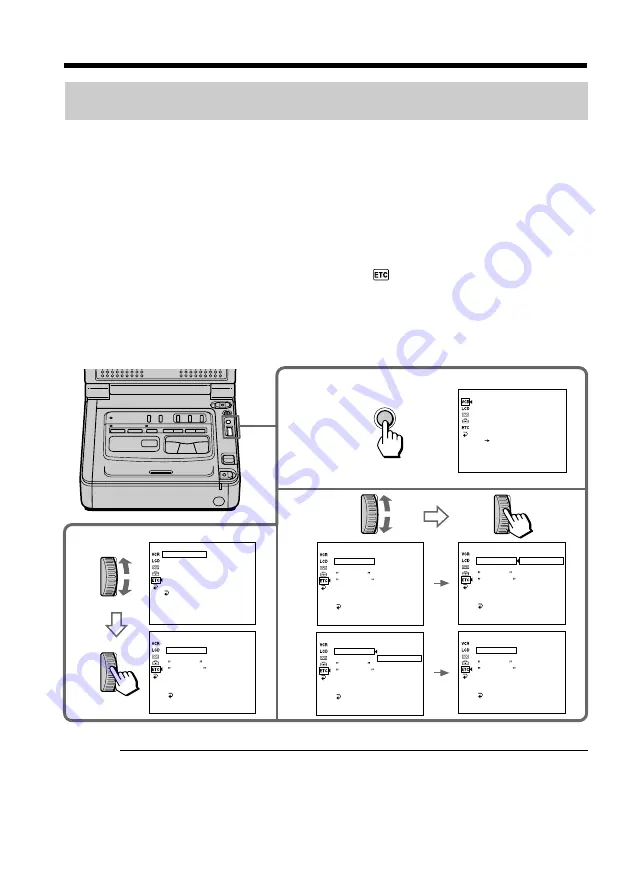
Press MENU to display the menu settings.
(
4
)
Turn the SEL/PUSH EXEC dial to select
, then press the dial.
(
5
)
Turn the SEL/PUSH EXEC dial to select EDIT SET, then press the dial.
(
6
)
Turn the SEL/PUSH EXEC dial to select CONTROL, then press the dial.
(
7
)
Turn the SEL/PUSH EXEC dial to select i.LINK, then press the dial.
If you connect using the i.LINK cable (DV connecting cable)
With digital-to-digital connection, video and audio signals are transmitted in digital
form for high-quality editing.


