background image

10

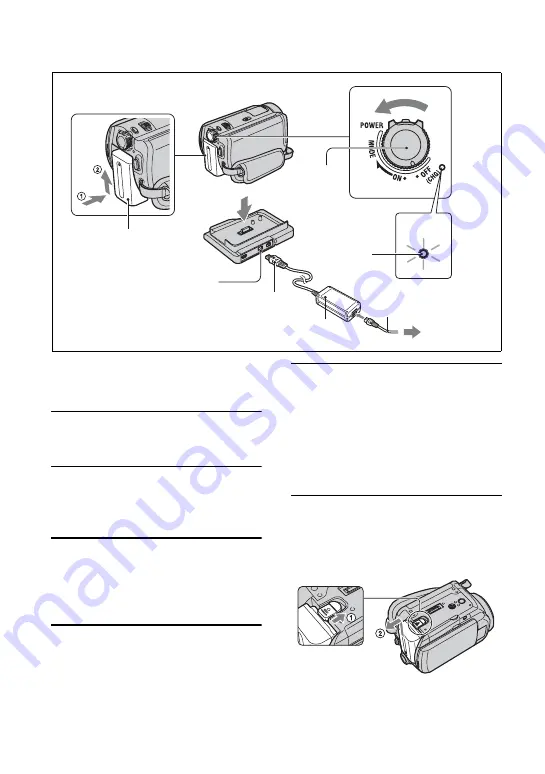
You can charge the battery after attaching the 
“InfoLITHIUM” battery pack (P series) to 
your camcorder.

1

Slide the battery pack in the 
direction of the arrow until it clicks.

2

Slide the POWER switch in the 
direction of the arrow to set it to 
OFF (CHG) (The default setting).

3

Connect the AC Adaptor to the DC 
IN jack on the Handycam Station. 
Be sure that the 

v

 mark on the DC 

plug is facing up.

4

Connect the power cord to the AC 
Adaptor and the wall outlet.

5

Set the camcorder onto the 
Handycam Station securely.

The CHG (charge) lamp lights up and 
charging starts. The CHG (charge) lamp 
turns off when the battery pack is fully 
charged. Remove the camcorder from the 
Handycam Station.

To remove the battery pack

Slide the POWER switch to OFF (CHG). 
Slide the BATT (battery) release lever and 
remove the battery pack.

• When you remove the battery pack, make sure 

that none of the respective lamps of the POWER 
switch (p.12) is on.

Step 2: Charging the battery pack

1

2

3

4

5

5

POWER 
switch

CHG 
lamp

DC IN jack

DC plug

AC Adaptor

Power cord

To the 
wall outlet

Battery pack

BATT (battery) 
release lever

Summary of Contents for DCR-SR40 - 30GB Hard Disk Drive Handycam

Page 1: ...nic Compound free vegetable oil based ink Additional information on this product and answers to frequently asked questions can be found at our Customer Support Website Also refer to Handycam Handbook PDF By referring to Handycam Handbook PDF contained in the supplied CD ROM you can find more detailed information on how to use the camcorder US ...

Page 2: ...your home consult your dealer or local power company For those sets designed to operate from battery power or other sources refer to the operating instructions Polarization This set may be equipped with a polarized ac power cord plug a plug having one blade wider than the other This plug will fit into the power outlet only one way This is a safety feature If you are unable to insert the plug fully...

Page 3: ...lightning storm or when it is left unattended and unused for long periods of time unplug it from the wall outlet and disconnect the antenna or cable system This will prevent damage to the set due to lightning and power line surges Damage Requiring Service Unplug the set from the wall outlet and refer servicing to qualified service personnel under the following conditions When the power cord or plu...

Page 4: ...on Model DCRA C162 and AC Adaptor Model AC L25A L25B CAUTION You are cautioned that any changes or modifications not expressly approved in this manual could void your authority to operate this equipment Read this first CAUTION For customers in the U S A and CANADA Model No DCR SR Serial No Model No AC Serial No For customers in the U S A Declaration of Conformity Trade Name SONY Model No DCR SR40 ...

Page 5: ...ouraged to try to correct the interference by one or more of the following measures Reorient or relocate the receiving antenna Increase the separation between the equipment and receiver Connect the equipment into an outlet on a circuit different from that to which the receiver is connected Consult the dealer or an experienced radio TV technician for help The supplied interface cable must be used w...

Page 6: ...on gravity condition the block noise to protect the camcorder may also be recorded If the drop sensor catches a drop repeatedly recording play back may be stopped Note on operational temperatures When the temperature of the camcorder becomes extremely high or extremely low you may not record or playback the camcorder to provide protection to the camcorder In case of this a message appears on the L...

Page 7: ...etting adjustments before recording 13 Recording 14 Playback 15 Parts and functions used for the camcorder 16 Indicators displayed during recording playback 18 Deleting images 20 Playing the image on a TV 20 Performing with a computer 21 Performing various functions Setup 24 Troubleshooting 27 Warning indicators 29 Precautions 31 Specifications 33 Getting Started Recording Playback Troubleshooting...

Page 8: ...10 A V connecting cable 1 p 20 USB cable 1 Wireless Remote Commander 1 DCR SR60 SR80 A button type lithium battery is already installed Rechargeable battery pack NP FP50 1 p 11 Lens Cap 1 p 12 DCR SR40 To attach the lens cap Thread the grip belt through the lens cap ring CD ROM 1 p 21 ImageMixerforHDDCamcorder Software Handycam Handbook PDF Operating Guide This manual 1 Step 1 Checking supplied it...

Page 9: ...ander until it clicks A button type lithium battery CR2025 is used in the Remote Commander Do not use batteries other than the CR2025 When the lithium battery becomes weak the operating distance of the Remote Commander may shorten or the Remote Commander may not function properly In this case replace the battery with a Sony CR2025 lithium battery Use of another battery may present a risk of fire o...

Page 10: ...the wall outlet 5 Set the camcorder onto the Handycam Station securely The CHG charge lamp lights up and charging starts The CHG charge lamp turns off when the battery pack is fully charged Removethecamcorderfromthe Handycam Station To remove the battery pack Slide the POWER switch to OFF CHG Slide the BATT battery release lever and remove the battery pack When you remove the battery pack make sur...

Page 11: ...in low temperatures The available recording and playback time will be shorter depending on the conditions under which you use your camcorder On the AC Adaptor Connect the AC Adaptor to an easily accessible wall outlet close by If any trouble occurs while using the adaptor immediately shut off the power by removing the plug from the wall outlet Do not use the AC Adaptor placed in a narrow space suc...

Page 12: ...ect the desired geographical area with then touch 4 Set DST Y year M month D day hour and minute The clock starts The recording date and time are not displayed during recording but are automatically recorded onto the hard disk and displayed during playback see Handycam Handbook PDF Instead of DST SUMMERTIME is displayed for some models When resetting the date and time You can set the desired date ...

Page 13: ...ights up Movie To record movies Still To record still images When you turn on Still the screen aspect ratio is changed to 4 3 automatically 3 Press WIDE SELECT repeatedly to select the desired screen aspect ratio DCR SR60 SR80 4 Fasten the grip belt and hold your camcorder correctly Step 4 Making setting adjustments before recording 2 3 1 2 180 degrees max 2 90 degrees max 1 90 degrees to the camc...

Page 14: ...k or AC Adaptor You cannot record movies and still images at the same time The maximum continuous recordable time is approximately 13 hours Recording Movies Still Images Press START STOP A or B To stop recording press START STOP again Press PHOTO lightly to adjust the focus A then press it fully B A shutter sound is heard When disappears the image has been recorded 1 123 1 0M FINE P MENU 60min REC...

Page 15: ...imes faster four touches make it approximately 60 times faster The ACCESS lamp either lights or flashes when image data is read from the hard disk drive of the camcorder To adjust the volume Touch t VOLUME then adjust it with If you cannot find VOLUME in touch SETUP p 24 12 34 01 DATE EDIT 60min 60min P MENU DEC 21 2006 Previous 6 images Next 6 images Movie tab The last recorded played back movie ...

Page 16: ...rding lamp lights up red during recording The lamp flashes when the remaining capacity for the battery or the hard disk of the camcorder is running low 8 Tripod receptacle Bottom surface To use a tripod attach the tripod optional the length of the screw must be less than 5 5 mm to the tripod receptacle using a tripod screw 9 Zoom buttons Press for zooming in out q LCD screen To record in mirror mo...

Page 17: ...k zoom 1 Play back the image you want to magnify 2 Magnify the image with T Telephoto A frame appears on the LCD screen 3 Touch the portion you want to display in the center of the LCD screen 4 Adjust the magnification with W Wide angle T Telephoto To cancel touch END qa Speaker Sound comes out from the speaker while playing back qh EASY button Refer to the instructions on EASY button in Recording...

Page 18: ...uality FINE STD q Number of recordable still images 60min P MENU REC 00 01 00 60min 60min P MENU 112 Viewing movies Viewing still images qa Playback mode qs Recording folders files qd Video operation buttons qf Number of played back movies Total number of recorded movies qg Previous Next button qh Recording folders files qj VISUAL INDEX button qk Previous Next button ql Numberofplayedbackstillimag...

Page 19: ...Self timer recording Continuous photo recording Bracket recording Flash light MICREF LEVEL low Indicator Meaning Repeat of Slide show Indicator Meaning Fader LCD backlight off Drop sensor off Drop sensor 60min 00 01 00 60min P MENU STBY Upper left Upper center Upper right Bottom Center Indicator Meaning NightShot plus Super NightShot plus Color Slow Shutter PictBridge connecting E Warning Indicato...

Page 20: ...Next Date button to select the date of the desired image 2 Touch t EDIT t DELETE DATE t YES Deleting the last scene You can check the last recorded movie still image Also you can delete the checked images 1 Slide the POWER switch to light up the Movie or Still lamp then touch 2 Touch t YES Connect your camcorder to the input jack of TV or VCR using A V connecting cable 1 supplied or A V connecting...

Page 21: ... ROM from the disc drive of your computer x For Macintosh user 1 Turn on the computer 2 Place the CD ROM supplied on the disc drive of your computer 3 Open the Handbook folder in the CD ROM double click the US folder and then drag and drop the Handbook pdf on the computer After having the software installed double click Handbook pdf you can view the handbook x System requirements When using the su...

Page 22: ...g a computer compatible with Hi Speed USB USB2 0 When you connect a USB interface not compatible with Hi Speed USB USB2 0 the data transfer ratio will be that of USB1 1 USB full speed Disc Drive A DVD writable drive Operations are not guaranteed on any computers fulfilling the above system requirements x Installing software You need to install the software to your Windows computer The installation...

Page 23: ... steps below toinstall DirectX9 0c Ifnot skiptostep qd 1Read License Agreement then click Next 2Click Next 3Click Finish qd Make sure Yes I want to restart my computer now is checked then click Finish The computer turns off once then starts up again automatically Restart When you complete the installation the shortcut icons for ImageMixer for HDD Camcorder and ImageMixer destination folder appearo...

Page 24: ...ze setup items that are not added to Personal Menu 1 Touch t SETUP 2 Select the desired setup item Touch to select the item then touch The process in step 3 is the same as that in step 2 3 Select the desired item You can also touch the item directly to select it 4 Customize the item After finishing the settings touch t close to hide the setup screen If you decide not to change the settings touch t...

Page 25: ...s clearer images with the light which emits infrared light while using NightShot plus COLOR SLOW S Records an image brighter in color even in dark places SELF TIMER Selects whether to set the self timer for shooting a still image SELF TIMER Selects whether to set the self timer for recording a movie DIGITAL ZOOM Selects the zoom level using digital zoom WIDE SELECT 2 Sets the screen aspect ratio m...

Page 26: ...ct ratio of an image output from the camcorder USB SPEED Selects the speed for data transfer via USB connection DATA CODE Displays date and time and camera data during playback DISPLAY Selects a number of thumbnails on the VISUAL INDEX display REMAINING Selects whether to display the remaining hard disk free space for a movie recording REMOTE CTRL 1 Select whether to receive remote control signals...

Page 27: ...ll settings are reset except the Personal Menu items The temperature of your camcorder is extremely high Turn off your camcorder and leave it for a while in a cool place The temperature of your camcorder is extremely low With POWER switch turned on leave the camcorder for a while If you still cannot operate the camcorder turn it off taking it to a warm place Leave the camcorder there for a while t...

Page 28: ...te the camcorder turn it off taking it to a warm place Leave the camcorder there for a while then turn on the camcorder The recording stops The temperature of your camcorder is extremely high Turn off your camcorder and leave it for a while in a cool place The temperature of your camcorder is extremely low Turn off the camcorder and take it to a warm place Leave the camcorder there for a while the...

Page 29: ...tor pertaining to files Slow flashing The file is damaged The file is unreadable Warning on the hard disk of the camcorder Fast flashing Anerrormayhaveoccurredwiththehard disk drive in your camcorder Warning on the hard disk of the camcorder Fast flashing The hard disk of the camcorder is fully recorded Anerrormayhaveoccurredwiththehard disk drive in your camcorder E Battery level warning Slow fla...

Page 30: ... camera shake easily occurs Use the flash The camcorder is unsteady so camera shake easily occurs Hold the camcorder steady with both hands and record the image However note that the camera shake warning indicator does not disappear You hear a melody when the warning indicators appear on the screen ...

Page 31: ...arly careful of the lens Keep the POWER switch setting to OFF CHG when you are not using your camcorder Do not wrap your camcorder with a towel for example and operate it Doing so might cause heat to build up inside Whenremovingthepowercord pullitbytheplug and not the cord Do not damage the power cord such as by placing anything heavy on it Keep metal contacts clean Keep the Remote Commander and b...

Page 32: ...revent mold periodically clean the lens as described above It is recommended that you operate your camcorder about once a month to keep it in optimum state for a long time To charge the pre installed rechargeable battery Your camcorder has a pre installed rechargeable battery to retain the date time and other settings even when the POWER switchissettoOFF CHG Thepre installed rechargeablebattery is...

Page 33: ...els Effective Still 16 9 Approx 750 000 pixels Lens Carl Zeiss Vario Tessar Filter diameter 30 mm 1 in DCR SR40 Optical 20 Digital 40 800 F 1 8 3 1 DCR SR60 SR80 Optical 12 Digital 24 800 F 1 8 2 5 Focal length DCR SR40 f 2 3 46 mm 3 32 1 13 16 in When converted to a 35 mm still camera For movies 44 880 mm 1 3 4 34 1 32 in For still images 44 880 mm 1 3 4 34 1 32 in DCR SR60 SR80 f 3 0 36 mm 1 8 1...

Page 34: ...o 140 F Dimensions Approx 69 71 117 mm 2 3 4 2 7 8 4 5 8 in w h d including protrusions 69 71 117 mm 2 3 4 2 7 8 4 5 8 in w h d including protrusions with supplied battery attached Mass Approx DCR SR40 340g 12 oz main unit only 390g 13 oz including the NP FP50 rechargeable battery pack and the lens cap DCR SR60 350g 12 oz main unit only 390g 13 oz including the NP FP50 rechargeable battery pack DC...

Page 35: ...trademark of Sony Corporation ImageMixer for HDD Camcorder is a trademark of Pixela Corporation Dolby and the double D symbol are trademarks of Dolby Laboratories Dolby Digital Stereo Creator is a trademark of Dolby Laboratories DVD R DVD RW and DVD RW logo are trademarks Microsoft Windows and Windows Media are either registered trademarks or trademarks of Microsoft Corporation in the United State...

Reviews: