71
D
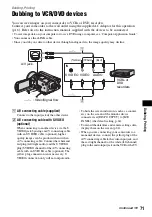
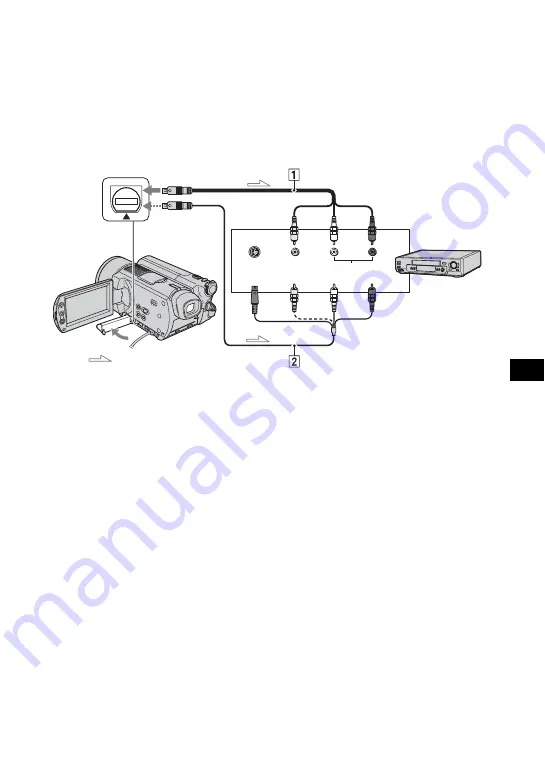
You can save images on your camcorder to VCRs or DVD recorders.
Connect your camcorder to the wall outlet using the supplied AC Adaptor for this operation
(p.16). Refer also to the instruction manuals supplied with the devices to be connected.
• To save image data on your computer or to save DVD using a computer, see “Computer Application Guide”.
• You cannot use the i.LINK cable.
• Since you dub your data to other device through analogue data, the image quality may decline.
1
A/V connecting cable (supplied)
Connect to the input jack of the other device.
2
A/V connecting cable with S VIDEO
(optional)
When connecting to another device via the S
VIDEO jack, by using an A/V connecting cable
with an S VIDEO cable (optional), higher
quality images can be produced than with an
A/V connecting cable. Connect the white and
red plug (left/right audio) and the S VIDEO
plug (S VIDEO channel) of the A/V connecting
cable with an S VIDEO cable (optional). The
yellow plug connection is not necessary. S
VIDEO connection only will not output audio.
• To hide the screen indicators (such as a counter,
etc.) on the screen of the monitor device
connected, set [DISP OUTPUT] to [LCD
PANEL] (the default setting, p.64).
• To record the date/time and camera settings data,
display them on the screen (p.62).
• When you are connecting your camcorder to a
monaural device, connect the yellow plug of the
A/V connecting cable to the video input jack, and
the red (right channel) or the white (left channel)
plug to the audio input jack on the VCR or the TV.
Dubbing, Printing
Dubbing to VCR/DVD devices
VCRs or
DVD
recorders
: Video/Signal flow
A/V jack
(Yellow) (White)
(Red)
S VIDEO VIDEO
AUDIO
IN
Continued
,
Summary of Contents for DCR SR100 - Handycam Camcorder - 3.3 MP
Page 25: ...25 Easy Handycam using your camcorder with automatic settings ...
Page 33: ...33 Recording Playback ...
Page 47: ...47 Recording Playback ...
Page 106: ......
Page 107: ......

